  public List<UserMatching> searchMatchingPartner(String loginId) {
        List<String> candidate = redisService.getMatchingCandidate(loginId, CACHE_DURATION_DAT, CACHE_DURATION_UNIT_DAYS);
        List<String> matchingList = redisService.getMatchingList(loginId, CACHE_DURATION_DAT, CACHE_DURATION_UNIT_DAYS);
        long lastProfileId = redisService.getLastViewedProfileId(loginId);
        return matchingServiceV1.searchPartner(loginId, candidate, matchingList, lastProfileId);
    }
이 메서드를 보면 레디스에 요청을 보내고, 응답을 받고 이 과정이 여러번에 걸쳐서 반복된다.

레디스 로그를 보면 매칭 프로필을 조회를 하는데 한번에 5번이나 요청이 오는 것을 볼 수 있다.
레디스 Pipeline
How to optimize round-trip times by batching Redis commands
레디스 Pipeline이란 여러 요청을 한번에 처리하는 방식이다. 각각의 요청이 오는 것을 기다리지 않고, 요청을 보낸다.
Client: INCR X
Server: 1
Client: INCR X
Server: 2
Client: INCR X
Server: 3
Client: INCR X
Server: 4
Redis는 위처럼 클라이언트에서 Redis 서버로 쿼리 요청을 보내면, 서버가 명령을 처리해서 클라이언트에 응답을 내리는 방식으로 진행된다.
네트워크 상태에 관계 없이, 패킷이 클라이언트에서 서버로 가고 서버에서 클라이언트로 가는 것은 시간이 소요된다. 이러한 시간을 RTT라고 한다(Round Trip Time).
RTT가 250ms라고 한다면(이건 상당히 느린편), 서버가 성능이 굉장히 좋아도 초당 4번의 요청만 처리할 수 있다.
서버는 클라이언트가 응답을 받지 않았거나, 모두 다 읽지 못했어도 요청을 처리할 수 있다. 이런 방식으로 여러 요청을 한번에 처리할 수 있는 것이다. 이를 pipelining이라고 한다.
클라이언트: "안녕하세요" 보냄
클라이언트: "날씨 좋네요" 보냄
클라이언트: "점심 뭐 먹지?" 보냄
서버: 한번에 모든 응답을 보냄
IMPORTANT NOTE: While the client sends commands using pipelining, the server will be forced to queue the replies, using memory. So if you need to send a lot of commands with pipelining, it is better to send them as batches each containing a reasonable number, for instance 10k commands, read the replies, and then send another 10k commands again, and so forth. The speed will be nearly the same, but the additional memory used will be at most the amount needed to queue the replies for these 10k commands.
다만, 클라이언트가 명령어 100만개를 한번에 보내면 서버는 응답 100만개를 메모리에 저장해놓고(큐 같은) 처리해야 한다. 이를 배치 형태로, 1만개씩 끊어서 보내고 응답받고 하는 식으로 하는 게 더 낫다고 한다. 속도는 비슷하지만, 메모리를 고려해서 처리하는 방식이다.
RTT만의 문제는 아니다.
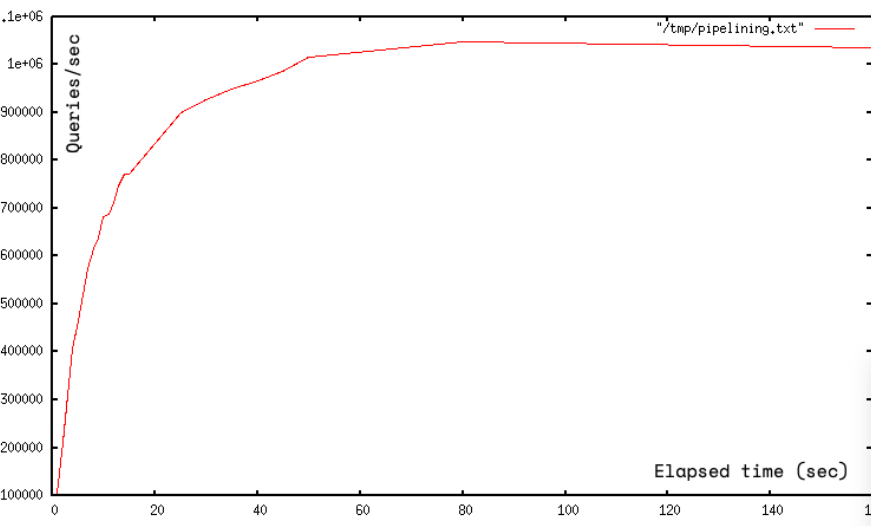
Pipelining is not just a way to reduce the latency cost associated with the round trip time, it actually greatly improves the number of operations you can perform per second in a given Redis server.
원래 Redis가 명령어 하나를 처리하는 건 굉장히 빠르다. 다만, 소켓 I/O관점에서는 costly(리소스가 많이 든다)하다.
이는 read()와 write() 시스템 콜을 계속 사용해야 하는 탓이다. 유저모드에서 커널 모드로 왔다갔다 하는 컨텍스트 스위치가 속도에 영향을 준다. Pipeline을 쓰면 한번에 시스템콜로 여러 명령어를 처리할 수 있다. 초당 처리율이 10배까지 올라갈 수 있을 정도다.
다만, 읽고-계산(클라이언트에서)-쓰는 작업을 Lua 스크립트가 파이프라인보다 더 효율적이라고 한다. 모든 걸 서버에서 하기 때문이다.
코드를 작성하자
    public List<UserMatching> searchMatchingPartner(String loginId) {
        List<Object> results = redisTemplate.executePipelined((RedisCallback<Object>) connection -> {
            String candidateKey = loginId + MATCHING_CANDIDATE_REDIS_KEY;
            String matchingKey = loginId + MATCHING_LIST_REDIS_KEY;
            String profileKey = loginId + LAST_PROFILE_ID_REDIS_KEY;

            connection.stringCommands().get(candidateKey.getBytes());  // DUMMY 체크용
            connection.listCommands().lRange(candidateKey.getBytes(), 0, -1);

            connection.stringCommands().get(matchingKey.getBytes());   // DUMMY 체크용
            connection.listCommands().lRange(matchingKey.getBytes(), 0, -1);

            connection.stringCommands().get(profileKey.getBytes());

            return null;

        });

        // 결과 처리
        String candidateValue = (String) results.get(0);
        List<String> candidateList = (List<String>) results.get(1);
        String matchingValue = (String) results.get(2);
        List<String> matchingList = (List<String>) results.get(3);
        String lastProfileId = (String) results.get(4);

        // DUMMY_CACHE 체크 로직
        List<String> candidate = (KEYWORD_DUMMY_CACHE.equals(candidateValue)) ?
                Collections.emptyList() : candidateList;
        List<String> matching = (KEYWORD_DUMMY_CACHE.equals(matchingValue)) ?
                Collections.emptyList() : matchingList;

        return matchingServiceV1.searchPartner(
                loginId,
                candidate,
                matching,
                lastProfileId != null ? Long.parseLong(lastProfileId) : 0L
        );

    }
redistemplate의 executePipelined를 사용하면 된다.
와이어샤크로 파이프라인을 확인해보자

레디스 monitor에서는 파이프라인이 작동하는지를 제대로 확인할 수 없었다.
와이어샤크를 통해서 패킷이 어떻게 도착하는지 확인해보자.

하고서 필터에 tcp.port == 6379를 입력해준다.
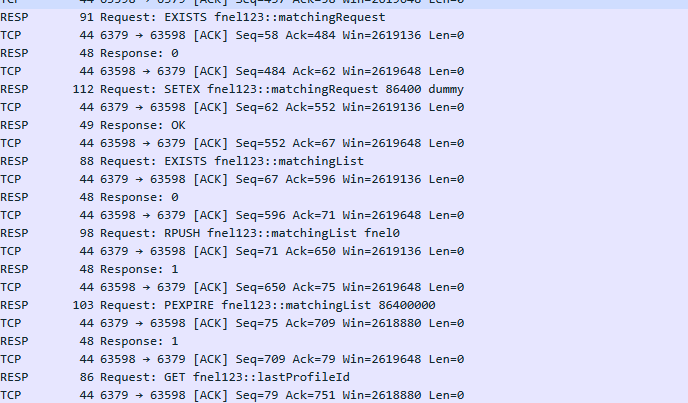
파이프라인을 적용하지 않을 때는 요청들이 1건씩 가고, 응답도 1건씩 온다.

반면, 파이프라인을 적용하면 요청이 하나로 묶여서 가고 응답도 하나만 받는다.
비교 테스트
좀더 정확한 테스트를 위해서 10번씩 돌리고
각각의 평균 시간을 쟀다.
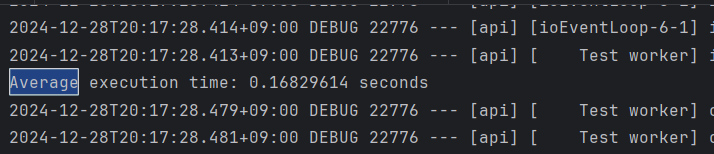
레디스에 요청을 여러번 보내고 받을 때 현재 0.2초 정도의 시간이 걸린다.

파이프라인을 쓰면 0.11초 정도로 줄어든다. 0.5초 정도가 줄어든 셈이다.
요청이 많지않아서 요청을 좀더 많이 보내보고 성능 차이를 확인해보자.
가능하면 버퍼를 쓰자.
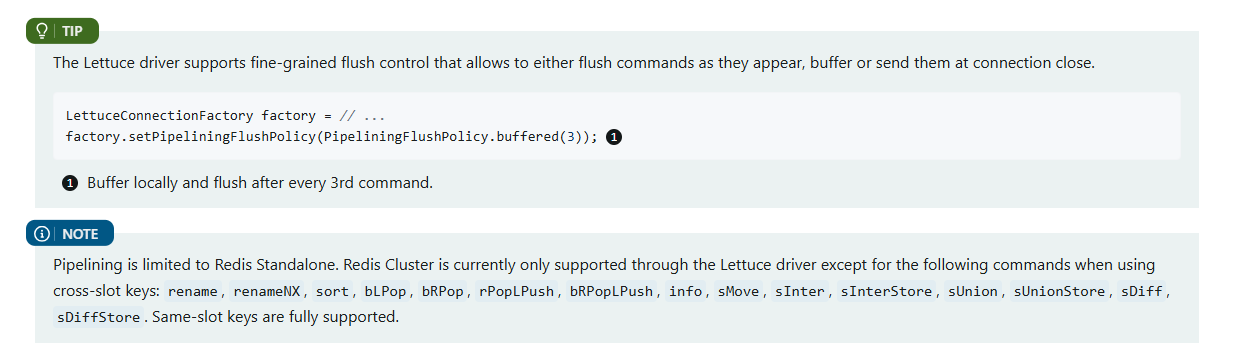
레디스 클러스터가 아니라 일반 레디스를 쓰면 위처럼 명렁어도 버퍼에 담아서 보낼 수 있다.
Elasticache는 클러스터라서 버퍼는 안될 것으로 보인다.
