
⚠️ 해당 포스팅은 인프런 공룡책 강의를 듣고 개인적으로 정리하는 글입니다. 정확하지 않은 정보가 있을 수 있으니 주의를 요합니다.
Section 07
Chapter 6 CPU Synchronization Tools (2)
Higher-level software tools to solve the CSP
- 고차원의 소프트웨어에서 임계 영역을 해결하기 위해 여러가지 옵션이 존재한다.
- Mutex Locks : 동기화를 위한 가장 간단한 옵션
- Spin Lock : 뮤텍스락과 비슷하지만, 컨텍스트 스위칭을 일으키지 않는 옵션
- Semaphore : 가장 강력하고, 편리하고, 효과적인 옵션
- Monitor : 뮤텍스와 세마포어의 단점을 해결한 옵션
- Liveness : 진전(데드락) 문제를 해결한 옵션
Mutex Locks
- mutex는 mutal exclusion (상호 배제)란 뜻이 담겨져 있으며 경쟁 상황(race condition)을 방지하고, 임계 영역(critical section)을 보호하기 위해 사용한다.
- 임계 영역에 입장하기 전, 프로세스는
lock을 획득해야 한다. - 또한, 임계 영역을 벗어날 때는
lock을 다시 반납해야 한다. lock이 걸려있을 경우 락이 풀릴 때까지 기다리며 컨텍스트 스위칭을 실시한다.
즉, 바쁜 대기(busy waiting)을 실시하지 않고 sleep 상태로 들어갔다가, wakeup 콜이 오면 다시 권한 획득을 시도한다.

- 뮤텍스락을 구현하기 위한 두 가지 함수와 한 가지 변수가 존재한다.
- 두 함수로는
acquire()와release()가 있다. - 변수로는
available, 뮤텍스락 입장이 가능한지 불가능한지 판단하는 변수이다.
- 두 함수로는
acquire(),release()둘 중 하나만 호출하고, 모든 과정은 원자적(atomically)으로 이루어진다.
앞에서도 이야기 했지만, 원자적으로 이루어지면 기능 실행 도중 컨텍스트 스위칭이 일어나지 않는다.compare_and_swap연산을 이용하여 구현될 수 있다.
Spin Lock
- 뮤텍스락에서 바쁜 대기(busy waiting)를 사용하는 방법이다.
- 컨텍스트 스위칭이 일어나지 않게 무한 루프를 돔으로서 비용을 줄일 수 있다.
조금만 기다리면 바로 사용할 수 있는데, 굳이 컨텍스트 스위칭이 일어나야 하냐는 관점에서 바라보면 이해가 쉽다. - 멀티 코어 시스템을 구동할 때 특정 상황에서, 스핀락은 오히려 선호되기도 한다.
- 짧게 수행되는 작업에 적합하며, 오히려 오랫동안 바쁜 대기를 유지한다면 CPU의 소요 시간이 길어질 수도 있으므로 적절한 상황에서 사용해야 한다.
Busy Waiting (바쁜 대기)

- 어떤 프로세스가 임계 영역에 진입했을 때,
acquire()를 실행하기 위해 무한 루프를 일으키는 것을 의미한다. - 멀티 프로그래밍 환경에서는 생산적으로 CPU 사이클을 소모하지 못해 큰 단점으로 지적된다.
Semaphore

- 세마포어는 초기화를 제외하고 두 개의 표준 원자 연산(atmoic operations)를 통해서만 액세스 되는 정수 변수를 의미한다.
wait(),signal()
: 가끔은P(),V()라고 칭하는 경우도 있다.
- 세마포어 정수 변수에 대한 모든 수정 사항은
wait(),signal()연산을 통해 이루어지며 모두 원자적으로 실행되어야 한다. - 세마포어의 종류는 두 가지가 있다.
- Binary Semaphore : 0과 1 사이의 범위, 뮤텍스락과 비슷하다.
- Counting Semaphore : 제한 영역이 존재하지 않으며 여러 개의 자원을 가진 인스턴스에 사용된다.
Counting Semaphore
- 사용 가능한 자원의 수만큼 세마포어를 초기화한다.
- 자원 사용시
wait()을 호출하고,count의 수를 감소시킨다.
열쇠 창고에 있는 열쇠를 가져가니, 열쇠 창고에 있는 열쇠의 수가 줄어드는 것 - 자원 사용 후 반납시에는
signal()을 호출하고,count의 수를 증가시킨다.
열쇠를 다 사용하고 열쇠 창고에 반납하니 열쇠 창고에 있는 열쇠의 수가 증가되는 것 count가 0이 되었을 때는 모든 자원이 사용되고 있는 것을 의미하므로, 프로세스는 블락(busy waiting)된다.
Semaphore to solve synchronization problem
- 세마포어를 사용하여 동기화 문제를 해결하려면 어떻게 해야할까?
- 두 개의 프로세스가 동시에 실행되고 있고, 각각 세마포어를 가지고 있다고 가정해보자.
- 프로세스2의 세마포어는 반드시 프로세스1의 세마포어가 완전히 실행되고 난 후에 동작하여야 한다.
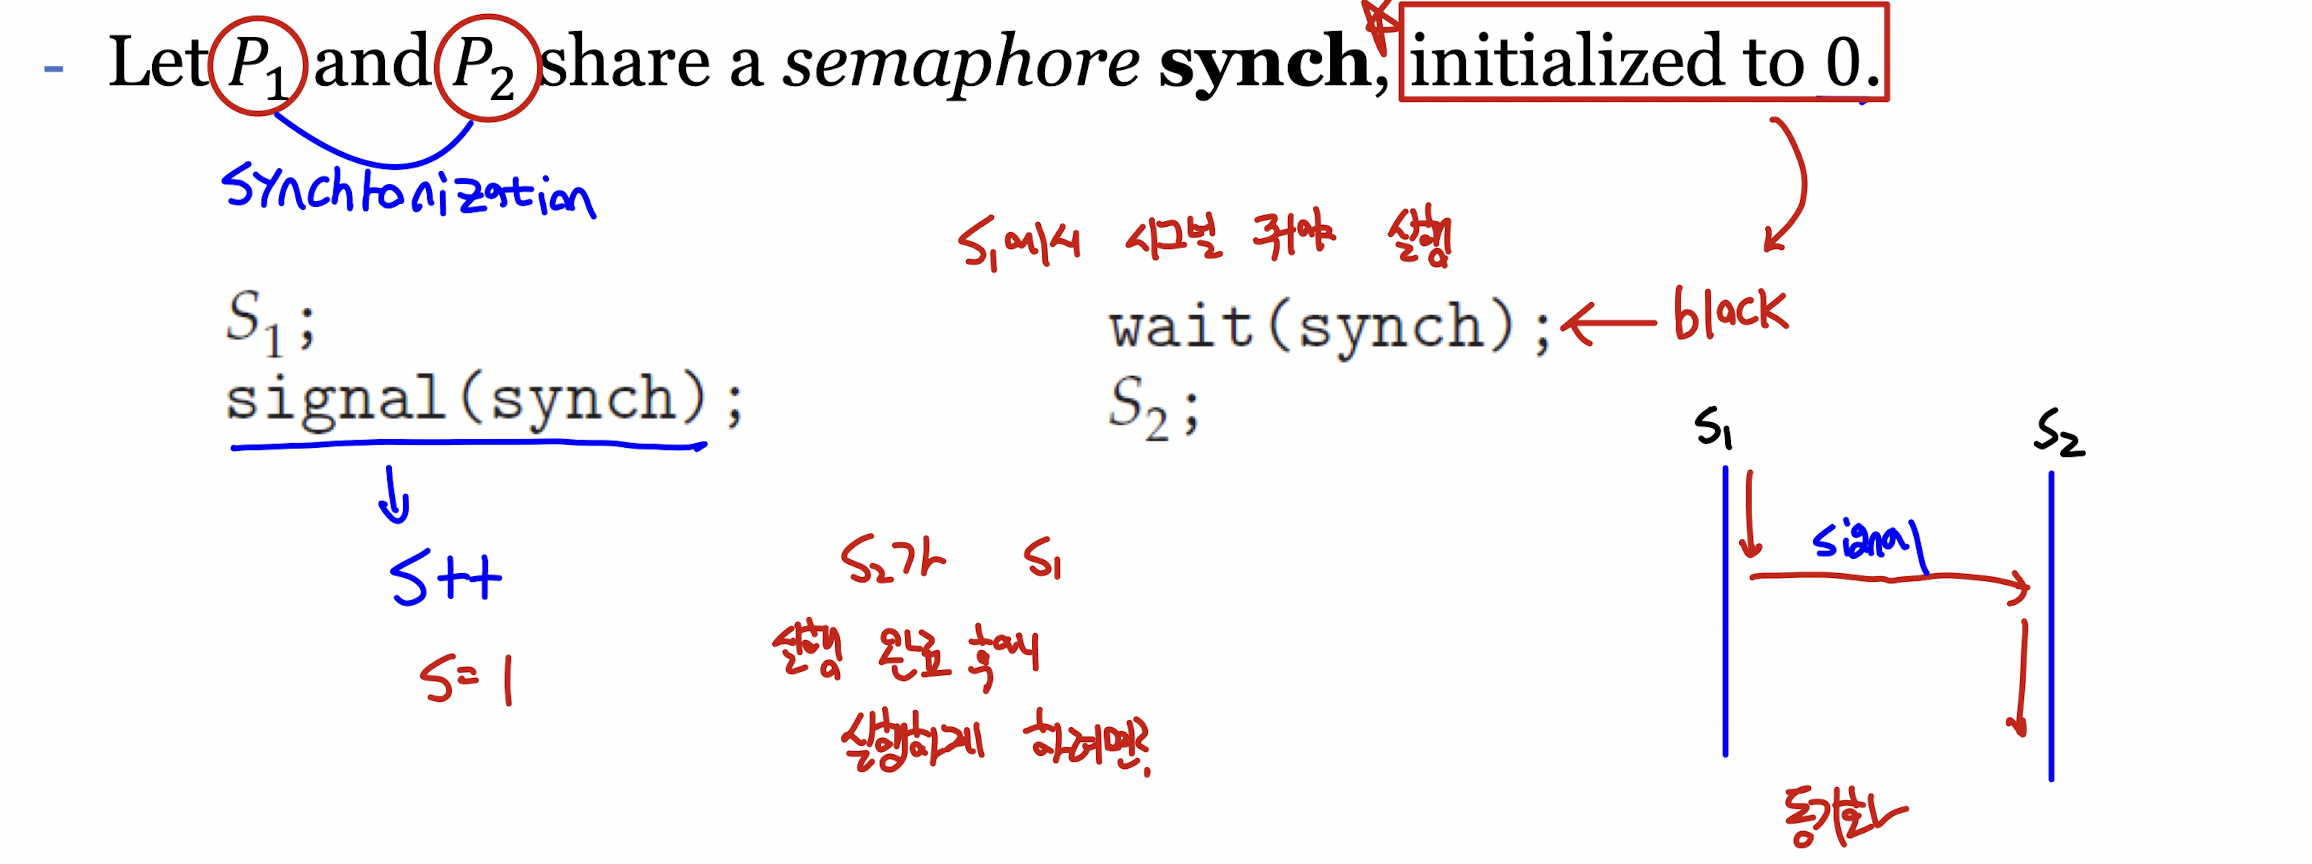
- 프로세스1과 프로세스2가
sync라는 세마포어 변수를 공유하게 하고, 0으로 초기화하면 자연스럽게 해결할 수 있다.
- 프로세스2의 세마포어는 반드시 프로세스1의 세마포어가 완전히 실행되고 난 후에 동작하여야 한다.
Semaphore Implementation
- 세마포어도 바쁜 대기가 발생할 수 있어 이 문제를 해결할 필요가 있다.
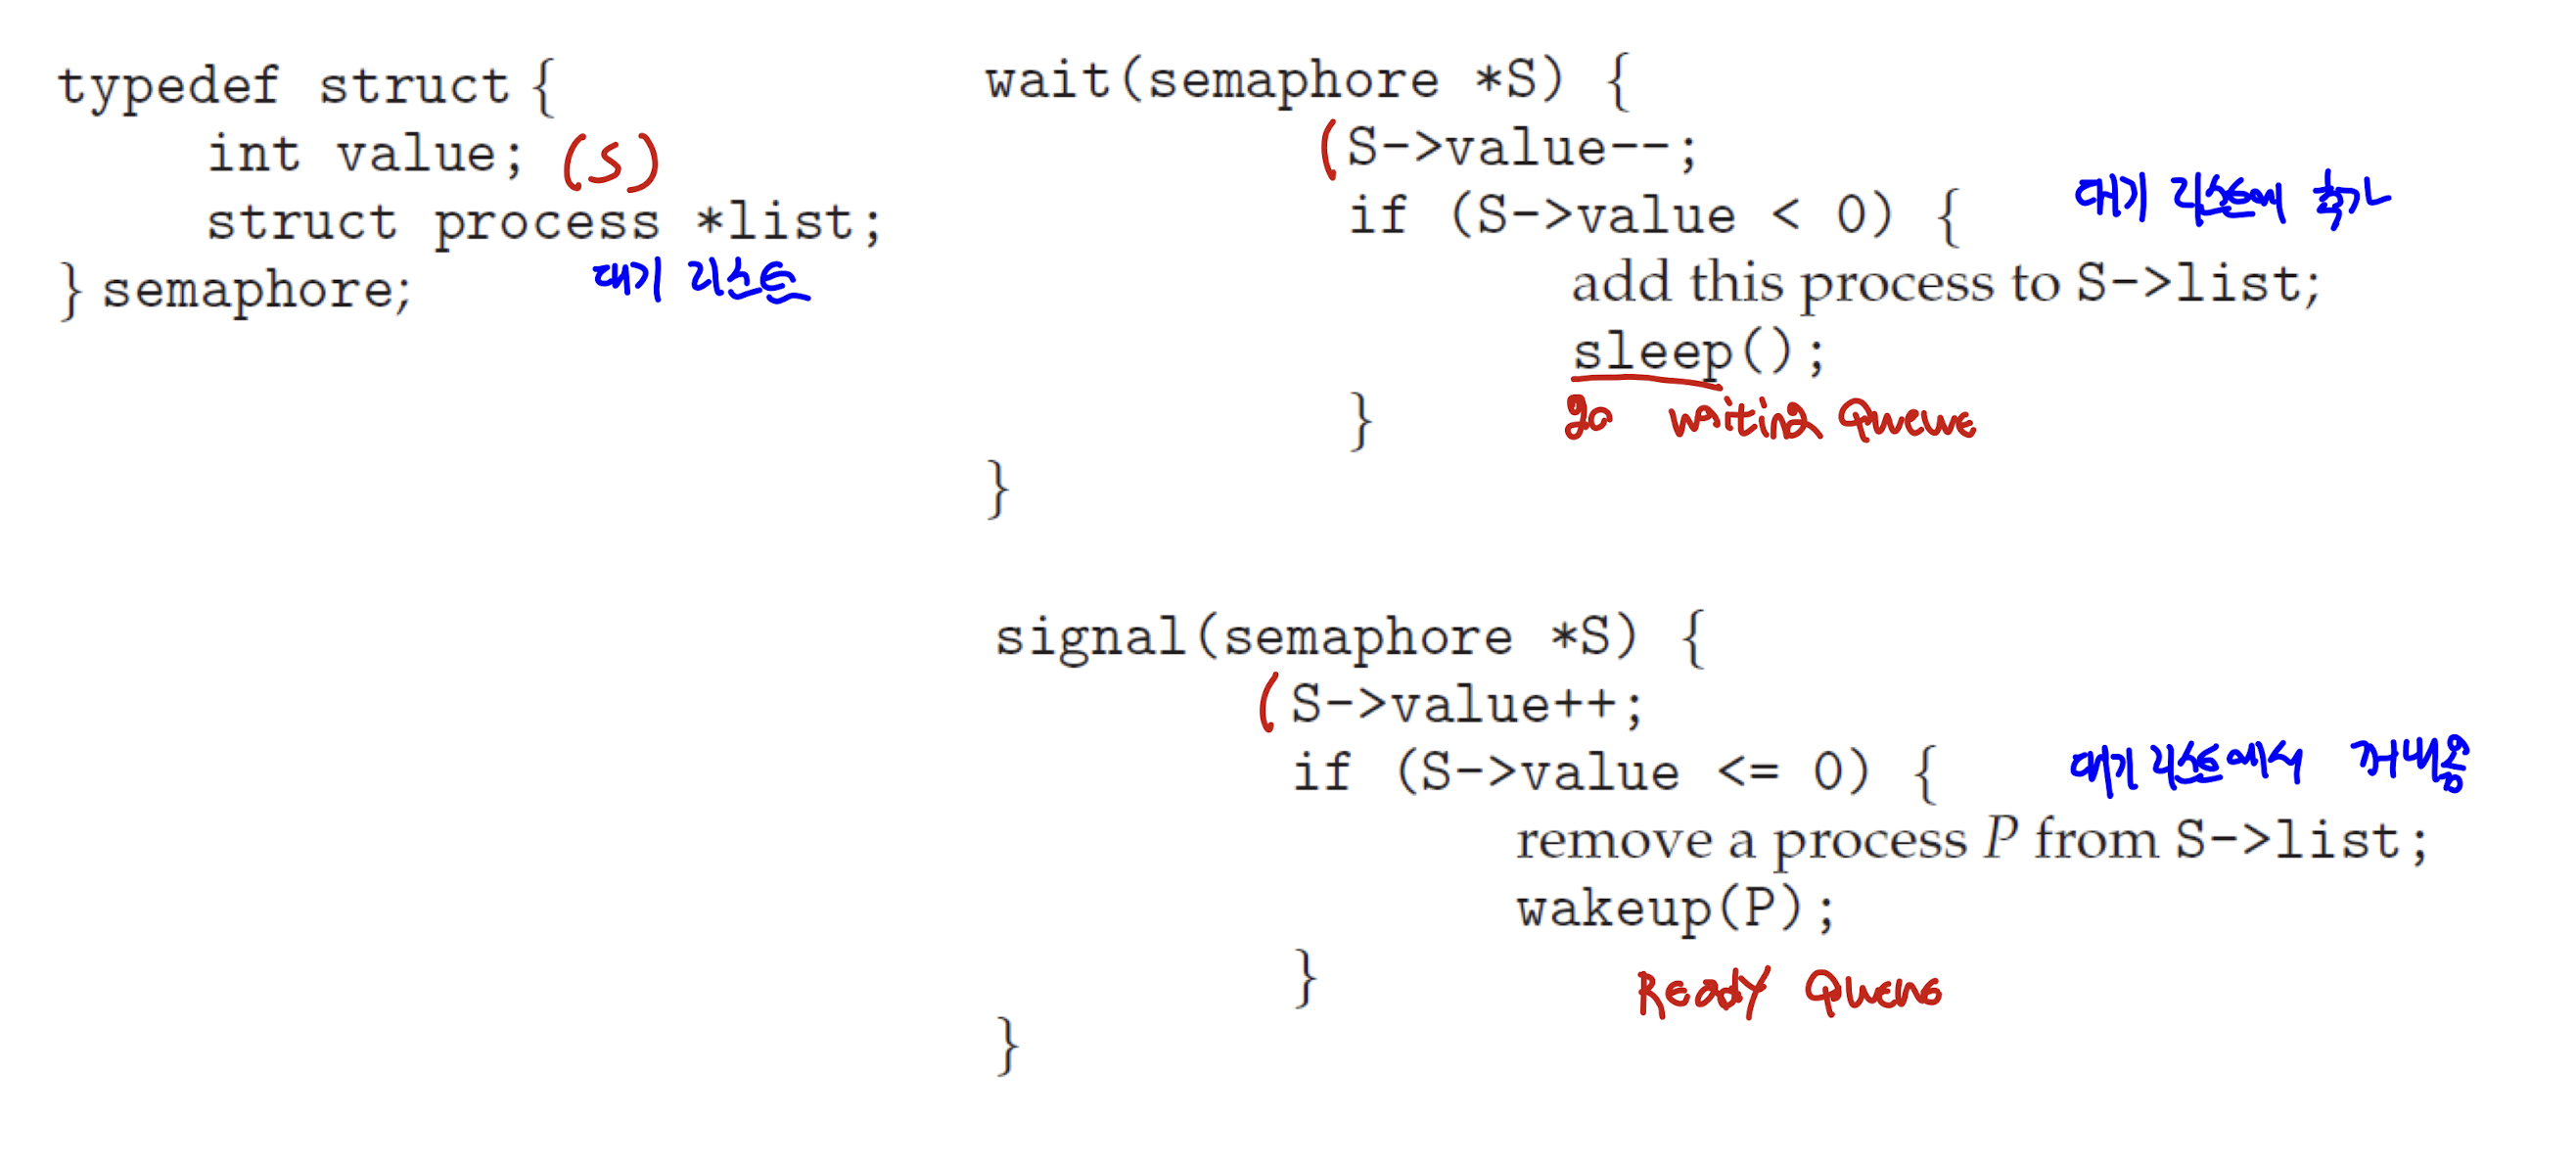
- 프로세스가
wait()연산을 실행할 때 세마포어가 양수가 아니면, 무조건 대기해야 한다. - 바쁜 대기보다는, 스스로를 지연시켜
waiting queue로 향하게 만드는 것이다. signal()연산을 실행하면, 프로세스는ready queue로 들어가 재실행을 준비한다.(뮤텍스락과 비슷한 느낌이다.)
void *counter(void *param)
{
    int k;
    for (k = 0; k < 10000; k++) {
        /* entry section */
        sem_wait(&sem);
        /* critical section */
		sum++;
		/* exit section */
		sem_post(&sem);
		/* remainder section */
	}
    pthread_exit(0);
}

#include <stdio.h>
#include <pthread.h>
#include <semaphore.h>

int sum = 0;  // a shared variable

sem_t sem;

int main()
{
	pthread_t tid1, tid2;
	sem_init(&sem, 0, 1); // binary semaphore
    pthread_create(&tid1, NULL, counter, NULL);
    pthread_create(&tid2, NULL, counter, NULL);
    pthread_join(tid1, NULL);
    pthread_join(tid2, NULL);
	printf("sum = %d\n", sum);
}

/* result : sum = 50000 */
- 위는 바이너리 세마포어, 즉
n = 1일 때의 예시 코드이다. - 그렇다면, 이번에는 코드를 살짝 바꿔보자.
void *counter(void *param)
{
    int k;
    for (k = 0; k < 10000; k++) {
        /* entry section */
        sem_wait(&sem);
        /* critical section */
		sum++;
		/* exit section */
		sem_post(&sem);
		/* remainder section */
	}
    pthread_exit(0);
}


/* 위의 코드와 동일하므로 중략 */

int main()
{
	pthread_t tid1, tid2;
	sem_init(&sem, 0, 5);
    for (i = 0; i < 5; i++)
    	pthread_create(&tid1, NULL, counter, NULL);

	for (i = 0; i < 5; i++)
	    pthread_join(tid[i], NULL);

	printf("sum = %d\n", sum);

    /* 결과가 50000이 나올까? */
}
- 단순하게 바라보면, 스레드를 실행하고 종료할 때가지 기다리니 기대값인
50000이 나올 것이라고 생각하지만, 실상은 그렇지 않다. - 오히려 스레드 5개 전부 열쇠함에 진입해 열쇠를 받고, 동시에 실행하니 동기화가 정상적으로 진행되지 않아 원하는 값을 받지 못하게 된다.
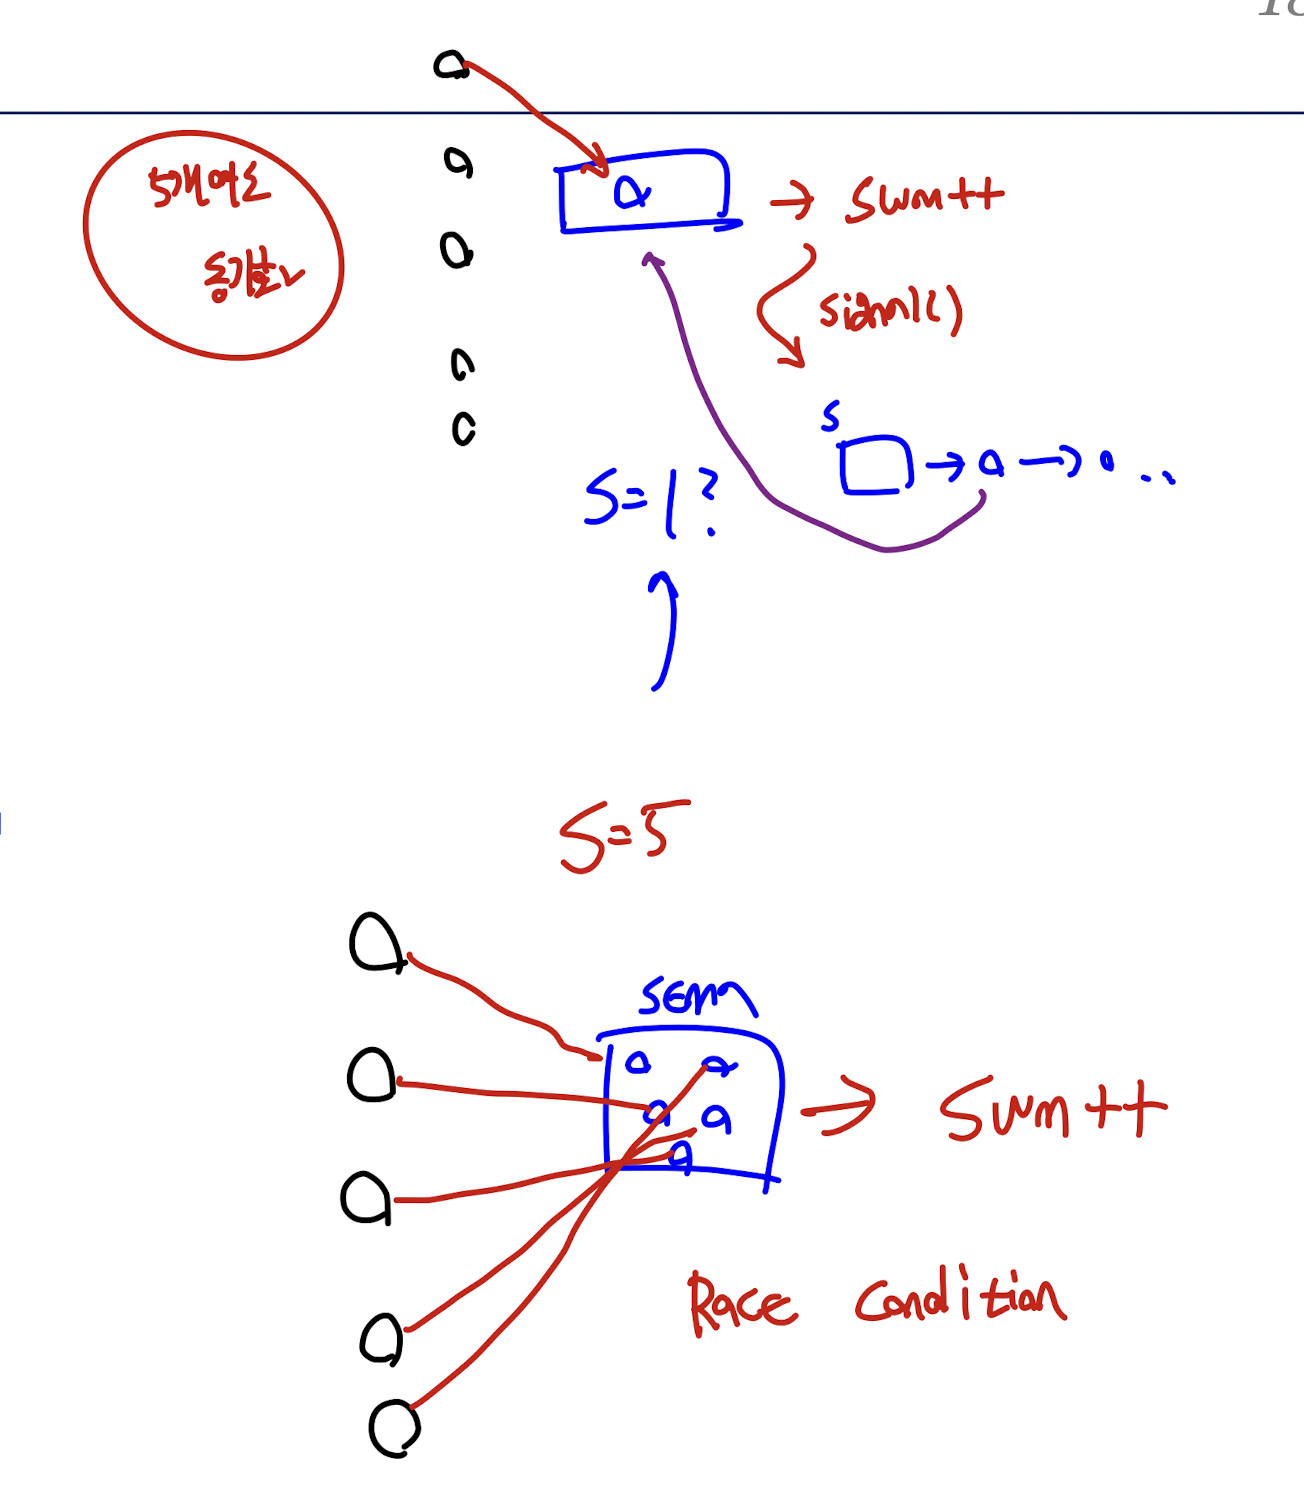
sem_init(&sem, 0, 1)로 코드를 변경하여 열쇠함에 있는 열쇠를 하나로 고정시켜버린다면, 동기화가 이뤄질 수 있을 것이다.
Monitors
- 세마포어는
wait,signal연산을 이용해 상호 배제를 제공한다. - 그러나, 순서를 바꿔서 실행하거나 하나라도 생략할 경우 상호 배제의 원칙을 지킬 수 없고, 프로그램 전체에 구성되어 있으면 코드 복잡도가 높아져 프로그래머의 실수가 일어날 확률이 높다.
- 이 단점을 보완하기 위해, 프로그래밍 언어 수준(high-level)에서 간단한 동기화 옵션인 모니터가 나타난 것이다.
- 하나의 객체마다 하나의 모니터에 결합할 수 있으며 해당 객체에 여러 스레드가 접근할 수 없도록 막는
lock기능을 지원하여 동기화를 수행한다.
Conditional Variables
- 기본적인 모니터 구조는 일부 동기화 문제를 해결하기에 부족한 점이 있다.
- 그래서 조건 변수를 추가하여 동기화 메커니즘을 추가한다.
- 조건 변수는
wait()혹은signal()연산에 의해서만 움직인다.
즉, 모니터는 lock 오브젝트와 조건 변수들로 구성되어 있다는 의미이다.
Monitor in java
- 자바에서는 모니터 오브젝트를 제공하여, 스레드의 동기화를 지원한다.
- 자바의 모니터 동기화에서 알아두어야 할 키워드는 다음과 같다.
	synchronized (object) {
    	// critical section
    }

    public synchronized void add() {
    	// critical section
}-
synchronized- 임계 영역에 해당하는 코드 블록을 선언할 때 사용한다.
- 해당 코드 블록에는 모니터락을 획득해야 진입이 가능하다.
- 모니터락을 가진 객체 인스턴스를 지정할 수 있다.
- 메소드에 선언하면 메소드 코드 블록 전체가 임계 영역으로 지정된다.
-
wait,notify()- java.lang.Object 클래스에 선언되어 모든 자바 객체가 가진 메소드이다.
- 스레드가 어떤 객체의
wait()메소드 호출시, 해당 객체의 모니터락을 얻기 위해 대기 상태로 진입한다. - 스레드가 어떤 객체의
notify()메소드 호출시, 해당 객체 모니터에 대기중인 스레드 하나를 깨운다. notifyAll()메소드 호출시 해당 객체 모니터에 대기중인 스레드를 전부 깨운다.
이제, 예시를 통해 알아보도록 하자.
	static class Counter {
		private static Object object = new Object();
		public static int count = 0;
		public static void increment() {
        	count++;
		}
	}


	static class MyRunnable implements Runnable{
		@Override
		public void run() {
			for (int i = 0; i < 10000; i ++) Counter.increment();
		}
	}

	public static void main(String[] args) throws Exception{
		Thread[] threads = new Thread[5];
		for(int i = 0; i < threads.length; i ++) {
			threads[i] = new Thread(new MyRunnable());
			threads[i].start();
		}

		for(int i = 0; i < threads.length; i ++) {
			threads[i].join();
		}
		System.out.println("counter = " + Counter.count);
	}
}
- 지금까지 운영체제를 공부했다면, 스레드가 5개 동시에 실행되면서 동기화가 정상적으로 이루어지지 않을 것임을 예측할 수 있을 것이다.
public class SynchExample {
	static class Counter {
		public static int count = 0;
		synchronized public static void increment() { // 메소드 전체 임계영역 설정
			count++;
		}
	}

	static class MyRunnable implements Runnable{
		@Override
		public void run() {
			for (int i = 0; i < 10000; i ++) Counter.increment();
		}
}- 메소드 전체를 임계 영역으로 설정한 방법으로, 정상 작동하는 것을 확인할 수 있다.
- 이 때,
synchronized영역을 길게 작성하는 것은 멀티 스레드의 성능을 저하시킬 수 있으므로 지양해야 한다.
public class SynchExample {
	static class Counter {
    	private static Object object = new Object(); // object lock
		public static int count = 0;
		public static void increment() {
        	synchronized (object) {
				count++; // 임계 영역을 따로 지정하는 방법이다.
            }

		}
	}

	static class MyRunnable implements Runnable{
		@Override
		public void run() {
			for (int i = 0; i < 10000; i ++) Counter.increment();
		}
}- 메소드의 일부를 임계 영역으로 설정한 방법으로, 정상 작동한다.
public class SynchExample {
	static class Counter {
		public static int count = 0;
		public void increment() { // static이 빠짐
        	synchronized (this) { // this로 자기(스레드) 참조
				count++;
            }

		}
	}

	static class MyRunnable implements Runnable{
    	Counter counter; // not static, 인스턴스 변수 필요
        public MyRunnable(Counter counter) {
        	this.counter = counter;
        }
		@Override
		public void run() {
			for (int i = 0; i < 10000; i ++)
            	counter.increment();
		}
	}

    public static void main(String[] args) throws Exception{
		Thread[] threads = new Thread[5];
		for(int i = 0; i < threads.length; i ++) {
			threads[i] = new Thread(new MyRunnable(new Counter()));
            // 인스턴스를 생성하는 모습, 이 코드에선 5개 인스턴스를 따로 넘기는 것이다.
			threads[i].start();
		}

		for(int i = 0; i < threads.length; i ++) {
			threads[i].join();
		}
		System.out.println("counter = " + Counter.count);
	}
}- 이 코드는 정상적으로 작동하지 않는다.

- 위의 세마포어 예시와 비슷한 경우로, 인스턴스가 5개 생성되어 객체를 따로 관리하여 동기화가 정상적으로 진행되지 않는 것이다. 이해가 되지 않는다면 아래의 해결책을 보자.
public static void main(String[] args) throws Exception{
		Thread[] threads = new Thread[5];
		Counter counter = new Counter(); // 인스턴스 선언
        for(int i = 0; i < threads.length; i ++) {
			threads[i] = new Thread(new MyRunnable(counter));
            // 하나의 인스턴스를 넘기는 모습이다.
			threads[i].start();
		}

		for(int i = 0; i < threads.length; i ++) {
			threads[i].join();
		}
		System.out.println("counter = " + Counter.count);
	}
- 이 코드에서 5개의 스레드 모두 같은
this, 즉 같은 것을 참조하고 있기 때문에 정상적인 동기화가 진행되어 기대 결과값인50000이 출력되게 된다.
Liveness
- 진전 문제와 한정 대기, 즉 데드락과 기아 문제를 해결한 방법이다.
- 데드락과는 반대되는 개념으로, 어떤 경우에도 프로세스가 진전(progress)될 수 있게 보장한다.
Deadlock
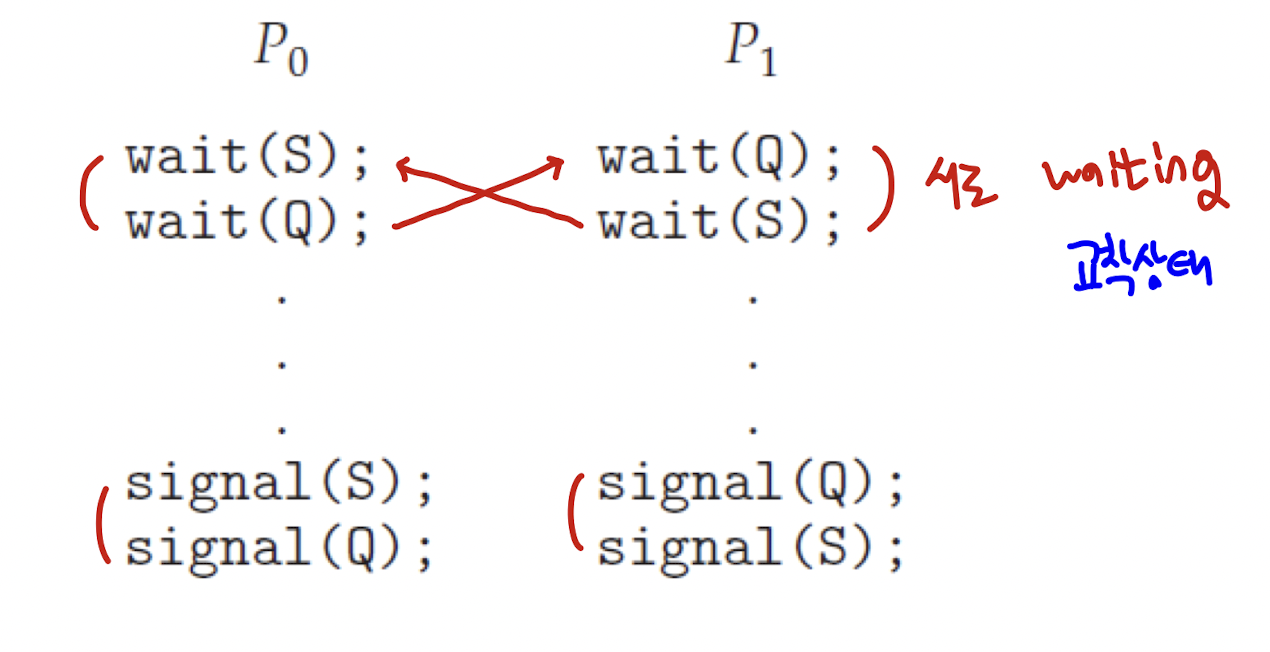
- Deadlock(교착 상태)은 프로세스가 영원히 대기 상태에 빠져 자원의 할당을 받지 못하고 있는 상태를 의미한다.
Priority Inversion
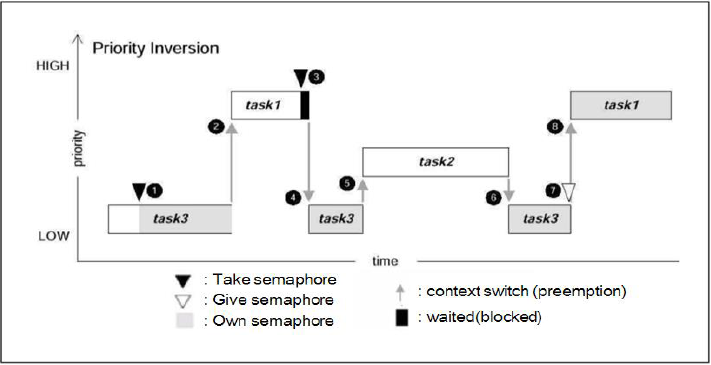
- Priority Inversion(우선순위 역전)은 높은 우선 순위를 가진 프로세스가 낮은 우선 순위 프로세스에게 밀려 실행하지 못하는 현상을 의미한다.
- 스케줄링과 동기화 사이에서의 상호작용으로 일어나며, 스케줄링에서 실행되어야 하는 스레드와 동기화에서 실행되어야 하는 스레드가 서로 다른 경우 발생한다.
- Task3이 세마포어 획득
- 스케줄러에 의해 Task1 호출
- Task1이 Task3의 세마포어를 획득하기 위해 대기
- 스케줄러에 의해 Task3 재실행
- 세마포어와 관련 없는 Task2가 Task3 보다 높으니 스케줄러에 의해 실행
- Task2 종료 후 Task3 재실행
- 우선순위가 가장 높은 Task1이 가장 늦게 실행
- 일반적으로 이 문제를 해결하기 위해 우선순위 상속 프로토콜을 사용한다.
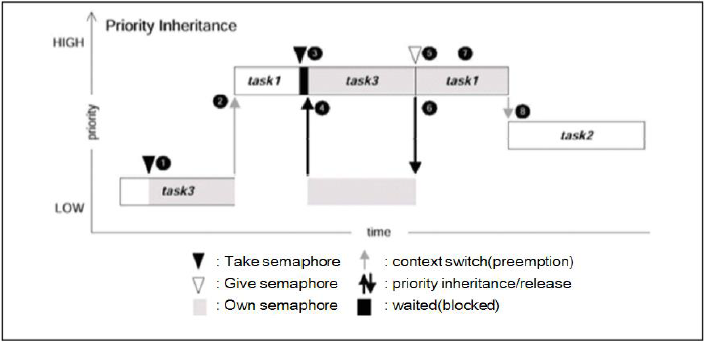
- Task3이 세마포어 획득
- 스케줄러에 의해 Task1 호출
- Task1이 Task3의 세마포어를 획득하기 위해 대기
- Task1의 우선 순위를 Task3이 임시로 상속받고 실행
- Task3 종료 후 Task1 실행
- Task2 실행

오늘도 잘 보고 갑니다