리눅스 기본 명령어 - User environments, Manipulating text
User environments
- Linux는 multi user system이므로 user environments에 대해서 살펴본다
Identifying Current User
-
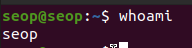
whoami: To identify the current user.
-
who: To list the currently logged-on users.

Users and Groups
-
uid: user들은 각각 고유한 ID를 가짐.
(/etc/passwd 에서 user들의 정보를 확인 가능)
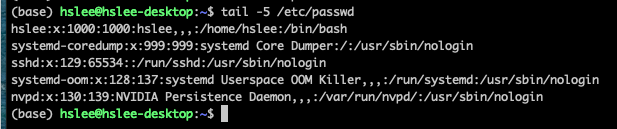
- line 하나하나가 모두 user이다.
- seop을 제외한 나머지 user들은 직접 만들지 않은 user들이다.
system이 접근 권한을 설정하기 위해서 내부적으로 만들어진 가상의 user. - x : passwd인데, 보안상 x로 표시
- 첫번째 1000 : UID
- 두번째 1000 : GID
- hslee : 사용자가 계정을 만들 때, 입력한 full name
- /home/seop : home directory
- /bin/bash : default로 사용하는 shell
-
gid: user들을 group으로 묶을 수 있고, group도 고유한 group ID를 가짐.
(/etc/group 에서 group들의 정보를 확인 가능)
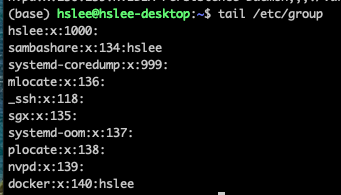
- sambashare라는 group에 hslee user가 포함됨.
Adding and Removing Users
useradd (모든 Linux) (불편)
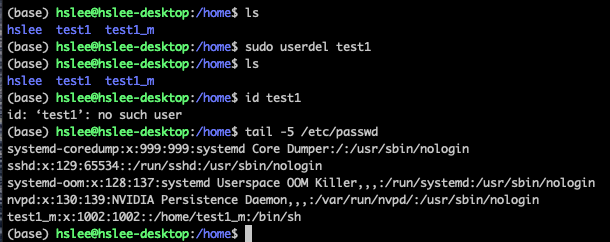
useradd로 test1이라는 user 생성
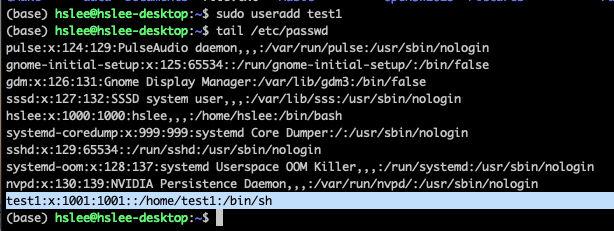
id명령어로 user에 대한 정보 확인 가능

- 그런데 /home/에 test1/이 없음.. 왜 그럴까?
 useradd는 기본적으로 홈 디렉토리를 생성하지 않음.
그래서 /home/test1 디렉토리가 자동으로 생성되지 않았던 것임.- 방법 1: sudo useradd
-mtest1

- 방법 1: sudo useradd
userdel (모든 Linux) (불편)
userdel로 test1 user 삭제
userdel은 useradd와 마찬가지로 기본적으로 /home/test1 디렉토리를 같이 제거해주지는 않지만, 시스템에서 user는 제거되었음.
- 방법 1: sudo userdel
-rtest1_m
-r 은 home directory까지 모두 지우라는 옵션

- 방법 1: sudo userdel
adduser (Debian 계열 배포판) (더 편함)
useradd, userdel은 user의 home directory를 자동으로 만들어주거나 제거해주지 않아서
-m, -r 옵션을 사용했어야 함.
반면에, adduser, deluser는 이러한 것들을 자동으로 해줘서 더 편함
sudo adduser로 test user 생성.
아래와 같이, 홈 디렉토리가 자동으로 생성됨.


su (switch user)
su명령어는 switch user의 준말로, 다른 계정으로 전환하는 명령어.
test user 계정으로 전환해보자. (-옵션은 아예 해당 user의 환경으로 완전히 변환, 환경 변수, Path, 홈 디렉토리 등)
su - test
(test계정의 passwd 입력)
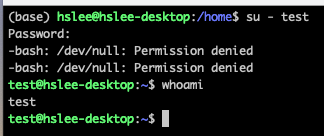 위와 같이, test user로 전환이 되었다.
sudo 권한 부여 = sudo group에 추가
- test user는 adduser로 새로운 user를 생성할 수 있을까?
아래와 같이, test user는 아직 super user 권한이 없기 때문에 생성 권한도 없을 것이다.

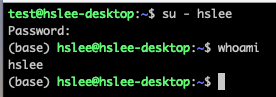
- 그럼 test user에게 super user 권한을 부여해보자.
그러기 위해 다시 sudo 권한이 있는 계정으로 복귀.방법 1:직접 /etc/group file을 수정
 /etc/group에 sudo group을 설정할 수 있기 때문에 해당 라인을 수정해보자.


 위와 같이 성공적으로 추가된 것을 확인할 수 있다.
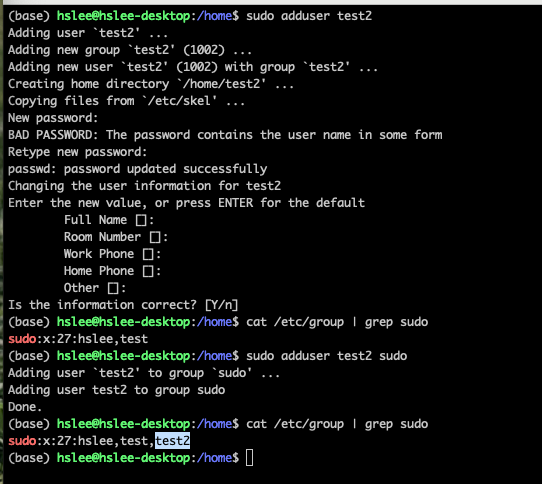
이제 다시, test user로 switching한 후에 sudo adduser를 재실행해보자.
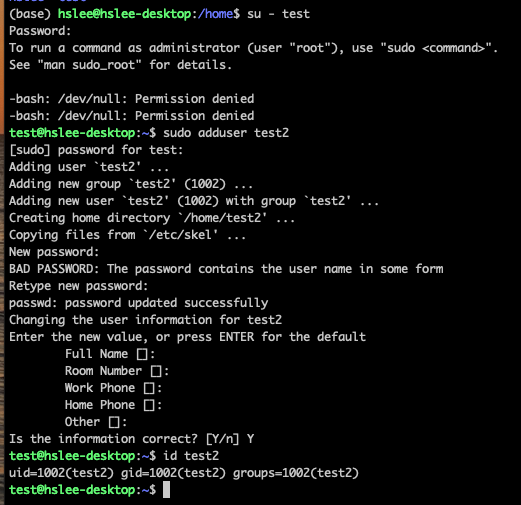 test user를 sudo group에 추가해줬기 때문에 sudo 권한을 통해 adduser test2를 성공했다.
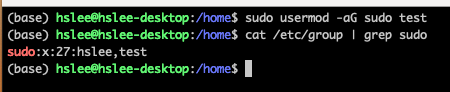
방법 2:sudo usermod -aG sudo [user명]
usermod 명령어는 user modify
-aG sudo: append to sudo Group
방법 3:sudo adduser [이미 존재하는 user명] sudo
(이미 존재하는 user명이어야 함. 존재하지 않으면 error)
deluser
- 이제
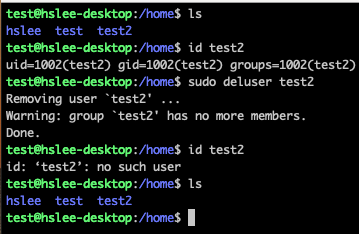
deluser명령어를 이용하여 test2 user를 제거해보자.
아래와 같이, 정상적으로 삭제되긴했지만 userdel과 마찬가지로 home directory까지 제거되진 않았다.
- 방법 1:
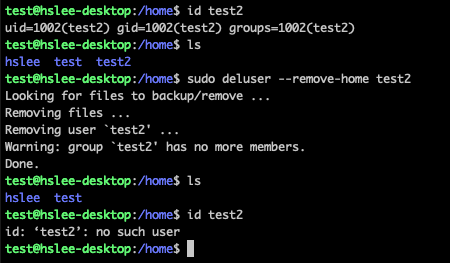
sudo deluser --remove-home test2
(userdel에서는 -r 옵션이었는데 deluser는 -r 옵션이 아님)
- 방법 1:
Adding and Removing Groups
-
groupaddoraddgroup:
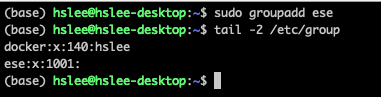
-
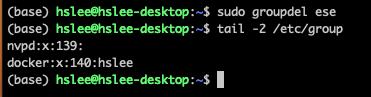
groupdelordelgroup:
user add, del in MacOS
-
mac에서는 useradd, adduser 명령어가 없음
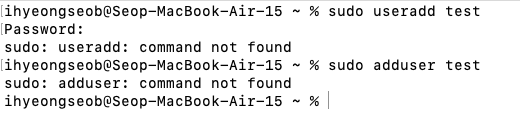
-
생성:
sudo sysadminctl -addUser [user명]


-
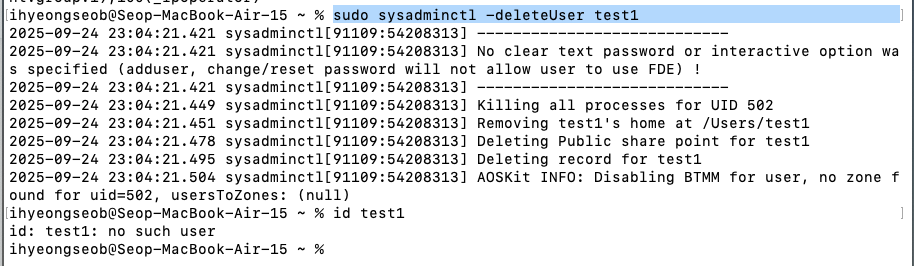
삭제:
sudo sysadminctl -deleteUser [user명]
root account and sudo command
-
root:
root user는 admin이기 때문에 모든 권한을 다 가짐.
root account를 다룬다는 것은 너무 위험하기 때문에
root 계정이 존재는 하지만 기본적으로 로그인할 수 없도록 잠겨있음.
그래서 sudo 명령어를 통해 root 권한을 일시적으로 부여받는 것임. -
sudo:
sudo gives temporary superuser privileges
ubuntu를 처음 설치했던 user가 처음 sudo 권한을 얻고, 그 이후의 user들은 sudo 권한이 없음.
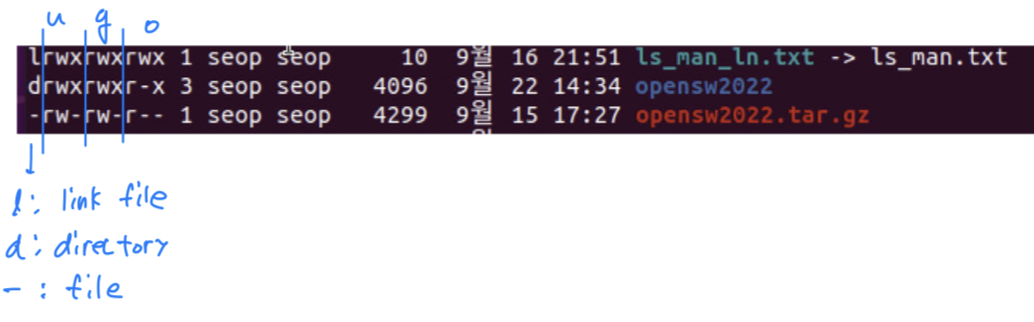
File Ownership
- In Linux, every file is associated with a user = u, a group = g and others = o
- Files have permissions(read = r, write = w, and execute = x)
chown: file 소유 user 변경chgrp: file 소유 group 변경chmod: Permission can be set separately for owner, group, and other- rwx:rwx:rwx ➡️ u:g:o
7 = ob111 ➡️ rwx
6 = ob110 ➡️ rw-
5 = ob101 ➡️ r-x
- rwx:rwx:rwx ➡️ u:g:o
- ls -l (file이름) : file에 대한 접근권한 확인하기
Example:
- 기존 myscript.sh file의 접근 권한 :
 user : rw-
group : rw-
others : r--
- chmod uo+x,g-w myscript.h :
 user : rwx
group : r--
others : r-x
- chmod 765 myscript.h
 user : rwx
group : rw-
others : r-x
Example: user1이 file을 실행하는 것을 막기. = execute- "Hello World!\n"를 출력하는 실행파일인 helloworld를 생성.
defualt로 others는 execute의 권한이 있다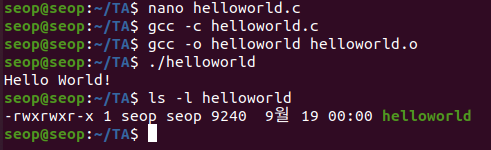
- others인 user1도 helloworld를 실행할 수 있다
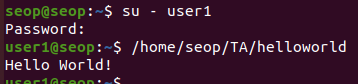
- seop계정에서 others의 execute 권한을 없애기

- 이제 others인 user1은 helloworld를 실행할 수 없다.

참고로 directory에 대한 execute 권한을 막는 것은 해당 directory에 접근을 못하도록 하는 것이다.
- "Hello World!\n"를 출력하는 실행파일인 helloworld를 생성.
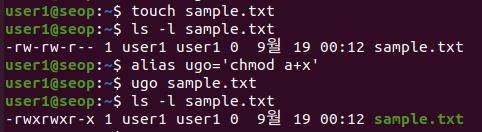
Quiz >
User, Group, Others 모두에게 실행권한을 주는 명령어를 별칭으로 생성한 후 아무 파일이나 만든 별칭을 사용해 실행권한을 추가하시오.


Environment Variables
Environment Variables:
각 사용자 별로 환경 변수를 다르게 설정하여 다른 값을 사용하도록 설정하는 변수(character string).
환경변수는 key-value pairs로 되어 있고, key는 보통 대문자로 표기한다.
Setting Environment Variables
-
특정 환경변수를 보고 싶을 때, (환경변수이름) 앞에
$를 붙여서 echo로 확인한다.
echo는 단순히 text를 display해주는 명령어일 뿐.
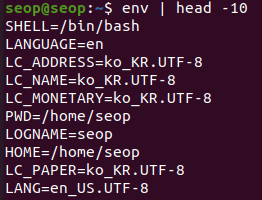
중요한 것은$환경변수이름- Some Example Environment Variables :

- echo $PATH에서 ':'이 자주 보이는데,
':'(column)은 각각이 실행파일들이 있는 directory라는 의미이다. (ls, pwd, ...) - HISTSIZE는 hist
- echo $PATH에서 ':'이 자주 보이는데,
- Some Example Environment Variables :
-
export: 새로운 환경변수를 만들고 싶을 때-
방법 1 : export (만들 환경변수이름)=value

-
방법 2 : (만들 환경변수이름) = value; export (만들 환경변수이름)

- 예제:
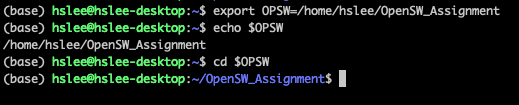
- 예제:
-
- 방법 3 : ':'(column)을 이용하여 기존 환경변수를 수정하는 방법


- 예제:
~/.bashrc:~/.zshrcin MacOS
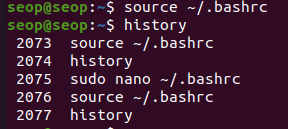
로그인할 때마다 export하지 않고 자동으로 환경변수가 설정되도록.
즉, Add a variable permanently- (
Edit ~/.bashrc) and(source ~/.bashrcor./bashrc)

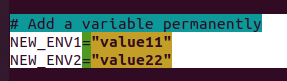
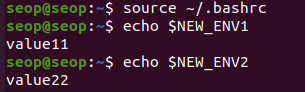
- (
User startup file : .bashrc
~/.bashrc: definesaliases(별명) and environment variables.alias: 매우 긴 명령어를 ~/.basrc file에 미리 축약해놓은 작은 명령어로 대신하여 사용

- example :
- 기존 alias 사용 :
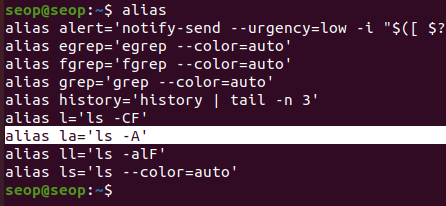
 (la와 'ls -A'가 똑같은 결과 ➡️ la는 'ls -A'의 alias임)
 - 새로운 alias 추가 :

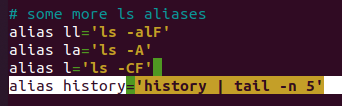
 history 명령어를 실행했을 때, 마지막 5줄만 나오도록 ~/.bashrc 수정
- 기존 alias 사용 :
Manipulating text
sed: Stream Editor = sed is used to modify the contents of a file or input streamawk: awk extracts and prints specific contents of a filesort: sortinggrep: Scans files for specific patterns; regular expression can be used.tee: tee takes output from any command, and send it to both a file and to standard output.wc: word count. (line, word, byte)
sed
-
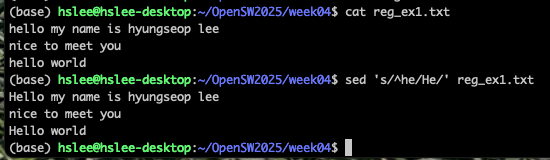
sed: stream editor.
stream을 line 단위로 읽어서, 특정 패턴을 찾아 수정 가능.-
sed s/pattern/replace_string/ file.txt:
file을 읽어서, 발견한 첫번째에만 적용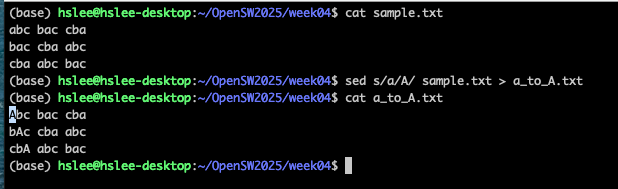
-
sed s/pattern/replace_string/
gfile.txt :
file을 읽어서, 발견한 모든 것에 적용
-
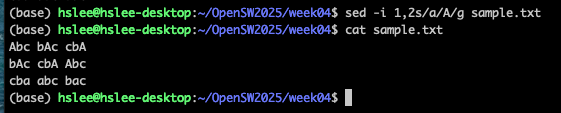
sed
1,2s/pattern/replace_string/g file.txt :
file의 1~2번째 줄 사이만 읽어서 적용
-
sed
-i
변경 사항을 inplace로 적용.
- MacOS에서는 -i 옵션 사용법이 살짝 다름.
sed-i [백업 파일의 확장자]~

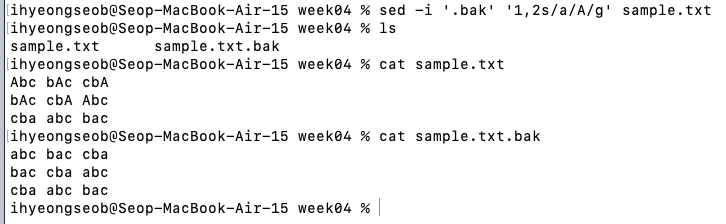
백업파일을 만들고 싶지 않으면 그냥 sed-i ''~

- MacOS에서는 -i 옵션 사용법이 살짝 다름.
-
- sed
\error\dfile.txt :
file을 읽어서, 'error'가 포함된 라인을 delete
아래 예제는 'ab'가 포함된 라인을 delete
Quiz > ls_man.txt 파일에세 모든 ls를 대문자 LS로 변경하여 LS_man.txt로 저장하시오. (출력은 상위 10줄)

awk
-
awk: is used to extract and then print specific contents
column으로 된 file들에 적용하면 유용함. -
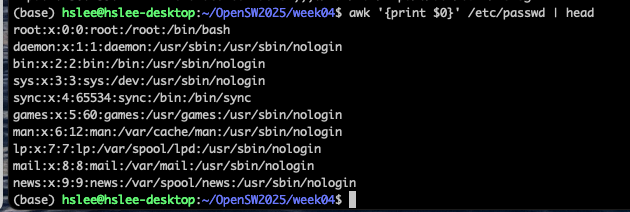
awk '{print $0}' file: print entire file ($0 : 파일 전체)
-
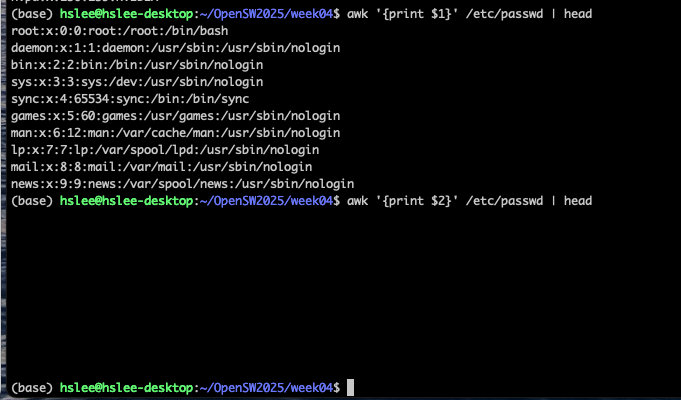
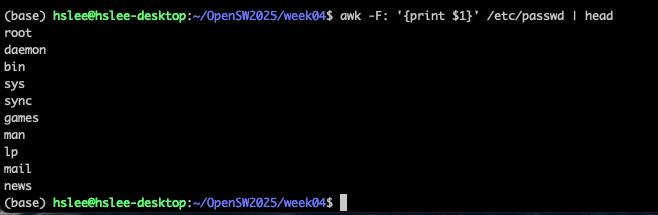
awk '{print
$1}' file: 1번째 column의 값들만 출력
아래 예제는 구분자 지정이 없으므로, 첫번째 column이 전체가 되어버림.
-
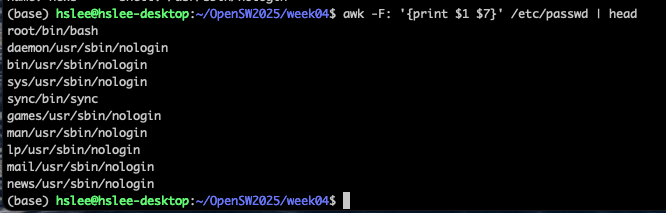
awk
-F:'{ print $1 }' file
-> ':'를 기준으로 구분했을 때, 1번째 column 값들을 출력
-
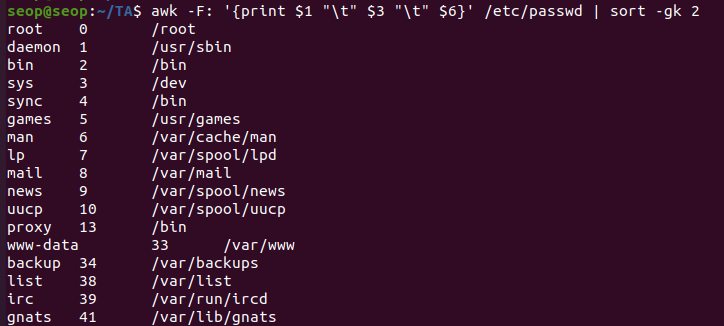
awk -F: '{ print $1 $7 }' file
-> ':'를 기준으로 구분했을 때, 1번째와 7번째 column 값들을 출력
 (아래처럼 "" 사이에 원하는 string을 출력할 수 있음/.)
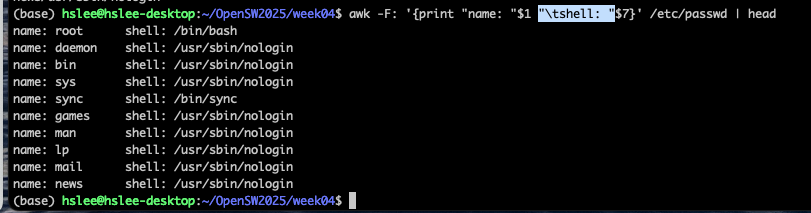
-
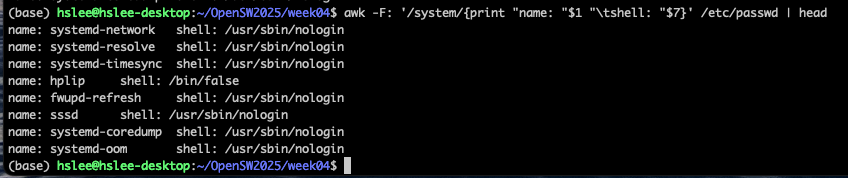
awk -F: '
/pattern/{"name: "$1 "\tshell: "$7}' file
-> /pattern/ 을 줘서 pattern이 찾아진 line들만 출력하도록 할 수 있다.
sort
-
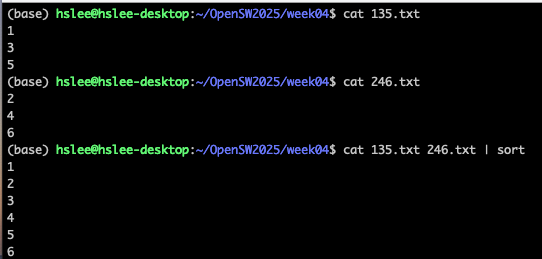
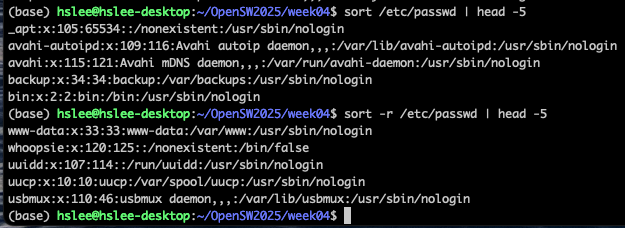
sort file: file에 있는 line들을 사전순으로 sorting

-
cat file1 file2 | sort: combined the two files, then sort the lines
-
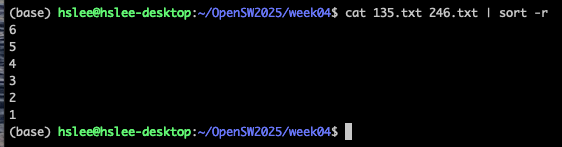
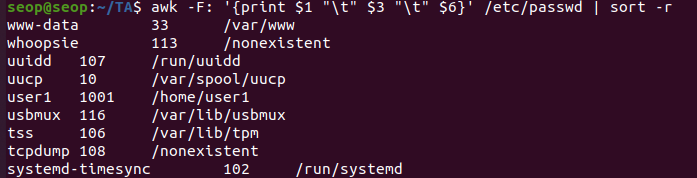
sort -r file: sort the lines in reverse order
-
sort -k 3 file: sort the lines by the 3rd field on each line
(0, 1000, 1001 ...)
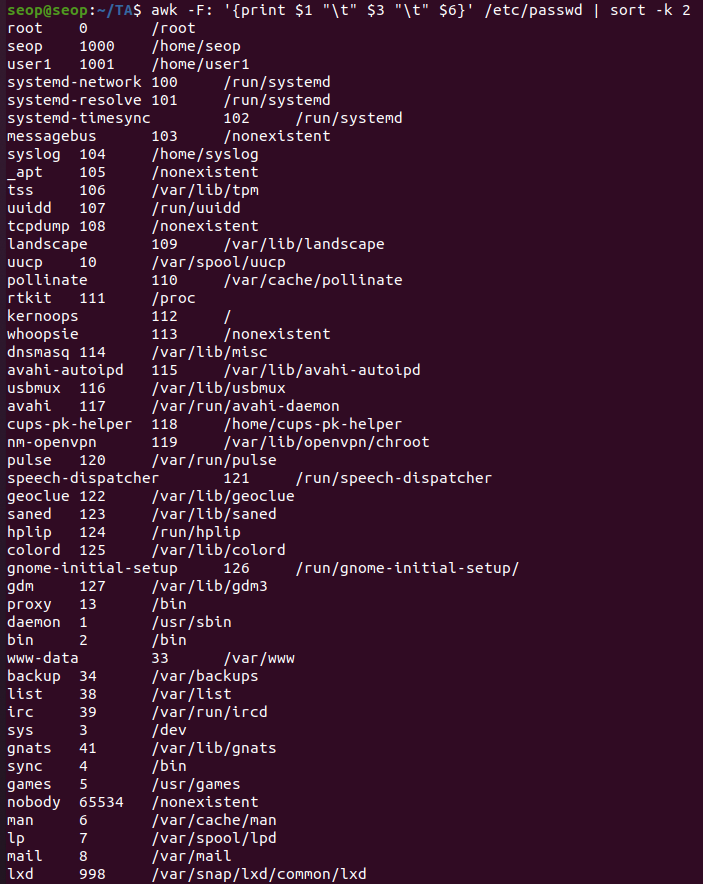
(진짜 숫자 크기로 정렬 하기 위해 -g option)
sort examples
-
sort, sort -r
-
sort도 awk 명령어에서 -F
구분자옵션을 줬던 것 처럼, 유사하게구분자를 부여할 수 있다.
sort에서는 -t'구분자'로 한다.
또한 구분자에 의한 기준 column 번호도 지정할 수 있다.-k옵션 이용.
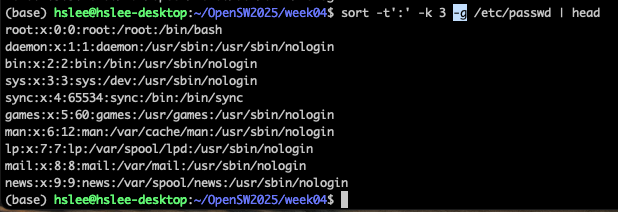
(아래 예제는:으로 구분하고, 3번째 column 기준으로 정렬하라.)
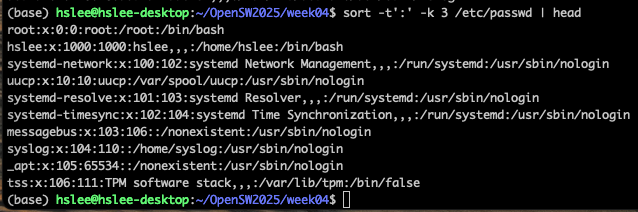
(3번째 column의 가장 앞에 숫자만 보고 정렬되었는데, 실제 숫자 크기대로 정렬하기 위해서 -n 또는 -g 옵션을 적용)
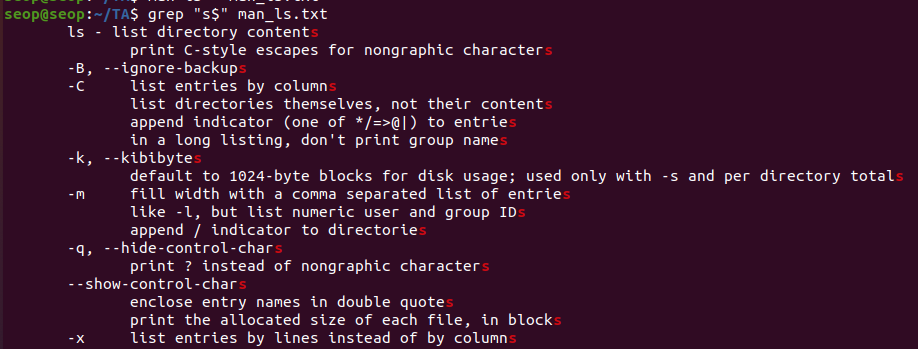
grep
grep [pattern] <file>: 찾는 패턴이 있는 라인 출력

-
grep -v [pattern] <file>: 찾는 패턴이 없는 라인 출력 -
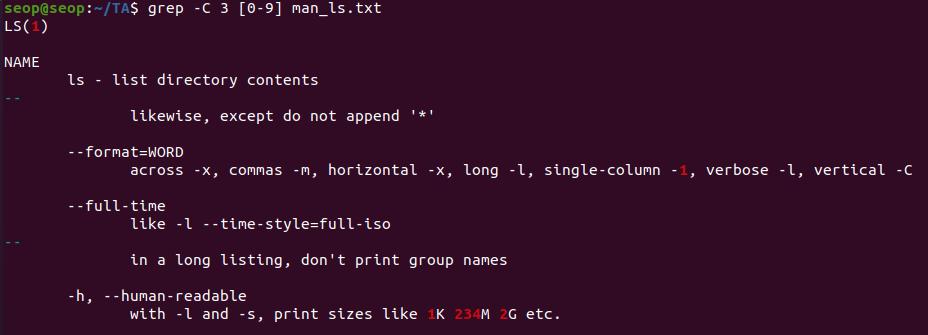
grep [0-9] <file>: print the lines that contain the number 0-9

-
grep -C 3 [pattern] <file>: pattern을 만족하는 line 기준 위, 아래 3줄. 총 7줄 출력.
-
grep
-i[pattern] :
pattern의 대소문자 상관없이 있으면 출력 -
grep
-r[pattern] /dir:
/dir 밑에 있는 sub-dir와 파일들을 recursive하게 찾아서 출력
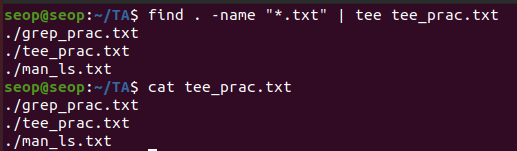
tee
tee: takes output from any command, and send it to both standard output, and to a file
Basic Regular expressions (BRE)
-
Consider sentence : "The quick brown fox jumped over the lazy dog"
-
.: 어떠한 character도 match
* a.. : azy

-
a | z: match a or z- b. | j. : br or ju
-
$: 라인의 끝 match- ..$ : og
-
^: 라인의 처음 match- ^... : 라인의 처음에서 그 뒤에 3개 item을 match
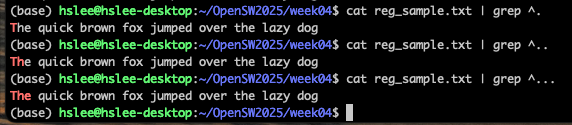
- ^... : 라인의 처음에서 그 뒤에 3개 item을 match
-
*: * 앞에 오는 item을 0번 또는 여러번 반복되는 것 match- l.* : l 뒤에 어떠한 character든 0번 또는 여러번 반복

- The.* : The 뒤에 어떠한 character가 오든 match

- l.* : l 뒤에 어떠한 character든 0번 또는 여러번 반복
-
[]: []안에 있는 어떠한 character든 match

-
-
examples :
-
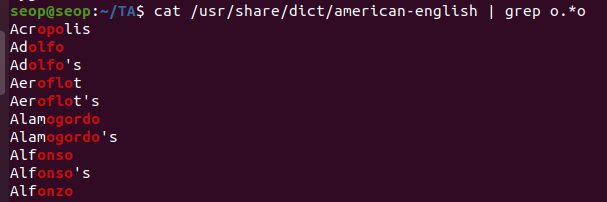
z로 시작하는 단어 찾기

-
z로 시작해서 a로 끝나는 단어
-
'o', 'o' 사이에 0~n개 문자가 들어있는 단어 출력
-
'a', 'a' 사이에 'a' or 'n' 들어있는 단어
-> a[an]a -
reg_ex1.txt에서 he로 시작하는 라인
-
세글자인 단어

-
z로 시작해서 a로 끝나는 단어

-
Extended Regular Expressions (ERE)
Basic Regular Expression은 오래된 linux tool들에서 기본적으로 동작했다면,
Extended Regular Expression은 더 확장된 기능을 제공.
grep에서 ERE를 쓰려면 -E option을 쓰거나,
egrep을 사용
+: + 앞에 오는 character가 1번 이상 반복

?: ? 앞에 오는 character가 0번 또는 1번 등장

(): ()로 그룹을 묶어서 처리. 반복하려면 뒤에 +, *, {} 붙임

|: OR

응용
-
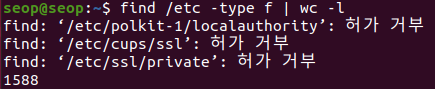
/etc 디렉터리 밑에 있는 일반 파일 개수 세기 :

-
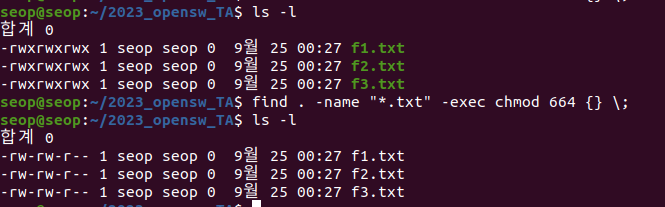
현재 디렉터리에 있는 모든 ".txt" file들의 접근 권한 변경하기
-
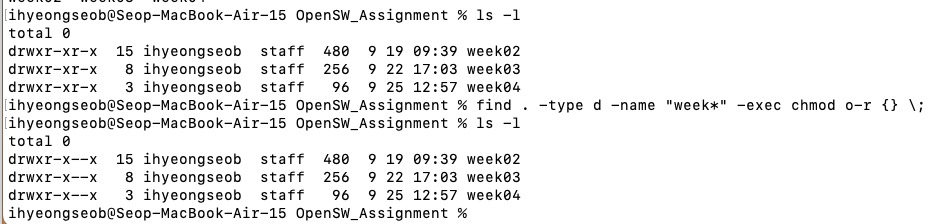
현재 디렉토리에 있는 모든 "week*"로 시작하는 디렉토리만 others에 대한 read 권한 해제하기.
-
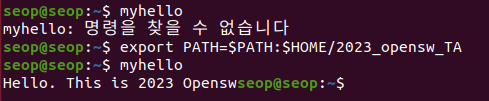
myhello 실행파일이 있는 디렉터리를 환경변수로 설정하여 ls처럼 사용하기

-
일시적인 환경변수 설정이 아닌 system을 재부팅했을 때도 계속해서 환경변수로 남게 만들기

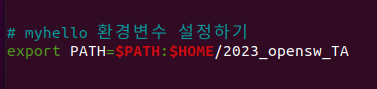
 (이제 system 재부팅 후 다시 시도해도 될 것이다)

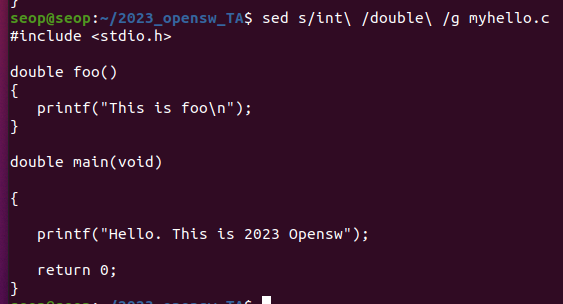
- myhello.c file에 있는 모든 int를 double로 바꾸기
(아래와 같이 하면 안된다. "printf"에 "int"가 있으니까 의도한 대로 바뀌지 않음)
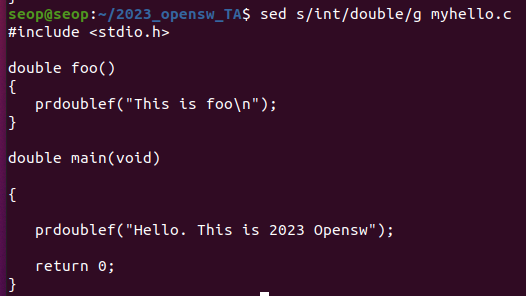
(아래와 같이 해야 한다. \(공백) : 공백)
-
현재 디렉터리에 대하여, 파일/디렉터리명 \t\t 크기 순서로 나타내라

-
test1 user의 home directory에 others에 대해서 write 권한 부여하기
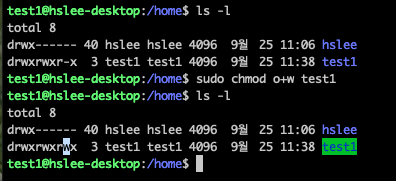
(위에서 others에 대해 write 권한을 줬기 때문에 아래에서 hslee user는 test1 user home directory에 파일을 생성할 수 있다.)
-
/etc/passwd에 'ss'로 시작하는 user에 대해서만,
uid, 사용 shell을 출력하시오.
단, uid에 대해서 내림차순 정렬해서 출력하시오.

