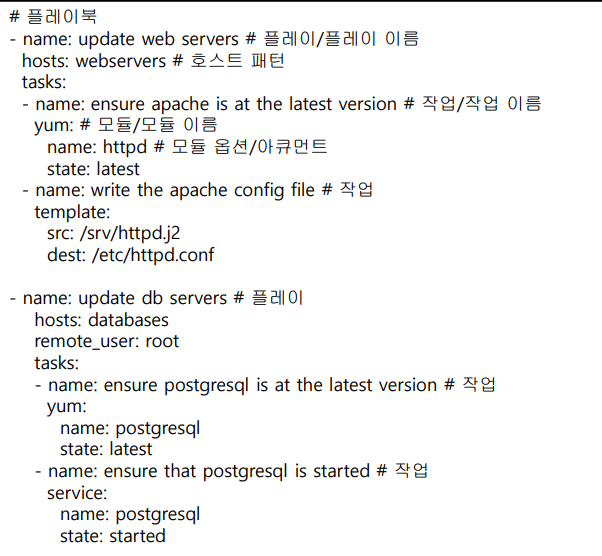
플레이북
Ansible 플레이북은 반복 가능하고 재사용 가능하며 간단한 구성 관리부터 여러 호스트에 복잡한 애플리케이션을 배포하는데 매우 적합하가.
- 작업을 두 번 이상 실행해야하는 경우 Ad-hoc 명령을 사용하지 않고, 플레이북을 작성하고 Git과 같은 소스 제어를 사용하는 것을 권장
YAML
Ansible 플레이북의 YAML 파일은 항상 목록(List)으로 시작되며, 목록의 각 항목은 해시(Hash) 또는 사전(Dictionary)이라는 키/값 쌍을 가지고 있다.
-
선택적으로 YAML 파일의 시작은 ---로, 파일의 끝은 ...으로 끝을 나타내고 들여쓰기 수준은 동일해야 하며, 공백문자로만 사용
-
탭은 구문 오류를 발생함으로 일반적으로 공백 2칸을 사용
yaml 문서의 원활한 작성 위해 vim 설정
vi ~/.vimrc

syntax on
autocmd FileType yaml setlocal ai ts=2 sw=2 sts=2 et autoindent
set cursorcolumn

# 만들어졌나 확인
ls -a ~/
목록 (list)
ymal은 기본적으로 사전(딕셔너리)과 목록(리스트) 형태로 되어있다.
- 목록은 -와 공백으로 시작
- 들여쓰기 수준은 동일해야 함
💡 ymal 목록 예시
---
# A list of tasty fruits
- Apple
- Orange
- Strawberry
- Mango
...

#축약 표현
[Apple, Orange,S trawberry. Mango]
사전 (dictionary)
- 사전은 키/값 쌍을 가지고 있으며, 키와 값은 : 으로 구분되며 : 뒤에 반드시 공백이 와야 함
💡 사전 예시
---
# An employee record
martin:
  name: Martin D'vloper
  job: Developer
  skill: Elite
...

# 축약 표현
{martin: {name: Martin D'vloper,job: Developer,skill: Elite}}
💡 사전+목록
---
# Employee records
- martin:
    name: Martin D'vloper
    job: Developer
    skills:
    - python
    - perl
    - pascal
- tabitha:
    name: Tabitha Bitumen
    job: Developer
    skills:
    - lisp
    - fortran
    - erlang
...

#축약 표현
[ martin: {name: Martin D'vloper, job: Developer, skill: ['python', 'perl','pascal']},
tabitha: {name: Tabitha Bitumen, job: Developer, skill: 'lisp', 'fortran','erlang']}]
부울 값
yes = true = True = TRUE
no = false = False = FALSE
YAML 작성 시 주의사항
-
콜론 YAML 구문 오류
foo: somebody said I should put a colon here: so I did 콜론 뒤에 콜론 기호
windows_drive: c: 콜론 뒤에 공백 -
해결방법: ' 작은 따옴표나, “ 큰 따옴표로 인용부호를 사용
foo: 'somebody said I should put a colon here: so I did'
windows_drive: 'c:' -
따옴표의 차이는 큰 따옴표는 안에서 탈출 문자를 사용할 수 있음
foo: "a \t TAB and a \n NEWLINE"
- 변수참조 할 때는 변수 명을 {{ }} 이중 중괄호를 사용
foo: "{{ variable }}" - 사전의 값 중 일부만 변수일 경우에도 값 전체를 큰 따옴표를 사용
foo: "{{ variable }}/additional/string/literal"
foo2: "c:\{{ variable }}\rest\of\path"
foo3: user is {{ variable }}
※역슬러쉬(\)를 보여주고 싶을 때에는 역슬러쉬 2개를 사용해야 된다. 역슬러쉬 뒤에 문자는 일반문자로 바뀐다. (ex: \")
-
문자열
: yes, true, no, false는 부울 값으로 예약되었다. 일반 문자열로 인식 하려면 인용
non_boolean: "yes"
other_string: "False" -
부동소수점
: 1.0은 부동 소수점 값으로, 이를 특정 버전을 지정해야 하는 경우 인용
version: "1.0"
플레이북 기본
플레이북은 하나 이상의 플레이를 가지고 있으며, 플레이는 작업을 실행하기 위한 특정 관리 노드 또는 그룹을 지정한다.
▪ 플레이에는 작업을 선언하며, 작업은 모듈을 호출
▪ 플레이북은 위에서부터 아래방향으로 순차적으로 진행된다.
YAML의 목록은 위에서 아래로 순서를 가짐
- 플레이북: 하나 이상의 플레이를 가짐
- 플레이: 하나 이상의 작업을 가짐
- 작업: 하나의 모듈과 모듈의 옵션/아규먼트를 지정
작업 실행 순서
① Ansible은 기본적으로 호스트의 패턴과 일치하는 모든 시스템에 대해 각 작업을 순서대로 실행
② 각 작업은 지정한 모듈 옵션을 사용하여 모듈을 실행
③ 하나의 작업이 호스트 패턴과 일치하는 모든 시스템에서 완료되면 다음 작업으로 이동
④ 특정 호스트에서 작업이 실패하면 해당 호스트는 작업이 더 남아 있더라도 제외
멱등성
-
수학이나 IT에서 연산의 한 성질을 나타내며, 연산을 여러 번 적용하더라도 결과가 달라지지 않는 성질을 의미
-
Ansible의 대부분 모듈은 원하는 최종 상태가 달성 되었는지 확인하고, 이미 원하는 최종 상태를 달성했다면 작업을 실행하지 않게 되는데 몇 번이고 작업을 반복 실행 하더라도 최종 상태가 변경되지 않기 때문에 멱등성을 가진다고 함.
-
모듈의 옵션에 따라 이러한 멱등성을 제공하지 않는 것도 있음.
: 멱등성을 제공하지 않는 모듈- 명령 관련 모듈: command, shell, raw
- service 모듈의 서비스 재시작
플레이북 실행 및 검증
-
플레이북 실행
ansible-playbook playbook.yml -
구문 체크
ansible-playbook playbook.yml --syntax-check -
체크 모드
ansible-playbook playbook.yml --check
: 체크 모드는 실제 실행이 아닌 모의 테스트(dry run)로 시뮬레이션을 진행
: 체크 모드는 관리 노드를 변경하지 않고 실행하고 모듈은 변경 사항을 보고함
: 검사모드를 지원하지 않는 모듈은 아무것도 보고하지 않으며 실행하지도 않음
-
차이점 모드
ansible-playbook playbook.yml --check --diff --limit foo.example.com
: 파일을 조작하는 모듈에서 변경 전 내용과 변경 후 내용을 출력 -
작업 목록 확인
ansible-playbook playbook.yml --list-tasks
: --list-tasks 옵션을 사용하면 플레이북의 플레이 목록 및 작업 목록을 확인할 수 있음 -
호스트 목록 확인
ansible-playbook playbook.yml --list-hosts
: --list-hosts 옵션을 사용하면 플레이북의 플레이 목록과 해당 플레이에 매칭되는 호스트 또는 그룹의 목록을 확인할 수 있음
-
Ansible Lint
ansible-lint playbook.yml
: 린트는 코드의 오류, 버그, 스타일 등을 점검하는 도구로 Ansible에
도 린트 도구를 사용할 수 있음
플레이북 작성요령
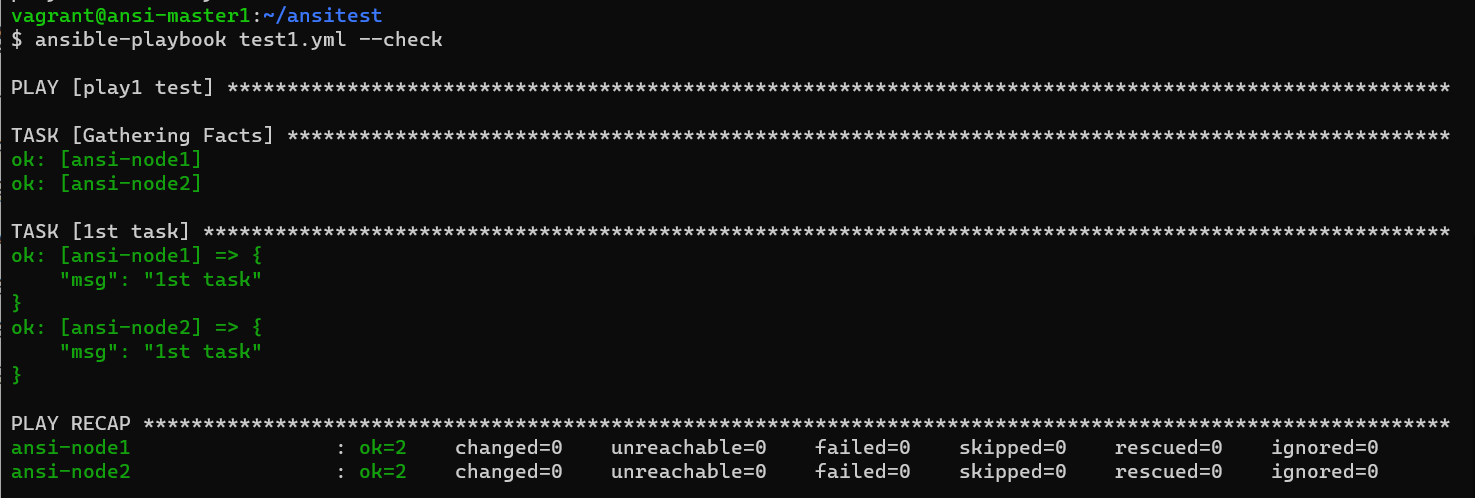
vi test1.yml

---
- name: play1 test  => 플레이 이름
  hosts: AA         => 플레이 대상
  tasks:            => 플레이 작업
  - name: 1st task
    debug:
      msg: "1st task"
...

# 구문 체크
ansible-playbook playbook.yml --syntax-check

# 체크 모드
ansible-playbook playbook.yml --check
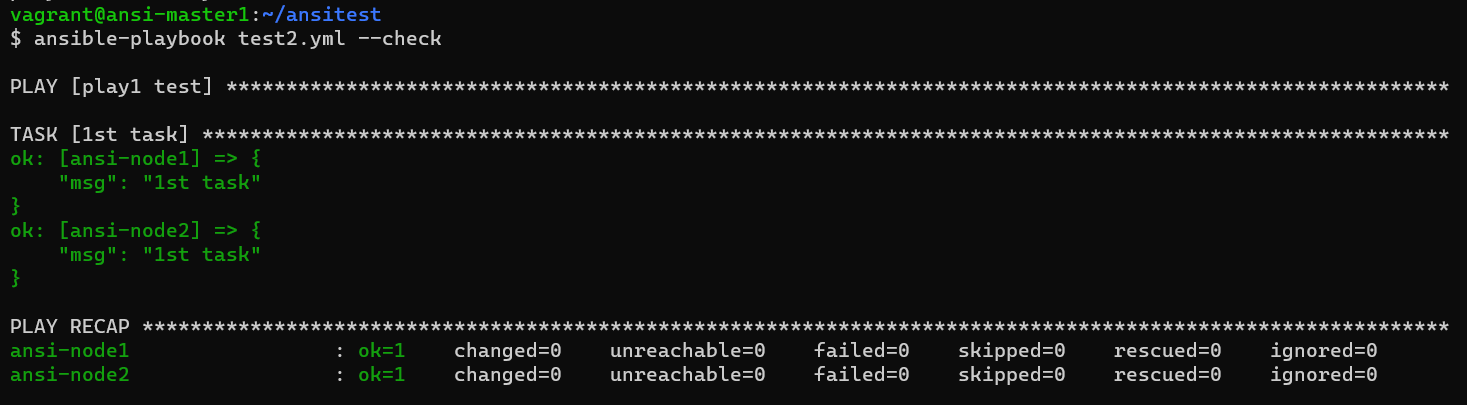
Gathering Facts
- Fact 라는 변수는 관리하는 대상의 기본 정보들을 담고 있는 변수
- Gathering Facts 를 실행시키지 않으려면 코드 수정
vi test2.yml

# 해당파일 불러오기
:r test1.yml

---
- name: play1 test
  hosts: AA
  gather_facts: no #0 false False FALSE 중 아무거나 가능, 추가
  tasks:
  - name: 1st task
    debug:
      msg: "1st task"
... 
다중 모듈: web 서비스 설치
작업에 대해서 여러 모듈을 실행한다.
mkdir files
echo "playbook test" > /home/vagrant/ansitest/files/index.html
============================
web-service.yml
---
- name: Install and start Apache HTTPD
hosts: BB
tasks:
- name: httpd package is present
apt:
name: apache2
update_cache: yes
state: present
- name: correct index.html is present
copy:
src: /home/vagrant/ansitest/files/index.html
dest: /var/www/html/index.html
- name: httpd is started
service:
name: apache2
state: started
enabled: true
...
# 구문 체크
ansible-playbook --syntax-check web-service.yml
# 설치, 체크로 진행하면 안됨!
ansible-playbook web-service.yml
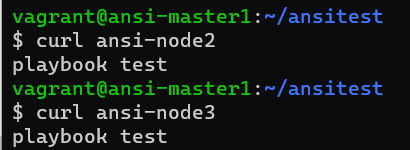
# 설치 확인, 미리 만들어두었던 'playbook' 화면이 나오는걸 볼 수 있음
vagrant@ansi-master1:~/ansitest
$ curl ansi-node2
playbook test
vagrant@ansi-master1:~/ansitest
$ curl ansi-node3
playbook test
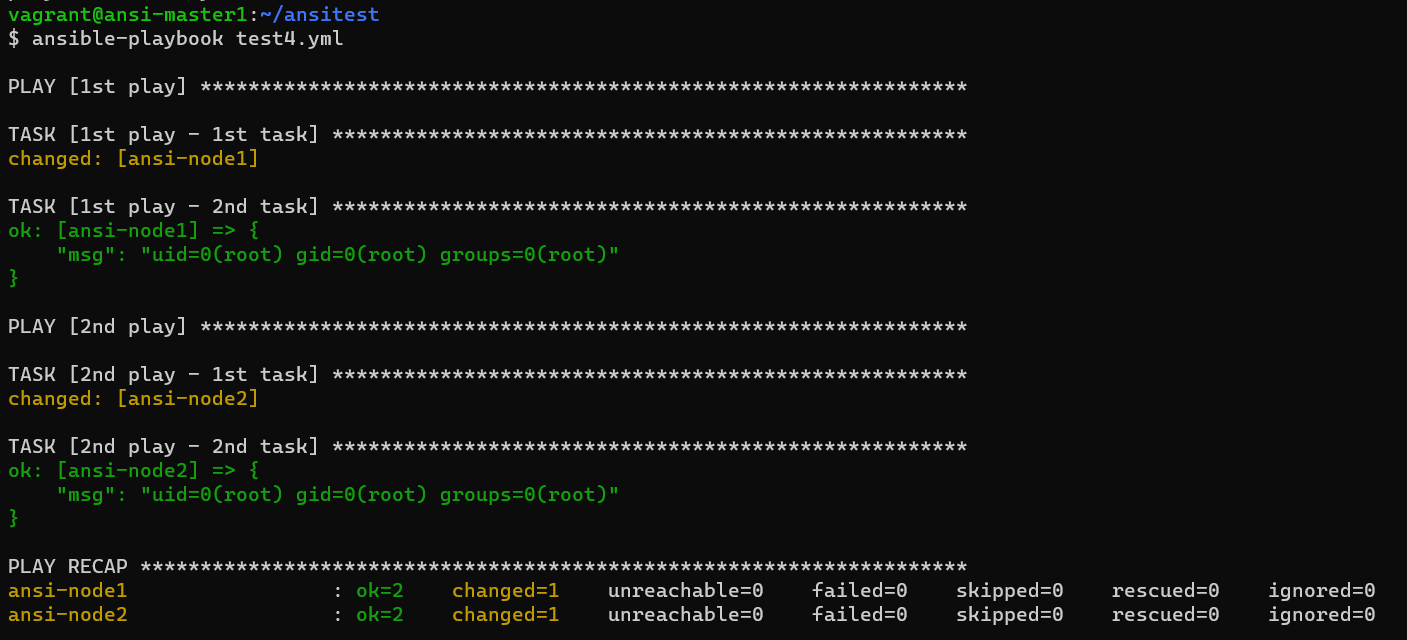
다중 작업: 기본 & http와 firewalld 실행
플레이를 설정함으로써 다중 작업이 가능하다.
- 기본적인 다중작업
vi test4.yml

- name: 1st play
  hosts: ansi-node1
  gather_facts: no
  tasks:
  - name: 1st play - 1st task
    command: id
    register: result1

  - name: 1st play - 2nd task
    debug:
      msg: "{{ result1.stdout }}"

- name: 2nd play
  hosts: ansi-node2
  gather_facts: no
  tasks:
  - name: 2nd play - 1st task
    command: id
    register: result2

  - name: 2nd play - 2nd task
    debug:
      msg: "{{ result2.stdout }}"
- 2nd play에 becom: no를 추가하면 2번째 paly가 vagrant로 되있는 것을 볼 수 있다.
- name: 2nd play
  hosts: ansi-node2
  gather_facts: no
  become: no
  tasks:
- http와 firewalld 실행
vi intranet.yml

---
- name: Enable intranet service
  hosts: ansi-node1
  tasks:
  - name: latest version of httpd and firewalld installed
    apt:
      pkg:
      - apache2
      - firewalld
      update_cache: yes
      state: latest

  - name: test html page is installed
    copy:
      content: "Welcome to the groupB intranet!\n"
      dest: /var/www/html/index.html

  - name: firewalld enabled and running
    service:
      name: firewalld
      enabled: true
      state: started

  - name: firewalld permits http service
    firewalld:
      service: http
      permanent: true
      state: enabled
      immediate: yes

  - name: httpd enabled and running
    service:
      name: apache2
      enabled: true
      state: started

- name: Test intranet web server
  hosts: ansi-node1
  become: no
  tasks:
  - name: connect to intranet web server
    uri:
      url: http://192.168.56.21
      return_content: yes
      status_code: 200

...


# 구문 확인
ansible-playbook --syntax-check intranet.yml

# 실행, -v: 자서한 결과 출력
ansible-playbook -v intranet.yml

# 결과 확인
vagrant@ansi-master1:~/ansitest
$ ssh ansi-node1 cat /var/www/html/index.html
Welcome to the groupB intranet!

Ansible의 변수
Ansible을 이용하여 시스템의 구성 관리를 자동화 할 수 있지만, 모든 시스템이 항상 같은 구성을 가지지 않고 경우에 따라 다른 구성을 가져야 할 수 있다. Ansible은 변수를 사용해 시스템 간 차이를 처리한다.
- 변수명
▪ 변수 이름에는 문자, 숫자, 밑줄 만 포함
▪ 이미 예약된 플레이북 키워드나 Python 키워드는 사용할 수 없음
▪ 변수는 숫자로 시작 불가
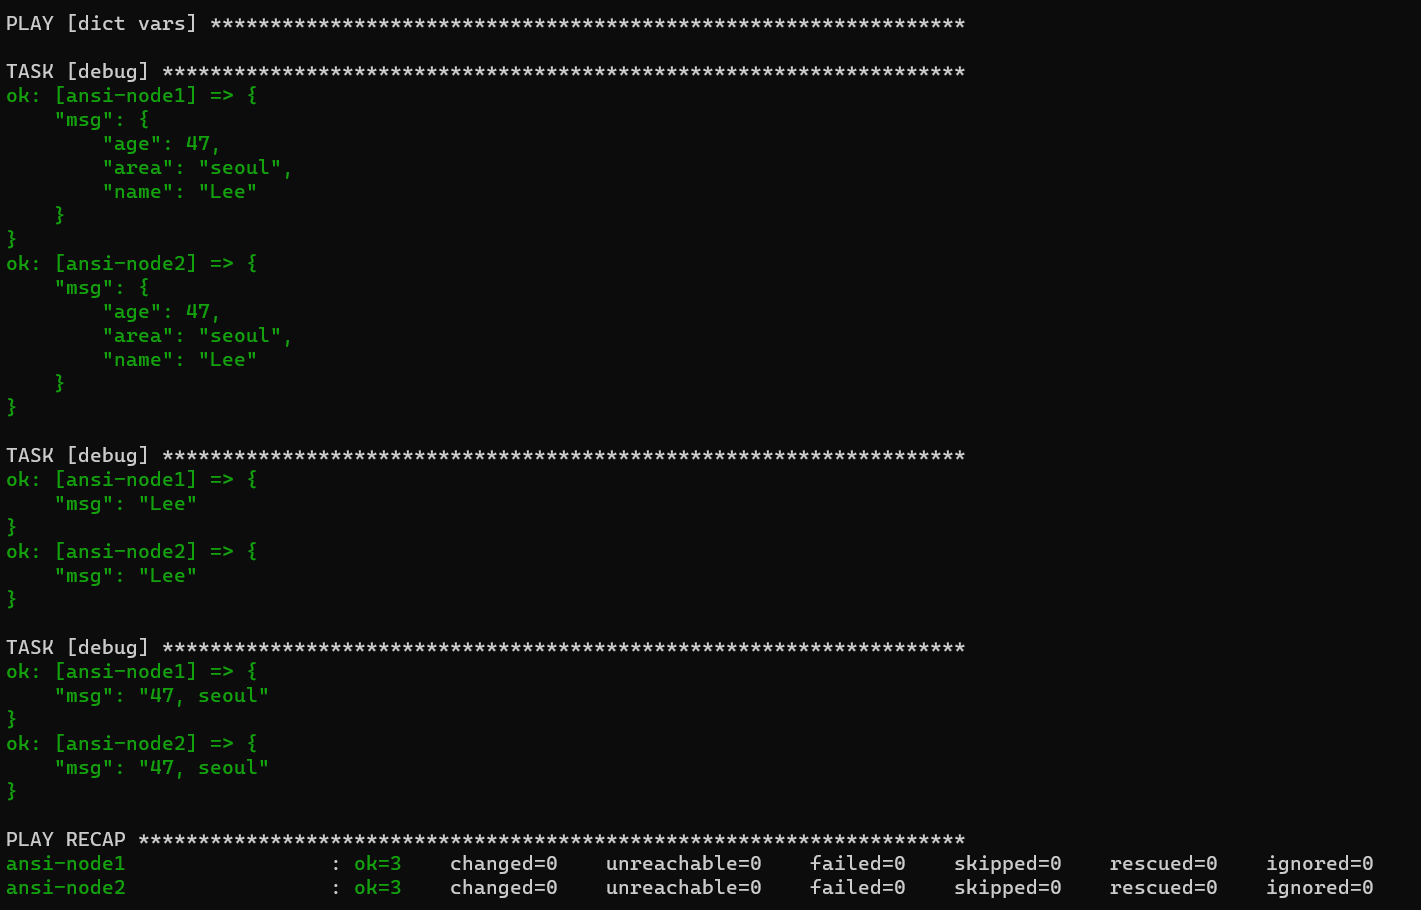
사전(dictionary) 변수 참조
• 목록 변수 참조시 key값을 이용해서 지정
• 키값 지정은 대괄호 표기법 ([]) 나 점 표기법(.) 를 이용
• 점 표기법 사용시 모듈에 따라 일부 키가 Python 사전의 속성 및 메서드와 충돌할 수 있음
- name: dict vars
  hosts: AA
  gather_facts: no
  vars:
    info:
      name: Lee
      age: 47
      area: seoul
  tasks:
  - debug:
      msg: "{{ info }}"
  - debug:
      msg: "{{ info.name }}"
  - debug:
      msg: "{{ info['age'] }}, {{ info.area }}"
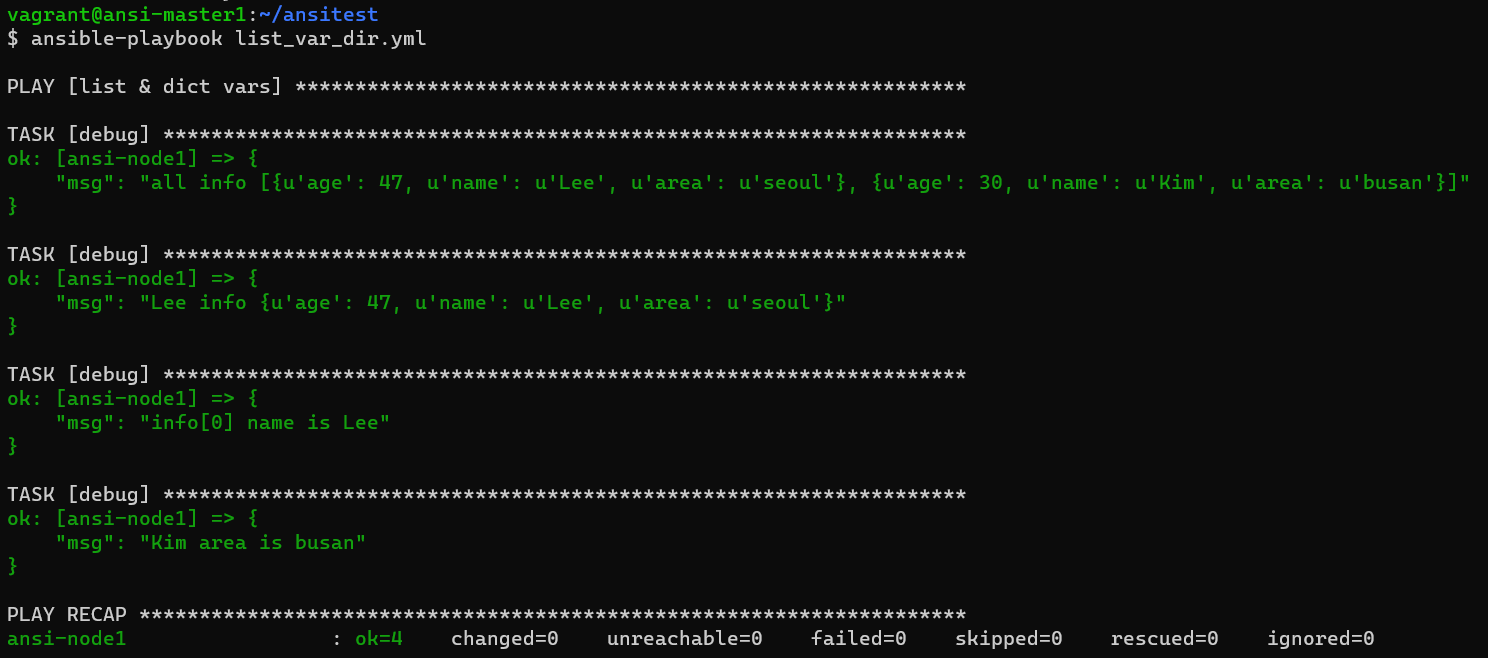
목록(list)와 사전(dictionary) 같이 사용
vi list_var_dir.yml

- name: list & dict vars
  hosts: ansi-node1
  gather_facts: no
  vars:
    infos:
    - name: Lee
      age: 47
      area: seoul
    - name: Kim
      age: 30
      area: busan
  tasks:
  - debug:
      msg: "all info {{ infos }}"
  - debug:
      msg: "Lee info {{ infos[0] }}"
  - debug:
      msg: "info[0] name is {{ infos[0].name }}"
  - debug:
      msg: "Kim area is {{ infos[1]['area'] }}"
등록 변수
등록 변수는 모듈의 반환 값을 저장하는 변수이다.
vi register_vars1

- name: resgister vasrs
  hosts: ansi-node1
  gather_facts: no
  tasks:
  - name: Input register vars
    command: "ls -la /home/vagrant"
    register: result

  - name: Output register vars
    debug:
      msg: "{{ result }}"

  # lines값만 출력하도록 설정
  - name: register vars stdout_lines
    debug:
      msg: "{{ result.stdout_lines}}"

 # 9번쨰 항목만 출력하도록 설정
  - name: stdout_lines[9] print
    debug:
      msg: "{{ result.stdout_lines[9] }}"


#실행
vagrant@ansi-master1:~/ansitest
$ ansible-playbook resgister_vars1.yml

PLAY [resgister vasrs] *********************************************************

TASK [Input register vars] *****************************************************
changed: [ansi-node1]

TASK [Output register vars] ****************************************************
ok: [ansi-node1] => {
    "msg": {
        "ansible_facts": {
            "discovered_interpreter_python": "/usr/bin/python3"
        },
        "changed": true,
        "cmd": [
            "ls",
            "-la",
            "/home/vagrant"
        ],
        "delta": "0:00:00.002319",
        "end": "2023-01-31 07:18:15.202598",
        "failed": false,
        "rc": 0,       # 정상적인 결과일 경우 0
        "start": "2023-01-31 07:18:15.200279",
        "stderr": "",
        "stderr_lines": [],
        "stdout": "total 36\ndrwxr-xr-x 6 vagrant vagrant 4096 Jan 31 05:17 .\ndrwxr-xr-x 4 root    root    4096 Jan 30 02:27 ..\ndrwx------ 3 vagrant vagrant 4096 Jan 31 05:17 .ansible\n-rw-r--r-- 1 vagrant vagrant  220 Jan 24 16:59 .bash_logout\n-rw-r--r-- 1 vagrant vagrant 3771 Jan 24 16:59 .bashrc\ndrwx------ 2 vagrant vagrant 4096 Jan 30 02:27 .cache\ndrwx------ 3 vagrant vagrant 4096 Jan 30 02:27 .gnupg\n-rw-r--r-- 1 vagrant vagrant  807 Jan 24 16:59 .profile\ndrwx------ 2 vagrant vagrant 4096 Jan 30 02:27 .ssh",
        "stdout_lines": [
            "total 36",
            "drwxr-xr-x 6 vagrant vagrant 4096 Jan 31 05:17 .",
            "drwxr-xr-x 4 root    root    4096 Jan 30 02:27 ..",
            "drwx------ 3 vagrant vagrant 4096 Jan 31 05:17 .ansible",
            "-rw-r--r-- 1 vagrant vagrant  220 Jan 24 16:59 .bash_logout",
            "-rw-r--r-- 1 vagrant vagrant 3771 Jan 24 16:59 .bashrc",
            "drwx------ 2 vagrant vagrant 4096 Jan 30 02:27 .cache",
            "drwx------ 3 vagrant vagrant 4096 Jan 30 02:27 .gnupg",
            "-rw-r--r-- 1 vagrant vagrant  807 Jan 24 16:59 .profile",
            "drwx------ 2 vagrant vagrant 4096 Jan 30 02:27 .ssh"
        ]
    }
}
# stdout: 한줄로 결과 출력, stdout_lines: 보기 쉽게 결과 출력


# lines값만 출력하도록 설정
TASK [register vars stdout_lines] **********************************************
ok: [ansi-node1] => {
    "msg": [
        "total 36",
        "drwxr-xr-x 6 vagrant vagrant 4096 Jan 31 05:17 .",
        "drwxr-xr-x 4 root    root    4096 Jan 30 02:27 ..",
        "drwx------ 3 vagrant vagrant 4096 Jan 31 05:17 .ansible",
        "-rw-r--r-- 1 vagrant vagrant  220 Jan 24 16:59 .bash_logout",
        "-rw-r--r-- 1 vagrant vagrant 3771 Jan 24 16:59 .bashrc",
        "drwx------ 2 vagrant vagrant 4096 Jan 30 02:27 .cache",
        "drwx------ 3 vagrant vagrant 4096 Jan 30 02:27 .gnupg",
        "-rw-r--r-- 1 vagrant vagrant  807 Jan 24 16:59 .profile",
        "drwx------ 2 vagrant vagrant 4096 Jan 30 02:27 .ssh"
    ]
}

TASK [stdout_lines[9] print] ***************************************************
ok: [ansi-node1] => {
    "msg": "drwx------ 2 vagrant vagrant 4096 Jan 30 02:27 .ssh"
}

PLAY RECAP *********************************************************************
ansi-node1                 : ok=4    changed=1    unreachable=0    failed=0    skipped=0    rescued=0    ignored=0
변수 심화 실습
vim play_vars_example.yml

- name: Deploy and start Apache HTTPD service
  hosts: AA
  vars:
  #options = { pkg : [ apache2 , firewalld ] , states : [ present , latest , started , enabled ] , bools : [ yes , no ] , rule : http } 해당 내용대로 변수 생성할 것
    options:
      pkg:
      - apache2
      - firewalld
      states:
      - present
      - latest
      - started
      - enabled
      bools:
      - yes
      - no
      rule: http
    #rule:
    # - http   rule: [http]

  tasks:
    - name: Required packages are installed and up to date
      apt:
        name:
          - "{{ options.pkg[0] }}"  # web package
          - "{{ options.pkg[1] }}"  # 방화벽 package
        state: "{{ options.states[1] }}" # 마지막 버전 지정

    - name: The web service is started and enabled
      service:
        name: "{{ options.pkg[0] }}"
        enabled: "{{ options.bools[0] }}" # 활성화 여부 True
        state: "{{ options.states[2] }}"     #  service 시작

    - name: The firewalld service is started and enabled
      service:
        name: "{{ options.pkg[1] }}"
        enabled: "{{ options.bools[0] }}" # 활성화 여부 True
        state: "{{ options.states[2] }}"     #  service 시작


    - name: Web content is in place  # copy 모듈을 이용해서 파일 생성
      copy:
        content: "Example web content"  # content 키워드로 파일 내용 작성
        dest: /var/www/html/index.html  # content의 내용으로 해당 경로에 파일 생성

    - name: "The {{ options.rule }} port for web is open"   # name 키워드에도 변수 사용 가능
      firewalld:
        service: "{{ options.rule }}"   # 포트를 열고자 하는 서비스명
        permanent: "{{ options.bools[0] }}"  #  영구 설정 여부
        immediate: "{{ options.bools[0] }}"   #  런타임 설정
        state: "{{ options.states[3] }}"   # 활성화 상태
변수 위치 정의
▪ 인벤토리
▪ 플레이북
▪ 재사용 가능 파일(외부 참조 파일)
▪ 역할
▪ 명령의 -e옵션
인벤토리 - 호스트 변수형태
atlanta:
  host1:
    http_port: 80
    maxRequestsPerChild: 808
  host2:
    http_port: 303
    maxRequestsPerChild: 90
인벤토리 - 그룹 변수형태
atlanta:
  host:
    host1:
    host2:
  vars:
    ntp_server: ntp.atlanta.example.com
    proxy: proxy.atlanta.example.com
플레이북 - 파일 내에 변수 지정
- 플레이에 vars 키워드를 사용하여 변수를 정의
vars.yml
---
- name: vars test
  hosts: all
  gather_facts: no
  vars:
    - username: play
  tasks:
    - debug:
        msg: "{{ username }}"

...

ansible-playbook vars.yml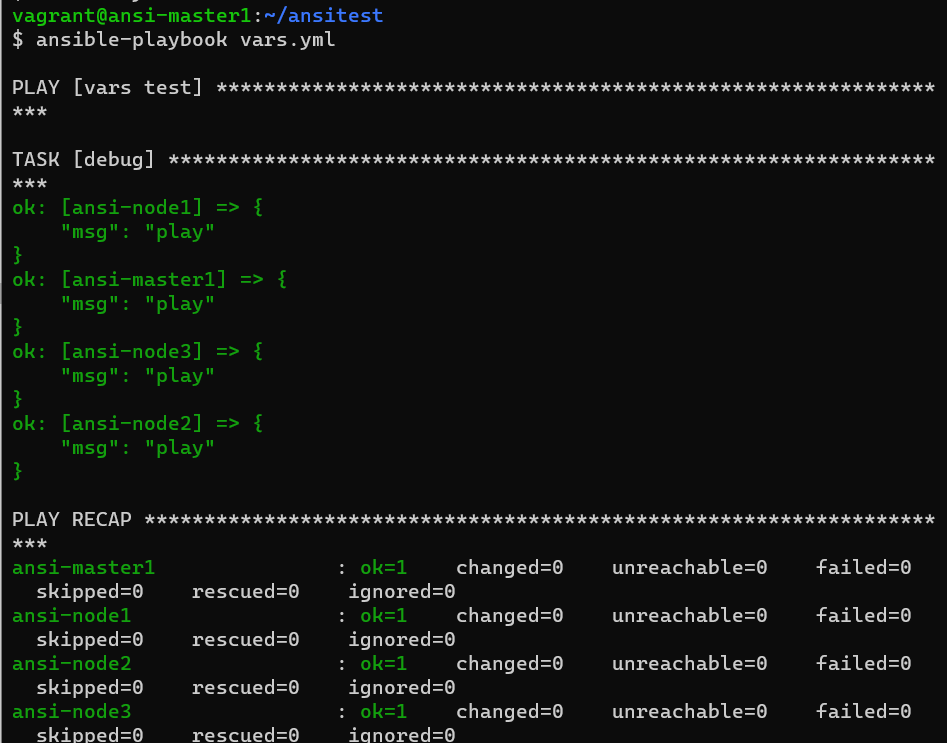
플레이북 – 변수 파일 생성
- 플레이에 vars_files 키워드를 사용하여 변수 파일을 포함할 수 있음
- 변수 파일은 YAML 형식으로 작성
# 변수파일 생성

vi testvar.yml

username: varsfiles

========================================

vi vars.yml

---
- name: vars test
  hosts: AA
  gather_facts: no
  vars_files:
  - testvar.yml
  tasks:
    - debug:
        msg: "{{ username }}"

...

ansible-playbook vars.yml

변수 우선순위
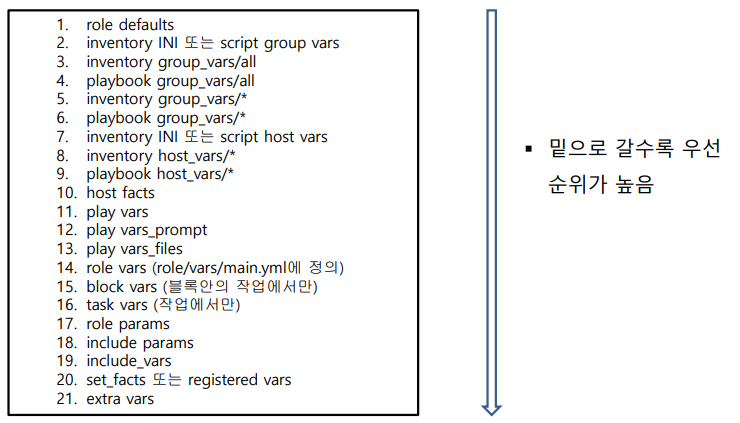
변수 범위
- group_vars/all: 모든 호스트에 공통적으로 적용할 변수 설정
- group_vars/<specific_group>: 특정 호스트 그룹에 공통적으로 적용할 변수 설정
- host_vars/< host >: 특정 호스트에만 적용할 변수 설정
- 플레이 또는 역할에서 만 적용할 변수 설정
- 특정 작업에만 적용할 변수 설정
ansible을 이용한 파일 및 디렉토리 생성
vi mk.yml
---
- name: make file and directory
hosts: ansi-node1
gather_facts: no
tasks:
- name: make directory
file:
path: "/tmp/testdir1/testdir2"
state: directory
recurse: yes
owner: bin
group: bin
- name: make file
file:
path: "/tmp/testdir1/testdir2/test1.txt"
state: touch
owner: vagrant
group: vagrant
- name: input test.txt data
lineinfile:
dest: "/tmp/testdir1/testdir2/test1.txt"
line: "make file and dir1"
- name: create file
copy:
content: "mask file and dir2"
dest: "/tmp/testdir1/testdir2/test2.txt"
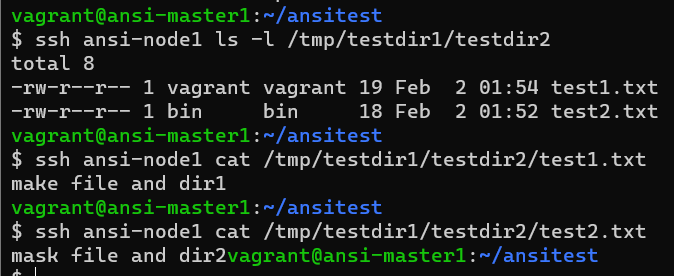
ansible-playbook mk.yml
#실행 결과 확인
ssh ansi-node1 ls -l /tmp/testdir1/testdir2
ssh ansi-node1 cat /tmp/testdir1/testdir2/test1.txt
ssh ansi-node1 cat /tmp/testdir1/testdir2/test2.txt