
웹 컴포넌트
웹 컴포넌트는 커스텀 컴포넌트를 만들기 위한 표준이다.
커스텀 컴포넌트는 사용자 정의 HTML 구조, 캡슐화 된 스타일, 자체 속성 및 메서드 등을 정의할 수 있다.
컴포넌트의 조건
- 컴포넌트 클래스(ES6 class 문법)
- 컴포넌트 클래스 내부에서만 관리되는 DOM 구조(캡슐화)
- 컴포넌트 클래스에만 적용되는 CSS 스타일(캡슐화)
- 다른 컴포넌트와 인터랙션 하기 위한 이벤트, 클래스, 메서드 등의 API
필요한 기술 사양
| 기술 사양 | 설명 |
|---|---|
| Custom elements | 커스텀 HTML 요소를 정의하는데 사용한다. |
| Shadow DOM | 컴포넌트 내부에 감춰진 DOM을 생성하는데 사용된다. |
| CSS Scoping | 컴포넌트 Shadow DOM 내부에만 적용되는 스타일을 선언하는 데 사용된다. |
| Event retargeting | 컴포넌트 개발 환경에 적합하게 만드는 데 사용된다. |
커스텀 요소
자체 속성(메서드 포함) 및 이벤트 등을 사용해 클래스에 기술된 커스텀 HTML 요소를 만들 수 있다.
커스텀 요소가 정의(define)되면 다른 HTML 표준 요소(예: <div>)와 동일하게 사용할 수 있다.
웹 컴포넌트 예시
class EuidInput extends HTMLElement {
  constructor() {
    // 요소가 생성될 때 호출된다.
    // HTMLElement를 확장하여 super()가 반드시 필요!
    super();

    // 섀도우 돔 트리를 연결하고 이에 대한 참조 반환
    // mode: open은 루트 외부의 자바스크립트에서 접근을 가능하게 해줌
    this.attachShadow({ mode: 'open' });
  }

  connectedCallback() {
    // 요소가 문서에 추가될 때 이 메서드 호출
    // 요소가 반복적으로 추가/제거될 경우 수차례 호출
  }

  disconnectedCallback() {
    // 요소가 문서에서 제거될 때 브라우저는 이 메소드를 호출
    // 요소가 반복적으로 추가/제거될 경우 수차례 호출
  }

  // static 메서드
  static get observedAttributes() {
    return [
      /* 변경을 관찰할 속성 이름 배열 */
    ];
  }

  // React와 같이 속성이 변경됨에 따라 callback으로 관리
  attributeChangedCallback(name, oldValue, newValue) {
    // observedAttributes()에 등록된 속성 중 값이 변경되면 호출
  }

  adoptedCallback() {
    // 요소가 새 문서로 이동되면 호출
    // document.adoptNode에서 발생하며, 거의 사용되지 않는다.
  }

  // 사용자가 정의한 속성 및 메서드를 작성할 수 있습니다.
  // ...
}
브라우저가 인식할 수 있도록 커스텀 요소 이름과 클래스를 정의한다.
customElements.define('euid-input', EuidInput);항상 뒤에 클래스가 와야하며 define으로 정의시 소문자
케밥 케이스로 정의한다.
HTML 문서에서 커스텀 요소를 사용할 때는 다음과 같이 작성한다.
<euid-input />JavaScript를 사용해 커스텀 요소를 생성할 수도 있다.
const euidInputNode = document.createElement('euid-input');웹 컴포넌트 동적으로 마운트
<script>
  // [미션]
  // 위에 HTML로 작성된 euid-counter 커스텀 요소를 프로그래밍 방식으로 생성한 후,
  // .demo 요소 내부에 마운트 하여 컴포넌트를 렌더링 합니다.

  // 컴포넌트가 존재한다면? 컴포넌트를 렌더링 하자.
  let componentName = 'euid-counter';
  customElements.whenDefined(componentName).then(() => {
    const createdCustomElement = document.createElement(componentName);
    createdCustomElement.setAttribute('min', 1);
    createdCustomElement.setAttribute('count', 3);
    createdCustomElement.setAttribute('max', 10);
    document.querySelector('.demo:last-of-type').append(createdCustomElement);
  });
</script>
whenDefined 메서드는 이름있는 요소가 정의되었다면 resolve하는 프로미스를 반환한다. 따라서
euid-counter이름의 커스텀 요소가 정의되었다면, 위 코드와 같은 컴포넌트들을 만들어.demo클래스의 마지막에 동적으로 마운트 시킨다.
그러나 이 과정에서 static get obsetvedAttributes 메서드와 attributeChangedCallback이 존재하지 않는다면 버튼을 클릭하여 값이 변해도 min과 max값을 초과하여 내부의 카운트 값이 변경된다.
EunidCounter/index.js
// [미션]
// 프로그래밍 방식으로 업데이트 된 속성을 감지하여
// 각 속성 값을 컴포넌트의 props에 업데이트 합니다.
// 속성 관찰
static get observedAttributes() {
  return ['min', 'max', 'step', 'count'];
}

// 속성 관찰 후 이것들을 props에 값을 넣어줌
attributeChangedCallback(name, oldValue, newValue) {
  this.props[name] = newValue;
}
위와 같은 코드를 작성하여 속성을 관찰할 props들을 설정하고, 만약 이 속성들 중 변경된것이 있다면
attributeChangedCallback으로 값을 변경한다.
컨테이너 컴포넌트(stateful)
컨테이너 컴포넌트란?
React가 제공하는 컴포넌트 유형 중 클래스 컴포넌트는 컨테이너 컴포넌트로서 사용됨
이와 반대되는 용어 -> presentational 컴포넌트 (예전의 함수형 컴포넌트), 그러나 지금은 React hooks로 인해 state를 가질 수 있음
이렇게 컴포넌트의 역할을 프레젠테이셔널, 컨테이너로 분리해 각각의 고유한 책임을 부여하여 컴포넌트 재사용성을 높이고, 디버깅을 손쉽게 처리한다.
React의 주된 작업은 애플리케이션 상태를 가져와 DOM 노드로 전환하는 것이다.
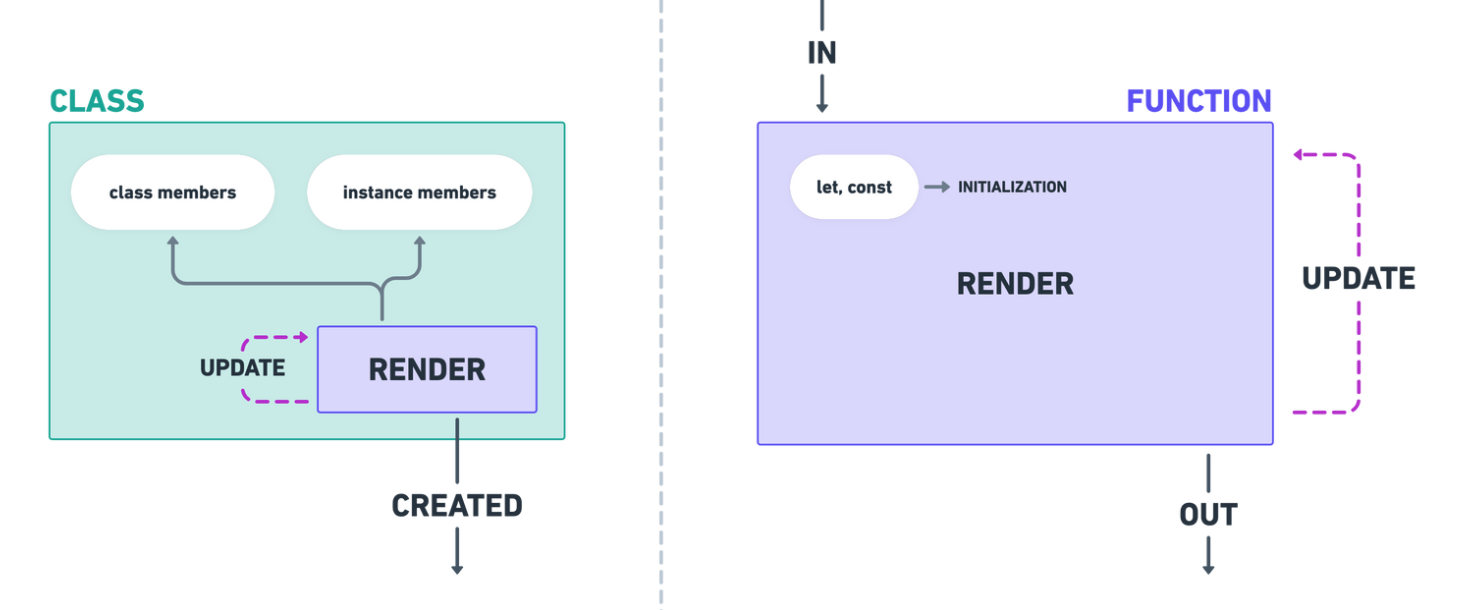
클래스 컴포넌트는 함수형 컴포넌트와 달리 인스턴스 멤버(프로퍼티)로 전달 속성(Props), 상태(State)를 가진다.
참고: https://ko.reactjs.org/docs/react-component.html#instance-properties
컴포넌트가 다시 렌더링 될 때, 함수형 컴포넌트는 함수 몸체가 다시 실행되지만 클래스형 컴포넌트는 render메서드만 다시 실행
prop vs. state
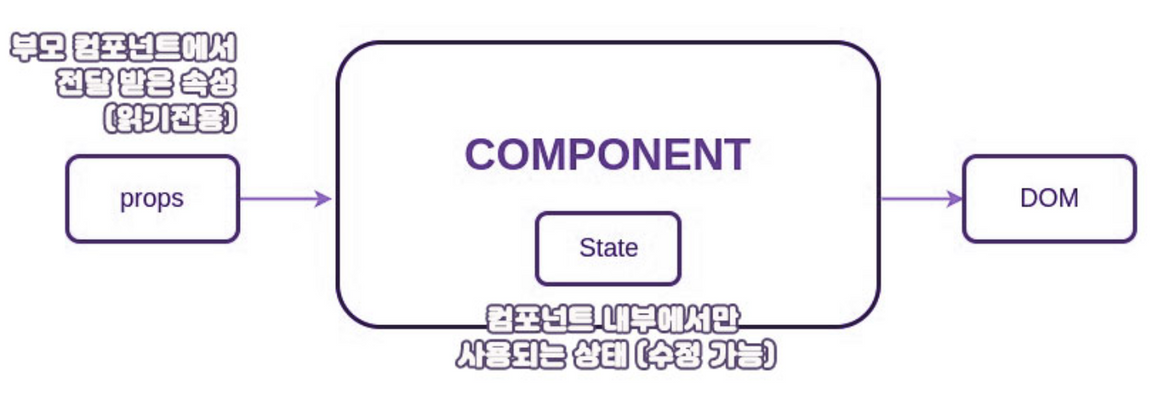
prop은 외부(부모)로 부터 전달 받아 사용하므로 읽기 전용으로 값을 업데이트 할 수 없다.
state는 변경 가능한 데이터(상태)로 업데이트가 필요한 컴포넌트는 상태를 설정해 사용한다. 이 경우 state는 컴포넌트가 소유한 로컬 데이터로 적용 범위는 현재 컴포넌트이다.
실제 실습
cra(creat-react-app)을 통해 환경구성
npx create-react-app .안의 파일중 reportWebVitals 는 나중에 배포를 하고 사용 --> WebVitals에 대한 보고를 함
// static method (sync)
import reportWebVitals from './reportWebVitals';
이는 동기 방식이기 때문에 dynamic import로 async방식으로 바꿔보자.
import('./reportWebVitals')
  .then(({ default: reportWebVitals }) => reportWebVitals(console.log))
  .catch(({ message }) => console.error(message));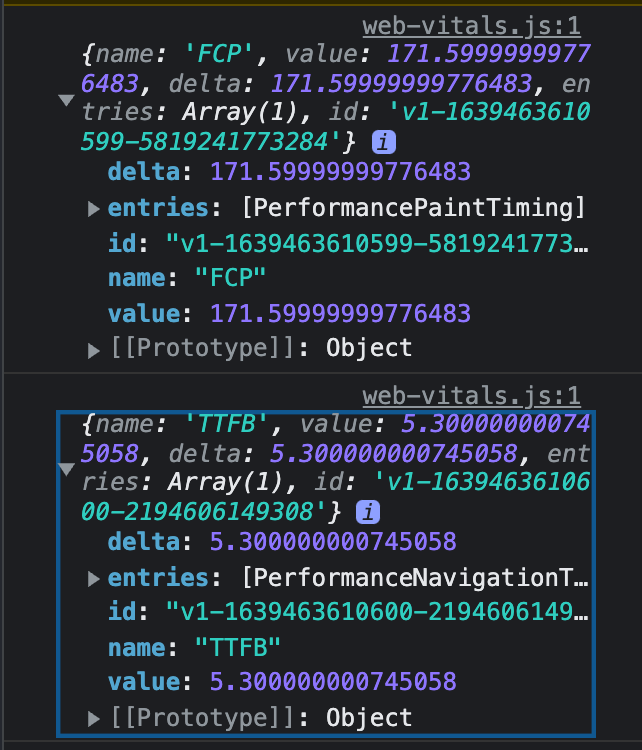
다음과 같은 Web Vitals에 대한 정보를 확인할 수 있다.
이는 빌드를 하고 나중에 사용하는 것이기 때문에process.env가production일때 사용!
index.js
// React 앱은 Node.js 환경에서 컴파일 되므로
// process.env를 사용할 수 있다.
const { NODE_ENV: devOrProdMode } = process.env;

// 빌드 할 때만, reportWebvitals 모듈 동적 호출
if (devOrProdMode.includes('production')) {
  // dynamic import (async)
  // reportWebVitals();
  import('./reportWebVitals')
    .then(({ default: reportWebVitals }) => reportWebVitals(console.log))
    .catch(({ message }) => console.error(message));
}
Header 만들기
import React from 'react';
import { ReactComponent as ReactLogo } from '../../assets/logo.svg';

// stateful component
export class AppHeader extends React.Component {
  constructor(props) {
    super(props);

    // 컴포넌트 상태 설정
    this.state = {
      brand: {
        label: 'React',
        className: 'App-logo',
      },
      description: '',
      learnLink: {
        className: 'App-link',
        href: 'https://reactjs.org',
        text: 'Learn React',
        isExternal: true,
      },
    };
  }

  render() {
    const {
      brand: { label, className },
      learnLink,
    } = this.state;
    return (
      <header className='App-header'>
        <ReactLogo title={label} className={className} />
        <p>
          Edit <code>src/App.js</code> and save to reload.
        </p>
        <a
          className={learnLink.className}
          href={learnLink.href}
          target={learnLink.isExternal && '_blank'}
          rel={learnLink.isExternal && 'noopener noreferrer'}
        >
          {learnLink.text}
        </a>
      </header>
    );
  }
}
위의
constructor내부에 상태this.state를 정의할 수 있지만 클래스 필드를 사용하여constructor없이 정의할 수 있다.
export class AppHeader extends React.Component {
  ...
  // 이렇게 되면 constructor 생략 가능!
  // 컴포넌트 상태 설정
  this.state = {
    brand: {
      label: 'React',
      className: 'App-logo',
    },
    description: '',
    learnLink: {
      className: 'App-link',
      href: 'https://reactjs.org',
      text: 'Learn React',
      isExternal: true,
    },
  };
클래스 필드는 아직 표준은 아니지만 컴파일 과정에서 Babel이 처리하여 바로 사용이 가능하다.
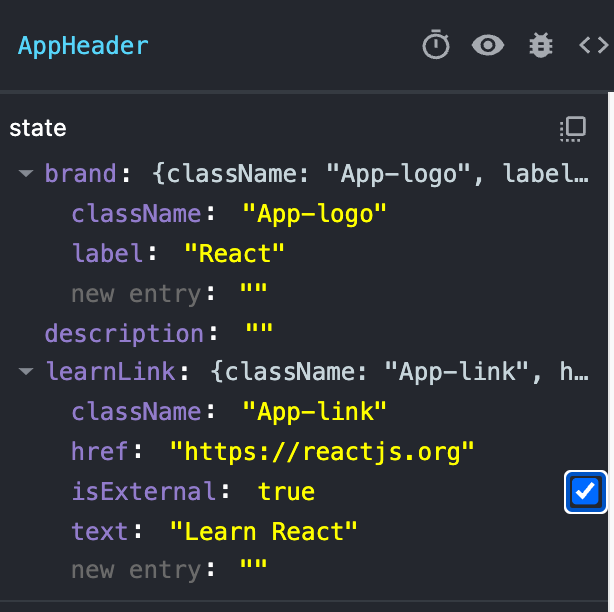
웹을 열고 다음의 화면을 볼 수 있는데, 리액트 dev tool 확장을 설치하였다면,
Component탭에 들어가서isExternal이라는 상태의 체크버튼을 눌러 상태에 따라 화면을 변화시킬 수 있다.
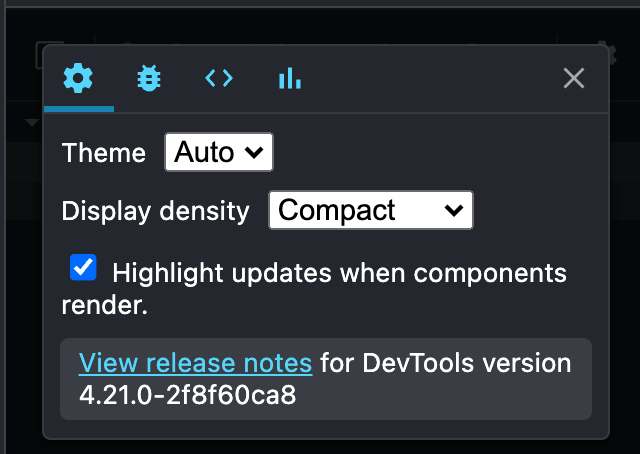
위 Highlight updates when ~ 이것을 체크하면 화면에서 재 렌더링 될때, 더 알아보기 쉽게해준다.
AppHeader.js
...

// stateful component
export class AppHeader extends React.Component {

  // 컴포넌트 상태 설정
  this.state = {
    ...
    description: 'Edit <code>src/App.js</code> and save to reload.',
  };

  render() {
    const {
      brand: { label, className },
      description,
      learnLink,
    } = this.state;
    return (
      ...
        <p>{description}</p>
      ...
    );
...
다음과 같이
AppHeader를 만들게 되면description의<code>태그가 JSX에 의해 그대로 문자열로 들어가게 된다.
따라서 다음과 같이 메서드로 만들면 되기는 한다.
  getDescription() {
    return ['Edit', ' ', <code key='appEntryFile'>src/App.js</code>, ' ', 'and save to reload.'];
  }
이를 위한 플러그인이 따로 존재한다고 한다.
클래스 컴포넌트 상태 업데이트
클래스에서 상태변경 메서드로 setState()를 사용한다.

참고사이트: https://ko.reactjs.org/docs/react-component.html#setstate
setState() 에 전달되는 updater는 함수 타입 설정도 가능하며 2번째 인자로 콜백 함수를 전달할 수 있다. (클래스 인스턴스 메서드 또한 가능)

setState의 2번째 인자로 콜백이 필요한 이유는 setState의 작동방식이 비동기 방식이기 때문에 모든 상태가 안정적으로 업데이트 된 이후, 실행하도록 콜백함수를 React에서 제공한다.

constructor에서 setState메서드를 호출하는 것은 무의미하며, render 부분에서 상태를 업데이트 하면 절대로 안되는 이유가 리액트는 상태가 변하면 render가 다시 되기 호출하여 화면에 그려지기 때문에 무한루프에 빠지게 된다.
클래스 컴포넌트 라이프 사이클
자주 사용되는 라이프 사이클
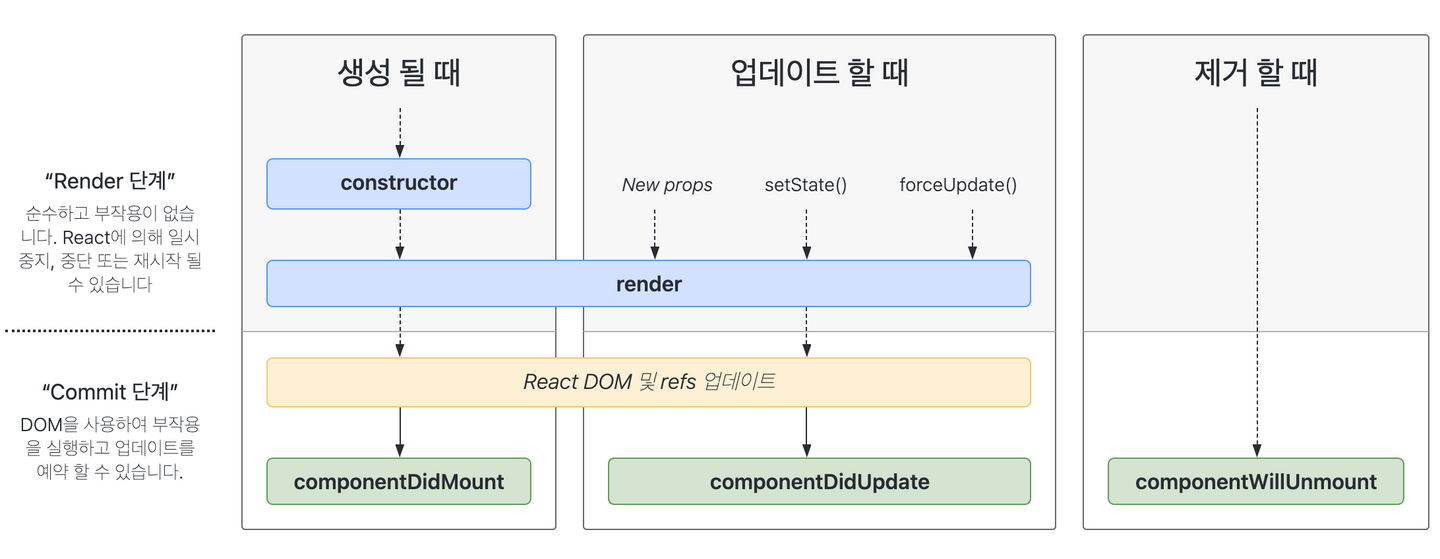
- constructor -> 컴포넌트 생성 시점에 호출
- render -> 컴포넌트 렌더링 시점에 호출
- componentDidMount -> DOM에 마운트 된 이후 시점에 호출
- componentDidUpdate -> 컴포넌트 업데이트 이후 시점에 호출
- componentWillUnMount -> 컴포넌트 제거 예정 시점에 호출
  // 라이프 사이클 메서드
  // 명령형 프로그래밍
  // 컴포넌트가 실제 DOM에 마운트 된 이후 실행
  componentDidMount() {
    console.log('컴포넌트가 실제 DOM에 마운트 된 이후 실행');
    // DOM 노드에 접근 가능 여부

    console.log('componentDidmount', document.querySelector('.App-header'));

    // 컴포넌트 상태 업데이트 (시간의 흐름에 따라 제어)
    setTimeout(() => {
      console.log('1000ms 지남', this); // 여기서 this는 컴포넌트 인스턴스
    }, 1000);
  }
라이프 사이클 이후 dom에 접근이 가능하여 접근성 고려한 웹을 만들 수 있음
명령형 프로그래밍을 사용해 유지/보수 하거나, 또는 접근성을 준수해야 할 때 사용되는 라이프 사이클 메서드 componentDidmount와 componentDidUpdate 이다.
이 이후 새로 업데이트가 되는 경우 3가지가 존재한다.
- new props
- setState()
- forceUpdate()
jQuery를 리액트에 적용시켜보기
yarn add jquery
모듈로 불러왔기 때문에 전역에서 정의되진 않았음
componentDidmount에 제이쿼리 코드 작성
// jQuery를 사용해 명령형 프로그래밍
$('.App-header').animate(
  {
    opacity: 0.1,
  },
  {
    duration: 1000,
  }
);
적용되는 것을 확인할 수 있음.
componentWillMount의 작동과정을 보기 위해 상위 컴포넌트 App을 class컴포넌트로 바꾸기
import './App.css';
import { Component } from 'react';

// stateless component(presentational) -> stateful component
// functional -> class
export default class App extends Component {
  state = {
    isShowHeader: true,
  };
  render() {
    return (
      <div className='App'>
        {this.state.isShowHeader ? this.props.children : '이런... 자식 노드가 없습니다.'}
      </div>
    );
  }
}
componentDidUpdate 상태 확인

참고사이트: https://ko.reactjs.org/docs/react-component.html#componentdidupdate
  componentDidUpdate(prevProps, prevState) {
    console.log('컴포넌트가 업데이트 되었습니다!!');
    console.log('이전 props 또는 state', { props: prevProps, state: prevState });
    console.log('현재 props 또는 state', { props: this.props, state: this.state });
  }
자주 사용되지 않는 라이프 사이클
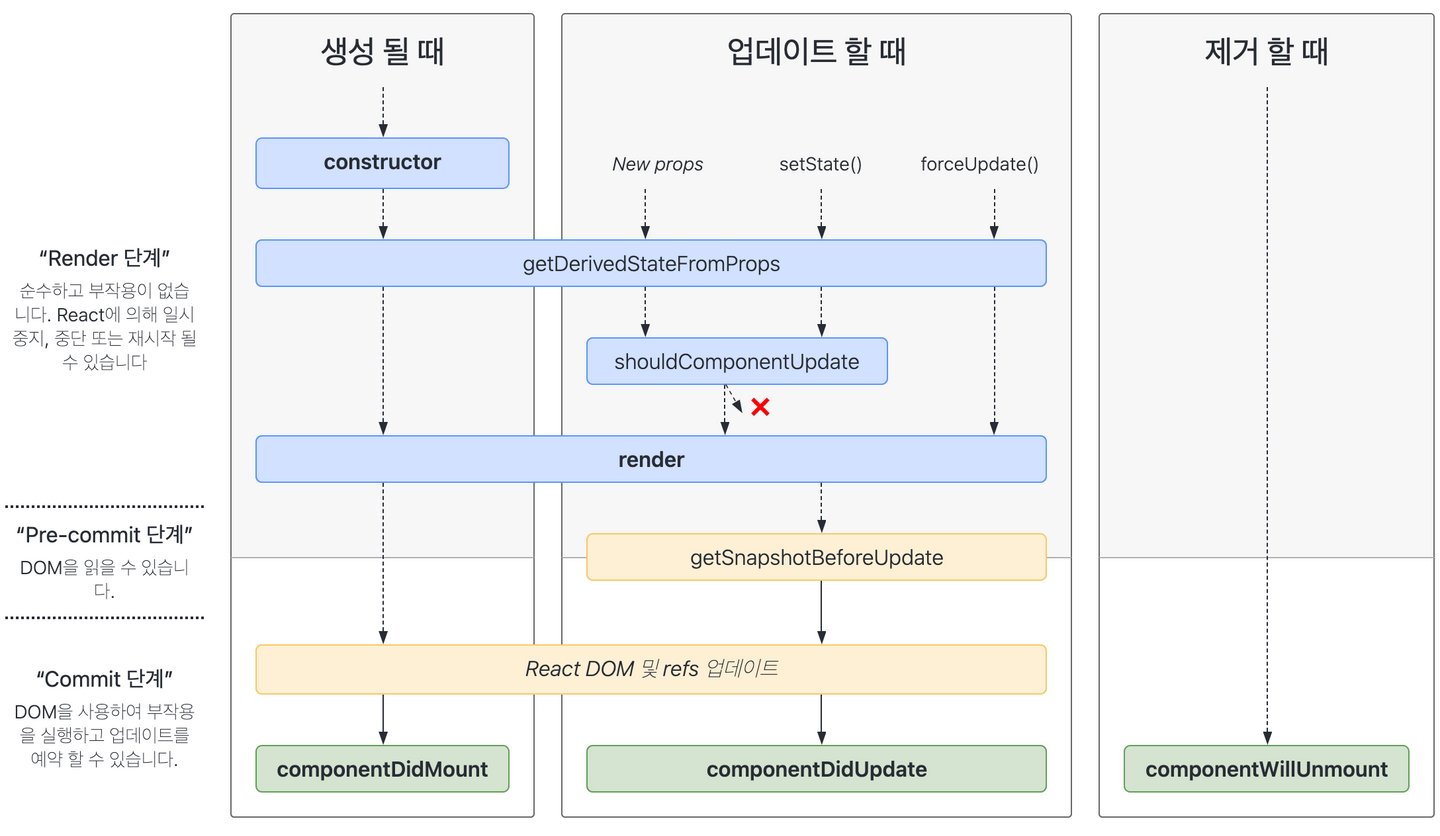
- getDerivedStateFromProps -> 전달된 상태 및 속성을 가져와 설정하는 시점에 호출
- shouldComponentUpdate -> 컴포넌트 업데이트 예정 시점에 호출(렌더링 or 렌더링 안함)
- getSnapshotBeforeUpdate -> 컴포넌트 업데이트 전 스냅샷 가져오는 시점에 호출
getDerivedStateFromProps
  static getDerivedStateFromProps(props, state) {
    // 이 안에서 this 인스턴스에 접근 X
    // 반환하는 것은 컴포넌트의 상태에 합성할 파생 상태(객체)
    return {
      count: props.count ?? 100,
    };
  }
getDerivedStateFromProps --> static 메서드라 this 접근 불가하여 파라미터로 접근을 해야됨
파생 상태 생성이 필요한 경우
1. props를 통해 state 업데이트
2. props와 state를 비교해 일치하지 않아 state 업데이트
cra에서 절대경로설정
참고 사이트: https://create-react-app.dev/docs/importing-a-component/#absolute-imports
webpack에서의 절대 경로 설정
참고: https://webpack.kr/configuration/resolve/#resolvealias
state 끌어올리기
shouldComponentUpdate 실습
참고 사이트: https://ko.reactjs.org/docs/lifting-state-up.html#gatsby-focus-wrapper
  shouldComponentUpdate(nextProps, nextState) {
    // 조건 확인 (비교)
    // props, state(with derivedState)
    // console.log('현재 props 또는 state', this.props, this.state);
    // console.log('다음 props 또는 state', nextProps, nextState);

    // 부모로부터 전달 받은 props의 brand.label 값이 바뀌면
    // 컴포넌트 렌더링을 하지 않는다.
    if (nextProps.brand.label !== this.props.brand.label) {
      // render() 미실행
      console.log('부모 컴포넌트의 리 렌더링 요청을 묵살한다.');
      return false;
    }

    // 상황 1.
    // 이전 props와 다음 props의 차이가 없다.
    // 굳이 재조정 알고리즘에 의해 다시 렌더링 될 필요가 없다.

    // render() 실행
    return true;
  }
shouldComponentUpdate() --> 오로지 성능 최적화만을 위한 것. 렌더링을 방지하는 목적으로 사용하는 경우 버그로 이어짐
원래 가지고 있는 brand.label을 부모로 lifting state up을 하여 넘겨주고 부모에서 props을 받아 조건에 따른 처리를 해줄 수 있음
참고 자료: https://ko.reactjs.org/docs/react-component.html#shouldcomponentupdate
getShanpShotBeforeUpdate
모션 UI쪽에서 많이 활용됨
특히 채팅 어플리케이션 구현 시 이를 작성하지 않으면 UI가 약간 삐그덕 하는 방식으로 작동되는 것을 볼 수 있음
getSnapshotBeforeUpdate(prevProps, prevState) {
  // DOM 노드에 접근 후, 정보 값을 읽기
  // 읽은 정보 값을 스냅샷 반환
  // snapshot (꼭 object가 아닐 수도 있음)
  return {
    name: 'this is snapshot',
    version: '0.1.2',
  };
}
참고 사이트: https://ko.reactjs.org/docs/react-component.html#getsnapshotbeforeupdate
