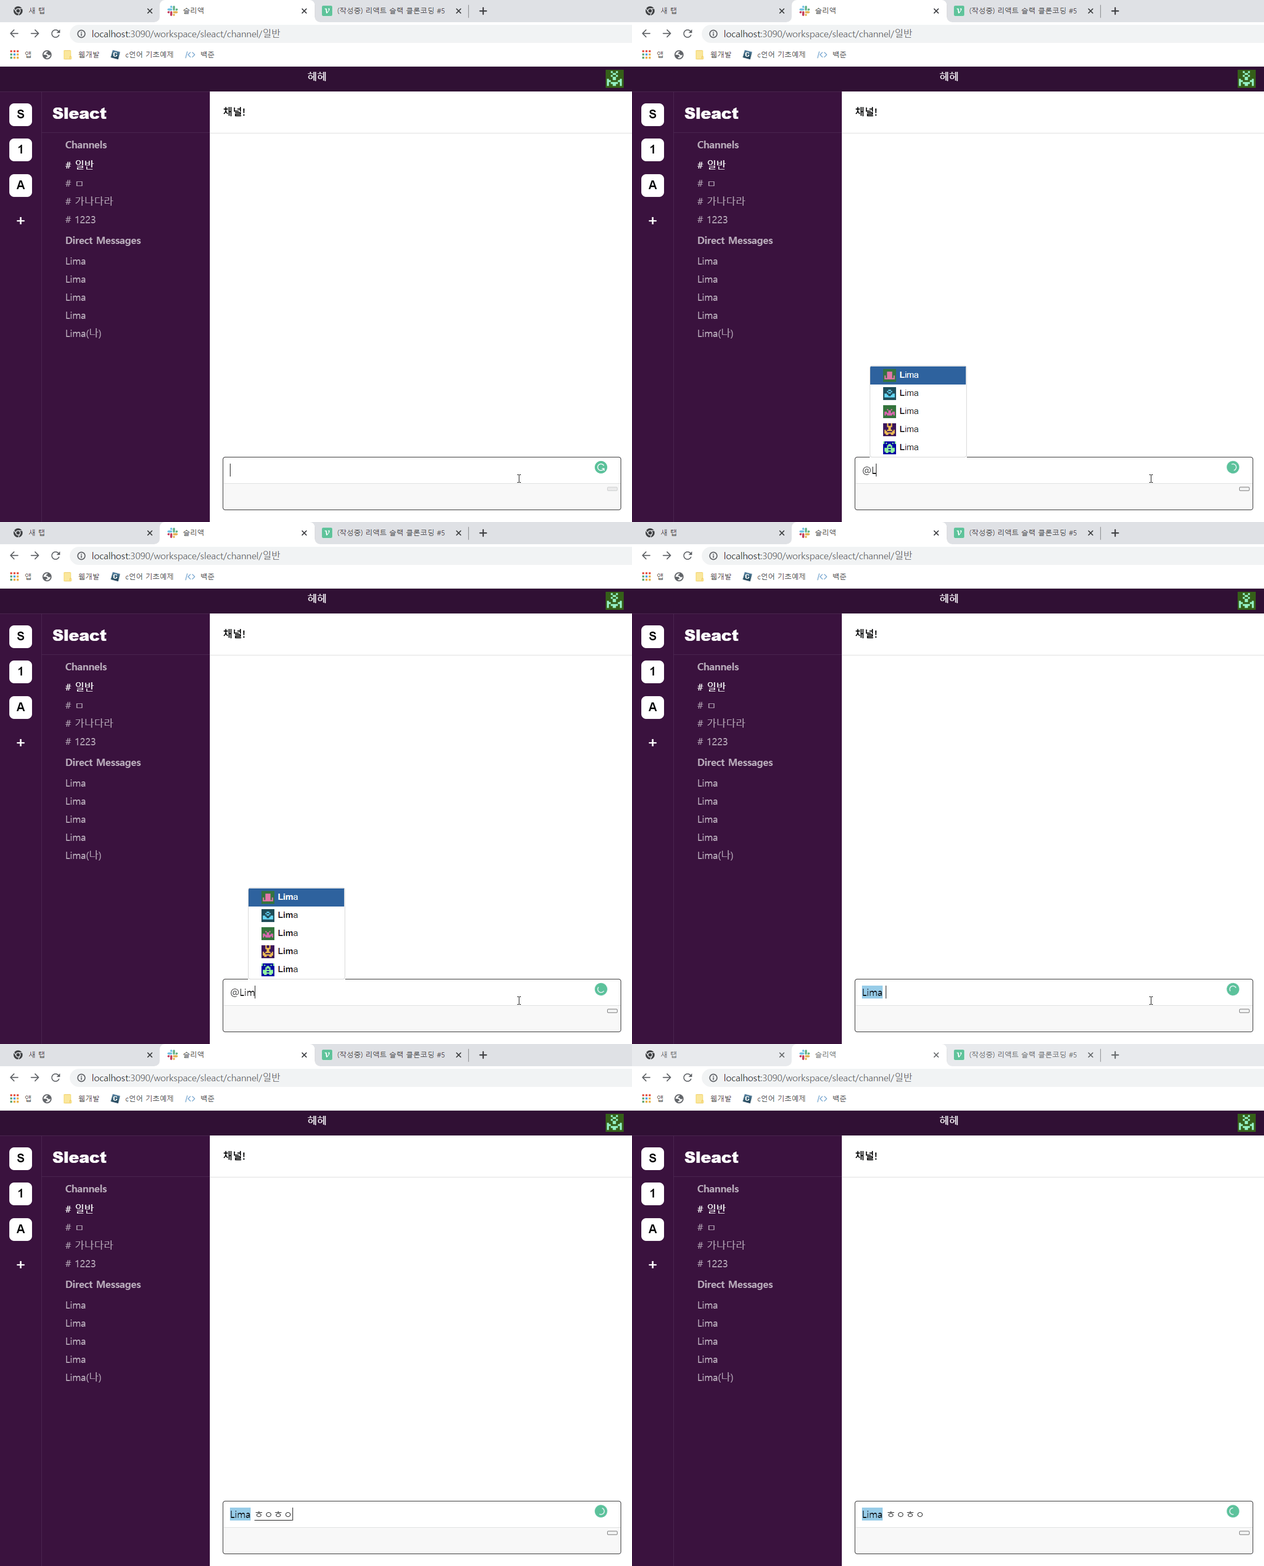
배운 것 :
Props 로 받은 값들은 deps 인자에 넣어주는 걸 잊지 말자
(useEffect, useCallback 같은 hook의 두번째 인자를 deps라고 부른다)
ChatBox/index.tsx
const ChatBox:VFC<Props> =({chat,onSubmitForm,onChangeChat,placeholder}) =>{
    // state 를 관리하는 게 아니라 태그에 직접 접근하고 싶을 때 ref 를 쓴다
    const textareaRef=useRef<HTMLTextAreaElement>(null)
    useEffect(()=>{
        if(textareaRef.current){
            autosize(textareaRef.current);
        }
    },[])
    const onKeydownChat = useCallback((e)=>{
        if(e.key==='Enter'){
            if(!e.shiftKey){
                e.preventDefault();
                onSubmitForm(e);
            }
        }
    },[onSubmitForm])
    // 여기선 deps가 onSubmitForm
WebSocket // 웹소켓이란?
실시간으로 서버와 데이터를 주고 받을 때 사용한다.
기존에 프론트 → 서버 , 서버 → 프론트 단방향 방식(논폴링)이였다면
웹소켓을 이용하여 양방향 방식으로 사용할 수 있다.
아래와 같이 사용한다.
import io from 'socket.io-client';
import React, {useCallback} from 'react';
import axios from 'axios';

const backUrl = 'http://localhost:3095';

const sockets:{[key: string]: SocketIOClient.Socket} = {}; // [key:string] 은 workspace 인데 어떤 데이터가 들어오든 문자열이면 된다 라는뜻
const useSocket = (workspace?:string) => {
    const disconnect = useCallback(() => {
        if (workspace) {
            sockets[workspace].disconnect();
            delete sockets[workspace]; // 연결 끊을 때
        }
    },[workspace]);

    if(!workspace){
        return [undefined,disconnect];
    }
    sockets[workspace] = io.connect(`${backUrl}/ws-${workspace}`);
    sockets[workspace].emit('hello','world'); // ← 데이터 보내기
    // 서버로 hello 라는 이벤트명으로 world 라는 데이터를 보낸다
    sockets[workspace].on('message',(data)=>{ // ← 데이터 전송하기
        console.log(data);
    })
    // 서버측에서 프론트에서 데이터가 오면 message 라는 이벤트에 콜백함수 적용

    return [sockets[workspace], disconnect]
}

export default useSocket;
스크롤바를 구현하려면 react-custom-scrollbars 를 설치해준다.
명령 프롬프트에 npm install react-custom-scrollbars --save 를 실행해준다.
타입스크립트는 npm i --save-dev @types/react-custom-scrollbars 를 실행해준다.
scrollbars 는 아래와 같이 사용한다.
import Chat from '@components/Chat';
import { IDM } from '@typings/db';
import React, { useCallback, useRef, VFC } from 'react';
import Scrollbars from 'react-custom-scrollbars';
import { ChatZone, Section } from './styles';

interface Props{
    chatData?:IDM[];
    // undefined 가 '?' 를 붙여줘서 걸러진다
}

const ChatList:VFC<Props>=({chatData})=>{
    const scrollbarRef = useRef(null);
    const onScroll = useCallback(()=>{

    },[])

    return (
        <ChatZone>
            <Scrollbars autoHide ref={scrollbarRef} onScrollFrame={onScroll}>
            {chatData?.map((chat)=>(
                <Chat key={chat.id} data={chat}/>
            ))}
            </Scrollbars>
        </ChatZone>
    )
}

export default ChatList;
채팅창에 '@hw0201203' 이런 식으로 태그 언급? 하는 라이브러리
명령프롬프트에 npm i react-mentions 를 실행해 주자.
타입스크립트로 할 경우 npm i --save-dev @types/react-mentions 도 실행한다
아래처럼 사용한다
ChatBox/index.tsx
import {Mention} from 'react-mentions'

...(생략)...

    return(
        <ChatArea>
            <Form onSubmit={onSubmitForm}>
                <MentionsTextarea id="editor-chat" value={chat} onChange={onChangeChat} onKeyDown={onKeydownChat} placeholder={placeholder} ref={textareaRef}>
                    <Mention
                        appendSpaceOnAdd
                        trigger="@"
                        data={memberData?.map((v)=>({id:v.id,display:v.nickname})) || []}
                        renderSuggestion={renderSuggestion}
                    />
                </MentionsTextarea>
...(생략)...
styled components 에 관한 내용
함수를 호출하는 방법에는 여러가지가 있다.
function a() 가 있으면
a()
a.call();
a.apply();
a.bind();
등등 이런 방식으로 호출할 수 있는데
a``;
로 호출하는 방식도 있다!
이 방식을 태그드 탬플릿 리터럴이라고 부른다.
사실 styled components를 써서 만드는 css는 함수라고 볼 수 있다!
또한 탬플릿 안에다가 아래처럼 변수에 함수를 넣을 수도 있다!
export const EachMention = styled.button<{ focus: boolean }>`
  padding: 4px 20px;
  background: transparent;
  border: none;
  display: flex;
  align-items: center;
  color: rgb(28, 29, 28);
  width: 100%;
  & img {
    // & : nested selector
    margin-right: 5px;
  }

  ${({ focus }) =>
    focus &&
    `
    background: #1264a3;
    color: white;
  `};
`;
위의 gif의 ChatBox에 적용된 소스코드이다.
ChatBox/index.tsx
...(생략)...
    return(
        <ChatArea>
            <Form onSubmit={onSubmitForm}>
                <MentionsTextarea
                    id="editor-chat"
                    value={chat}
                    onChange={onChangeChat}
                    onKeyDown={onKeydownChat}
                    placeholder={placeholder}
                    inputRef={textareaRef}
                    allowSuggestionsAboveCursor
                >
                    <Mention
                        appendSpaceOnAdd
                        trigger="@"
                        data={memberData?.map((v)=>({id:v.id,display:v.nickname})) || []}
                        renderSuggestion={renderSuggestion}
                    />
                </MentionsTextarea>
...(생략)...