
Spring Security : 스프링 기반의 애플리케이션에서 보안을 위한 표준, 다양한 요구사항을 쉽게 추가하고 변경할 수 있음
Spring Security와 OAuth2 클라이언트
- id/password 방식으로 로그인 구현 시 많은 기능(보안 / 비밀번호 찾기,변경 / 회원정보 변경 / 인증 등)을 직접 구현해야함
- OAuth 로그인 구현 시 직접 구현해야 하는 많은 기능들을 구글, 페이스북, 네이버에 맡기면 되니 서비스 개발에 집중할 수 있음
1. 구글 서비스 등록
- 구글 서비스에서 발급된 인증정보를 통해서 로그인 기능/소셜 서비스 기능을 사용할 수 있음
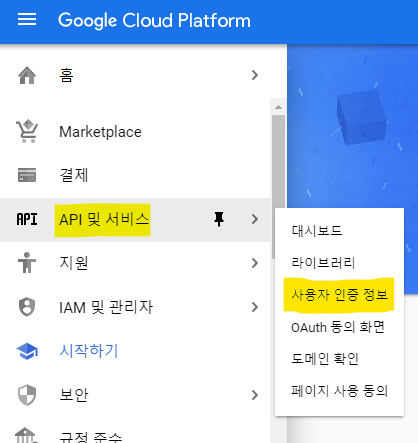
1.1 구글 사용자 인증정보 생성하기
-
구글 클라우드 플랫폼으로 이동하여 프로젝트 선택 탭 클릭

-
새 프로젝트 버튼 클릭

-
프로젝트 이름 작성

-
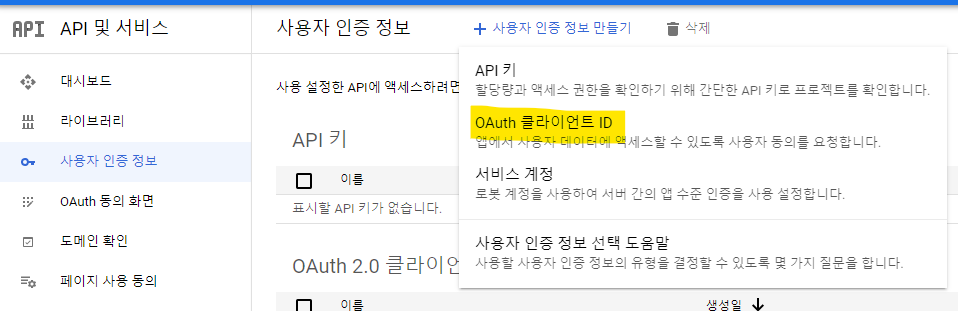
API및 서비스 > 사용자 인증 정보 클릭
-
사용자 인증 정보 만들기 버튼 클릭

-
OAuth 클라이언트 ID 항목 클릭
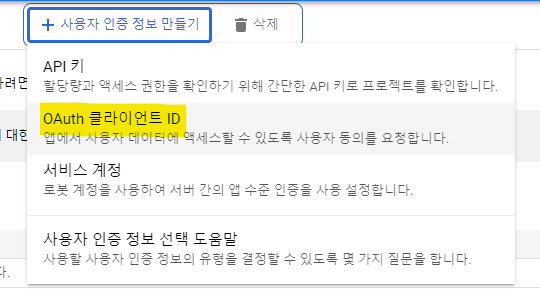
-
동의 화면 구성 클릭
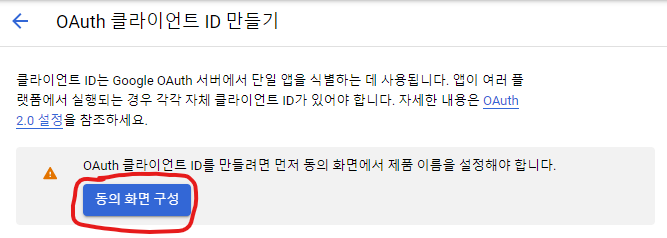
-
앱 정보 작성
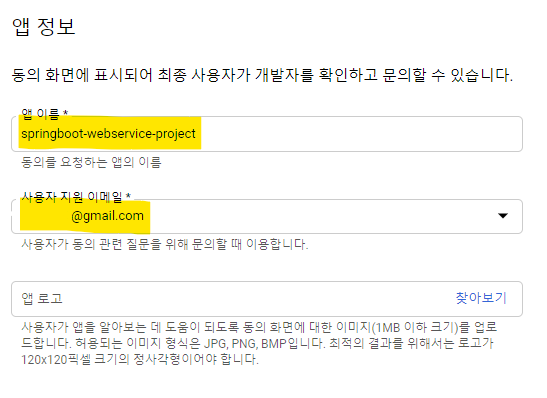
-
지원 이메일 작성

-
기본 범위 추가 -> 다 만든 후 대시보드로 이동


-
OAuth 클라이언트 ID 만들기 클릭
-
웹 애플리케이션 클릭
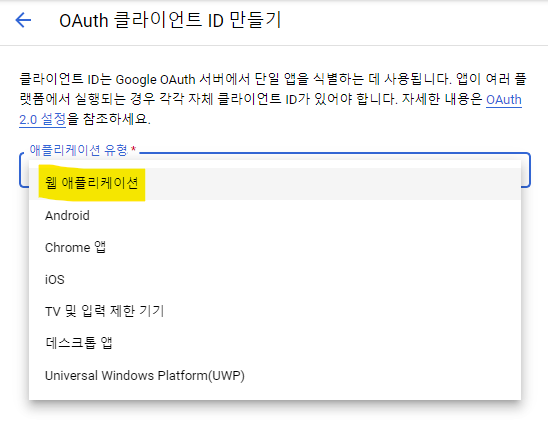
-
승인된 리디렉션 URI 입력

-
생성된 클라이언트 확인

1-2. 클라이언트 ID/비밀번호 프로젝트 설정하기
src/main/resources에 application-oauth.properties 파일 생성
spring.security.oauth2.client.registration.google.client-id=구글클라이언트ID
spring.security.oauth2.client.registration.google.client-secret=구글클라이언트시크릿
spring.security.oauth2.client.registration.google.scope=profile,email
- scope를 별도로 등록하지 않으면 기본값은 openid, profile, emial이다.
- 여기서 profile, email을 scope로 강제로 등록한 이유는 openid라는 scope가 있으면 Open Id Provider로 인식하기 때문이다.
- 이렇게 되면 OpenId Provider인 서비스(구글)와 그렇지 않은 서비스(네이버 등)로 나눠서 각각 OAuth2Service를 만들어야 한다.
- 하나의 OAuth2Service로 사용하기 위해 일부러 openid scope를 빼고 등록한다.
properties 파일 관리
- 스프링부트에서는 properties의 이름을 application-xxx.properties로 만들면 xxx라는 이름의 profile이 생성되어 관리할 수 있음
- profile = xxx 방식으로 호출하면 해당 properties의 설정들을 가져올 수 있음
- 그래서 스프링부트의 기본 설정 파일인 application.properties에서 application-oauth.properties를 포함하도록 구성함
application.properties에spring.profiles.include=oauth코드를 추가해 줌
.gitignore파일에 등록
- 구글 로그인을 위한 클라이언트 ID/비밀번호는 보안상 중요한 정보들
- git hub에 연동해서 사용하다보니 노출될 가능성이 높음
- 그래서 .gitignore 파일에 등록하여 application-auth.properties 파일이 업로드 되는것을 방지해야 함
.gitignore파일에application-oauth.properties코드 추가
1-3. 구글 로그인 연동하기
User 클래스 생성
domain > user패키지 생성
@Getter
@NoArgsConstructor
@Entity
public class User extends BaseTimeEntity {
    @Id
    @GeneratedValue(strategy = GenerationType.IDENTITY)
    private Long id;

    @Column(nullable = false)
    private String name;

    @Column(nullable = false)
    private String email;

    @Column
    private String picture;

    @Enumerated(EnumType.STRING)
    @Column(nullable = false)
    private Role role;

    @Builder
    public User(String name, String email, String picture, Role role) {
        this.name = name;
        this.email = email;
        this.picture = picture;
        this.role = role;
    }

    public User update(String name, String picture) {
        this.name = name;
        this.picture = picture;

        return this;
    }

    public String getRoleKey() {
        return this.role.getKey();
    }
}@Enumerated(EnumType.STRING): JPA로 데이터베이스를 저장할 때 enum값을 String으로 저장 될 수 있도록 선언함
Enum 클래스 Role 생성 (각 사용자의 권한 관리)
@Getter
@RequiredArgsConstructor
public enum Role {
    GUEST("ROLE_GUEST", "손님"),
    USER("ROLE_USER", "일반 사용자");

    private final String key;
    private final String title;
}- 스프링 시큐리티에서는 권한 코드에 항상 ROLE_이 앞에 있어야만 함
UserRepository 생성
public interface UserRepository extends JpaRepository<User, Long> {
    Optional<User> findByEmail(String email);
}findByEmail: email을 통해 이미 생성된 사용자인지 판단하기 위한 메소드
build.gradle에 스프링 시큐리티 의존성 추가
compile('org.springframework.boot:spring-boot-starter-oauth2-client')
SecurityConfig 클래스 생성
config.auth패키지를 생성 - 시큐리티 관련 클래스는 모두 이곳에 담으면 됨
@RequiredArgsConstructor
@EnableWebSecurity
public class SecurityConfig extends WebSecurityConfigurerAdapter {

    private final CustomOAuth2UserService customOAuth2UserService;

    @Override
    protected void configure(HttpSecurity http) throws Exception {
        http
                .csrf().disable()
                .headers().frameOptions().disable()
                .and()
                .authorizeRequests()
                .antMatchers("/", "/css/**", "/images/**", "/js/**", "/h2-console/**", "/profile").permitAll()
                .antMatchers("/api/v1/**").hasRole(Role.USER.name())
                .anyRequest().authenticated()
                .and()
                .logout()
                .logoutSuccessUrl("/")
                .and()
                .oauth2Login()
                .userInfoEndpoint()
                .userService(customOAuth2UserService);
    }
}@EnableWebSecurity: Spring Security 설정들을 활성화시켜줌.csrf().disable().headers().frameOptions().disable(): h2-console 화면을 사용하기 위해 해당 옵션들은 disabled 해줌.authorizeRequests(): URL별 권환 관리를 설정하는 옵션의 시작점.antMatchers(): 권한 관리 대상을 지정하는 옵션으로 URL, HTTP 메소드별로 관리가 가능함.permitAll(): 지정된 URL들에게 전체 열람 권한을 주는 옵션.antMatchers("/api/v1/**").hasRole(Role.USER.name()): "api/v1/** " 주소를 가진 api는 user 권한을 가진사람만 접근 가능하도록 함.anyRequest(): 설정된 값들 이외의 나머지 URL.authenticated(): 나머지 URL들은 모두 인증된 사용자(로그인한 사용자)들에게만 허용하는 옵션.logout().logoutSuccessUrl("/"): 로그아웃 기능에 대한 설정 진입점, 로그아웃 성공시 / 주소로 이동.oauth2Login(): OAuth2 로그인 기능에 대한 설정의 진입점.userInfoEndpoint(): OAuth2 로그인 성공 이후 사용자 정보를 가져올 때의 설정을 담당하는 옵션.userService(): 소셜 로그인 성공 시 후속 조치를 진행할 UserService 인터페이스의 구현체를 등록함
CustomOAuth2UserService 클래스 생성
- 해당 클래스는 구글 로그인 후 가져온 사용자의 정보(email, picture, name 등)을 기반으로 가입 및 정보수정, 세션 저장등의 기능을 지원함
@RequiredArgsConstructor
@Service
public class CustomOAuth2UserService implements OAuth2UserService<OAuth2UserRequest, OAuth2User> {
    private final UserRepository userRepository;
    private final HttpSession httpSession;

    @Override
    public OAuth2User loadUser(OAuth2UserRequest userRequest) throws OAuth2AuthenticationException {
        OAuth2UserService delegate = new DefaultOAuth2UserService();
        OAuth2User oAuth2User = delegate.loadUser(userRequest);

        String registrationId = userRequest.getClientRegistration().getRegistrationId();
        String userNameAttributeName = userRequest.getClientRegistration().getProviderDetails()
                .getUserInfoEndpoint().getUserNameAttributeName();

        OAuthAttributes attributes = OAuthAttributes.of(registrationId, userNameAttributeName, oAuth2User.getAttributes());

        User user = saveOrUpdate(attributes);
        httpSession.setAttribute("user", new SessionUser(user));

        return new DefaultOAuth2User(
                Collections.singleton(new SimpleGrantedAuthority(user.getRoleKey())),
                attributes.getAttributes(),
                attributes.getNameAttributeKey());
    }


    private User saveOrUpdate(OAuthAttributes attributes) {
        User user = userRepository.findByEmail(attributes.getEmail())
                .map(entity -> entity.update(attributes.getName(), attributes.getPicture()))
                .orElse(attributes.toEntity());

        return userRepository.save(user);
    }
}registrationId: 현재 로그인 중인 서비스를 구분 하는 코드, 네이버 로그인인지 구글 로그인인지 구분하기 위함userNameAttributeName: OAuth2 로그인 진행시 키가되는 필드값, 구글은 기본적으로 코드(sub)를 지원, 네이버와 카카오는 지원하지 않음OAuthAttributes: OAuth2UserService를 통해 가져온 OAuth2User의 attribute를 담을 클래스SessionUser: 세션에 사용자 정보를 저장하기 위한 Dto 클래스- 구글 사용자 정보가 업데이트 되었을 때를 대비하여
saveOrUpdate기능 구현
OAuthAttributes 클래스 생성
config>auth>dto패키지 생성
@Getter
public class OAuthAttributes {
    private Map<String, Object> attributes;
    private String nameAttributeKey;
    private String name;
    private String email;
    private String picture;

    @Builder
    public OAuthAttributes(Map<String, Object> attributes, String nameAttributeKey, String name, String email, String picture) {
        this.attributes = attributes;
        this.nameAttributeKey = nameAttributeKey;
        this.name = name;
        this.email = email;
        this.picture = picture;
    }

    public static OAuthAttributes of(String registrationId, String userNameAttributeName, Map<String, Object> attributes) {
           return ofGoogle(userNameAttributeName, attributes);
    }

    private static OAuthAttributes ofGoogle(String userNameAttributeName, Map<String, Object> attributes) {
        return OAuthAttributes.builder()
                .name((String) attributes.get("name"))
                .email((String) attributes.get("email"))
                .picture((String) attributes.get("picture"))
                .attributes(attributes)
                .nameAttributeKey(userNameAttributeName)
                .build();
    }

    public User toEntity() {
        return User.builder()
                .name(name)
                .email(email)
                .picture(picture)
                .role(Role.GUEST)
                .build();
    }
}of(): OAuth2User에서 반환하는 사용자 정보는 Map이기 때문에 값 하나하나를 변환해야만 함toEntity(): User 엔티티를 생성, OAuthAttribute에서 엔티티를 생성하는 시점은 처음 가입할 때, 기본권한을 guest로 주기위해 role 빌더 값에는 Role.GUEST를 사용
SessionUser 클래스 생성
config>auth>dto패키지에 생성
@Getter
public class SessionUser implements Serializable {
    private String name;
    private String email;
    private String picture;

    public SessionUser(User user) {
        this.name = user.getName();
        this.email = user.getEmail();
        this.picture = user.getPicture();
    }
}- SessionUser에는 인증된 사용자 정보만 필요하기 때문에 name, email, picture만 필드로 선언함
2. 로그인 테스트
2-1. index.mustache 수정
- 로그인 버튼과 로그인 성공 시 사용자의 이름을 보여주는 코드 추가
<div class="row">
        <div class="col-md-6">
            <a href="/posts/save" role="button" class="btn btn-primary">글 등록</a>
            {{#userName}}
                Logged in as: <span id="user">{{userName}}</span>
                <a href="/logout" class="btn btn-info active" role="button">Logout</a>
            {{/userName}}
            {{^userName}}
                <a href="/oauth2/authorization/google" class="btn btn-success active" role="button">Google Login</a>
            {{/userName}}
        </div>
</div>{{#userName}}: 머스테치는 다른 언어와 같은 if문을 제공하지 않고 true/false 여부만 판단하기 때문에 항상 최종값을 넘겨줘야함<a href="/logout">: 스프링 시큐리티에서 기본적으로 제공하는 로그아웃 url{{^userName}}: 해당 값이 존재하지 않는 경우 ^ 사용, userName이 없다면 로그인 버튼 노출<a href="/oauth2/authorization/google">: 스프링 시큐리티에서 제공하는 로그인 url
2-2. IndexController 수정
- index.mustache에서 userName을 사용할 수 있게 IndexController에서 userName을 model에 저장하는 코드 추가
@GetMapping("/")
    public String index(Model model) {
        model.addAttribute("posts", postsService.findAllDesc());
        SessionUser user = (SessionUser) httpSession.getAttribute("user");
        if (user != null) {
            model.addAttribute("userName", user.getName());
        }
        return "index";
 }
(SessionUser) httpSession.getAttribute("user");: 로그인 성공 시 값을 가져올 수 있음if (user != null): 세션에 저장된 값이 있을 때만 model에 userName 등록, 저장된 값이 없으면 model에는 값이 없기 때문에 로그인 버튼이 보이게 됨
3. 어노테이션 기반으로 코드 개선하기
IndexController 외 다른 컨트롤러와 메소드에서 세션값이 필요할때마다
SessionUser user = (SessionUser) httpSession.getAttribute("user");를 입력하여 직접 세션에서 가져와야 한다. 그렇게 되면 같은 코드가 계속해서 반복되고, 이 코드가 수정되야할 경우가 생긴다면 동일한 코드를 다 찾아서 수정해줘야 한다. 이런 불필요한 행동을 줄이기 위해서 메소드 인자로 세션값을 바로 받을 수 있도록 변경 할 것이다.
3-1. @LoginUser 어노테이션 생성
config>auth패키지에 생성
@Target(ElementType.PARAMETER)
@Retention(RetentionPolicy.RUNTIME)
public @interface LoginUser {
}@Target(ElementType.PARAMETER): 어노테이션이 생성될 수 있는 위치를 지정함, PARAMETER로 지정했으니 메소드의 파라미터로 선언된 객체에서만 사용이 가능하다.@interface: 이 파일을 어노테이션 클래스로 지정함, LoginUser라는 이름을 가진 어노테이션이 생성되었다고 보면 됨
3-2. LoginUserArgumentResolver 생성
- @LoginUser와 같은 위치에 생성
- HandlerMethodArgumentResolver를 구현한 클래스
- HandlerMethodArgumentResolver의 기능 : 컨트롤러 메소드에서 특정 조건에 맞는 파라미터가 있을 때 원하는 값을 바인딩해주는 인터페이스
@RequiredArgsConstructor
@Component
public class LoginUserArgumentResolver implements HandlerMethodArgumentResolver {
    private final HttpSession httpSession;

    @Override
    public boolean supportsParameter(MethodParameter parameter) {
        boolean isLoginUserAnnotation = parameter.getParameterAnnotation(LoginUser.class) != null;
        boolean isUserClass = SessionUser.class.equals(parameter.getParameterType());
        return isLoginUserAnnotation && isUserClass;
    }

    @Override
    public Object resolveArgument(MethodParameter parameter, ModelAndViewContainer mavContainer, NativeWebRequest webRequest, WebDataBinderFactory binderFactory) throws Exception {
        return httpSession.getAttribute("user");
    }
}supportsParameter(): 파라미터에 @LoginUser 어노테이션이 붙어있고, 파라미터 클래스 타입이 SessionUser.class 인 경우 true를 반환함resolveArgument(): 파라미터에 전달할 객체를 생성함, 여기에서는 세션 객체를 가져옴
3-3. WebConfig 클래스 생성
LoginUserArgumentResolver가 스프링에서 인식될 수 있도록 WebMvcConfigurer에 추가해줌HandlerMethodArgumentResolver는 항상WebMvcConfigurer의addArgumentResolvers()를 통해 추가해야함
@RequiredArgsConstructor
@Configuration
public class WebConfig implements WebMvcConfigurer {
    private final LoginUserArgumentResolver loginUserArgumentResolver;

    @Override
    public void addArgumentResolvers(List<HandlerMethodArgumentResolver> resolvers) {
        resolvers.add(loginUserArgumentResolver);
    }
}
3-4. IndexController 수정
@GetMapping("/")
    public String index(Model model, @LoginUser SessionUser user) {
        model.addAttribute("posts", postsService.findAllDesc());
        if (user != null) {
            model.addAttribute("userName", user.getName());
        }
        return "index";
}
4. 세션 저장소로 데이터베이스 사용하기
- 현재 만든 서비스는 세션이 내장 톰캣의 메모리에 저장되어 애플리케이션을 재실행하면 로그인이 풀림
- 이 문제를 해결하기 위해서 데이터베이스를 세션 저장소로 이용하는 방식을 선택
4-1. build.gradle에 의존성 등록
compile('org.springframework.session:spring-session-jdbc')
4-2. application.properties에 코드 추가
spring.session.store-type=jdbc
4-3. 데이터베이스에 생성된 테이블 확인
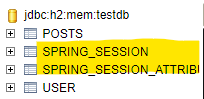
- JPA로 인해 세션 테이블이 자동 생성되었기 때문에 별도로 해야 할 일은 없음
5.네이버 로그인
5-1. 네이버 API등록
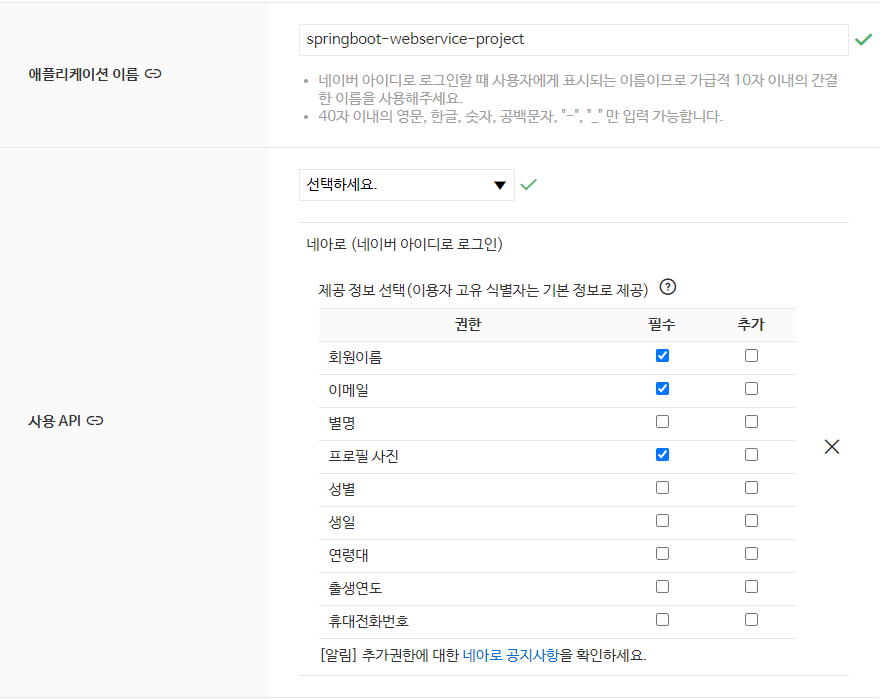
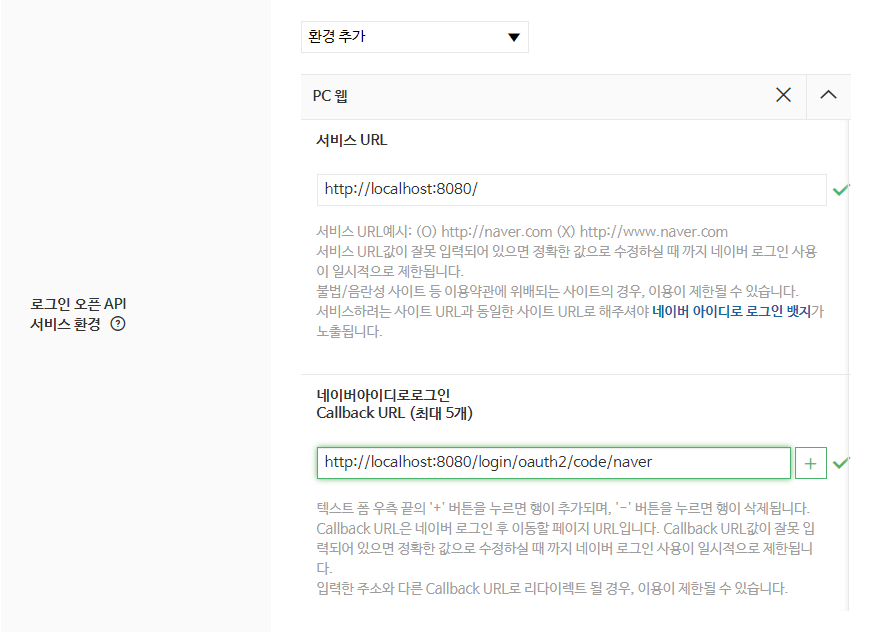
5-2. client id/password application-oauth.properties에 등록
# registration
spring.security.oauth2.client.registration.naver.client-id=클라이언트 id
spring.security.oauth2.client.registration.naver.client-secret=비밀번호
spring.security.oauth2.client.registration.naver.redirect-uri={baseUrl}/{action}/oauth2/code/{registrationId}
spring.security.oauth2.client.registration.naver.authorization-grant-type=authorization_code
spring.security.oauth2.client.registration.naver.scope=name,email,profile_image
spring.security.oauth2.client.registration.naver.client-name=Naver

# provider
spring.security.oauth2.client.provider.naver.authorization-uri=https://nid.naver.com/oauth2.0/authorize
spring.security.oauth2.client.provider.naver.token-uri=https://nid.naver.com/oauth2.0/token
spring.security.oauth2.client.provider.naver.user-info-uri=https://openapi.naver.com/v1/nid/me
spring.security.oauth2.client.provider.naver.user-name-attribute=responseuser-name-attribute=response: 네이버의 회원 조회시 반환되는 JSON형태 때문에 기준이 되는 USERNAME의 이름을 네이버에서는 response로 해야함
5-3. OAuthAttributes 코드 수정
public static OAuthAttributes of(String registrationId, String userNameAttributeName, Map<String, Object> attributes) {
        if ("naver".equals(registrationId)) {
            return ofNaver("id", attributes);
        }

        return ofGoogle(userNameAttributeName, attributes);
}

private static OAuthAttributes ofNaver(String userNameAttributeName, Map<String, Object> attributes) {
        Map<String, Object> response = (Map<String, Object>) attributes.get("response");

        return OAuthAttributes.builder()
                .name((String) response.get("name"))
                .email((String) response.get("email"))
                .picture((String) response.get("profile_image"))
                .attributes(response)
                .nameAttributeKey(userNameAttributeName)
                .build();
}
5-4. index.mustache 파일 수정
- 네이버 로그인 버튼 추가
<a href="/oauth2/authorization/naver" class="btn btn-secondary active" role="button">Naver Login</a>