오늘은 Retrofit의 내부 동작 원리에 대해 알아보려고 한다. 다음은 글의 목차이다.
목차
- Intro
- Retrofit 인스턴스 생성 방법
- Service 구현체 생성부터 네트워크 요청까지
- Service 인터페이스 검증 및 동적 프록시 객체 생성
- 캐싱된 service method를 관리하는 map
- ServiceMethod를 로드하는 과정
- 네트워크를 요청을 수행하는 과정
- 요약
- Outro
Intro
스타카토에서 CallAdapter를 적용하는 과정에서 Retrofit의 내부 구현을 조금 살펴보다보니 Retrofit은 어떤 방식으로 동작하는지 궁금해졌다. Retrofit은 sqaure사에서 제공해주는 안드로이드와 자바를 위한 type-safe HTTP client이다.
가장 먼저 Retrofit이 인스턴스를 생성하는 방법에 대해 알아보자.
Retrofit 인스턴스 생성 방법
@Provides
@Singleton
fun provideRetrofit(
	baseUrl: String,
    client: OkHttpClient,
    json: Json,
    callAdapterFactory: ApiResultCallAdapterFactory,
): Retrofit =
	Retrofit.Builder()
    	.baseUrl(baseUrl)
        .client(client)
        .addConverterFactory(
        	json.asConverterFactory(CONTENT_TYPE.toMediaType()),
        )
        .addCallAdapterFactory(callAdapterFactory)
        .build()
위 코드는 스타카토에서 사용하고 있는 Retrofit 생성 코드이다. Builder()를 사용해 Retrofit의 인스턴스를 생성한다.
Retrofit의 인스턴스를 생성한 후, create()에 인터페이스를 전달하면 구현체가 자동으로 생성된다.
즉, 개발자는 service의 구현체를 생성할 필요없이 create()의 파라미터로 service의 Java Class 인스턴스를 전달해주기만 하면 된다.
// 해당 코드의 annotation은 모두 dagger hilt의 annotation이다.
// dagger hilt를 사용하지 않는다면 provideMemoryApiService() 메서드만 주목해서 보면 된다.
@InstallIn(SingletonComponent::class)
@Module
object RetrofitModule {
    @Singleton
    @Provides
    fun provideMemoryApiService(): MemoryApiService = retrofit.create(MemoryApiService::class.java)
    ...
}Retrofit은 어떤 방식으로 service 인터페이스의 구현체를 생성할까?
Service 구현체 생성부터 네트워크 요청까지
Service 인터페이스 검증 및 동적 프록시 객체 생성
@SuppressWarnings("unchecked")
public <T> T create(final Class<T> service) {
    // service가 interface인지 검증
    validateServiceInterface(service);
    ...
}
service의 Java Class 인스턴스를 create()의 파라미터에 전달하면 create() 내부에서는 validateServiceInterface()를 호출한다.
private void validateServiceInterface(Class<?> service) {
	// service가 interface인지 확인
    if (!service.isInterface()) {
    	// interface가 아니라면 예외 던짐
    	throw new IllegalArgumentException("API declarations must be interfaces.");
	}
	...
}validateServiceInterface()는 이름에서도 알 수 있듯이 service가 인터페이스인지 검증하는 책임을 가지고 있다. 따라서 service가 인터페이스가 아니라면 예외를 던진다.
또한 타입 파라미터를 가지고 있는 경우에도 예외를 던진다.
private void validateServiceInterface(Class<?> service) {
    ...

    Deque<Class<?>> check = new ArrayDeque<>(1);
    // service가 인터페이스라면 check에 추가
    check.add(service);
    while (!check.isEmpty()) {
    	Class<?> candidate = check.removeFirst();

        // candidate가 타입 파라미터를 가지고 있는지 확인
      	if (candidate.getTypeParameters().length != 0) {
        	StringBuilder message =
            	new StringBuilder("Type parameters are unsupported on ").append(candidate.getName());
        	if (candidate != service) {
          		message.append(" which is an interface of ").append(service.getName());
        	}

            // 타입 파라미터를 가지고 있는 경우 예외 던짐
        	throw new IllegalArgumentException(message.toString());
        }
        Collections.addAll(check, candidate.getInterfaces());
    }
	...
}create()는 service 인터페이스를 검증한 후에 Proxy.newProxyInstance()를 이용해 지정된 인터페이스에 대해 동적으로 proxy 인스턴스를 반환한다. 이를 Dynamic Proxy Class라고 하는데, 클래스가 생성될 때 런타임에 지정된 인터페이스 목록을 구현하는 클래스라는 것을 Java Docs에서 확인할 수 있다.
A dynamic proxy class (simply referred to as a proxy class below) is a class that implements a list of interfaces specified at runtime when the class is created, with behavior as described below.
@SuppressWarnings("unchecked")
  public <T> T create(final Class<T> service) {
    // service가 interface인지 검증
    validateServiceInterface(service);

    // newProxyInstance()를 이용해 프록시 클래스 정의 없이 자동으로 프록시 객체를 등록
    return (T)
        Proxy.newProxyInstance(
            service.getClassLoader(),
            new Class<?>[] {service},
            new InvocationHandler() {
              private final Object[] emptyArgs = new Object[0];

              @Override
              public @Nullable Object invoke(Object proxy, Method method, @Nullable Object[] args)
                  throws Throwable {
                // If the method is a method from Object then defer to normal invocation.
                if (method.getDeclaringClass() == Object.class) {
                  return method.invoke(this, args);
                }
                ...
            });
Proxy.newProxyInstance(...) 의 세번째 파라미터를 보면 InvocationHandler 라는 것이 있다.
InvocationHandler 는 proxy 인스턴스의 메서드 호출을 처리하는 인터페이스이다. 즉, service의 메서드를 호출하면 InvocationHandler가 이를 낚아채 invoke() 에서 실행한다.
  @SuppressWarnings("unchecked")
  public <T> T create(final Class<T> service) {
    ...
    return (T)
        Proxy.newProxyInstance(
            service.getClassLoader(),
            new Class<?>[] {service},
            new InvocationHandler() {
              ...

              @Override
              public @Nullable Object invoke(Object proxy, Method method, @Nullable Object[] args)
                  throws Throwable {
                ...
                args = args != null ? args : emptyArgs;
                Reflection reflection = Platform.reflection;
                return reflection.isDefaultMethod(method)
                    ? reflection.invokeDefaultMethod(method, service, proxy, args)
                    : loadServiceMethod(service, method).invoke(proxy, args);
              }
            });
  }
마지막으로 isDefaultMethod에서는 전달받은 method를 isDefault() 함수를 이용해 default method인지 확인한다. Java Docs에서 정의하는 default method란 body가 있는 메서드이다.

Retrofit을 사용하기 위해 정의하는 service의 메서드들은 아래 코드처럼 body가 없기 때문에 isDefaultMethod()가 false를 반환해 loadServiceMethod()를 호출하게 된다.
body가 없는 service의 메서드
interface MemoryApiService {
    @GET(MEMORY_PATH_WITH_ID)
    suspend fun getMemory(
        @Path("memoryId") memoryId: Long,
    ): ApiResult<MemoryResponse> // body X
    ...
}
캐싱된 service method를 관리하는 map
loadServiceMethod()를 알아보기 전에 미리 이해하고 넘어가야 할 내용이 있다.
public final class Retrofit {
	private final ConcurrentHashMap<Method, Object> serviceMethodCache = new ConcurrentHashMap<>();
    ...
}
Retrofit 내부에는 serviceMethodCache라는 변수가 있다. serviceMethodCache는 map을 활용해 캐싱된 service 메서드들의 정보를 관리한다. 메서드와 관련된 정보를 관리하기 위해 아래 3가지 상태를 사용한다. 한 번 상태가 바뀌면 다시 이전 상태로 돌아갈 수는 없다.
상태
1. 값이 없는 상태 (No Value)
2. 잠금 상태 (Lock Object)
3. 완료 상태(ServiceMethod)
serviceMethodCache는 상태를 전환해주는 로직이 포함된 메서드를 이용해 접근해줘야 하는데, 이 메서드가 바로 loadServiceMethod()이다. 즉, loadServiceMethod()를 사용해서만 이 serviceMethodCache에 접근하도록 제한해야 한다.
ServiceMethod를 로드하는 과정
마지막으로 ServiceMethod를 로드하는 loadServiceMethod()에 대해 알아보자.
loadServiceMethod()는 가장 먼저 method가 파싱되었는지 확인한다. 만약 파싱되어 있다면, serviceMethodCache에서 해당 인스턴스를 바로 반환해준다.
ServiceMethod<?> loadServiceMethod(Class<?> service, Method method) {
	while (true) {
      	...
      	Object lookup = serviceMethodCache.get(method);

        // method가 이미 파싱되어있으면 해당 인스턴스를 바로 반환
      	if (lookup instanceof ServiceMethod<?>) {
        	return (ServiceMethod<?>) lookup;
      	}
        ...
	}
}
캐싱된 method 값이 없는 상태라면 동기화를 시작하고, method에 lock을 걸어야 한다. 잠금 상태 (Lock Object)는 어떤 스레드가 메서드의 annotation(@GET, @POST 등)을 파싱하고 있는 상태를 뜻한다. 다른 스레드들은 이 작업이 끝날 때가지 기다려야 한다.
lock이 성공적으로 걸리면 method의 annotation을 파싱하고 ServiceMethod 인스턴스를 생성한다. 생성된 ServiceMethod 인스턴스는 serviceMethodCache에 추가된다.
ServiceMethod<?> loadServiceMethod(Class<?> service, Method method) {
    while (true) {
    	...

      	if (lookup == null) {
        	// map에 method 값이 없는 상태라면 method에 lock을 걸어야 함
        	Object lock = new Object();
        	synchronized (lock) {
          		lookup = serviceMethodCache.putIfAbsent(method, lock);
          		if (lookup == null) {
            		// lock이 성공적으로 삽입 -> 작업 수행
            		ServiceMethod<Object> result;
                	try {
              			// method의 annotation을 파싱하고 ServiceMethod 인스턴스 생성
              			result = ServiceMethod.parseAnnotations(this, service, method);
            		} catch (Throwable e) {
              			// 작업 중 실패하면 method를 serviceMethodCache에서 삭제
              			serviceMethodCache.remove(method);
              			throw e;
            		}
                    // 생성된 ServiceMethod 인스턴스를 serviceMethodCache에 추가
            		serviceMethodCache.put(method, result);
            		return result;
          		}
        	}
      	}

      ...
  }
네트워크 요청을 수행하는 과정
method의 annotation을 파싱하고 ServiceMethod 인스턴스 생성하는 과정을 좀 더 살펴보면서 네트워크 요청이 어떻게 이루어지는 알아보자. ServiceMethod.parseAnnotations(...);를 따라 가보면 다음과 같은 코드를 볼 수 있다.
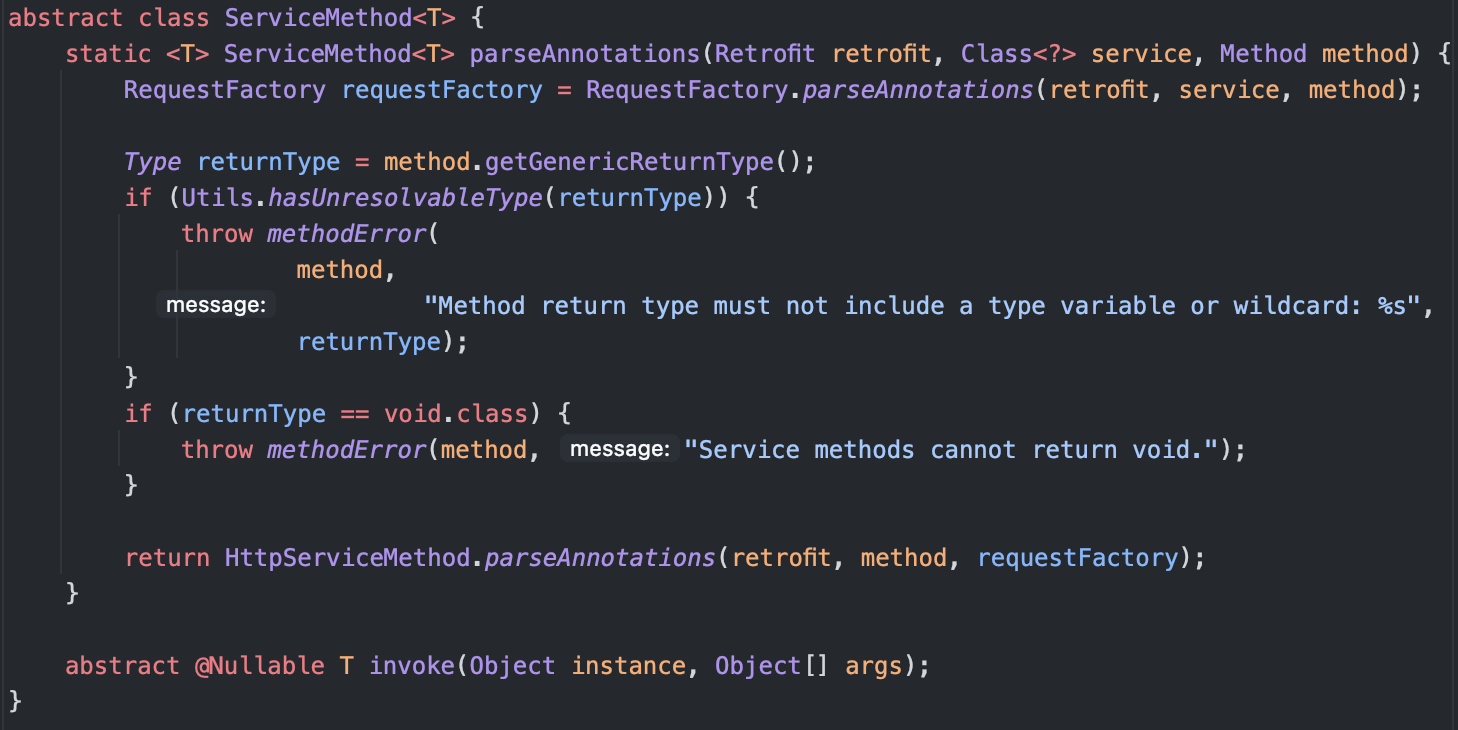
RequestFactory.parseAnnotations(...)를 통해 method에 정의된 annotation을 파싱하고 이 정보를 RequestFactory에 담아 객체를 생성한다. 그리고 HttpServiceMethod.parseAnnotations(...)에 retrofit과 method, requestFactory 담아 HttpServiceMethod 객체를 생성한다.
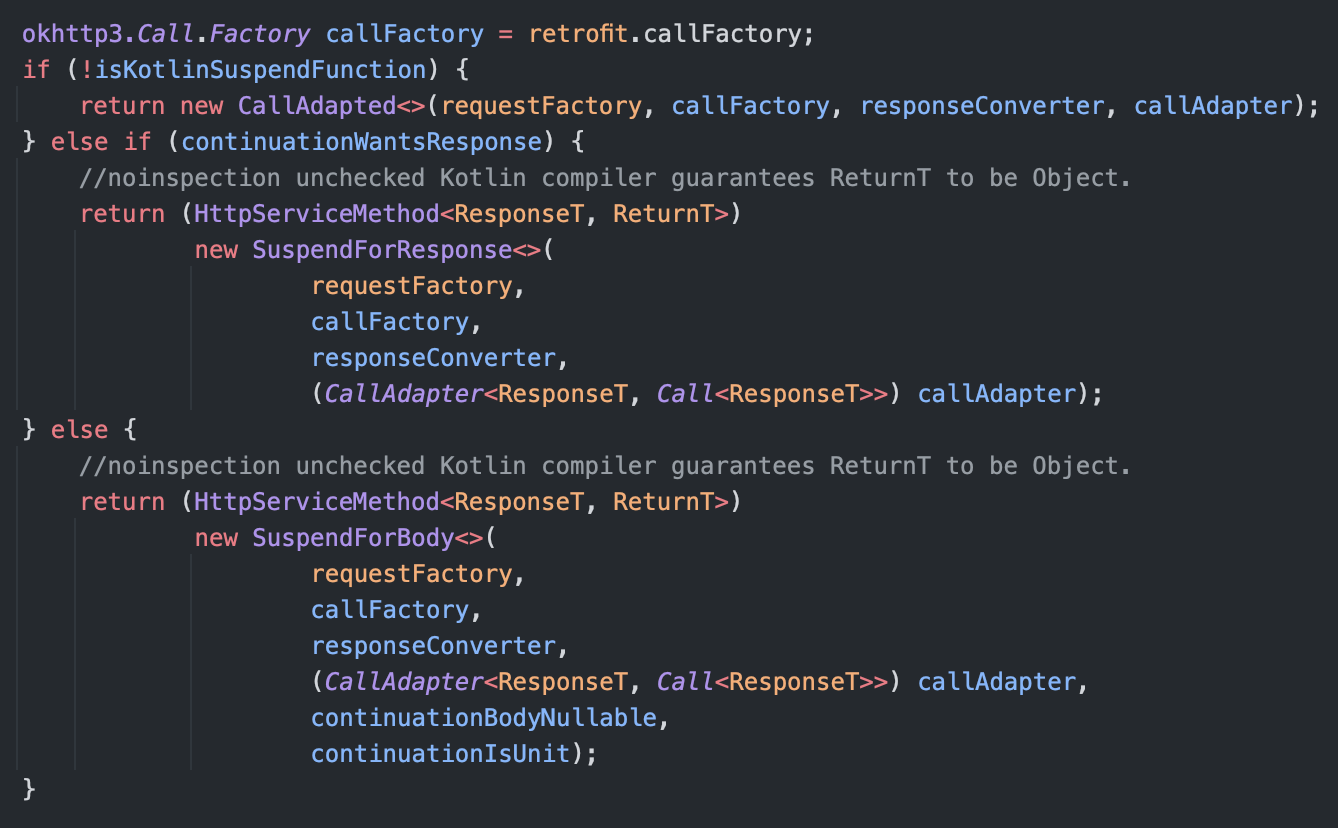
이어서 HttpServiceMethod.parseAnnotations(...)를 따라 가보면 메서드 하단에서 아래와 같은 코드를 볼 수 있다. 여기서 주목할만한 부분은 kotlin suspend 함수 사용 여부를 확인한다는 점이다. suspend 함수가 아니라면 CallAdapted를 생성하여 반환하고, Response 객체를 원한다면 SuspendForResponse 객체, Body를 원한다면 SuspendForBody 객체를 반환한다.
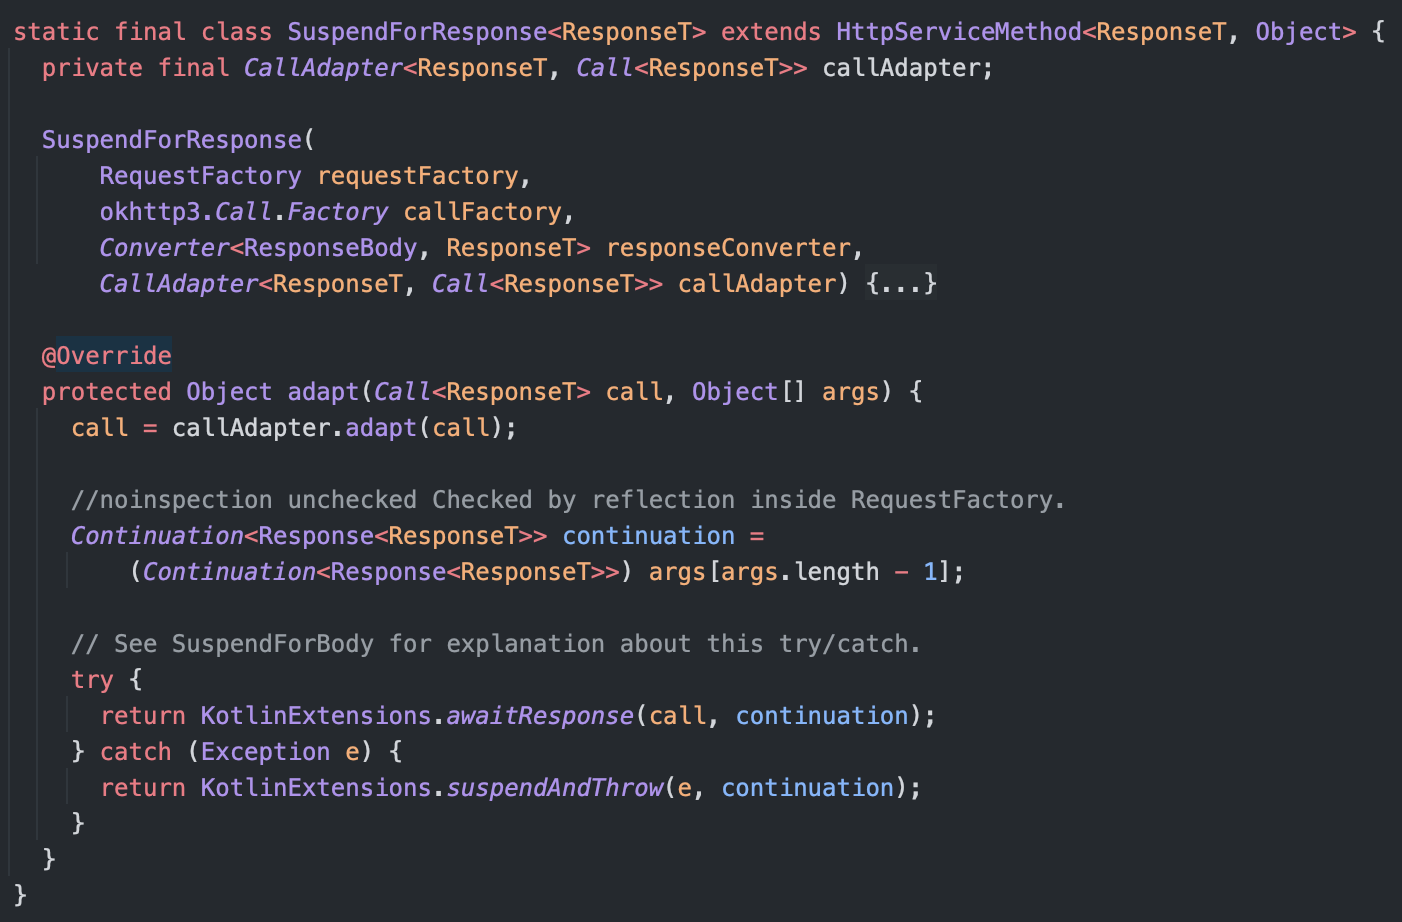
위 코드에서 SuspendForResponse를 따라가보면 메서드 하단에서 KotlinExtensions.awaitResponse(...)를 볼 수 있다.
awaitResponse()는 Retrofit의 Call 객체를 코루틴으로 처리해주고 있다.
suspendCancellableCoroutine을 사용하여 코루틴을 중단하고, enqueue를 활용해 비동기로 네트워크 요청을 수행하는 것을 확인할 수 있다.
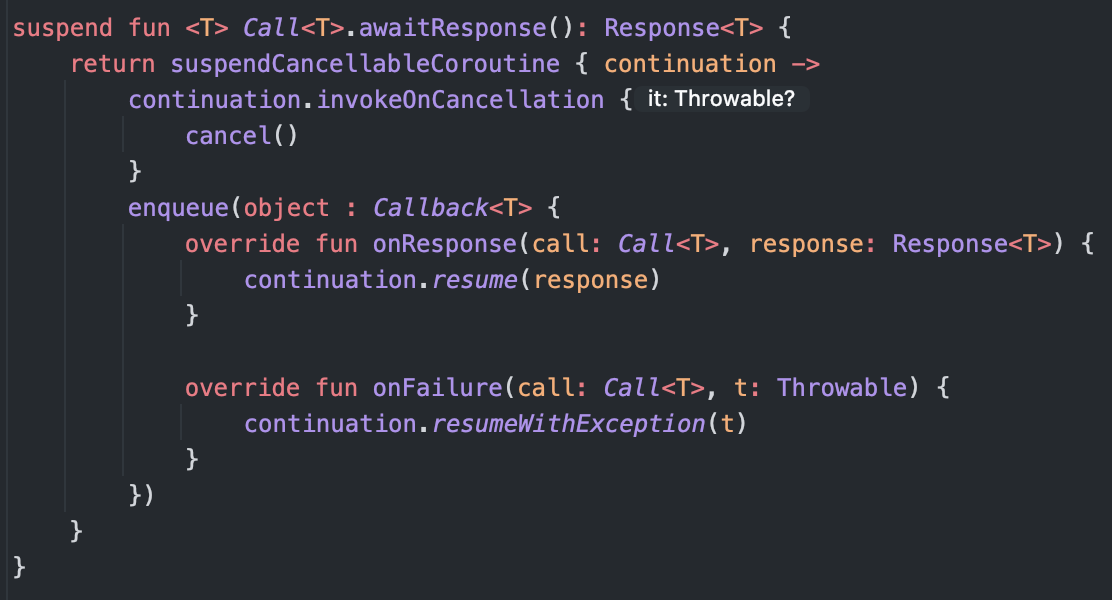
네트워크 요청에 성공하면 onResponse에서 코루틴을 재개하고 Response를 반환한다. 요청이 실패하면 onFailure에서 예외를 던져 코루틴을 실패 상태로 처리한다. 코루틴이 취소되면 invokeOnCancellation을 통해 Retrofit 요청도 취소된다.
요약
앞선 말한 내용들을 간단하게 정리하자면, Retrofit은 create()를 통해 service 인터페이스의 Dynamic Proxy Class를 생성한다. service의 메서드를 호출하면, 이 Dynamic Proxy Class는 InvocationHandler의 invoke()를 통해 메서드 호출을 처리한다.
Retrofit을 사용해 정의한 service의 메서드들은 일반적으로 body가 없으므로, ServiceMethod를 로드하여 처리한다. 이를 위해 Retrofit은 service 메서드의 annotation을 파싱하여 ServiceMethod 객체를 생성하고, 이를 캐싱한다.
만약 이 과정에서 suspend 함수를 사용하면, Retrofit은 내부적으로 코루틴을 이용해 비동기 네트워크 요청을 처리하며, 요청의 성공 또는 실패에 따라 코루틴을 재개하거나 취소하는 것을 알 수 있었다.
Outro
지금까지 Retrofit의 내부 동작 원리에 대해 알아보았다.
Retrofit이 어떻게 동작하는지 잘 모르고 사용했었는데, 그 동작 원리를 알게 되니 정말 고마운 존재라는 것을 새삼 느꼈다. 자주 사용하는 라이브러리에 대해서는 그 내부 동작 원리를 공부해두면 많은 도움이 될 것 같다.
참고자료

맨날 기계적으로 retrofit 코드를 활용하였는데 덕분에 한층 더 깊이 배우고 갑니다! 감사합니다