목차
- Spring REST Docs 사용하는 이유
- Spring REST Docs 시작하기
- build.gradle
- 전체 흐름
- 테스트 작성
- 테스트 세팅 방법
- 테스트 코드에서 문서 작성 방법
- adoc(asciidoc) 작성 방법
- Spring REST Docs 심화편 (추후 업데이트 예정)
프로젝트를 만들면서 필요한 부분을 정리하고 있습니다.
모호하거나, 잘못된 부분이 있으면 댓글로 남겨주세요! 감사합니다 :)
1. Spring REST Docs 사용하는 이유
자바 문서 자동화에는 주로 Swagger 와 Spring Rest Docs 가 사용됩니다.
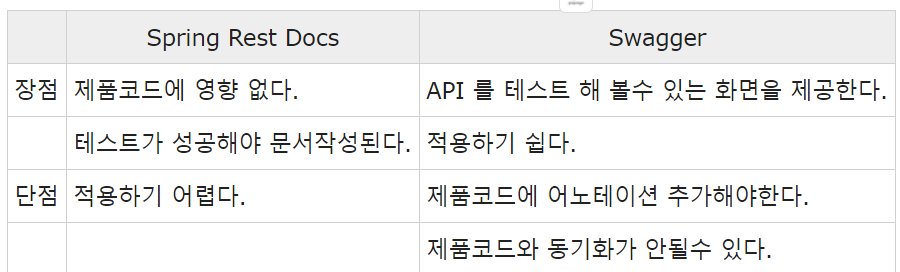
API 문서의 목적은 개발하는 스펙을 정의하는것이라 생각합니다. Swagger는 API 동작을 테스트하는 용도에 더 특화되어 있는 반면에 Spring Rest Docs 은 깔끔 명료한 문서를 만들수 있습니다.
이전 프로젝트까지는 포스트맨, 스웨거를 사용했었기 때문에 이번 프로젝트는 Spring Rest Docs를 사용하기로 결정했습니다.
2. Spring REST Docs 시작하기
개발 스펙
- SpringBoot 2.3.1 RELEASE
- Gradle 6.4.1
- JUnit 5
- Spring REST Docs (MockMvc) 2.0.4 RELEASE
- Asciidoctor 1.5.9.2
2.1 ./build.gradle
buildscript {
    ext {
        springBootVersion = '2.3.1.RELEASE'
    }
    repositories {
        mavenCentral()
    }
    dependencies {
        classpath("org.springframework.boot:spring-boot-gradle-plugin:${springBootVersion}")
    }
}

plugins {
    id "org.asciidoctor.convert" version "1.5.9.2"  // (1)
}

apply plugin: 'java'
apply plugin: 'org.springframework.boot'
apply plugin: 'io.spring.dependency-management'

repositories {
    mavenLocal()
    maven { url 'https://repo.spring.io/libs-snapshot' }
    mavenCentral()
}

group = 'com.example'

sourceCompatibility = 1.8
targetCompatibility = 1.8

ext {
    snippetsDir = file('build/generated-snippets')          // (2)
}

ext['spring-restdocs.version'] = '2.0.4.BUILD-SNAPSHOT'   // (3)

dependencies {
    asciidoctor 'org.springframework.restdocs:spring-restdocs-asciidoctor'  // (4)
    compile 'org.springframework.boot:spring-boot-starter-web'
    testCompile('org.springframework.boot:spring-boot-starter-test') {
	    exclude group: 'junit', module: 'junit;'
    }
    testCompile 'org.springframework.restdocs:spring-restdocs-mockmvc'      // (5)
    testCompile 'org.junit.jupiter:junit-jupiter-api'
    testRuntime 'org.junit.jupiter:junit-jupiter-engine'
}

test {
    outputs.dir snippetsDir // (6)
    useJUnitPlatform()
}

asciidoctor {
    inputs.dir snippetsDir  // (7)
    dependsOn test          // (8)
}

bootJar {
    dependsOn asciidoctor                      // (9)
    from ("${asciidoctor.outputDir}/html5") {  // (10)
        into 'static/docs'
    }
}

※ 스니펫(snippet) : 문서 조각으로 생각하면 됩니다
(1) Asciidoctor 플러그인을 적용하는 부분입니다.
(2) 해당 경로에 asciidoc 문서인 스니펫이 생성됩니다.
(3) 사용하고자 하는 spring-rest-docs 버전을 명시해줍니다.
(4) asciidoctor 구성이 들어있는 spring-restdocs-asciidoctor를 dependency에 추가합니다. 이렇게 하면 .adoc 파일에서 사용할 스니펫 속성이 자동으로 구성되어 build/generated-snippets 을 가리키게 됩니다. 또한 operation 블록 매크로를 사용할 수 있습니다.
(5) testCompile 구성이 있는 spring-restdocs-mockmvc를 dependency에 추가하세요. MockMvc가 아닌 REST Assured를 사용하려면 spring-restdocs-mockmvc 대신에 spring-restdocs-restassured 를 추가하세요.
(6) Configure the test task to add the snippets directory as an output.
(7) Configure the snippets directory as an input.
(8) gradle build 시 test → asciidoctor 순으로 수행됩니다.
(9) gradle build 시 asciidoctor → bootJar 순으로 수행됩니다.
(10) gradle build 시 ./build/asciidoc/html5/ 에 html 파일이 생깁니다.
잘 이해가 안가면 밑에 흐름을 이해하고 다시 의존성을 확인해보시길 바랍니다.
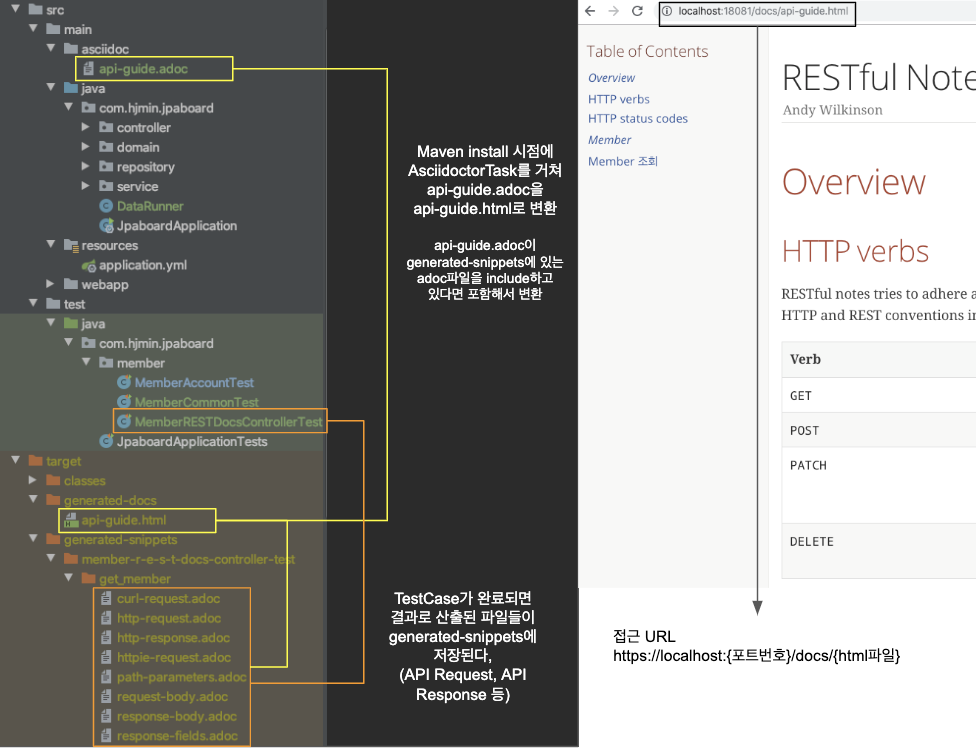
2.2. 전체 흐름(gradle 기준)
1) gradle(or maven) clean : 프로젝트 내 build 폴더 삭제(초기화)
2) 테스트 케이스 수행
※ **주의사항**
메서드명을 한글로 하면 이후 ./gradlew build 때 asciidoc 에러가 발생한다.
메서드명은 영어로 하고 테스트 결과를 한글로 보고 싶다면 @Display 애노테이션을 붙이자

@Display(value = "한글_테스트_명")
@Test
void test() throws Exception { ...
3) 테스트 결과가 adoc 파일로 생성됨(build/generated-snippets/*.adoc 형태)
4) html 파일을 생성해줄 index.adoc 파일 생성 (src/docs/asciidoc/index.adoc)
5) index.adoc 에서 테스트 결과를 모아 문서 작성(snippet import 등)
6) ./gradlew build(or maven package) → build/asciidoc/html5 경로에 index.html 생성됐는지 확인
7) 터미널 열고 → 프로젝트 경로 → cd build/lib/
8) java -jar [생성된 jar 파일] (예 : java -jar spring-rest-docs-example.jar)
9) http://localhost:8080/docs/index.html 접속해서 확인
다음 [BE/2주차] Spring Rest Docs 적용기 (2)