Lecture 8
Welcome!
- In previous weeks, we introduced you to Python, a high-level programming language that utilized the same building blocks we learned in C. Today, we will extend those building blocks further in HTML, CSS, and JavaScript.
- The internet is a technology that we all use.
- Using our skills from previous weeks, we can build our own web pages and applications.
- The ARPANET connected the first points on the internet to one another.
- Dots between two points could be considered routers.
Routers
-
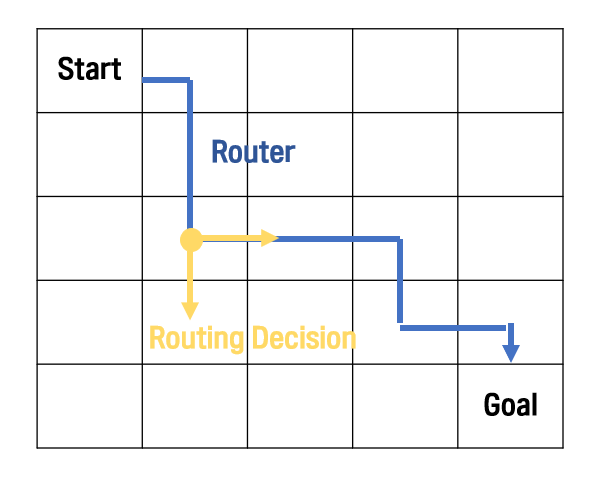
To route data from one place to another, we need to make routing decisions. That is, someone needs to program how data is transfered from point A to point B.
-
You can imagine how data could take multiple paths from point A and point B, such that when a router is congested, data can flow through another path.
-
TCP/IP are two protocols that allow computers to transfer data between them over the internet.
- Protocol: 컴퓨터가 정보를 효율적으로 주고받기 위해 정한 일종의 약속/형식.
-
IP or internet protocol is a way by which computers can identify one another across the internet. Every computer has a unique address in the world. Addresses are in this form:
#.#.#.# -
Numbers range from
0to255. IP addresses are 32-bits(8bits * 4), meaning that these addresses could accommodate over 4 billion addresses. 40억(4 billion)은 32bits가 주어졌을 때 셀 수 있는 가장 큰 양수이다(0~4billion). Newer versions of IP addresses can accommodate far more computers! -> IP ver.4: 32bits/ IP ver.6: 128bits -
Reflexive IP address (
127.0.0.1.): always refer to itself(your computer) -
In the real world, servers do a lot of work for us.
-
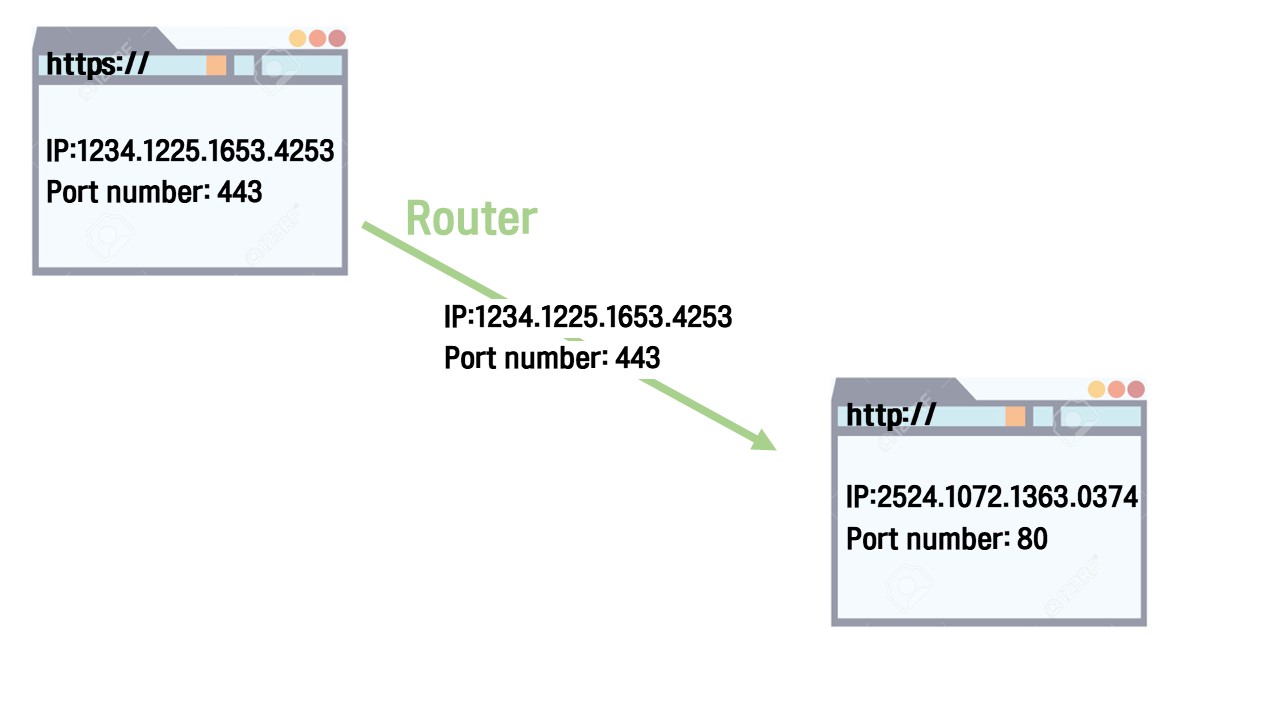
TCP, or transmission control protocol, is used to distinguish web services from one another. For example,
80is used to denote HTTP and443is used to denote HTTPS. These numbers are port numbers. -
When information is sent from one location to another, an IP address and TCP port number are sent.
-
These protocols are also used to fragment large files into multiple parts called packets. For example, a large photo of a cat can be sent in multiple packets. When a packet is lost, TCP/IP can request missing packets again from the origin server.
-
TCP will acknowledge when all the data has been transmitted and received.
DNS
- It would be very tedious if you needed to remember an address number(IP) to visit a website.
- DNS, or domain name systems, is a collection of servers on the internet that are used to route website addresses like harvard.edu to a specific IP address.
- DNS converts domain names to IP addresses and vice versa.
- Root DNS servers(.com/ .edu/ .... top level domains) -> smaller DNS servers owned by company, or apartment or home
- DNS simply hold a table or database that links specific, fully qualified domain names to specific IP addresses. (keys: domain names like Havard.edu / values: IP addresses)
HTTP
-
HTTP or hypertext transfer protocol is an application-level protocol that developers use to build powerful and useful things.
-
When you see an address such as
https://www.example.comyou are actually implicitly visiting that address with a/at the end of it. (=>https://www.example.com/: the slash denotes the root of the server, which is the default page or folder in the server.) -
The path is what exists after that slash. (
https://www.example.com/path) For example,https://www.example.com/folder/file.htmlvisitsexample.comand browses to thefolderfolder and then visits the file namedfile.html.example.comis the domain name, and.comis the Top Level Domain orTLD- Examples of TLD:
.com,.edu,.net,.gov - Country Code TLD (CCTLD):
.kr,.uk,.jp wwwis a Host Name
-
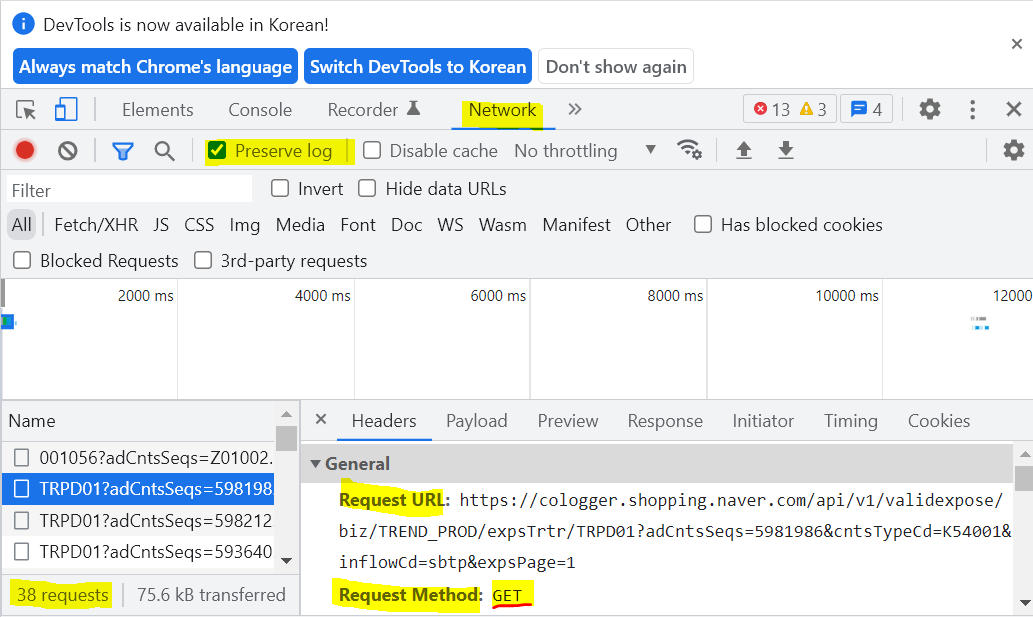
httpsin this address is the protocol that is used to connect to that web address. By protocol, we mean that HTTP utilizesGETorPOSTrequests to ask for information from a server. For example, you can launch Google Chrome, right-click, and clickinspect. When you open thedeveloper toolsand visitNetwork, selectingPreserve log, you will seeRequest Headers. You’ll see mentions ofGET. This is possible in other browsers as well, using slightly different methods.
-
Request usually looks like this:
``` GET / HTTP/1.1 Host: www.example.com ... ``` -
Generally, after making a request a server, you will receive the following in
Response Headers:HTTP/1.1 200 OK Content-Type: text/htmlHTTP/1.1: 1.1버전 HTTP - The server is responding in the same version of HTTP (Request used HTTP 1.1) in this example200 OK: Status code which means everything's okContent-Type: text/html: HTTP header which is key-value pair which means that the type of this content that's coming back from the server is text/html.
-
This approach to inspecting these logs may be a bit more complicated than need be. You can analyze the work of HTTP protocols at code.cs50.io. For example, type the following in your terminal window:
curl -I https://www.harvard.eduNotice that the output of this command returns all the header values of the responses of the server.
-curl: Connect URL - shows headers, but it doesn't show the images of the graphics. It gives you a whole response from the server containing only those header values, the key value pairs inside of the envelope. -
Similarly, execute the following in your terminal window:
curl -I http://www.harvard.eduNotice that the
sinhttpshas been removed. The server response will show that the response is301instead of100, meaning that the website has permanently moved.
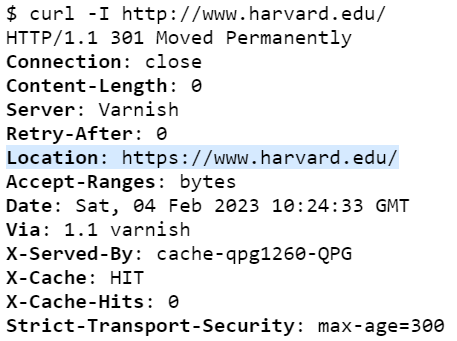
When computer finds301response, it will look for alocationheader, find that URL, and automatically redirects to that URL. This also happens when you type justhavard.edu(omittingwww) -
Further, execute the following command in your terminal window:
curl -I https://harvard.eduNotice that you will see the same
301response, providing a hint to a browser of where it can find the correct website. -
Similar to
301, a code of404means that a specified URL has not been found. There are numerous other response codes, such as:200 OK 301 Moved Permanently 302 Found 304 Not Modified 304 Temporary Redirect 401 Unauthorized 403 Forbidden -> ex. you need to log in 404 Not Found 418 I'm a Teapot 500 Internal Server Error 503 Service Unavailable -> if servers are overloaded -
It’s worth mentioning that
500errors are always your fault as the developer. This will be especially important for next week’s pset, and potentially for your final project! -
We can send more complicated commands to the server. For example, we can attempt the following:
  GET /search?q=cats HTTP/1.1
  Host: www.google.com
Notice that not only are we specifying a path but also user input using the
?mark.qis used to denote query, passingcatsto it.?: convention for passing human user input to the server
-
If you manually type
google.com/search?=catsinto your web browser address bar, it will manually query Google for results related tocats.
HTML
-
HTML or hypertext markup language is made up of tags, each of which may have some attributes that describe it.
-
In your terminal, type
code hello.htmland write code as follows:<!DOCTYPE html> <!-- Demonstrates HTML --> <html lang="en"> <head> <title>hello, title</title> </head> <body> hello, body </body> </html>Notice that the
htmltag both opens and closes this file. Further, notice thelangattribute, which modifies the behavior of thehtmltag(html 문서 안의 언어가 무엇인지 정함). Also, notice that there are bothheadtags andbodytags. Indentation is not required but does suggest a hierarchy.- 참고: 맨 위의
<!DOCTYPE html>은 모든 html ver.5(최신버전) 파일에 들어가는 문구이다. 이 문구가 있으면 최신 버전의 html을 쓰는 것이다.
- 참고: 맨 위의
-
You can serve your code by typing
http-server. This serve is now available on a very long URL. If you click it, you can visit the website with your own code.- cf. server: respond to requests with responses. That's all
-
When you visit this URL, notice that the file name
hello.htmlappears at the end of this URL.- 정확히는 URL 들어가서 hello.html을 들어가야 함
- 해당 페이지의 주소는
https://elenaljh-vigilant-space-potato-6p97rq69jp934g5x-8080.preview.app.github.dev/hello.html인데, 맨 뒤가/hello.html인 것을 볼 수 있다. - 파일 이름 앞에
/을 붙여서 브라우저는 사용자가 서버의 특정 파일에 접근할 수 있게 해준다.
-
The hierarchy of tags can be represented as follows:
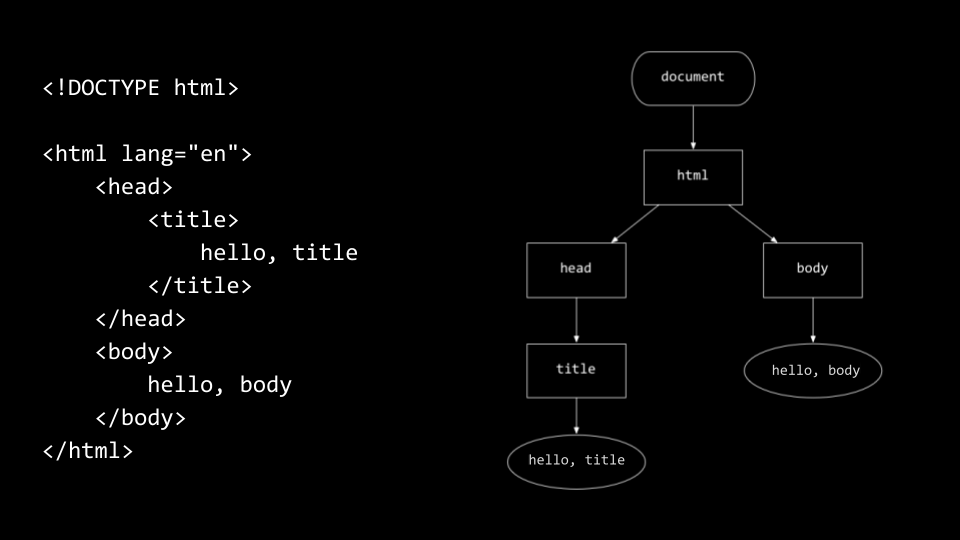
-
The browser will read your HTML file top to bottom and left to right.
- Chrome, Safari,.. build data structure(right-side of the picture: tree) in the computer's memory so as to know what it is you have told them to do.
- Using JavaScript, we can add/remove things from the tree
1. 줄바꾸는 법
-
참고:
<br>은 break의 약자로, 줄바꿈을 의미한다. 또한</br>과 같이 닫는 문법은 쓰지 않는다. 즉,<br>만 사용한다. Brake를 사용해도 줄바꿈은 가능하지만 문단을 나눈다는 것을 더 확실히(명시적으로) 하기 위해서는<p>, </p>를 사용한다. -
Because whitespace is effectively ignored in HTML(즉,
<body> </body>의 본문에서 암만 줄바꿈을 해봤자 먹히지 않는다는 뜻), you will need to use<p>paragraph tags to open and close a paragraph. Consider the following:<!DOCTYPE html> <!-- Demonstrates paragraphs --> <html lang="en"> <head> <title>paragraphs</title> </head> <body> <p> Lorem ipsum dolor sit amet, consectetur adipiscing elit. Vivamus convallis scelerisque quam, vel hendrerit lectus viverra eu. Praesent posuere eget lectus ut faucibus. Etiam eu velit laoreet, gravida lorem in, viverra est. Cras ut purus neque. In porttitor non lorem id lobortis. </p> <p> Mauris ut dui in eros semper hendrerit. Morbi vel elit mi. Sed sit amet ex non quam dignissim dignissim et vel arcu. Pellentesque eget elementum orci. Morbi ac cursus ex. Pellentesque quis turpis blandit orci dapibus semper sed non nunc. </p> <p> Aenean venenatis convallis ante a rhoncus. Nullam in metus vel diam vehicula tincidunt. Donec lacinia metus sem, sit amet egestas elit blandit sit amet. </p> <p> Integer at justo lacinia libero blandit aliquam ut ut dui. Quisque tincidunt facilisis venenatis. Nullam dictum odio quis lorem luctus, vel malesuada dolor luctus. Aenean placerat faucibus enim a facilisis. </p> <p> Suspendisse rutrum vestibulum odio, sed venenatis purus condimentum sed. Morbi ornare tincidunt augue eu auctor. Vivamus sagittis ac lectus at aliquet. </p> <p> Sed quis malesuada mi. Nam id purus quis augue sagittis pharetra. Nulla facilisi. Maecenas vel fringilla ante. Cras tristique, arcu sit amet blandit auctor, urna elit ultricies lacus, a malesuada eros dui id massa. </p> </body> </html>Notice that paragraphs start with a
<p>tag and end with a</p>tag. -
HTML allows for the representation of headings(제목):
<!DOCTYPE html>

<!-- Demonstrates headings (for chapters, sections, subsections, etc.) -->

<html lang="en">

    <head>
        <title>headings</title>
    </head>

    <body>

        <h1>One</h1>
        <p>
            Lorem ipsum dolor sit amet, consectetur adipiscing elit. Vivamus convallis scelerisque quam, vel hendrerit lectus viverra eu. Praesent posuere eget lectus ut faucibus. Etiam eu velit laoreet, gravida lorem in, viverra est.
        </p>

        <h2>Two</h2>
        <p>
            Mauris ut dui in eros semper hendrerit. Morbi vel elit mi. Sed sit amet ex non quam dignissim dignissim et vel arcu. Pellentesque eget elementum orci.
        </p>

        <h3>Three</h3>
        <p>
            Aenean venenatis convallis ante a rhoncus. Nullam in metus vel diam vehicula tincidunt. Donec lacinia metus sem, sit amet egestas elit blandit sit amet.
        </p>

        <h4>Four</h4>
        <p>
            Integer at justo lacinia libero blandit aliquam ut ut dui. Quisque tincidunt facilisis venenatis. Nullam dictum odio quis lorem luctus, vel malesuada dolor luctus. Aenean placerat faucibus enim a facilisis.
        </p>

        <h5>Five</h5>
        <p>
            Suspendisse rutrum vestibulum odio, sed venenatis purus condimentum sed. Morbi ornare tincidunt augue eu auctor. Vivamus sagittis ac lectus at aliquet. Nulla urna mauris, interdum non nibh in, vehicula porta enim.
        </p>

        <h6>Six</h6>
        <p>
            Sed quis malesuada mi. Nam id purus quis augue sagittis pharetra. Nulla facilisi. Maecenas vel fringilla ante. Cras tristique, arcu sit amet blandit auctor, urna elit ultricies lacus, a malesuada eros dui id massa.
        </p>

    </body>

</html>
Notice that
<h1>,<h2>, and<h3>denote different levels of headings. (<h1>이 가장 폰트가 크고,<h6>가 가장 작다.
2. 리스트 만들기
-
We can also create lists within HTML:
<!DOCTYPE html>

<!-- Demonstrates (ordered) lists -->

<html lang="en">
    <head>
        <title>list</title>
    </head>
    <body>
        <ol>
            <li>foo</li>
            <li>bar</li>
            <li>baz</li>
        </ol>
    </body>
</html>
Notice that the
<ol>tag creates an ordered list containing three items.
-<ol>: ordered list - 앞에 번호로 순서가 매겨진 리스트가 생김
-<ul>: unordered list - 앞에 동그라미로 표시된 불릿 리스트가 생
3. 표 만들기
-
We can also create a table in HTML:
<!DOCTYPE html>

<!-- Demonstrates table -->

<html lang="en">
    <head>
        <title>table</title>
    </head>
    <body>
        <table>
            <tr>  <!--table row-->
                <td>1</td> <!--table data-->
                <td>2</td>
                <td>3</td>
            </tr>
            <tr>
                <td>4</td>
                <td>5</td>
                <td>6</td>
            </tr>
            <tr>
                <td>7</td>
                <td>8</td>
                <td>9</td>
            </tr>
            <tr>
                <td>*</td>
                <td>0</td>
                <td>#</td>
            </tr>
        </table>
    </body>
</html>
Tables also have tags that open and close each element within.
4. 이미지 삽입
-
Images can also be utilized within HTML:
<!DOCTYPE html>

<!-- Demonstrates image -->

<html lang="en">
    <head>
        <title>image</title>
    </head>
    <body>
        <!-- https://www.harvard.edu/ -->
        <img alt="Harvard University" src="harvard.jpg">
    </body>
</html>
Notice that
src="harvard.jpg"indicates the path where the image file can be located. 또한alt = "Harvard University"는 서버 오류 등으로 이미지를 보여줄 수 없을 때 해당 이미지를 대체할 텍스트를 명시한다.
5. 비디오 삽입
-
Videos can also be included in HTML:
<!DOCTYPE html>

<!-- Demonstrates video -->

<html lang="en">
    <head>
        <title>video</title>
    </head>
    <body>
        <!-- https://www.harvard.edu/ -->
        <video autoplay loop muted playsinline width="1280">
            <source src="halloween.mp4" type="video/mp4">
        </video>
    </body>
</html>
Notice that the
widthattribute defines the width of the video.
Also,autoplay,loop,muted,playsinlineattributes don't need values.
6. 링크하기
-
You can also link between various web pages:
<!DOCTYPE html>

<!-- Demonstrates link -->

<html lang="en">
    <head>
        <title>link</title>
    </head>
    <body>
       Visit <a href="image.html">Harvard</a>.
    </body>
</html>
Notice that the
<a>or anchor tag is used to makeHarvarda linkable text.hrefis an attribute of the anchor tag(<a>), and it means 'hyper reference'. 그리고 anchor tag 사이에 끼워넣은 "Havard"라는 글자에 하이퍼링크가 걸리게 됨.
<a href = "https://www.naver.com">COUPANG</a>라는 코드를 보면, COUPANG에 네이버로 연결하는 주소를 링크했다는 것을 알 수 있다. 피싱(Phishing)사이트들은 이런 방식으로 사람들을 속인다.
7. Meta - 페이지를 모바일 환경에 맞게 조정하기
-
Meta tags are used to hold information about the data within the HTML file. Consider the following:
<!DOCTYPE html>

<!-- Demonstrates responsive design -->

<html lang="en">
    <head>
        <meta name="viewport" content="initial-scale=1, width=device-width">
        <title>meta</title>
    </head>
    <body>
        Lorem ipsum dolor sit amet, consectetur adipiscing elit. Vivamus convallis scelerisque quam, vel hendrerit lectus viverra eu. Praesent posuere eget lectus ut faucibus. Etiam eu velit laoreet, gravida lorem in, viverra est. Cras ut purus neque. In porttitor non lorem id lobortis. Mauris gravida metus libero, quis maximus dui porta at. Donec lacinia felis consectetur venenatis scelerisque. Nulla eu nisl sollicitudin, varius velit sit amet, vehicula erat. Curabitur sollicitudin felis sit amet orci mattis, a tempus nulla pulvinar. Aliquam erat volutpat.
    </body>
</html>
Notice this set of
metaattributes makes this page mobile-friendly.
Attributesname: name of some feature of the browser. "veiwport" is the technical term for big rectangular region to which I keep referring (the body of you page)contentfor the viewport: you can say some esoteric details like "initial scale", "width", etc.
-
There are numerous
metakey-value pairs that you can use:<!DOCTYPE html> <!-- Demonstrates Open Graph tags --> <html lang="en"> <head> <meta property="og:title" content="CS50"> <meta property="og:description" content="Introduction to the intellectual enterprises of computer science and the art of programming."> <meta property="og:image" content="cat.jpg"> <title>meta</title> </head> <body> ... </body> </html>Notice that these key value pairs relate to the
titleanddescriptionof the web page.
"Open Graph" tag란? 페이지 주소를 링크하면 가끔 이런 배너가 뜨는 것을 볼 수 있다.

open graph는 이런 배너에 어떤 소개문구와 이미지를 띄울지 정하는 태그다.
8. 검색기능
구글로 'cat'을 검색했을 때, 검색 결과 페이지의 주소가 https://www.google.com/search?q=cat.... 이런 형식으로 뜨는 것을 볼 수 있다. 이처럼 어떤 것을 검색했을 때 검색 화면의 주소는 https://www.example.com/path?key=value&key=value... 형식으로 작성된다.
-
You can also create forms reminiscent of Google’s search:
<!DOCTYPE html>

<!-- Demonstrates form -->

<html lang="en">
    <head>
        <title>search</title>
    </head>
    <body>
        <form action="https://www.google.com/search" method="get">
            <!--검색창 만들기-->
            <input name="q" type="search">
            <!--검색버튼 만들기-->
            <input type="submit" value="Google Search">
        </form>
    </body>
</html>
Notice that a
formtag opens and provides the attribute of whatactionit will take.form태그는 web form을 만드는데, 텍스트 박스나 버튼 등을 만든다. Theinputfield is included, passing the nameq(for 'query') and the type assearch.submit은 클릭할 수 있는 버튼을 만들어주고,form태그의action인자는 submit 버튼을 눌렀을 때 구글검색을 실행하도록 만들어준다. -
We can make this search better as follows:
<!DOCTYPE html>

<!-- Demonstrates additional form attributes -->

<html lang="en">
    <head>
        <title>search</title>
    </head>
    <body>
        <form action="https://www.google.com/search" method="get">
            <input autocomplete="off" autofocus name="q" placeholder="Query" type="search">
            <button>Google Search</button>
        </form>
    </body>
</html>
Notice that
autocompleteis turnedoff.autofocusis enabled.
추가적으로autocomplete="off"는 자동완성기능을 끄는것이고,autofocus는 검색창을 클릭하지 않아도 커서가 창에서 깜박거리는 기능, 그리고placeholder="Query"는 검색창에 회색 글씨로 "Query"라고 설명문을 써놓는 기능이다. -
We’ve seen just a few of many HTML elements you can add to your site. If you have an idea for something to add to your site that we haven’t seen yet (a button, an audio file, etc.) try Googling “X in HTML” to find the right syntax!
CSS
CSS, or cascading style sheet, is a markup language that allows you to fine-tune the aesthetics of your HTML files.- CSS와 관련해 앞으로 듣게 될 용어들은 다음과 같다: type selector, class selector, ID selector, attribute selector...
1. Style attribute
-
In your terminal, type
code home.htmland write code as follows:<!DOCTYPE html> <!-- Demonstrates inline CSS with P tags --> <html lang="en"> <head> <title>css</title> </head> <body> <!--large font size--> <!--주의: style= "font-size: ~~; ..."라고 ""로 묶는다--> <p style="font-size: large; text-align: center;"> John Harvard </p> <!--medium font size--> <p style="font-size: medium; text-align: center;"> Welcome to my home page! </p> <!--small font size--> <p style="font-size: small; text-align: center;"> Copyright © John Harvard <!-- ©: (c)라는 copyright symbol 특수문자 --> </p> </body> </html>Notice that some
styleattributes are provided to the<p>tags. Thefont-sizeis set tolarge,medium, orsmall. Thentext-alignis set to center. -
While correct, the above is not well-designed, because there is repetition(
text-align: center). We can remove redundancy by modifying our code as follows - CSS의 C = Cascading => 자식코드들이 동일한 속성을 공유한다면, 그 속성을 반복해서 쓰는 대신 부모코드에 넣으면 자식코드들도 그 속성을 상속(cascade down, inherit)받음:<!DOCTYPE html> <!-- Removes outer DIV --> <html lang="en"> <head> <title>css</title> </head> <body style="text-align: center"> <div style="font-size: large"> John Harvard </div> <div style="font-size: medium"> Welcome to my home page! </div> <div style="font-size: small"> Copyright © John Harvard </div> </body> </html>Notice that
<div>tags are used to divide up this HTML file into specific regions. div means division. -> 코드의 각 내용은 문단이라기보다는 제목, 본문, 바닥글로 페이지의 구성요소/부분(division of the page)에 가깝다. 따라서<p>보다는<div>를 사용하는 것이 더 적합하다.text-align: centeris invoked on the entire body of the HTML file. -
It turns out that there is newer semantic text
<header>,<main>,<footer>that is included in HTML. 페이지 내용을<div>로 도배하는 대신 새로운 태그들을 이용하면 코드의 내용이 좀 더 명확해지고, 구글 등 검색엔진들도 페이지의 중요한 내용을 감지해 검색기능에 반영하는 등 많은 이점을 누릴 수 있다. We can modify our code as follows:<!DOCTYPE html> <!-- Uses semantic tags instead of DIVs --> <html lang="en"> <head> <title>css</title> </head> <body style="text-align: center"> <header style="font-size: large"> John Harvard </header> <main style="font-size: medium"> Welcome to my home page! </main> <footer style="font-size: small"> Copyright © John Harvard </footer> </body> </html>Notice that the
headerandfooterboth have different styles assigned to them. -
This practice of placing the style and information(
styleattribute) all in the same location is not good practice. -> html을 작업하는 사람과 CSS를 작업하는 사람이 동시에 문서를 편집한다고 생각해보라.. 처음에는 그럭저럭 손발이 맞는다 쳐도 내용이 조금만 복잡해지만 서로 꼬이고 난리나고 끔찍.. We could move the elements of style to the top of the file as follows(styletag 도입):<!-- 페이지의 각 부분의 style 설정하기 --> <html lang="en"> <head> <style> body{ text-align: center; } header { font-size: large; } main { font-size: medium; } footer { font-size: small; } </style> <title>css</title> </head> <body> <header> John Harvard </header> <main> Welcome to my home page! </main> <footer> Copyright © John Harvard 1636 </footer> </body> </html>위 코드는 아래와 같이 고칠 수 있다. (아래 코드는 다른 사람들이 다시 사용할 수 있는 re-usable code임)
<!-- Demonstrates class selectors --> <html lang="en"> <head> <style> .centered { text-align: center; } .large { font-size: large; } .medium { font-size: medium; } .small { font-size: small; } </style> <title>css</title> </head> <body class="centered"> <header class="large"> John Harvard </header> <main class="medium"> Welcome to my home page! </main> <footer class="small"> Copyright © John Harvard </footer> </body> </html>Notice all the style tags are placed up in the
headin thestyletag wrapper. Also notice that we’ve assigned classes, calledcentered,large,medium, andsmallto our elements, and that we select those classes by placing a dot (dot means this is a "class") before the name, as in.centered-> centered, large, medium, small은 개발자가 스스로 정의한 class임. 앞에서 정의한 클래스는 뒤에서<tag class="name">의 형태로 계속 사용할 수 있다.
2. link 태그를 이용해 style태그의 내용을 CSS 파일로 옮기기
-
It turns out that we can move all our style code into a special file called a CSS file. We can create a file called
style.cssand paste our classes there:.centered { text-align: center; } .large { font-size: large; } .medium { font-size: medium; } .small { font-size: small; }Notice that this is verbatim what appeared in our HTML file.
-
linktag does not give you a link that you can click on. It just links to another file that then gets automatically included or imported, to borrow our language from C or in Python. -
We then can tell the browser where to locate the CSS for this HTML file:
<!DOCTYPE html> <!-- Demonstrates external stylesheets --> <html lang="en"> <head> <!-- link로 CSS파일과 html파일 연결하기--> <link href="style.css" rel="stylesheet"> <title>css</title> </head> <body class="centered"> <header class="large"> John Harvard </header> <main class="medium"> Welcome to my home page! </main> <footer class="small"> Copyright © John Harvard </footer> </body> </html>Notice that
style.cssis linked to this HTML file as a stylesheet, telling the browser where to locate the styles we created.
Frameworks
-
Similar to third-party libraries we can leverage in Python, there are third-party libraries called frameworks that we can utilize with our HTML files.
-
내가 직접 페이지 디자인을 할 수도 있지만 세상엔 나보다 디자인을 더 잘 하는 사람들이 많기 때문에.. 그냥 남이 만든 디자인을 따오는게 더 나을 때도 있다
-
Bootstrap is one of these frameworks that we can use (for free!) to beautify our HTML and easily perfect design elements such that our pages are more readable.
-
Bootstrap can be utilized by adding the following
linktag in theheadof your html file:<head> <!-- 아래에서 링크한 CSS 문서는 내가 만든게 아니라 남이 만든거임--> <link href="https://cdn.jsdelivr.net/npm/bootstrap@5.2.2/dist/css/bootstrap.min.css" rel="stylesheet" integrity="sha384-Zenh87qX5JnK2Jl0vWa8Ck2rdkQ2Bzep5IDxbcnCeuOxjzrPF/et3URy9Bv1WTRi" crossorigin="anonymous"> <title>favorites</title> </head> -
You can learn more about this in the Bootstrap Documentation.
JavaScript
- JavaScript is another programming language that allows for interactivity within web pages.
- 자바스크립트는 C와 비슷해보이지만 몇 가지 차이점도 존재함.
1. 조건문
-
JavaScript supports conditionals:
if (x < y)
{

}
else
{

}
2. 변수
-
Variables are also supported -
let으로 변수를 선언한다.:let counter = 0;
3. Counter
-
You can also increment:
counter = counter + 1;
counter += 1;
counter++;
4. 반복문
-
Loops are very similar to what you have seen before in C. Only difference in here is using
letinstead ofint:for (let i = 0; i < 3; i++) { }while (true) { }
JS와 C는 많은 부분에서 유사하다. 그렇다면 JS는 대체 무엇을 하기 위해 만들어진 언어일까? 그것을 알려면 다시 아래 그림을 봐야 한다.
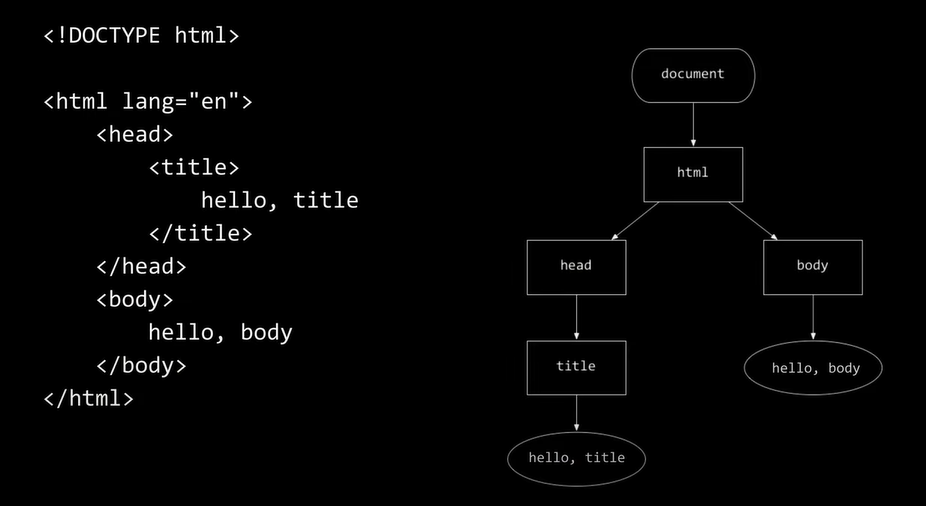
왼쪽은 간단한 웹페이지의 html 문서이고, 오른쪽은 DOM(Document Object Model)으로, 브라우저가 메모리(RAM)에 자동으로 만드는 트리이다. JS는 이 트리를 조작(read, change)할 수 있다.
html 파일에 변화가 생기면 페이지를 새로고침해야 변경사항을 알 수 있다. 그러나 JS를 이용하면 24시간 라이브로 변경사항이 업데이트(DOM 트리에 새 노드 추가 등)되기 때문에 페이지를 새로고침하지 않아도 무엇이 바뀌었는지 알 수 있다.
5. 자바스크립트와 HTML
- JavaScript allows you to dynamically read and modify the html document loaded into memory such that the user need not reload to see changes.
- JS는 브라우저의 클라이언트 사이드에서 작동하기 때문에 html file안에다가 쓴다.
- Consider the following HTML:
<!DOCTYPE html> <!--Use 'form' tag--> <html lang="en"> <head> <script> function greet() { let name = document.querySelector('#name').value; alert('hello, ' + name); } </script> <title>hello, title</title> </head> <body> <form onsubmit="greet(); return false;"> <input autocomplete="off" autofocus id="name" placeholder="Name" type="text"> <button type="submit">Greet</button> </form> </body> </html><body>부분form태그의onsubmit인자는 html 인자이지만, 그 안에 JS의 코드를 넣을 수 있다.greet();는 코드 윗줄의<script>에서 따로 정의한 함수고,return false;는 함수greet();를 서버에 넘기지 말라는 뜻이다.input태그의id="name"은name = document.querySelector()의 괄호 안에 들어갈 unique identifier을 정의하기 위해 적은 것이다. 즉name이 unique identifier가 된다. 이제 페이지의 text box에 입력한 내용은 "name"이 된다.
<script>부분.querySelector: Hash(#), dot(.) 등의 문자로 DOM의 특정 노드를 select할 수 있다.#name은 id가 name인 것을 unique하게 select 한다..value: text box의 value를 가져온다.alert('hello, ' + name);: 파이썬처럼 문자열과 변수를 합해서 출력할 수 있다.- 참고로 문자열을 입력할 때 html에선 double quote("")를, JS에서는 single quote('')를 사용하는 것이 관습이다.
- 그러나 위처럼 html과 js를 한 파일에서 섞어쓰는 것은 좋은 디자인이 아니다. html, css, js를 각각 다른 파일에서 관리하는 것이 훨씬 깔끔하다.
- 다음 코드를 보자:
<!DOCTYPE html>
<!--Use 'form' tag-->
<html lang="en">
	<head>
		<script>
		document.addEventListener('DOMContentLoaded', function() {
			document.querySelector('form').addEventListener('submit', function(event) {
				let name = document.querySelector('#name').value;
				alert('hello, ' + name);
				event.preventDefault();
			});
		})
		</script>
		<title>hello, title</title>
	</head>
	<body>
		<form>
			<input autocomplete="off" autofocus id="name" placeholder="Name" type="text">
			<button type="submit">Greet</button>
		</form>

	</body>
</html>-
위의 코드에서
<form>의 attribute가 없어진 것과<script>의 내용이 바뀐 것을 주의하시오 -
<script>태그 내용에서 주목할 점
-document.querySelector('form').addEventListener('submit', function(event):id=#name이 아닌form태그를 select함,submit이벤트 발생을 감지
-function('event'){함수 내용};: JS는 한 줄로 함수를 정의할 수 있다. 참고로 함수 정의시 괄호 안에event라는 argument를 넣는 것이 관습임.
-let name = document.querySelector('#name').value;:id=name을 select한 후 그 값을 가져오고, 'hello + 사용자가 text box에 입력한 이름'을 출력함.
-event.preventDefault(): 앞에서 쓴 html코드에서<form>의return false;에 해당한다.
-document.addEventListener('DOMContentLoaded', function() {JS 코드});: html문서가 모두 읽히고 DOM이 생성되었을 때 JS코드를 실행시키는 함수이다. html과 js코드의 배치순서로 인해 버그가 발생할 여지를 없애준다.
- 결국 이 코드의 핵심은 한 파일 안에서 JS코드는<script>태그에 몰아넣었고, html코드는 아래쪽에 몰아넣어서 두 언어를 분리했다는 것이다. -
이제 CSS와 마찬가지로 JS를 다른 파일로 분리하고 html파일과 연결해보자
```html <!DOCTYPE html> <html lang="en"> <head> <script src="hello.js"></script> <title> hello,title </title> </head> <body> <form> <input autocomplete="off" autofocus id="name" placeholder="Name"> <button type="submit">Greet</button> </form> </body> </html> ``` -
<script src="hello.js"></script>로 js파일과 html파일을 연결한다. -
hello.js파일을 만들고 js코드를 옮긴다.
	```js
	document.addEventListener('DOMContentLoaded', function() {
				document.querySelector('form').addEventListener('submit', function(event) {
					let name = document.querySelector('#name').value;
					alert('hello, ' + name);
					event.preventDefault();
				});
			})
	```
6. submit이벤트 말고 다른 이벤트(keyup이벤트) 사용해보기
-
다음 코드를 보자
```html <!DOCTYPE html> <!-- Demonstrates keyup and template literals --> <html lang="en"> <head> <script> document.addEventListener('DOMContentLoaded',function(){ let input = document.querySelector('input'); input.addEventListener('keyup', function(event) { let name = document.querySelector('p'); if (input.value) { name.innerHTML = 'hello, ${input.value}'; } else { name.innerHTML = 'hello, whoever you are'; } }); }); </script> <title>hello</title> </head> <body> <form> <input autocomplete="off" autofocus placeholder="Name" type="text"> </form> <p></p> </body> </html> ``` -
document.addEventListener('DOMContentLoaded',function(){});: html 문서에 js코드 삽입시 선언하는 함수. -
let input = document.querySelector('input');:<input>태그를 select하고 input 변수 선언 -
input.addEventListener('keyup', function(event){});: 사용자가 키보드를 누르고 떼는 순간 실행되는 함수. -
let name = document.querySelector('p');<p>태그 select해서 name변수 선언 -
<p></p>: paragraph 태그임. 나중에 hello,David나 hello,Carter등이 들어올 자리임. -
if (input.value) {name.innerHTML = 'hello, ${input.value}';}: 만약input변수에 값이 있다면 name 태그, 즉<p>로 가서<p>와</p>사이의 html을'hello, ${input.value}'로 바꾼다.
7. 버튼을 클릭해서 표 데이터 정렬하기
<!DOCTYPE  html>

<!-- Demonstrates table -->

<html  lang="en">
	<head>
		<link  href="https://cdn.jsdelivr.net/npm/bootstrap@5.2.2/dist/css/bootstrap.min.css"  rel="stylesheet"  integrity="sha384-Zenh87qX5JnK2Jl0vWa8Ck2rdkQ2Bzep5IDxbcnCeuOxjzrPF/et3URy9Bv1WTRi"  crossorigin="anonymous">
		<script  src="https://cdn.jsdelivr.net/npm/bootstrap@5.2.2/dist/js/bootstrap.bundle.min.js"  integrity="sha384-OERcA2EqjJCMA+/3y+gxIOqMEjwtxJY7qPCqsdltbNJuaOe923+mo//f6V8Qbsw3"  crossorigin="anonymous"></script>
		<script  src="https://code.jquery.com/jquery-3.6.1.min.js"  integrity="sha256-o88AwQnZB+VDvE9tvIXrMQaPlFFSUTR+nldQm1LuPXQ="  crossorigin="anonymous"></script>
		<link  rel="stylesheet"  href="https://unpkg.com/bootstrap-table@1.21.1/dist/bootstrap-table.min.css">
		<script  src="https://unpkg.com/bootstrap-table@1.21.1/dist/bootstrap-table.min.js"></script>
		<title>favorites</title>
	</head>
	<body>
		<table  class="table table-striped"  data-toggle="table">
			<thead>
				<tr>
					<th  data-sortable="true"  scope="col">Timestamp</th>
					<th  scope="col">language</th>
					<th  scope="col">problem</th>
				</tr>
			</thead>
			<tbody>
				<tr>
					<td>10/24/2022 8:33:26</td>
					<td>C</td>
					<td>Credit</td>
				</tr>
				<!--표 데이터 생략-->
			</tbody>
		</table>
	</body>
</html>- 부트스트랩을 이용해 표 모양을 예쁘게 꾸몄다. ->
bootstrap.min.css,bootstrap.bundle.min.js,jquery-3.6.1.min.js,bootstrap-table.min.css,bootstrap-table.min.js을 이용함. <table class="table table-striped" data-toggle="table">
- aesthetics of table: "table", "table-striped"
-data-toggle="table"
-data-sortable="true"를 이용해 정렬할 수 있다.<thead>: table head로, 표의 열이름을 뜻함.
8. 재미있는 기능 - RGB 버튼 눌러 배경색 바꾸기
<!DOCTYPE html>

<!-- Demonstrates programmatic changes to style -->

<html lang="en">
	<head>
		<title>background</title>
	</head>
	<body>
		<button id="red">R</button>
		<button id="green">G</button>
		<button id="blue">B</button>
		<script>

			   let body = document.querySelector('body');
			    document.querySelector('#red').addEventListener('click', function() {
			       body.style.backgroundColor = 'red';
			   });
			   document.querySelector('#green').addEventListener('click', function() {
			       body.style.backgroundColor = 'green';
			   });
			   document.querySelector('#blue').addEventListener('click', function() {
			       body.style.backgroundColor = 'blue';
			   });

		</script>
	</body>
</html>
document.querySelector('#red').addEventListener('click', function():id="red"인 버튼이 클릭되었을 때 다음 함수 실행함.body.style.backgroundColor = 'red';:body의style에서backgroundColor에 접근해'red'로 바꾸기
- 이렇게body.style.backgroundColor이라는 문법은 js로 페이지의 css를 바꿀 수 있게 하기 때문에 강력하다.
- 주의점: css에서 배경색깔은background-color인데 js에서 배경색깔은backgroundColor이다. 스펠링 틀리지 않도록 하자. 이런 식으로 js를 이용해 css를 사용하는 경우, css의 변수명을 잘 조작해야 한다 -> camel case: 하이픈(-) 제거, 그리고 뒤에 붙어있는 단어 앞글자 대문자화시킨 후 붙여쓰기
Notice that JavaScript listens for when a specific button is clicked. Upon such a click, certain style attributes on the page are changed.bodyis defined as the body of the page. Then, an event listener waits for the clicking of one of the buttons. Then, thebody.style.backgroundColoris changed.
9. 재미있는 기능 - 글자 등을 깜박거리게 하기
-
Similarly, consider the following:
<!DOCTYPE html>

<html lang="en">
    <head>
        <script>

            // Toggles visibility of greeting
            function blink()
            {
                let body = document.querySelector('body');
                if (body.style.visibility == 'hidden')
                {
                    body.style.visibility = 'visible';
                }
                else
                {
                    body.style.visibility = 'hidden';
                }
            }

            // Blink every 500ms
            window.setInterval(blink, 500);

        </script>
        <title>blink</title>
    </head>
    <body>
        hello, world
    </body>
</html>
This example blinks a text at a set interval. Notice that
window.setIntervaltakes in two arguments: 1) A function to be called(blink) and 2) a wait period (in milliseconds)(500) between function calls. 또한window는 js와 브라우저에서 쓸 수 있는 global special variable로, window와 관련된 모든 것을 다룬다.setInterval은 말그대로 millisecond 단위로 interval을 설정하고, 그 interval이 종료된 후 인자로 넣은 함수를 호출한다. 참고로blink()을 인자로 넣는 것이 아니라blink를 인자로 넣는다는 것을 명심하라.
10. 재미있는 기능 - 자동완성
-
Consider the following:
<!DOCTYPE html>

<html lang="en">

    <head>
        <title>autocomplete</title>
    </head>

    <body>

        <input autocomplete="off" autofocus placeholder="Query" type="text">

        <ul></ul>

        <script src="large.js"></script>
        <script>

            let input = document.querySelector('input');
            input.addEventListener('keyup', function(event) {
                let html = '';
                if (input.value) {
                    for (word of WORDS) {
                        if (word.startsWith(input.value)) {
                            html += `<li>${word}</li>`;
                        }
                    }
                }
                document.querySelector('ul').innerHTML = html;
            });

        </script>

    </body>
</html>
This is a JavaScript implementation of autocomplete.
11. 재미있는 기능 - geolocation
-
Interestingly, we can also geolocate using JavaScript:
<!DOCTYPE html>

<html lang="en">
    <head>
        <title>geolocation</title>
    </head>
    <body>
        <script>

            navigator.geolocation.getCurrentPosition(function(position) {
                document.write(position.coords.latitude + ", " + position.coords.longitude);
            });

        </script>
    </body>
</html>
Notice that
navigator.geolocationis used togetCurrentPosition. This will not work if your computer or browser does not allow for location tracking. -
The capabilities of JavaScript are many and can be found in the JavaScript Documentation.
Summing Up
In this lesson, you learned how to create your own HTML files, style them, leverage third-party frameworks, and utilize JavaScript. Specifically, we discussed… 참고로 강의에서 교수가 계속 html 공식 문서를 봤더니.. CSS, bootstrap 공식 문서를 봤더니.. 라고 말한 것에서 느낀 것은, 언어를 배울 때는 많이 알 필요도 없고 전체적인 와꾸만 알고 필요할 때 공식문서를 찾아서 세부적인 사항을 적용하는 능력이 더 중요하다는 것이다. 결국 CS 지식(Problem Solving skill 포함)이 가장 중요하고 프로그래밍 언어를 구성하는 기본적인 문법과 이 논리를 각 언어에서 어떻게 구현했는지 알아채고 빠르게 습득하는 능력, 그리고 자잘한 세부사항들은 빠르게 검색해서 적용하는 능력을 기르는 것이 좋을 것 같다.
- TCP/IP
- DNS
- HTML
- CSS
- Frameworks
- JavaScript
See you next time!
