이번에는 클라우드에서 서비스 디스커버리를 알아보자 이전(챕터 1장) 개념에서 살펴본것과 같이 라우팅 패턴에 속한다.
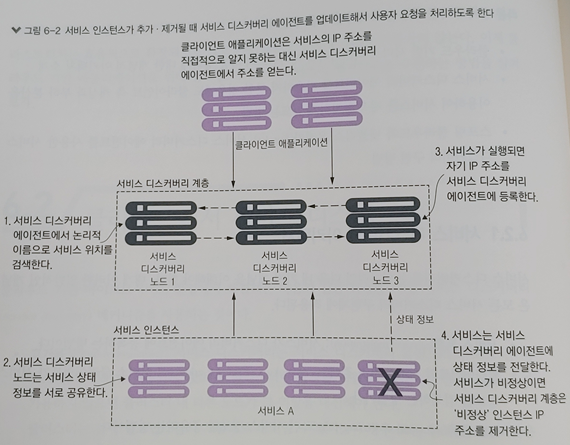
서비스 디스커버리를 사용하면 서비스를 소비하는 클라이언트에서 서버가 배포된 물리적 위치(IP 및 서버 이름)를 추상화 할 수 있다.
소비자는 물리적 위치가아닌 논리적 이름을 사용하여 비즈니스 로직을 호출한다.
또 서비스 인스턴스가 시작되도 종료될 때 인스턴스 등록 및 등록 취소도 처리한다.
이번에는 넷플레스에서 지원하는 유레카 서비스를 서비스 디스커버리 엔진으로 동작하도록 구현을 하고자한다
아키택쳐는 대략 아래와 같다
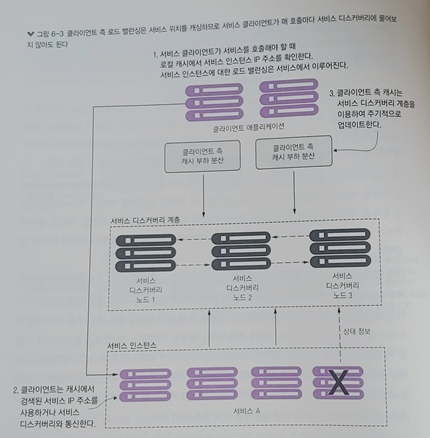
서비스 디스커버리 엔진에 완전히 의존하기 때문에 더욱 견고한 접근 방법으로 클라이언트 측 로드밸런싱으로 알려진 방법을 사용할 수 있다.
라운드 로빈 알고리즘식 로드밸런싱을 사용하는데 클라이언트 요청을 여러 서버에 분산시키는 방법을 의미한다. 이 방법은 클라이언트 요청을 차례로 각 서버에 전달하는 것이다.
이러한 장점은 서비스 인스턴스가 다운되면 인스턴스가 레지스트리에서 제거가 된다. 작업이 완료되면 클라이언트 측 로드 밸런서는 레지스트리 서비스와 지속적으로 통신하여 자동으로 레지스트리를 업데이트한다.
아래는 진행하고자하는 서비스들의 소스를 참고할 깃헙 주소이다.
https://github.com/hyeokjinON/microservice_study/tree/master/chapter6/Final
이제 서비스 디스커버리인 유레카 서비스를 구축해보자
먼저 pom.xml에 의존성을 추가하자
pom.xml
<?xml version="1.0" encoding="UTF-8"?>
<project xmlns="http://maven.apache.org/POM/4.0.0" xmlns:xsi="http://www.w3.org/2001/XMLSchema-instance"
	xsi:schemaLocation="http://maven.apache.org/POM/4.0.0 https://maven.apache.org/xsd/maven-4.0.0.xsd">
	<modelVersion>4.0.0</modelVersion>
	<parent>
		<groupId>org.springframework.boot</groupId>
		<artifactId>spring-boot-starter-parent</artifactId>
		<version>2.2.5.RELEASE</version>
		<relativePath/> <!-- lookup parent from repository -->
	</parent>
	<groupId>com.optimagrowth</groupId>
	<artifactId>eurekaserver</artifactId>
	<version>0.0.1-SNAPSHOT</version>
	<name>Eureka Server</name>
	<description>Eureka Server</description>

	<properties>
		<java.version>11</java.version>
		<docker.image.prefix>ostock</docker.image.prefix>
		<spring-cloud.version>Hoxton.SR1</spring-cloud.version>
	</properties>

	<dependencies>
		<dependency>
			<groupId>org.springframework.boot</groupId>
			<artifactId>spring-boot-starter-actuator</artifactId>
		</dependency>
		<dependency>
			<!-- 애플리케이션 구성을 검색하려고 스프링 컨피그 서버에 연결하는 클라이언트를 include하도록 메이븐에 지시한다.-->
			<groupId>org.springframework.cloud</groupId>
			<artifactId>spring-cloud-starter-config</artifactId>
		</dependency>
		<dependency>
			<groupId>org.springframework.cloud</groupId>
			<!-- 유레카 라이브러리를 include하도록 메이븐에 지시-->
			<artifactId>spring-cloud-starter-netflix-eureka-server</artifactId>
			<exclusions>
				<!-- 넷플릭스 리본 라이브러리를 exclude한다-->
				<exclusion>
                    <groupId>org.springframework.cloud</groupId>
                    <artifactId>spring-cloud-starter-ribbon</artifactId>
                </exclusion>
                <exclusion>
                    <groupId>com.netflix.ribbon</groupId>
                    <artifactId>ribbon-eureka</artifactId>
                </exclusion>
            </exclusions>
		</dependency>
		<dependency>
		    <groupId>org.springframework.cloud</groupId>
			<!-- 스프링 클라우드 로드 밸런서 라이브러리를 include하도록 메이븐에 지시한다.-->
		    <artifactId>spring-cloud-starter-loadbalancer</artifactId>
		</dependency>
		<dependency>
			<groupId>org.springframework.boot</groupId>
			<artifactId>spring-boot-starter-test</artifactId>
			<scope>test</scope>
			<exclusions>
				<exclusion>
					<groupId>org.junit.vintage</groupId>
					<artifactId>junit-vintage-engine</artifactId>
				</exclusion>
			</exclusions>
		</dependency>
	</dependencies>

	<dependencyManagement>
		<dependencies>
			<dependency>
				<groupId>org.springframework.cloud</groupId>
				<artifactId>spring-cloud-dependencies</artifactId>
				<version>${spring-cloud.version}</version>
				<type>pom</type>
				<scope>import</scope>
			</dependency>
		</dependencies>
	</dependencyManagement>

	<build>
		<plugins>
			<plugin>
				<groupId>org.springframework.boot</groupId>
				<artifactId>spring-boot-maven-plugin</artifactId>
			</plugin>
			<!-- This plugin is used to create a docker image and publish the image to docker hub-->
			<plugin>
				<groupId>com.spotify</groupId>
				<artifactId>dockerfile-maven-plugin</artifactId>
				<version>1.4.13</version>
				<configuration>
					<repository>${docker.image.prefix}/${project.artifactId}</repository>
	                <tag>${project.version}</tag>
					<buildArgs>
						<JAR_FILE>target/${project.build.finalName}.jar</JAR_FILE>
					</buildArgs>
				</configuration>
				<executions>
					<execution>
						<id>default</id>
						<phase>install</phase>
						<goals>
							<goal>build</goal>
							<goal>push</goal>
						</goals>
					</execution>
				</executions>
			</plugin>
		</plugins>
	</build>

</project>
유레카 서버에 시작될때 실행되는 bootstrap.yml이다
bootstrap.yml
spring:
    application:
      # 스프링 클라우드 컨피그 클라이언트가 찾고 있는 서비스를 알 수 있도록 유레카 서비스의 이름을 지정한다
     name: eureka-server
    cloud:
        config:
          # 스프링 클라우드 컨피그 서버의 위치를 지정한다
            uri: http://configserver:8071
        loadbalancer:
          # 리본이 클라이언트 측 기본 로드 밸런서이므로 비활성화 한다.
            ribbon:
               enabled: false
스프링 컨피그 서버에서 유레카의 설정을한다
configServer : eureka-server.yml
spring:
  application:
    name: eureka-server
  boot:
    admin:
      context-path: /admin
server:
  # 유레카 서버의 수신 포트를 지정한다
  port: 8070
eureka:
  instance:
    # 유레카 인스턴스의 호스트이름을 설정한다.
    hostname: eurekaserver
  client:
    # 컨피그 서버가 유레카 서비스에 등록하지 않도록 지시한다.
    registerWithEureka: false
    # 컨피그 서버가 캐시 레지스트리 정보를 로컬에 캐시하지 않도록 지시한다
    fetchRegistry: false
    serviceUrl:
      # 서비스 URL을 제공한다
      defaultZone: http://${eureka.instance.hostname}:${server.port}/eureka/
  server:
    # 서비스가 요청을 받기 전 초기 대기 시간을 설정한다.
    waitTimeInMsWhenSyncEmpty: 5


management:
  endpoints:
    web:
      exposure:
        include: "*"
애플리케이션 부트스트랩 클래스에 애너테이션을 지정한다.
EurekaServerApplication.java
package com.optimagrowth.eureka;

import org.springframework.boot.SpringApplication;
import org.springframework.boot.autoconfigure.SpringBootApplication;
import org.springframework.cloud.netflix.eureka.server.EnableEurekaServer;

@SpringBootApplication
// 스프링 서비스에서 유레카 서버를 활성화한다
@EnableEurekaServer
public class EurekaServerApplication {

	public static void main(String[] args) {
		SpringApplication.run(EurekaServerApplication.class, args);
	}

}
스프링 유레카에 서비스 등록
먼저, 기존 라이선싱 서비스와 통신하는 조직 서비스를 추가한다.
조직 및 라이런싱 서비스의 pom.xml 파일에 스프링 유레카 의존성을 추가한다.
licensing-service, organization-service > pom.xml
		<dependency>
			<groupId>org.springframework.cloud</groupId>
			<!-- 유레카 라이브러리를 포함하여 서비스가 유레카에 등록할 수 있게 한다-->
			<artifactId>spring-cloud-starter-netflix-eureka-client</artifactId>
			<exclusions>
				<exclusion>
                    <groupId>org.springframework.cloud</groupId>
                    <artifactId>spring-cloud-starter-ribbon</artifactId>
                </exclusion>
                <exclusion>
                    <groupId>com.netflix.ribbon</groupId>
                    <artifactId>ribbon-eureka</artifactId>
                </exclusion>
            </exclusions>
		</dependency>
조직 및 라이선스 서비스 각각 bootstrap.yml에 유레카에 등록될 서비스의 논리적인 이름을 작성한다. (spring.applicataion.name)
bootstarp.yml
# organization-service
spring:
    application:
     name: organization-service
    profiles:
      active: dev
    cloud:
        config:
            uri: http://configserver:8071

# licensing-service
spring:
    application:
     name: licensing-service
    profiles:
      active: dev
    cloud:
        config:
            uri: http://configserver:8071
그리고 유레카에 대한 서비스의 application.properties 파일을 수정한다.
licensing-service는 컨피그서버에 있는 icensing-service.properties에 작성하고
organization-service는 컨피그 서버에 있는 organization-service.properties에서 작성을한다.
(registerWithEureka, fetchRegistry 이 두가지는 기본적으로 true지만 설명목적으로 애플리케이션 구성파일에 추가했다.)
preferIpAddress를 true로 사용하는 이유는
컨테이너 기반의 배포환경(도커)에서 컨테이너는 DNS 엔트리가 임의로 생성한 호스트 이름을 할당해서 시작되기 때문에 애플리케이션은 해당 컨테이너에 대한 DNS 엔트리가 없어 호스트 이름의 위치를 제대로 얻지 못한다.
그래서 해당 프로퍼티를 설정하면 클라이언트가 IP주소로 전달받도록 유레카에 알려준다
organization-service.properties 및 licensing-service.properties
# 서비스 이름 대신 서비스 IP 주소를 등록한다
eureka.instance.preferIpAddress = true
# 유레카 서비스 등록 여부
eureka.client.registerWithEureka = true
# 레지스트리 사본을 로컬에 내려받기
eureka.client.fetchRegistry = true
# 유레카 서비스의 위치 설정
eureka.client.serviceUrl.defaultZone = http://eurekaserver:8070/eureka/
그리고 organization-service의 OrganizationServiceApplication.java 와 licensing-service 의 LicenseServiceApplication.java 에서 유레카 클라이언트를 지정해주는 어노테이션을 설정해준다
@EnableEurekaClient유레카 REST API
유레카의 REST API로 서비스의 모든 인스턴스를 볼 수 있다.
예를들어 레지스트리의 조직 서비스를 보려면
http://localhost:8070/eureka/apps/organization-service
GET 엔드포인트를 호출할 수 있다.
서비스에 대한 검색키, 조직 서비스 인스턴스의 IP, 서비스가 현재 작동중인지 등을 알 수 있다.
유레카 대시보드
http://localhost:8070 으로 이동하면 대시보드를 통해 서비스 등록 상태를 볼 수 있다.
서비스 디스커버리를 이용한 서비스 검색
라이선싱 서비스가 조직 서비스 위치를 직접적으로 알지 못해도 조직 서비스를 호출 할 수 있는 방법을 설명한다.
라이선싱 서비스는 유레카를 이용하여 조직 서비스의 물리적 위치를 검색한다.
서비스 디스커버리를 위해 서비스 소비자가 스프링 클라우드 로드 밸런서와 상호 작용할 수 있는 세가지 다른 스프링/넷플릭스 클라이언트 라이브러리를 살펴보고 적용해보자.
-
스프링 Discovery Client : Discovery Client와 표준 스프링 RestTemplate 클래스를 사용하여 조직 서비스를 호출
-
REST 템플릿을 이용한 Discovery Client : 향상된 RestTemplate으로 로드 밸런서를 사용하는 서비스를 호출
-
넷플릭스 Feign 클라이언트 : 넷플릭스 Feign 라이브러리를 사용하여 스프링 클라우드 로드 밸런서를 경유하여 서비스 호출
여러 REST 클라이언트로 라이선싱 서비스 호출해보자
LicenseController.java
	// clientType 매개변수가 사용할 REST 클라이언트를 결정한다.
	@RequestMapping(value="/{licenseId}/{clientType}",method = RequestMethod.GET)
	public License getLicensesWithClient( @PathVariable("organizationId") String organizationId,
			@PathVariable("licenseId") String licenseId,
			@PathVariable("clientType") String clientType) {

		return licenseService.getLicense(licenseId, organizationId, clientType);
	}
(해당 코드들은 기존 챕터에서 사용했던 프로젝트에 이어서 추가를 한다)
LicenseService.java
 	public License getLicense(String licenseId, String organizationId, String clientType){
		License license = licenseRepository.findByOrganizationIdAndLicenseId(organizationId, licenseId);
		if (null == license) {
			throw new IllegalArgumentException(String.format(messages.getMessage("license.search.error.message", null, null),licenseId, organizationId));
		}

		Organization organization = retrieveOrganizationInfo(organizationId, clientType);
		if (null != organization) {
			license.setOrganizationName(organization.getName());
			license.setContactName(organization.getContactName());
			license.setContactEmail(organization.getContactEmail());
			license.setContactPhone(organization.getContactPhone());
		}

		return license.withComment(config.getProperty());
	}


    private Organization retrieveOrganizationInfo(String organizationId, String clientType) {
		Organization organization = null;

		switch (clientType) {
		case "feign":
			System.out.println("I am using the feign client");
			organization = organizationFeignClient.getOrganization(organizationId);
			break;
		case "rest":
			System.out.println("I am using the rest client");
			organization = organizationRestClient.getOrganization(organizationId);
			break;
		case "discovery":
			System.out.println("I am using the discovery client");
			organization = organizationDiscoveryClient.getOrganization(organizationId);
			break;
		default:
			organization = organizationRestClient.getOrganization(organizationId);
			break;
		}

		return organization;
	}
이제 각 clientType에 따른 조직 서비스 호출 및 로드밸런싱을 하는 코드를 만들어보자
OrganizationDiscoveryClient.java
package com.optimagrowth.license.service.client;

import java.util.List;

import org.springframework.beans.factory.annotation.Autowired;
import org.springframework.cloud.client.ServiceInstance;
import org.springframework.cloud.client.discovery.DiscoveryClient;
import org.springframework.http.HttpMethod;
import org.springframework.http.ResponseEntity;
import org.springframework.stereotype.Component;
import org.springframework.web.client.RestTemplate;

import com.optimagrowth.license.model.Organization;

@Component
public class OrganizationDiscoveryClient {

    // Discovery Client를 클래스에 주입
    @Autowired
    private DiscoveryClient discoveryClient;

    public Organization getOrganization(String organizationId) {
        RestTemplate restTemplate = new RestTemplate();
        // 조직 서비스의 모든 인스턴스 리스트를 얻는다
        List<ServiceInstance> instances = discoveryClient.getInstances("organization-service");

        if (instances.size()==0) return null;
        // 서비스 엔드포인트를 검색 해서 가져온다
        String serviceUri = String.format("%s/v1/organization/%s",instances.get(0).getUri().toString(), organizationId);

        // 서비스 호출을 위해 표준 스프링 RestTemplate 클래스를 사용한다.
        ResponseEntity< Organization > restExchange =
                restTemplate.exchange(
                        serviceUri,
                        HttpMethod.GET,
                        null, Organization.class, organizationId);

        return restExchange.getBody();
    }
}
OrganizationRestTemplateClient.java
package com.optimagrowth.license.service.client;

import org.springframework.beans.factory.annotation.Autowired;
import org.springframework.http.HttpMethod;
import org.springframework.http.ResponseEntity;
import org.springframework.stereotype.Component;
import org.springframework.web.client.RestTemplate;

import com.optimagrowth.license.model.Organization;

@Component
public class OrganizationRestTemplateClient {
    @Autowired
    RestTemplate restTemplate;

    public Organization getOrganization(String organizationId){
        ResponseEntity<Organization> restExchange =
                // 로드 밸런서 지원 RestTemplate을 사용할 때 유레카 서비스 ID로 대상 URL을 생성한다.
                restTemplate.exchange(
                        "http://organization-service/v1/organization/{organizationId}",
                        HttpMethod.GET,
                        null, Organization.class, organizationId);

        return restExchange.getBody();
    }
}
OrganizationFeignClient.java
package com.optimagrowth.license.service.client;


import org.springframework.cloud.openfeign.FeignClient;
import org.springframework.web.bind.annotation.PathVariable;
import org.springframework.web.bind.annotation.RequestMapping;
import org.springframework.web.bind.annotation.RequestMethod;

import com.optimagrowth.license.model.Organization;

// Feign에 서비스를 알려 준다
@FeignClient("organization-service")
public interface OrganizationFeignClient {
    // 엔드포인트 경로와 액션을 정의한다.
    @RequestMapping(
            method= RequestMethod.GET,
            value="/v1/organization/{organizationId}",
            consumes="application/jon")
    // 엔드포인트에 전달되는 매개변수를 정의한다.
    Organization getOrganization(@PathVariable("organizationId") String organizationId);
}
해당 코드들을 사용하려면 LicenseServiceApplication.java 클래스에 에너테이션을 추가시켜야 한다.
스프링 Discovery Client 경우 LicenseServiceApplication에
@EnableDiscoveryClient를 추가한다
REST 템플릿을 이용한 Discovery Client 경우 로드 밸런서를 지원하는 RestTemplate 빈을 생성하는 getRestTemplate()를 생성하고 @LoadBalanced 어노테이션을 추가한다.
넷플릭스 Feign 클라이언트 경우 LicenseServiceApplication 에 @EnableFeignClients 어노테이션을 추가한다.
LicenseServiceApplication.java
package com.optimagrowth.license;

import java.util.Locale;

import org.springframework.boot.SpringApplication;
import org.springframework.boot.autoconfigure.SpringBootApplication;
import org.springframework.cloud.client.discovery.EnableDiscoveryClient;
import org.springframework.cloud.client.loadbalancer.LoadBalanced;
import org.springframework.cloud.context.config.annotation.RefreshScope;
import org.springframework.cloud.openfeign.EnableFeignClients;
import org.springframework.context.annotation.Bean;
import org.springframework.context.support.ResourceBundleMessageSource;
import org.springframework.web.client.RestTemplate;
import org.springframework.web.servlet.LocaleResolver;
import org.springframework.web.servlet.i18n.SessionLocaleResolver;

@SpringBootApplication
@RefreshScope
// 유레카 Discovery Client를 활성화한다.
@EnableDiscoveryClient
// 코드에서 Feign 클라이언트를 사용하려고 추가한다.
@EnableFeignClients
public class LicenseServiceApplication {

	public static void main(String[] args) {
		SpringApplication.run(LicenseServiceApplication.class, args);
	}

	@Bean
	public LocaleResolver localeResolver() {
		SessionLocaleResolver localeResolver = new SessionLocaleResolver();
		localeResolver.setDefaultLocale(Locale.US);
		return localeResolver;
	}
	@Bean
	public ResourceBundleMessageSource messageSource() {
		ResourceBundleMessageSource messageSource = new ResourceBundleMessageSource();
		messageSource.setUseCodeAsDefaultMessage(true);
		messageSource.setBasenames("messages");
		return messageSource;
	}

	// 조직 서비스의 모든 인스턴스를 얻는다.
	@LoadBalanced
	@Bean
	public RestTemplate getRestTemplate(){
		return new RestTemplate();
	}

}
필요에 따라 가장 적합한 것을 선택하여 적용하면 되겠다.
유레카 서비스 구축은 여기까지이다.
🧨 다음 챕터에는 Resilience4j를 통한 클라이언트 측 회복성 여러 패턴들을 알아보고 적용해 볼 것이다.