첫 번째: 앱을 고려하기
모바일 장치 인터넷 사용량 통계
- 웹 사이트 트래픽의 55%는 모바일 장치에서 발생해요.
- 인터넷에 접속하는 92.3%가 모바일 장치를 사용해요.
- 약 43억 2천만 명의 활성 모바일 인터넷 사용자가 있어요.
- 2025년까지 전 세계적으로 10억 개 이상의 5G 연결이 발생할 거에요.
웹 앱과 모바일 앱
웹 앱
- HTML, CSS, JavaScript로 개발합니다.
- 모바일 기기에 웹 브라우저로 앱처럼 사용합니다.
- 다양한 모바일 플랫폼의 지원이 가능합니다.
- 유지보수가 쉽고 스스로 업데이트 할 수 있습니다.
- 네이티브 앱보다 생산 비용이 저렴합니다.
모바일 앱
- SDK 개발이 필요합니다.
- 모바일 기기에 앱을 다운로드하여 사용합니다.
- 다양한 모바일 기기의 기능과 호환됩니다.
- 스토어의 승인을 통해 안전성을 보장합니다.
- 인터넷 연결 없이 동작합니다.
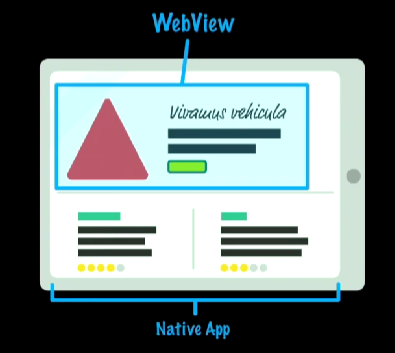
웹뷰
앱이 웹 컨텐츠를 표시하는 데 사용할 수 있는 내장형 브라우저
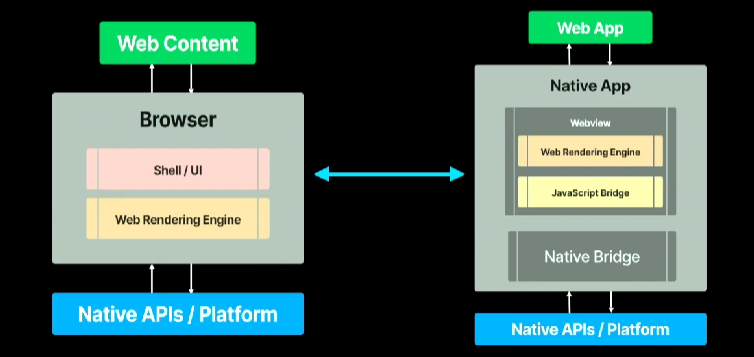
웹뷰 내에서 실행되는 자바스크립트는 기본 시스템 API를 호출할 수 있습니다. (이러한 기능을 브릿지라고 합니다.)
브릿지
- 네이티브와 웹뷰의 통신을 위해 제공되는 자바스크립트 인터페이스
- 웹뷰가 직접 네이티브 API를 호출할 수 없으므로 반드시 브릿지를 통해 호출
- 즉, 브릿지는 웹뷰 인터페이스의 구현체
대표적안 웹뷰의 통신 객체
- Window 오브젝트 사이에서 안전하게 Cross-Origin 통신이 가능
- 대중적으로 페이지와 팝업, 페이지 내부의 페이지 iframe 간에 통신에 사용(ex.yotube)
- Window.postMessage를 통해 전달된 인자는 이벤트 객체를 통해서만 사용 가능
- Window.addEventListener("message", callback)으로 핸들링 가능
웹뷰가 좋은 이유
- 웹과 앱을 한 번에 개발 가능 => 개발 속도 향상, 일관된 경험 제공
- 앱을 배포하지 않아도 웹뷰를 수정하면 반영 가능 => 앱 스토어 심사가 불필요
웹뷰가 기술적으로 좋은 이유는요?
- 런타임 시 발생하는 웹 코드(+ 임의 웹 컨텐츠) 격리 => 개발자가 로드되는 컨텐츠를 추가적으로 제어 가능
- 웹에 종속적이나 앱에 종속적이지 않음 => 웹뷰의 보안/부수적인 기능에 대해 재정의 가능
- 웹과 앱의 통신 방법을 다양하게 적용 가능 => 특정 플랫폼에 종속되지 않고 통신이 가능
아래와 같은 선택지가 생겨요!
- 센서(GPS, 자이로...), 알림, 카메라 등 사용 가능
- 모바일 저장소 사용 가능
- 일정 / 연락처 접근 가능
- 앱 대 앱 공유 가능
- 그 외 여러 네이티브 시스템과 깊이 통합 가능
두 번째: 앱을 준비하기
React Native vs Flutter
React Native
- 메타가 2015년에 출시
- 아직까지도 메이저 버전이 릴리즈 되지 않았음
- 크로스 플랫폼, 운영체제를 지원
Flutter
- 구글이 2018년 출시
- 구글에서 관리하고 꾸준한 업데이트를 통해 발전하는 중
- 크로스 플랫폼, 운영체제를 지원
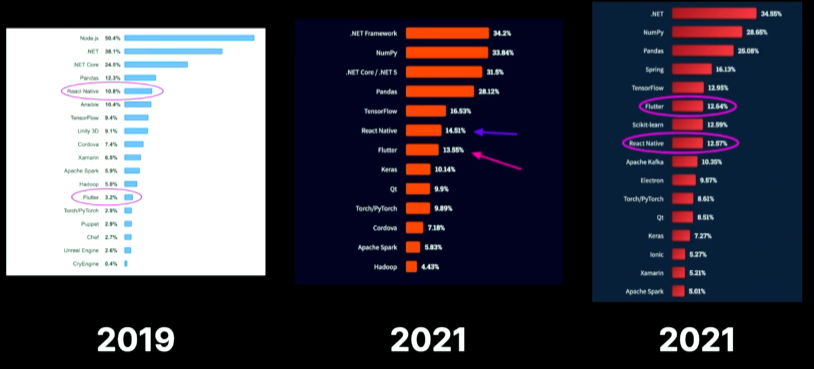
스택 오버 플로우 인기 툴 투표 결과
플러터와 리액트 네이티브 비교 항목
- 학습 곡선
- CLI 용이성
- 성능
- 디버깅
- 패키지 및 라이브러리
- 기술적 성숙함
- 문서
- 커뮤니티
- IDE
- 용량
- 핫 리로드
- 프로그래밍 언어
생각만해도 어질어질하죠?
극닥적인 정리
웹 없이 앱을 시작하되, 네이티브 개발 리소스가 없다면 플러터
리액트를 사용하여 웹 서비스를 개발 중이라면 리액트 네이티브
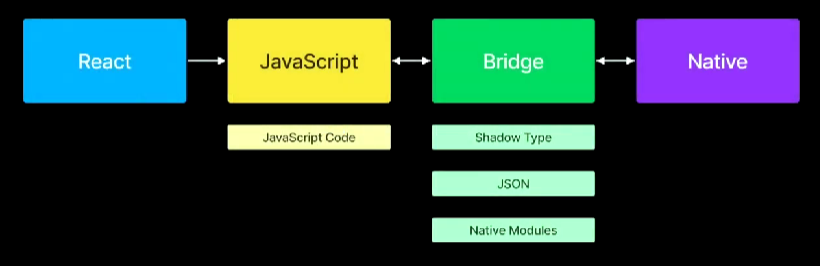
리액트 네이티브 웹뷰가 제공하는 브릿지 웨이
- 리액트 네이티브 => 웹
- injectedJavaScript 프로퍼티
- injectJavaScript 메서드
- 웹 => 리액트 네이티브
- onMessage 프로퍼티
- postMessage 메서드
네이티브 사이드에서 웹으로 주입하기
import { Component } from 'react';
import { View } from 'react-native';
import { WebView } from 'react-native-webview';

export default class App extends Component {
	render(){
    	const runFirst = `
			document.body.style.backgroundColor: 'red';
			setTimeout(function() {window.alert('hi')}, 2000);
			true;
		`
        return (
        	<View style={{ flex: 1}}>
          		<WebView
					source={{ url: 'https://github.com/react-native-webview/react-native-webview'}}
                  	onMessage{(event) => {}}
                  	injectedJavaScript={runFirst}
                 />
            </View>
        )
    }
}
해당 코드는 웹뷰가 웹을 열때 위에 있는 템플릿 문자열을 넣어서 전송할 수 있습니다. 즉, 해당 코드가 먼저 실행됩니다. => alert으로 hi가 출력
웹 사이드 HTML
const html = `
<html>
	<body>
		<script>
			setTimeout(function(){
				window.ReactNativeWebView.postMessage("Hello!")
			},2000)
		</script>
	</body>
</html>
`
웹 사이드에서 네이티브로 전송하기
import { Component } from 'react';
import { View } from 'react-native';
import { WebView } from 'react-native-webview';

export default class App extends Component {
	render(){
        return (
        	<View style={{ flex: 1}}>
          		<WebView
					source={{ html }}
                  	onMessage{(event) => {
                  		alert(event.nativeEvent.data);
                  	}}

                 />
            </View>
        )
    }
}
세 번째: 앱을 설정하기
리액트가 네이티브 앱으로 통합되는 과정
React Native CLI
- Expo CLI 이전, 리액트 네이티브 팀과 커뮤니티가 제공한 툴
- 기초적인 개발 설정을 제공하지만 추가 구성 및 설정 필요
- 자바스크립트 코드와 네이티브 기기 소스 코드를 합쳐야 한다면 React Native CLI가 좋음

Expo CLI
- 정리된 앱 개발 워크플로우로서 프로젝트 생성 및 코드 작성과 네이티브 기능 통합이 쉬움
- React Native CLI를 사용하는 것보다 훨씬 쉽고 간단하며 언제든 React Native CLI로 전환 가능
- EAS(Expo Application Services)
- Expo 관리 장치에서 앱을 빌드하고 앱 스토어에 제출하는 프리미엄 서비스
- Expo 관리 장치에서 앱을 빌드하고 앱 스토어에 제출하는 프리미엄 서비스
프로젝트 설정하기
# Expo CLI 설치
sudo npm install -g expo-cli

# 원하는 프로젝트로 변경
cd { 원하는 프로젝트 경로 }

# Expo 프로젝트 생성
# 구버전: expo init { 프로젝트 명 }
npx create-expo-app --template {Example}
yarn create expo-app
npm create expo-app
리액트 네이티브 웹뷰 추가하기
# WebView 라이브러리 설치
yarn add react-native-webview
import { WebView } from 'react-native-webview';
export default function App(){
return (
<WebView style={styles.container} source={{ uri: 'https://github.com/hyeon9782' }}
)
}이제 끝인 걸까요? 아닙니다!
개발자님..앱이 이상해요...
- 화면이 노치에 가려져요
- 뒤로/앞으로 가기가 동작하지 않아요
- 스와이프가 안 돼요
- 인터넷이 안되면 하얀 화면이 나와요
- 키보드가 화면을 다 잡아먹는데... 스크롤이 안 돼요
네 번째: 앱을 개발하기
필수적으로 알아야 하는 개념
- 네비게이션
- 화면 중첩과 보호
- 네이티브 기기와 통신
- 권한 획득
네비게이션은 무엇인가요?
- 웹은 앵커 태크 (
<a></a>)- 웹은 URL이 브라우저 히스토리에 스택으로 푸시
- 앱은 네비게이터 (Navigater)
- 네비게이션은 정의한 화면을 렌더링하는 방법을 결정하는 리액트 컴포넌트
- 엡이 화면을 전환하고 탐색 기록을 관리할 수 있는 방법
- 차이점은 스택이 변경될 때 제스쳐와 애니메이션을 제공한다는 것
네비게이션 구성하는 방법
- 네비게이션 컨테이너
- 탐색 트리를 관리하고 상태를 포함하는 루트 컴포넌트
- 모든 네비케이터 구조는 여기에 래핑
- 화면 구성을 정의하기 위한 스크린 컴포넌트를 자식으로 포함
네비게이션 컨테이너 정의하기
import { NavigationContainer } from '@react-navigation/native';

const App = () => {
	<NavigationContainer>
    	{/* Stack, Drawer, BottomTab */}
    </NavigationContainer>
}
스택 (Stack)
- 새 화면이 스택 위에 배치
- 화면 간 앱이 전환하는 방법 제공
- iOS, Android 기본 애니메이션이 적용되나 커스텀 가능
import { createNativeStackNavigator } '@react-navigation/native-stack';

const Stack = createNativeStackNavigator();

const StackNavigator = () => (
	<Stack.Navigator>
    	<Stack.screen name="Home" component={HomeScreen} />
    </Stack.Navigator>
)
드로어 (Drawer)
- 제스처를 통해 열고 닫을 수 있는 화면을 렌더링
import { createDrawerNavigator } '@react-navigation/drawer';

const Drawer = createDrawerNavigator();

const DrawerNavigator = () => (
	<Drawer.Navigator>
    	<Drawer.screen name="Home" component={HomeScreen} />
    </Drawer.Navigator>
)
바텀 탭 (Bottom Tab)
- 다른 영역을 전환할 수 있는 화면 하단의 탭 모음
- 영역은 천천히 초기화 되고, 처음 열리기 전까지 마운트되지 않음
import { createBottomTabNavigator } '@react-navigation/bottom-tab';

const BottomTab = createBottomTabNavigator();

const BottomTabNavigator = () => (
	<BottomTab.Navigator>
    	<BottomTab.screen name="Home" component={HomeScreen} />
    </BottomTab.Navigator>
)
스크린 컴포넌트
- navigation
- navigate: 다른 화면으로 이동 => 스크린 이름을 입력해서 이동
- reset: 네비게이터 상태를 지우고 새로 교체 => 유저 정보 등 민감한 정보를 제어한 후 스택 제어
- goBack: 활성 화면을 닫고 스택의 뒤로 이동 => 웹 컴포넌트의 "뒤로가기"를 직접 구현 가능
- dispatch: 탐색 상태 업데이트를 위한 객체 전송 => 절대 url 경로를 스택으로 푸시 가능
- route
- params: 매개변수 전달 => 초기 데이터 또는 스크린에 initialParams로 추가 정의 가능
풀 스크린 웹뷰가 아니면요?
컴포넌트에서 스크린 컴포넌트가 보내주는 navigate나 route를 전달받지 못할 때가 있습니다.
// react-navigation/native
const navigation = useNavigation();

const route = useRoute();
앱을 개발해보기: Hello, Real World!
리얼 월드 앱이 제공하는 기능
- 반응형 디자인 (PC, Tablet, Mobile)
- 포스팅 조회 및 권한에 따른 등록/수정/삭제
- 로그인/회원가입 등의 유저 기능
- 대용량 데이터 페이지네이션
- 부수적인 기능 제공 (좋아요, 피드, 해시태그)
이번 발표에서 앱으로 구현할 웹 서비스 코드
- 최소한의 개발
- 최대한 빠른 릴리즈
- 웹 프로젝트 사용 스택
- next.js v.13(page dir)
- react-query
- emotion
- axios
앱 구현과 기본적인 설계는... 어떻게?
- 모바일 웹과 앱에서의 컴포넌트를 어떻게 구분해서 제어할까? (Header 등등)
- 앱(웹뷰)인지 여부를 판단해서 조건문으로 컴포넌트를 렌더링하자!
- 페이지 라우팅은 어떻게 제어할까?
- router 이벤트를 발생시키지 않고 postMessage로 웹뷰에 보내자!
- 로그인 여부에 따라 다른 화면을 보여줄 수 있을까?
- 쿠키, 로컬 스토리지에 저장된 유저 정보를 전송하고... 네비게이션을 중첩해보자!
- 유저 정보를 어떻게 저장해둘까?
- 리액트 네이티브 저장소 라이브러리를 적용해보자!
앱, 웹뷰, 모바일 웹... 어떻게 판단하죠?
윈도우 객체 정보로 판단하기
// window navigator 객체의 userAgent
const isiOS = window.navigator.userAgent.match('iPad');
			|| window.navigator.userAgent.match('iPhone');
			|| window.navigator.userAgent.match('iPod');

const isAndroid = window.navigator.userAgent.match('Android');

// 리액트 네이티브 웹뷰 객체의 inject
const isWebView = !!window.ReactNativeWebView;
스크린 넓이로 판단하기
const MAX_MOBILE_SIZE = 992;

const useIsMobile = () => {
	const [width, setWidth] = useState(undefined);

  	useEffect(() => {
    	const handleResize = () => {
        	const { innerWidth: changedWidth } = window;
          	setWidth(changedWidth);
        }

        handleResize();

      	window.addEventListener('resize', handleResize);

      	return () => window.removeEventListener('resize', handleResize)
    }, []);

  	return { isMobile: !!width && width < MAX_MOBILE_SIZE };
}
라우터 이벤트를 어떻게 제어하죠?
웹뷰에게 메세지를 전달하기 위한 함수
const sendRouterEvent = async (params) => {
	window.ReactNativeWebView.postMessage(JSON.stringify({ type: 'ROUTER_EVENT', ...prams }))
}
웹뷰 여부 체크하기
const useWebView = () => {
	const isWebViewRef = useRef(false);

  	useEffect(() => {
    	if (isWebViewRef.current) return;

      	if (typeof window !== 'undefined' && window.ReactNativeWebView) {
        	isWebViewRef.current = true;
        }
    }, [])

  	return {
    	isWebView: isWebViewRef.current
    }
}
리액트에서 사용하는 useWebView 커스텀 훅
라우팅 발생 시 웹뷰 여부에 따라 별도 핸들링
const useAppRouter = () => {
	const { isWebView } = useWebView();
  	const router = useRouter();

  	const path = async (url, as, options = { shallow: true }) => {
    	return isWebView
      		? sendRouterEvent({
        		path: `${BASE_URL}${url}`,
          		screenName: options.appScreenName ?? '',
          		data: {...(options.appSendData ?? {})},
        	})
      		: router.push(url, as, options);
    }

    return { push }
}
useWebView를 Next에서 사용하는 router를 사용해서 한 번 더 래핑
웹뷰일 때는 sendMessage, 웹뷰가 아닐때는 라우터를 푸시
실제 리액트 네이티브 앱에서 핸들링하는 코드
const WebViewContainer = ({ navigation }) => {
	const requestOnMessage = (event) => {
    	const nativeEvent = JSON.parse(event.nativeEvent.data);

      	if (nativeEvent.type === 'ROUTER.EVENT'){
        	const { path } = nativeEvent;

          	const pushAction = StackActions.push(key, { url: path, isStack: true});
          	navigation.dispatch(pushAction);
          	return;
        }
    }

    return (
    	<WebView
      		source={{ uri: BASE_URL }}
    		onMessage={requestOnMessage}
    )
}
로그인 유저는 어떻게 구분하죠?
중첩 네비게이션
- 다른 네비게이션에 중첩 렌더링
- 상위 네비게이터에서 하위 네비게이터로 디스패치 가능
const Home = () => {
	return (
    	<Tab.Navigator>
        	<Tab.Screen name="Feed" component={Fedd}>
            <Tab.Screen name="Messages" component={Messages}>
        </Tab.Navigator>
    )
}

const App = () => {
	return (
    	<NavigationContainer>
        	<Stack.Navigator>
              <Stack.Screen
                name="Home"
                component={Home}
                options={{ headerShom}}
                >
              <Stack.Screen name="Profile" component={Profile}>
              <Stack.Screen name="Setting" component={Setting}>
            </Stack.Navigator>
        </NavigationContainer>
    )
}
케이스에 맞게 화면을 구성할 수 있습니다.
정보 저장
- @react-native-async-storage/async-storage
- 리액트 네이티브 커뮤니티에서 개선과 유지보수를 담당하는 라이브러리
- 리액트 네이티브를 위한 암호화되지 않은 키-값 저장소로 비동기 동작
- 다중 플랫폼 지원
- Android, iOS, Web, MacOS, Windows
- 직렬화를 통한 string 데이터 저장, localStorage와 같은 사용법
- JSON.stringify, JSON.parse API 활용 가능
현재(또는 대중적)으로 필요한 기능 우선순위 선별하기
- 푸시 알림이 필요합니다.
- 모바일 웹이 아니라 앱을 사용한 이벤트 데이터가 필요합니다.
- 네이티브 기능(카메라, GPS)이 필요합니다.
- 딥링크 등 앱 간 공유 기능이 필요합니다.
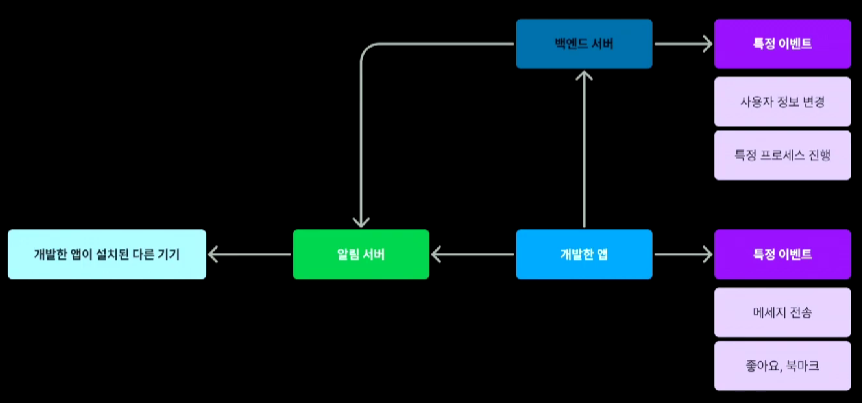
알림의 종류
- 로컬 알림
- 앱이 설치된 기기에서 설치된 앱이 트리거하는 알림(리마인더, 알람 시계, 할 일 앱 등)
- 푸시 알림
- 내 기기에 설치된 앱에서 트리거된 알림을 다른 기기에 설치된 앱으로 전송
푸시 알림 기능은 구글과 애플에서 유료로 막아놨습니다. 하지만 서드파티 툴을 사용하면 가능합니다.
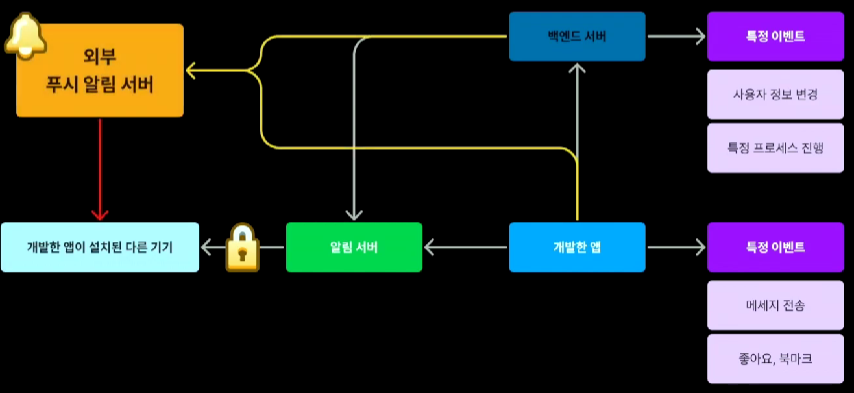
외부 푸시 알림 서버는 HTTP 요청으로 소통합니다.
알림 기능을 위한 사전 준비
- expo-notifications 설치
- app.json 설정
- extra.eas.projectId 추가
- Expo로 생성한 프로젝트 아이디
- expo-constants 라이브러리로 호출 가능
- extra.eas.projectId 추가
// app.json
"expo": {
  // 그 외 설정
  "plugins": [
    [
      "expo-notifications",
      {
        "icon: "./assets/favicon.png",
        "color": "#ffffff"
      }
    ]
  ],
  "extra": {
    "eas": {
    	"projectId": "여러분의 프로젝트 아이디"
    }
  }
}
expo-notifications으로 로컬 알림 설정하기
- setNotificationHandler: 알림에 대한 전반적인 설정
import * as Notifications from 'expo-notifications';

Notifications.setNotificationHandler({
	handleNotification: async () => {
    	return {
        	shouldPlaySound: false,
          	shouldSetBadge: false,
          	shouldShowAlert: true
        }
    }
})- addNotificationReceivedListener: 알림이 도착하면 트리거
- addNotificationResponseReceivedListener: 도착한 알림을 터치하면 트리거
useEffect(() => {
	const subscription1 = Notifications.addNotificationReceivedListener((notification) => {
    	console.log(알림이 도착했어요!)
      	const { userName, type } = notification.request.content.data;
      	setUserInfo({ name: userName, type });
    })

    const subscription2 = Notifications.addNotificationResponseReceivedListener((response) => {
    	console.log(알림을 터치했어요!)
      	const { userName, type } = response.notification.request.content.data;
      	Alert.alert(`도착한 유저 정보: ${type} - ${userName}`)
    })

    return () => {
    	subscription1.remove();
      	subscription2.remove();
    }


}, [])- scheduleNotificationAsync: 로컬 알림을 전송(trigger로 핸들링)
Notifications.scheduleNotificationAsync({
	content: {
    	title: '로컬 알림 타이틀이에요.',
      	body: '로컬 알림에 들어갈 내용이에요',
      	data: { userName: targetUserName, type: '로컬 알림'},
    },
  	trigger: {
    	seconds: 2,
    }
})
expo-notifications으로 푸시 알림 설정하기
- getPermissionsAsync: 권한 상세 정보를 가져오는 메서드
const { status } = await Notifications.getPermissionsAsync({
	ios: {
    	allowAlert: true,
      	allowBadge: true,
      	allowAnnouncements: true,
    }
})
권한이 있는지 확인하는 코드입니다. 권한이 없다면 요청을 해야합니다.
- requestPermissionsAsync: 권한을 요청하는 메서드
const { status } = Notifications.requestPermissionsAsync();- getExpoPushTokenAsync: expo 프로젝트 아이디로 앱이 설치된 현재 기기의 토큰을 가져오는 메서드
const pushTokenData = await Notifications.getExpoPushTokenAsync({ projectId })그 외, 알아두어야 하는 것들: 리액트 네이티브의 코어 컴포넌트
- Text와 View, Image, ScrollView, TextInput
- 브라우저가 아니기 때문에 div, h2 태그 등 HTML 요소는 사용 불가
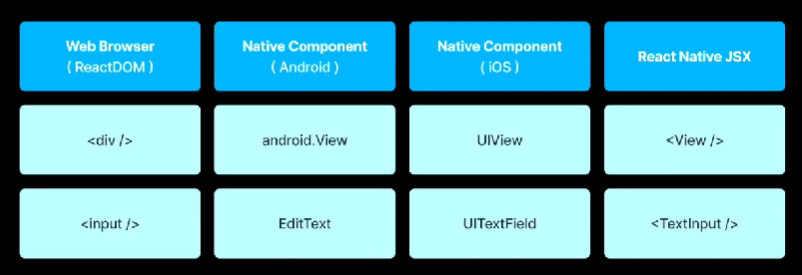
- 브라우저가 아니기 때문에 div, h2 태그 등 HTML 요소는 사용 불가
그 외, 알아두어야 하는 것들: 존재하지 않는 CSS
- 브라우저가 아니기 때문에 제어 및 사용이 불가능
- DOM 구조가 아니므로 스타일 상속이 존재하지 않음
- 프로퍼티를 이용한 인라인 스타일과 StyleSheet 객체로 작성 가능
그 외, 알아두어야 하는 것들: 웹과 다른 이벤트
- Click 이벤트 대신 Pressable 컴포넌트로 감싸서 이벤트를 핸들링
- TouchableHightlight, TouchableNativeFeedback, TouchableOpacity
- DOM 이벤트 객체가 없으므로 event.nativeEvent 객체를 활용하여 핸들링
- DOM의 스크롤이 없으므로 ScrollView 컴포넌트로 스크롤을 핸들링
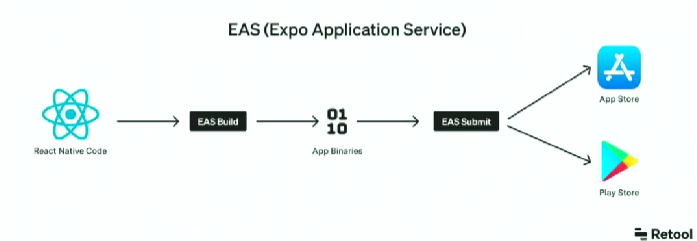
마지막으로, 앱의 빌드는 EAS의 도움을 받습니다.
eas build 해당 명령어 하나면 앱이 빌드됩니다. iOS 번들링은 유료입니다!
정리해볼까요? 목표는 최소한의 개발, 최대한 빠른 릴리즈
- 화면에 대한 설계
- 각 화면의 연결을 어떻게 관리할 것인지 네비게이션 고려
- 웹, 모바일 웹, 앱을 구분하는 함수를 만들고 웹과 앱이 통신하는 브릿지 작성
- 유저의 사용성을 개선하기 위한 저장소 추가
- 앱이 배포되기 위한 필요 최저한의 네이티브 개발
- 푸시 알림
앱 출시는 어떻게 준비하나요?
앱 출시를 위한 계정 생성
- 구글 개발자 계정, 애플 개발자 계정을 각각 등록해야 합니다.
- 구글 개발자 계정은 수수료 결제 시 바로 사용 가능해요.
- 애플 개발자 계정은 최대 3주까지 시간이 소요되니 미리 준비해주시면 좋아요.
앱 출시를 위한 에셋(Assets) 준비
- 아이콘: 1024*1024 사이지의 png 파일이 필요합니다.
- 스크린샷: 기기 해상도별로 준비합니다.
- 예시) 5.8형(12422208), 6.5형(12422688), 9형(2048*2732)
- 안내용 동영상: 500메가 이하로 동영상 업로드가 가능합니다.
- 인앱 구매 상품이 있다면 640*920 크기의 인앱 심사용 스크린샷이 필요합니다.
- 모든 이미지에는 타 채널 정보가 포함되어 있으면 안됩니다.
- 앱 사용 가능 연령을 표기하기 위한 등급을 설정합니다.
- 사용자를 지원할 수 있는 링크된 웹페이지가 반드시 필요합니다.
- 스토어 게시글을 작성하고 개인정보 처리 방침을 작성합니다.
웹뷰만 사용해서 앱을 출시할 수 있나요?
실제로 앱에서만 사용할 수 있는 네이티브 기능을 넣지 않고 웹과 동일한 경우에는 구글과 애플에서 거절 메일이 올때도 있습니다.
다섯 번째: 앱을 확장하기
개선해야 하는 것들: 완성한 뒤에 보이는 디테일
- 스플래시 이미지, 앱 아이콘을 쉽게 등록할 수 있는 app.json
- 상태 표시줄 디자인을 도와주는 StatusBar 컴포넌트
- 기기의 모서리, 상단 노치 등의 간격을 조절해주는 SafeAreaView 컴포넌트
- 앱의 테마를 설정할 수 있는 여러가지 수단들: app.json, useTheme, StyleSheet...
- 유저 인터렉션 UI에 대한 핸들링
- 리액트 네이티브에서 제공하는 컴포넌트만으로는 더 예뻐질 수 없는 우리의 서비스
- 어 컴포넌트로 외부/내부 컨테이너를 구성하여 작성하기
나머지 고려사항 - 1
- 브릿지 인터페이스의 확장
- 웹뷰와 웹, 리액트 네이티브와 네이티브 SDK 간의 브릿지를 추가하기
- 스토어에 배포하기 전 앱의 안정성 관리
- 릴리즈 버저닝, 테스트 및 사용자 앱 버전 관리
- 화면 보호하기
- 웹뷰 URL 노출을 어떻게 숨길 수 있을까
- 네비게이션 중첩을 활용하여 어떻게 사용성을 증가시킬 수 있을까?
나머지 고려사항 - 2
- 이벤트 수집
- 유저의 앱 사용 이벤트를 어떻게 수집할까?
- 앰플리튜드, 구글 애널리틱스, 파이어 베이스 등
- 서비스 로그 수집
- 앱(프론트), 서버(백엔드), 인프라(데브옵스) 모니터링 수단 강구
- 네트워크 상태가 불안정해도 흔들리지 않는 사용자 경험 제공
- 캐싱 적용
- 웹뷰와 네이티브 컴포넌트의 종속성을 분리하여 구성
앱을 확장하고 싶다? 네이티브 개발이 필수입니다.
마무리
이번 영상에서는 웹뷰를 이용해 기존에 있던 웹 서비스를 앱으로 빠르게 구현하는 방법을 다뤘습니다. 저는 웹뷰에 대한 지식이 전혀 없음에도 해당 영상만 보고도 앱을 출시할 수 있을 거 같다는 생각이 들만큼 아주 라이브러리 설명부터 빌드까지 설명을 해주시는데요. 리액트 네이티브의 Expo라는 프레임워크를 사용합니다. 웹뷰에 대한 관심은 있지만 어떻게 시작해야될지 모르겠는 분들이 보시면 정말 도움이 많이될 거 같습니다.
Reference