JSTL
JSTL의 정식 명칭은 자바서버 페이지 표준 태그 라이브러리(JavaServer Pages Standard Tag Library)이고 줄여서 JSTL이라 부른다.
일반적으로 알고있는 JSTL이란 JSTL + EL의 조합을 말한다.
HTML코드 내에java코드인 스크립틀릿<%= student %>를${student}로,<%=if %>문을<c:if>,<%=for%>문을<c:forEach>로 대체하여 사용한다.
- JSTL은 JSP 페이지 내에서 자바 코드를 바로 사용하지 않고 로직을 내장하는 효율적인 방법을 제공한다. 표준화된 태그 셋을 사용하여 자바 코드가 들락거리는 것보다 더 코드의 유지보수와 응용 소프트웨어 코드와 사용자 인터페이스 간의 관심사의 분리로 이어지게 한다.
- JSTL은 라이브러리이기 때문에 사용하기전에 core를
header에 추가해주어야 한다.<%@ taglib prefix="접두사" uri="URI" %> <%@ taglib uri="http://java.sun.com/jstl/core" prefix="c" %>
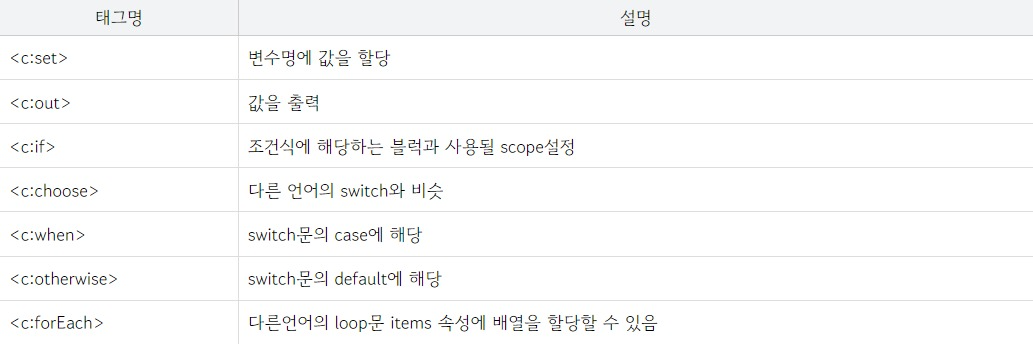
- JSTL core의 태그
사용 예제(JSP 형식과 비교)
<%@ taglib uri="http://java.sun.com/jsp/jstl/core" prefix="c"%>
<html>
<head>
    <title>test_jstl/hello.jsp</title>
</head>
<body>
    <h1>JSTL 의 core 라이브러리 사용해보기</h1>
    <c:forEach var="i" begin="0" end="9" step="1">
    <p>안녕 JSTL <strong>${i}</strong></p>
    </c:forEach>

---------------------------------------------------------------------------

    <h1>JSTL 을 사용하지 않고 java code 를 활용해서 위와 같은 동작을 해 보세요</h1>
    <%for(int i=0; i<10; i++){%>
        <p>안녕 JSTL <strong><%=i%></strong></p>
    <%}%>
</body>
</html>

<c:out> 태그
출력문을 만드는 태그이다.
<c:out value="출력값" default="기본값" />
<c:out value="출력값">기본값</c:out>
사용 예시
<c:out value="Hello World" /><br> 			//Hello World
<c:out value="${null}">JSTL</c:out><br>		//JS
<c:out value="Hello">World</c:out><br>		//Hello
<c:out value="${null}" />					//
<c:set> 태그
변수를 다룰 때 사용한다.
이 태그로 생성한 변수는 JSP의 로컬 변수가 아니라 서블릿 보관소(JspContext, ServletRequest, HttpSession, ServletContext)에 저장된다.
<c:set var="변수명" value="값" scope="page(기본값)|request|session|application" />
<c:set var="변수명" scope="page(기본값)|request|session|application">값</c:set>
사용 예시
<%--<c:set> 기본 사용 방법--%>
<c:set var="username1" value="현근1" />
<c:set var="username2">현근2</c:set>
${username1}<br>										//현근1
${username2}<br>										//현근2
${pageScope.username1}<br>								//현근1
${pageScope.username2}<br>								//현근2
<p></p>

<%--보관소 지정(ServletRequest)--%>
<c:set var="username3" scope="request">현근3</c:set>
${pageScope.username3}<br>								//현근3
${requestScope.username3}<br>
<p></p>

<%--기존 값 덮어씀--%>
<% pageContext.setAttribute("username4", "현근4"); %>
기존 username4 : ${username4}<br>						//기존 username4 : 현근4
<c:set var="username4" value="현근5" />
변경 username4 : ${username4}<br>						//변경 username4 : 현근5
💡 실행 결과
- scope의 기본값은 page이다. scope를 생략하면
JspContext에 저장된다.scope="request"와 같이 scope를 명시적으로 지정할 수도 있다.
<c:set>을 이용한 객체의 프로퍼티 값 설정
<c:set target="대상 객체" property="설정할 프로퍼티" value="프로퍼티 값" />사용 예시
<%!
    public static class MyMember {
        int no;
        String name;

        public int getNo() {
            return no;
        }

        public void setNo(int no) {
            this.no = no;
        }

        public String getName() {
            return name;
        }

        public void setName(String name) {
            this.name = name;
        }
    }
%>
<%
    MyMember member = new MyMember();
    member.setNo(100);
    member.setName("김연아");
    pageContext.setAttribute("member", member);
%>
${member.name}<br>											//김연아
<c:set target="${member}" property="name" value="박지성" />
${member.name}<br>											//박지성
Inner class MyMember의 인스턴스
member를 생성하고member의name을<c:set>태그를 사용해서 변경하는 코드이다.
<c:set>으로 객체의 프로퍼티 값을 설정할때는setter()의 리턴 타입이 반드시void여야 한다.
<c:remove> 태그
보관소에 저장된 값을 제거한다.
<c:remove var="변수명" scope="page(기본값) | request | session | application" />
<c:set>과 마찬가지로scope속성으로 보관소를 명시할 수 있고 보관소의 기본값은 page이다.
사용 예시<% pageContext.setAttribute("username1", "황현근"); %> ${username1}<br> //황현근 <c:remove var="username1" /> ${username1}<br> //
<c:if> 태그
test의 조건식이 true이면 '내용'이 실행된다.
var, scope 속성은 test 결과를 저장할때 사용한다.
<c:if test="조건식" var="변수명" scope="page(기본값) | request | session | application">내용</c:if>사용 예시
<c:if test="${10 > 20}" var="result1">
    10은 20보다 크다.<br>
</c:if>
result1 : ${result1}<br>

<c:if test="${10 < 20}" var="result2">
    20은 10보다 크다.<br>
</c:if>
result2 : ${result2}
---------------------------
// result1 : false
// 20은 10보다 크다.
// result2 : true
<c:forEach> 태그
반복 작업에 사용한다. 특히 목록에서 값을 꺼내서 처리할 때 사용한다.
<c:forEach var="변수명" items="목록 데이터" begin="시작 인덱스" end="종료 인덱스">콘텐츠</c:forEach>items에는 다음을 지정할 수 있다.
- 배열
- java.util.Collection 구현체(ArrayList, LinkedList, EnumSet, ...)
- java.util.Iterator 구현체
- java.util.Enumeration 구현체
- java.util.Map 구현체
- 콤마(,) 구분자로 나열된 문자열
사용 예시<% List<String> fruits = new ArrayList<>(); fruits.add("apple"); fruits.add("banana"); fruits.add("pineapple"); fruits.add("kiwi"); fruits.add("melon"); pageContext.setAttribute("fruits", fruits); %> <ul> <c:forEach var="fruit" items="${fruits}"> <li>${fruit}</li> </c:forEach> </ul> ----------------------------------------- apple banana pineapple kiwi melon
복합 조건문 태그 (if-else)
<c:choose>, <c:when>, <c:otherwise> 세 가지를 사용한다.
<c:choose>
<c:when test="${data == 'A'}">data 값이 A이면 실행</c:when>
<c:when test="${data == 'B'}">data 값이 B이면 실행</c:when>
<c:when test="${data == 'C'}">data 값이 C이면 실행</c:when>
<c:otherwise>data 값이 A, B, C값이 아닐 경우 실행</c:otherwise>
</c:choose>
if-else문 처럼 사용 가능하며,when이true이면 해당 블럭이 실행된다. 모든when이false이면otherwise블럭이 실행된다.
EL
EL의 정식 명칭은 표현 언어(Expression Language)라고 하며 줄여서 EL이라고 부른다.
사용법
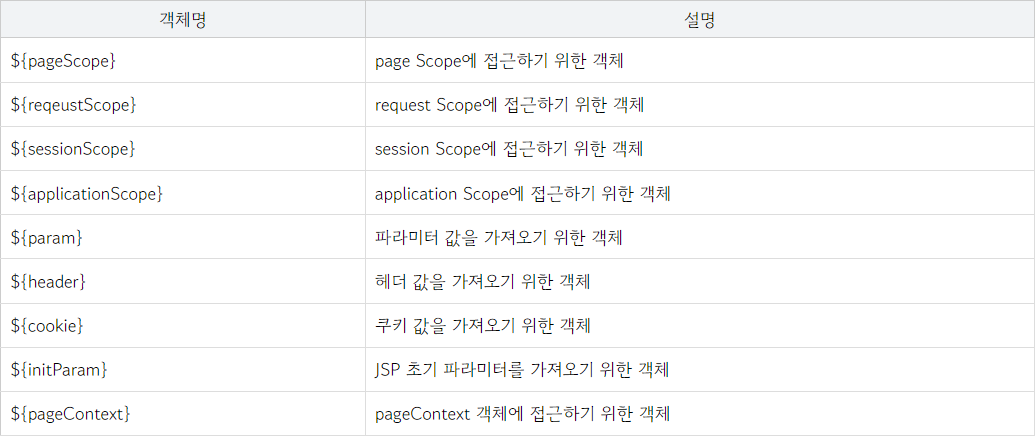
<%= name %>
${name}
EL의 내장 객체
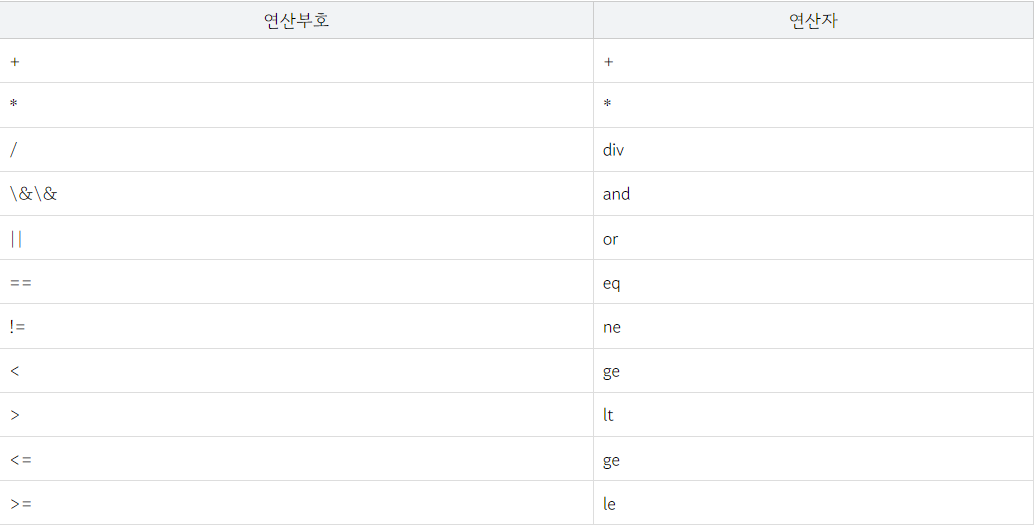
EL의 연산자 종류 및 표현법
사용 예제 1<% @taglib uri="http://java.sun.com/jstl/core" prefix="c" %> <html> <body> <c:forEach var="i" begin="1" end="10" step="1"> <c:out value="${i}"/> <br/> </c:forEach> ${person.address.city} </body> </html>사용 예제 2 (전체 코드)
<%@ page contentType="text/html;charset=UTF-8" language="java" %>
<%
    String myName="김구라";
   /*
      page scope 에  "myName" 이라는 키값으로 myName 담기
      해당 jsp 페이지 에서만 사용할 수 있다.
   */
    pageContext.setAttribute("myName", myName);     //page scope

    String yourName="해골";
   /*
      request scope 에 "yourName" 이라는 키값으로 yourName 담기
      request scope 에 담은 값은 응답하기 전까지 사용할 수 있다.
      (다른 페이지로 forward 이동해도 사용할 수 있다)
      (다른 페이지로 redirect 이동하면 사용할 수 없다)
   */
    request.setAttribute("yourName", yourName);     //request scope

    String ourName="원숭이";
   /*
      session scope 에  "ourName" 이라는 키값으로 ourName 담기
      session scope 에 담은 값은 세션이 유지 되는 동안 사용할 수 있다.
      (다른 페이지로 forward, redirect 이동 해도 사용할 수 있다)
      (웹브라우저를 닫거나 세션을 초기화 하기 전까지 사용할 수 있다)
   */
    session.setAttribute("ourName", ourName);       //session scope

    String companyName="에이콘";
   /*
      application scope 에 "companyName" 이라는 키값으로 companyName 담기
      application scope 에 담은 내용은 서버를 끄기 전까지 사용할 수 있다.
      (웹브라우저를 닫아도 지워지지 않는다)
   */
    application.setAttribute("companyName", companyName);       //application scope

%>
	-------------------------------------------------------------------------------
        <h1> EL 로 page scope 에 저장된 값 추출</h1>
        <p>내 이름은 <strong>${pageScope.myName}</strong></p>
        <p>내 이름은 <strong>${myName}</strong></p>

        <h1> EL 로 request scope 에 저장된 값 추출</h1>
        <p>너의 이름은 <strong>${requestScope.yourName}</strong></p>
        <p>너의 이름은 <strong>${yourName}</strong></p>
        <%-- 위의 EL 은 아래의 코드를 대신할 수 있다. --%>
        <%
            String result = (String)request.getAttribute("yourName");
        %>
        <p>너의 이름은 <strong><%=result%></strong></p>

        <h1> EL 로 session scope 에 저장된 값 추출</h1>
        <p>우리 이름은 <strong>${sessionScope.ourName}</strong></p>
        <p>우리 이름은 <strong>${ourName}</strong></p>
        <%-- 위의 EL 은 아래의 코드를 대신할 수 있다. --%>
        <%
            String result2 = (String)request.getAttribute("ourName");
        %>
        <p>우리 이름은 <strong><%=result2%></strong></p>

        <h1> EL 로 application scope 에 저장된 값 추출</h1>
        <p>학원 이름은 <strong>${applicationScope.companyName}</strong></p>
        <p>학원 이름은 <strong>${companyName}</strong></p>
사용 예제 3
<%
    //CafeDto 객체를 생성해서 글 하나의 정보를 담고
    CafeDto dto = new CafeDto();
    dto.setNum(1);
    dto.setWriter("김구라");
    dto.setTitle("나는 구라다");

    //"dto" 라는 키값으로 request scope 에 담기
    request.setAttribute("dto", dto);
%>
-------------------------------------------------
	<%
        CafeDto result = (CafeDto)request.getAttribute("dto");
    %>
        <p>글번호 : <strong><%=result.getNum()%></strong></p>
        <p>작성자 : <strong><%=result.getWriter()%></strong></p>
        <p>제목 : <strong><%=result.getTitle()%></strong></p>

        <h3>EL 을 이용해서 위의 작업하기</h3>
        <p>글번호 : <strong>${requestScope.dto.getNum()}</strong></p>
        <p>작성자 : <strong>${dto.getWriter()}</strong></p>
        <%-- 필드명만 적으면 자동으로 getter 메소드를 호출해준다. --%>
        <p>제목 : <strong>${dto.title}</strong></p>
사용 예제 4
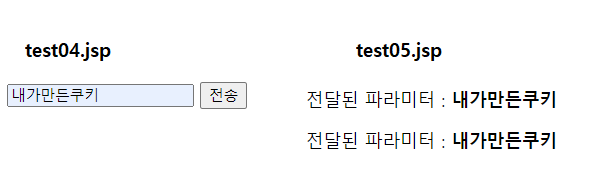
<h1>요청 파라미터도 el 로 추출할수 있다.</h1>       	--- test04.jsp
    <form action="test05.jsp" method="post">
      <input type="text" name="msg"/>
      <button type="submit">전송</button>
    </form>
    <br>
    <a href="test05.jsp?msg=hello">test05.jsp</a>
--------------------------------------------------
<h1>param.파라미터명 형식으로 추출할 수 있다</h1>		--- test05.jsp
<p>전달된 파라미터 : <strong>${param.msg}</strong></p>
<p>전달된 파라미터 : <strong><%=request.getParameter("msg")%></strong></p>