■ resourece manager 구현
orcl 쪽 db 에서 구현해주세요
a) SYSTEM user로 접속하여 consumer group ONLINE_USERS 를 생성한다
SQL> conn system/oracle_4U
orcl(SYSTEM) > exec dbms_resource_manager.create_pending_area();
--> 리소스 메니저를 구현하기 위한 영역을 설정하겠다.

-
db 에 만들어져있는 Consumer 그룹확인하는 명령어
select consumer_group
from dba_rsrc_consumer_groups
where consumer_group like '%ONLINE%';
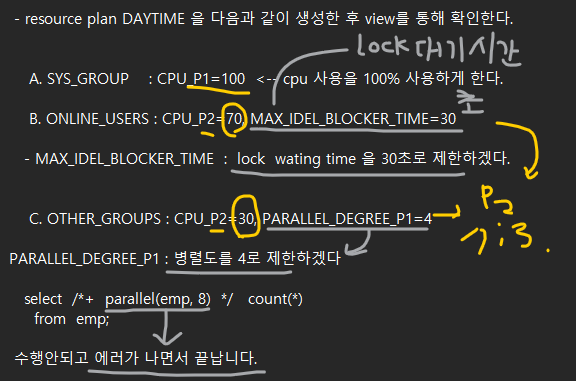
- resource plan DAYTIME 을 다음과 같이 생성한 후 view를 통해 확인한다.
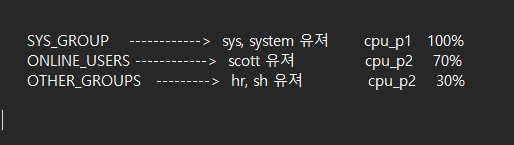
A. SYS_GROUP    : CPU_P1=100  <-- cpu 사용을 100% 사용하게 한다.

B. ONLINE_USERS : CPU_P2=70, MAX_IDEL_BLOCKER_TIME=30- MAX_IDEL_BLOCKER_TIME : lock wating time 을 30초로 제한하겠다.
C. OTHER_GROUPS : CPU_P2=30, PARALLEL_DEGREE_P1=4PARALLEL_DEGREE_P1 : 병렬도를 4로 제한하겠다
select /+ parallel(emp, 8) / count(*)
from emp;
수행안되고 에러가 나면서 끝납니다.
-- 리소스 플랜 생성 (daytime)
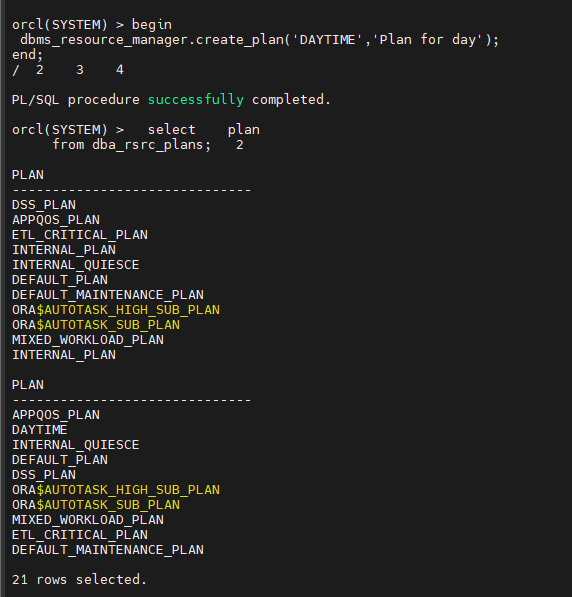
SQL> begin
dbms_resource_manager.create_plan('DAYTIME','Plan for day');
end;
/
PL/SQL procedure successfully completed.
-- 위에서 생성한 daytime plan 이 생성되었는지 확인하시오 !
select plan
from dba_rsrc_plans;
-- 리소스 디렉티브 생성 (디렉티브 : 분배방법)
-- 기존에 이미 있는 SYS_GROUP 은 CPU 를 1순위로 100% 사용하겠금 지시어 생성
SQL> begin
dbms_resource_manager.create_plan_directive('DAYTIME', 'SYS_GROUP','1st Group Set', cpu_p1=>100);
end;
/
PL/SQL procedure successfully completed.
-- online_users 그룹은 lock blocking time을 30초로 지정 , cpu 사용 우선순위 2번째 이고 70% 만 사용
begin
dbms_resource_manager.create_plan_directive('DAYTIME', 'ONLINE_USERS','2nd Group set',
cpu_p2=>70,max_idle_blocker_time=>30);
end;
/
-- other_groups 는 병렬도를 4로 지정 , cpu 사용율 우선순위가 2번째이고 30% 만 사용하겠금 설정
begin
dbms_resource_manager.create_plan_directive('DAYTIME', 'OTHER_GROUPS','3rd Group',
cpu_p2=>30,parallel_degree_limit_p1=>4);
end;
/
-- 검증 작업
SQL> exec dbms_resource_manager.validate_pending_area();
PL/SQL procedure successfully completed.
-- 구현
SQL> exec dbms_resource_manager.submit_pending_area();
PL/SQL procedure successfully completed.
-- 내가 어떻게 설정했는지 조회하는 방법
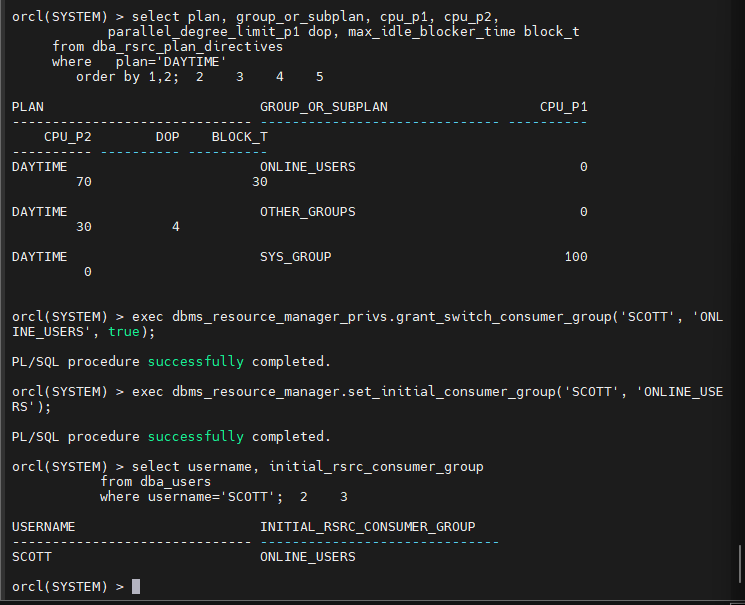
SQL> select plan, group_or_subplan, cpu_p1, cpu_p2,
parallel_degree_limit_p1 dop, max_idle_blocker_time block_t
from dba_rsrc_plan_directives
where plan='DAYTIME'
order by 1,2;
c) SCOTT user를 consumer group ONLINE_USERS로 지정하고
default consumer group으로 지정한다.
SQL> exec dbms_resource_manager_privs.grant_switch_consumer_group('SCOTT', 'ONLINE_USERS', true);
PL/SQL procedure successfully completed.
SQL>
SQL> exec dbms_resource_manager.set_initial_consumer_group('SCOTT', 'ONLINE_USERS');
PL/SQL procedure successfully completed.
SQL> select username, initial_rsrc_consumer_group
from dba_users
where username='SCOTT';
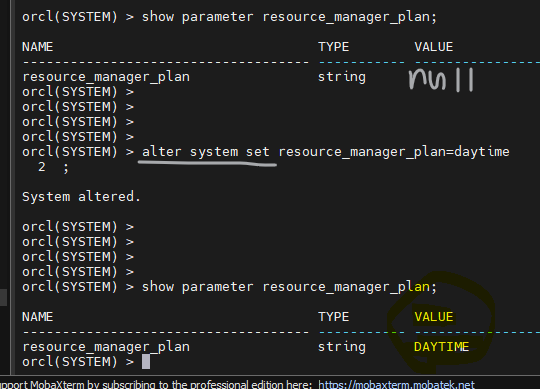
문제1. 현재가 낮시간이므로 daytime 리소스 플랜이 활성화되게 하시오
alter system set resource_manager_plan=daytime
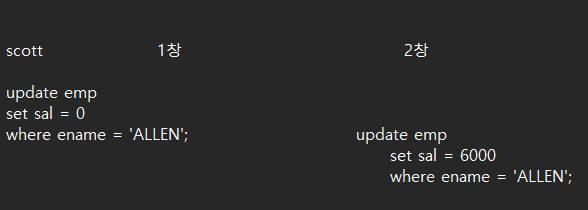
문제2. scott 터미널 창을 2개를 열고 다음과 같이 update 를 수행해서 lock 이 30초 후 풀리는지 테스트 하시오
문제3. 위의 max_idel_blocker_time 을 60초로 변경하시오 !
 exec dbms_resource_manager.create_pending_area();

 begin
dbms_resource_manager.update_plan_directive(
plan=>'DAYTIME',
group_or_subplan=>'ONLINE_USERS',
new_max_idle_blocker_time=>60);
  end;
/
문제4. max_idel_time 을 수정해서 scott 유져로 접속해서 10초 동안 아무런 작업을 하고 있지 않으면 자동으로 접속이 끊기게 하시오
 exec dbms_resource_manager.create_pending_area();

 begin
dbms_resource_manager.update_plan_directive(
plan=>'DAYTIME',
group_or_subplan=>'ONLINE_USERS',
new_max_idle_blocker_time=>10);
  end;
/

 exec dbms_resource_manager.submit_pending_area();
문제5. 잘 설정이 되었는지 확인해봅니다.
select plan, group_or_subplan, cpu_p1, cpu_p2,
parallel_degree_limit_p1 dop, max_idle_blocker_time block_t,
max_idle_time
from dba_rsrc_plan_directives
where plan='DAYTIME'
order by 1,2;
문제6. scott 로 접속해서 10초 동안 아무것도 안하고 있으면 접속이 끊기는지 확인하시오
문제7.
 exec dbms_resource_manager.create_pending_area();

 begin
dbms_resource_manager.update_plan_directive(
plan=>'DAYTIME',
group_or_subplan=>'ONLINE_USERS',
new_max_idle_blocker_time=>-1);
  end;
/

exec dbms_resource_manager.submit_pending_area();
문제8. scott 유져가 undo 사용량을 제한하게끔 설정 하시오
new_undo_pool=>10

exec dbms_resource_manager.create_pending_area();

 begin
dbms_resource_manager.update_plan_directive(
plan=>'DAYTIME',
group_or_subplan=>'ONLINE_USERS',
new_undo_pool=>10);
  end;
/

exec dbms_resource_manager.submit_pending_area();
문제9. scott 유져로 접속해서 undo 사용량을 과도하게 사용하는 dml 문장을 수행하시오
orcl(SCOTT) > create table sales500 as select * from sh.sales;


Table created.

orcl(SCOTT) > orcl(SCOTT) > delete from sales500;
delete from sales500
            *
ERROR at line 1:
ORA-30027: Undo quota violation - failed to get 148 (bytes)
문제10 그럼 다시 scott 유져가 undo 의 제한을 받지 않도록 설정하시오
 exec dbms_resource_manager.create_pending_area();

 begin
dbms_resource_manager.update_plan_directive(
plan=>'DAYTIME',
group_or_subplan=>'ONLINE_USERS',
new_undo_pool=>-1);
  end;
/

exec dbms_resource_manager.submit_pending_area();
▣ 예제121. resource manager 로 cpu 사용을 제한해볼 수 있어야해요.
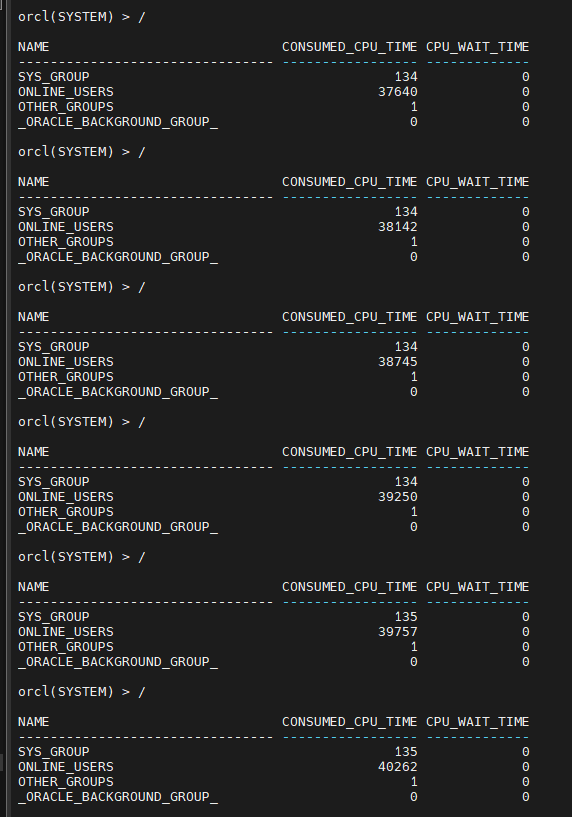
- 현재 컨슈머 그룹들의 cpu 사용율을 실시간으로 확인하고 싶다면?
select name, consumed_cpu_time, cpu_wait_time from v$rsrc_consumer_group;

실시간으로 볼 수 있다.
※ 오전에는 daytime 리소스 플랜을 생성했는데 밤에 수행하는 작업을 위해 nighttime 리소스 플랜을 생성하시오 !
낮시간에는 주로 주문이 들어오는 시간이므로 OLTP 유져들을 위한 리소스 매니저 였다면
밤시간에는 주로 데이터 분석을 하는 batch 작업들이 많이 수행되므로 batxh_users 라는 컨서머 그룹을 생성하겠습니다.
- consumer group : batch_users
- resource plan : nighttime
- resource directive : batch_users 에 대해서 병렬작업을 제한 없이 수행되겠금 설정
■ resource manager 구현
a) SYSTEM user로 접속하여 consumer group BATCH_USERS 를 생성한다
SQL> conn system/oracle_4U
SQL> exec dbms_resource_manager.create_pending_area();
--> 리소스 메니저를 구현하기 위한 영역을 설정하겠다.
-- 컨슈머 그룹 생성
SQL> exec dbms_resource_manager.create_consumer_group('BATCH_USERS','Users for Online'); ~> SYS_GROUP 과 OTHER_GROUP 은 이미 만들어져 있기 때문에 BATCH_USERS 만 생성한다.
↑ ↑
dba 권한 유져들 리소스 사용에 대한 제한이 높은 유져들
- db 에 만들어져있는 Consumer 그룹확인하는 명령어
 select    consumer_group
    from   dba_rsrc_consumer_groups
    where   consumer_group  like  '%BATCH%';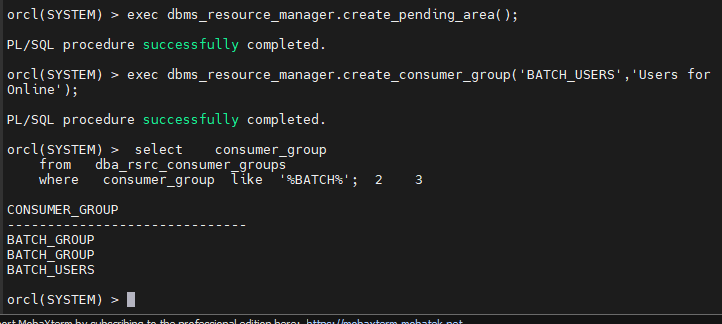
-- 리소스 플랜 생성 (nighttime)
SQL> begin
 dbms_resource_manager.create_plan('NIGHTTIME','Plan for night');
end;
/

PL/SQL procedure successfully completed.
-- 위에서 생성한 nighttime plan 이 생성되었는지 확인하시오 !
  select    plan
from dba_rsrc_plans; 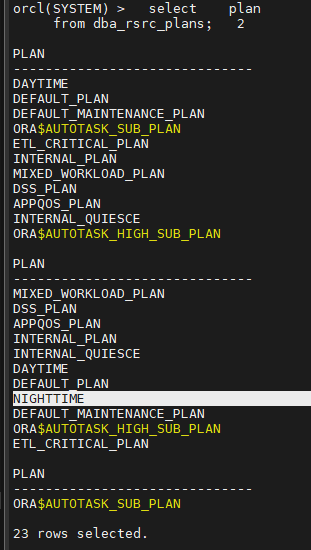
-- 리소스 디렉티브 생성 (디렉티브 : 분배방법)
-- 기존에 이미 있는 SYS_GROUP 은 CPU 를 1순위로 100% 사용하겠금 지시어 생성
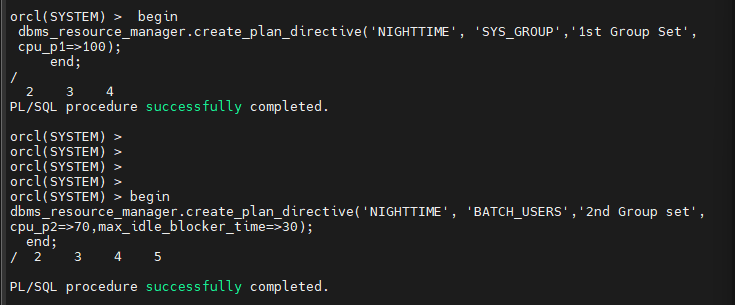
SQL> begin dbms_resource_manager.create_plan_directive('NIGHTTIME', 'SYS_GROUP','1st Group Set',    cpu_p1=>100);
     end;
/
PL/SQL procedure successfully completed.
-- batch_users 그룹은 lock blocking time을 30초로 지정 , cpu 사용 우선순위 2번째 이고 70% 만 사용
 begin
dbms_resource_manager.create_plan_directive('NIGHTTIME', 'BATCH_USERS','2nd Group set',
cpu_p2=>70,max_idle_blocker_time=>30);
  end;
/
-- other_groups 는 병렬도를 4로 지정 , cpu 사용율 우선순위가 2번째이고 30% 만 사용하겠금 설정
begin dbms_resource_manager.create_plan_directive('NIGHTTIME', 'OTHER_GROUPS','3rd Group',
cpu_p2=>30,parallel_degree_limit_p1=>4);
end;
/
-- 검증 작업
SQL> exec dbms_resource_manager.validate_pending_area();
PL/SQL procedure successfully completed.
-- 구현
SQL> exec dbms_resource_manager.submit_pending_area();
PL/SQL procedure successfully completed.
-- 내가 어떻게 설정했는지 조회하는 방법
SQL> select plan, group_or_subplan, cpu_p1, cpu_p2,
            parallel_degree_limit_p1 dop, max_idle_blocker_time block_t
     from dba_rsrc_plan_directives
     where   plan='NIGHTTIME'
        order by 1,2;
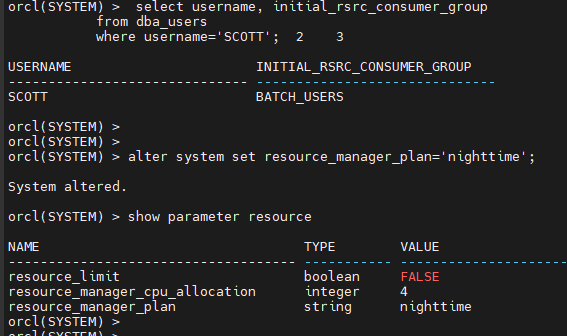
c) SCOTT user를 consumer group BATCH_USERS로 지정하고
default consumer group으로 지정한다.
SQL> exec dbms_resource_manager_privs.grant_switch_consumer_group('SCOTT', 'BATCH_USERS', true);
PL/SQL procedure successfully completed.
SQL> exec dbms_resource_manager.set_initial_consumer_group('SCOTT', 'BATCH_USERS');
PL/SQL procedure successfully completed.
SQL> select username, initial_rsrc_consumer_group
from dba_users
where username='SCOTT';
orcl(SYSTEM) > alter system set resource_manager_plan='nighttime';
System altered.
orcl(SYSTEM) > show parameter resource
▣ 예제124. 스케줄러를 이용해서 업무 자동화를 할 수 있어야 해요
os 의 crontab 과 같은 기능을 오라클에서 구현한 것
특정 시간에 특정 작업이 자동으로 수행되도록 설정하는 기능
- 스케줄의 종류 2가지 ?
- time base 스케줄러 : 특정 시간에 특정 작업이 수행되게 자동화
- event base 스케줄러 : 특정 이벤트가 발생하면 특정 작업이 수행되게
dba 작업이 스케줄러 사용에 유용한 경우
-
매일 밤 또는 매월 말일에 월말 작업(통계정보 수집) 을 자동화
-
database 백업을 자동화 (dba 는 백업을 잘해야 한다)
-
테이블 통계정보 수집
-
invalid 된 인덱스나 프로시져를 다시 valid 시키는 작업을 자동화
리눅스의 crontab vs 오라클 스케즐러
※ crontab 에 비해 오라클 스케즐러가 더 좋은 이유?
-
작업 수행과정이 잘 진행되고 있는지 모니터링을 할 수 있다.
-
작업 수행 이력을 확인할 수 있다.
-
스케즐을 설정하는게 훨씬 더 자세히 설정할 수 있다.
예: 월, 수, 금 요일 밤10시에 특정작업이 수행되게해라 ~
■ 실습 순서
- 프로그램 생성 ( dbms_scheduler.create_program)
- 스케줄 생성 ( dbms_scheduler.create_scheduler)
- 작업 생성 ( dbms_scheduler.create_job)
- 작업이 잘 수행되는지 모니터링 ( select * from dba_scheduler_job_run_details )
■ 스케즐러 작업 실습
- scott 에게 dba 권한을 부여하고 scott 유져에서 emp01 테이블을 생성합니다
 SYS> grant  dba  to  scott;

 SCOTT> create table emp01
( hiredate date );- scott 으로 접속해서 스케즐을 생성한다.
SCOTT> begin
       dbms_scheduler.create_schedule(
       schedule_name=>'scott_insert_sch',
       repeat_interval=>'freq=secondly; interval=5');
      end;
       /
5초마다 한번씩 작동되는 스케즐

- 프로그램 생성
SCOTT> begin
       dbms_scheduler.create_program(
       program_name=>'scott_insert_prog',
       program_type=>'PLSQL_BLOCK',
       program_action=>'begin insert into emp01(hiredate) values (sysdate); end;');
       end;
 /
emp01 테이블에 오늘 날짜를 입력하는 프로그램 생성
-- 3) 작업(job) 생성
SCOTT> begin
       dbms_scheduler.create_job(
       job_name=>'scott_insert',
       program_name=>'scott_insert_prog',
       schedule_name=>'scott_insert_sch' );
       end;
/- 작업, 프로그램 enable
SCOTT> exec dbms_scheduler.enable('scott_insert');
SCOTT> exec dbms_scheduler.enable('scott_insert_prog');
- 결과 확인
SCOTT> select * from emp01;

- 스케즐이 잘 도는지 확인하시오 !
select * from dba_scheduler_job_run_details
WHERE owner='SCOTT';
문제. scott_insert  job 을 중지 시킵니다.

SCOTT> exec dbms_scheduler.disable('scott_insert');

문제. scott_insert  job 을 drop 시키시오

SCOTT> exec dbms_scheduler.drop_job('scott_insert');

문제.  scott_insert_sch 스케즐을 drop 하시오

SCOTT> exec dbms_scheduler.drop_schedule('scott_insert_sch');

문제.  scott_insert_prog 프로그램을 drop 시키시오

SCOTT> exec dbms_scheduler.drop_program('scott_insert_prog');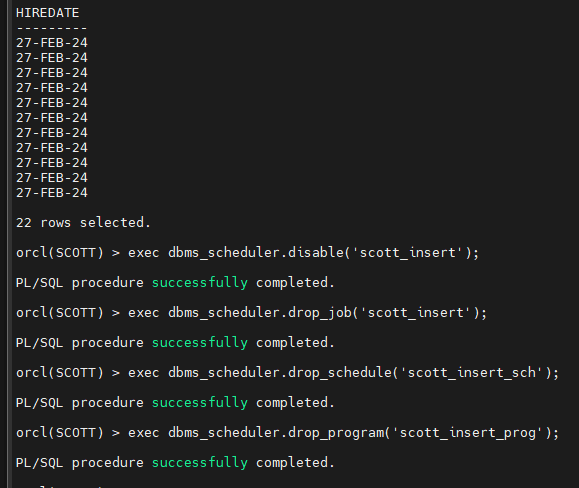
문제1. 다음의 명령어가 매일 아침 8시에 수행되게 하시오
alter system set resource_manager_plan='daytime';
답
1. 스케줄 생성 매일 8시 정각에 수행되는 옵션
begin
       dbms_scheduler.create_schedule(
       schedule_name=>'scott_daily_8am_sch',
       repeat_interval=>'freq=daily; byhour=8; byminute=0; bysecond=0');
      end;
       /
freq=daily; 매일
byhour=8; byminute=0; bysecond=0 8시 정각
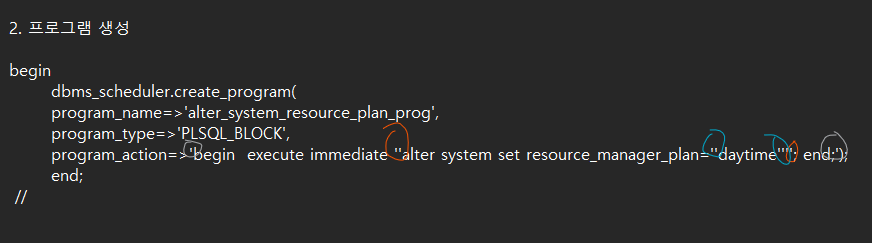
- 프로그램 생성
begin
       dbms_scheduler.create_program(
       program_name=>'alter_system_resource_plan_prog',
       program_type=>'PLSQL_BLOCK',
       program_action=>'begin  execute immediate ''alter system set resource_manager_plan=''daytime''''; end;');
              end;
 /
- 작업생성
begin
       dbms_scheduler.create_job(
	job_name=>'alter_system_resource_job',
	program_name=>'alter_system_plan_prog',
	schedule_name=>'scott_daily_8am_sch');
	end;
/- 작업 활성화
SCOTT> exec dbms_scheduler.enable('alter_system_resource_job');
SCOTT> exec dbms_scheduler.enable('alter_system_plan_prog');
문제2 매일 밤 10시에 아래의 명령어가 수행되게끔 스테줄과 프로그램과 잡을 생성 하시오
alter system set resource_manger_plan='nighttime';
답
1. 스케줄 생성 매일 밤 10시 정각에 수행되는 옵션
begin
       dbms_scheduler.create_schedule(
       schedule_name=>'scott_night_10pm_sch',
       repeat_interval=>'freq=daily; byhour=22; byminute=0; bysecond=0');
      end;
/- 프로그램 생성
begin
       dbms_scheduler.create_program(
       program_name=>'alter_system_plan2_prog',
       program_type=>'PLSQL_BLOCK',
       program_action=>'begin  execute immediate ''alter system set resource_manager_plan=''nighttime''''; end;');
       end;
/- 작업생성
begin
       dbms_scheduler.create_job(
	job_name=>'alter_system_resource_job2',
	program_name=>'alter_system_plan2_prog',
	schedule_name=>'scott_daily_10pm_sch');
	end;
/
활성화
SCOTT> exec dbms_scheduler.enable('alter_system_resource_job2');
SCOTT> exec dbms_scheduler.enable('alter_system_plan2_prog');

18 장 공간관리

dba 가 한달에 한번씩 수행하는 db reorg 작업에 대한 내용
db reorg 작업이란 방청소 같은것
db objects (table, index 등) 다시 구성하면서 성능을 높이고 저장공간도 확보하는 작업
▣ 예제 125. db reorg 작업을 할 줄 알아야 해요
db reorg 작업 후에 얻을 수 있는 효과 2가지
1. 성능이 좋아진다
2. 공간이 확보된다.
db reorg 작업을 하게 되었을 때 나타나는 구체적인 효과
- HWM(High Water Mark )를 아래로 내립니다.
- ROW Migration 현상이 일어난 row 들을 정리
- 여유 공간이 확보됩니다.
※ db reorg 작업 방법 3가지
- table export -----> table drop --------> table import (잘 안쓰는 방법)
- table 을 다른 테이블 스페이스로 move / 같은 테이블 스페이스로 move
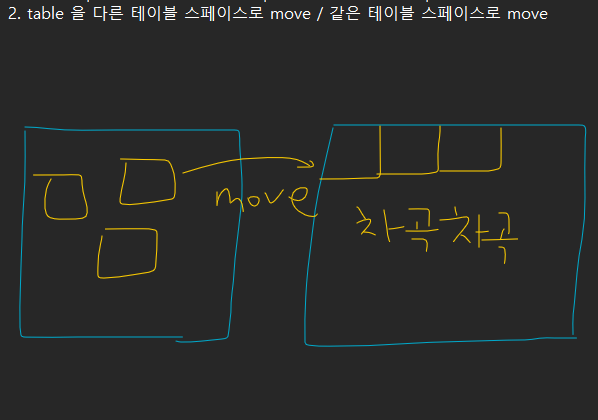
■ 테이블을 move 하는 것으로 db reorg 하기
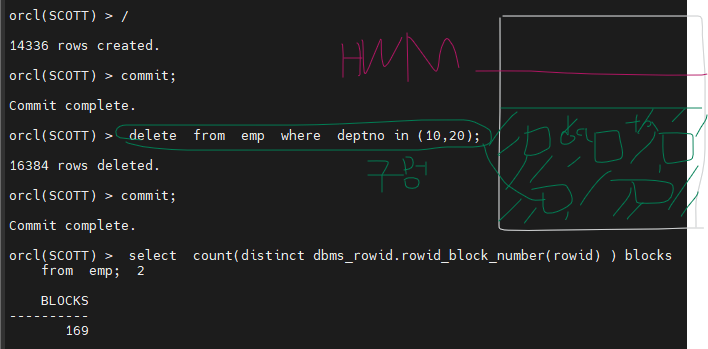
- scott 유져에서 emp 테이블의 HWM 를 높인다.
orcl(SCOTT) > insert  into emp
         select  *
           from emp;

  SQL>   /  엔터  <---------  10번 수행
  SQL>  commit;
  SQL>  delete  from  emp  where  deptno in (10,20);
SQL> commit; - emp 테이블의 HWM 가 어떻게 되는지 확인한다.
 select  count(distinct dbms_rowid.rowid_block_number(rowid) ) blocks
    from  emp;
-
emp 테이블이 어느 테이블스페이스에 있는지 조회하시오 !
select table_name, tablespace_name
from user_tables
where table_name='EMP';create tablespace ts100
datafile '/home/oracle/ts100.dbf' size 50m; -
emp 테이블을 ts100 테이블스페이스로 move 하시오 !
alter table emp move tablespace ts100;
-
emp 테이블이 다른 테이블스페이스로 이동했는지 확인한다.
select table_name, tablespace_name
from user_tables
where table_name='EMP';

6. High Water Mark 가 아래로 내려왔는지 확인하시오 !
select count(distinct dbms_rowid.rowid_block_number(rowid) ) blocks
from emp;
BLOCKS
76
※ 위의 move 작업을 할 때 주의할 사항이 무엇인가 ?
emp 와 dept 테이블에 인덱스가 있다면 move 시킨 이후에 반드시 그 인덱스가 사용 가능한 지 확인해야 합니다.
만약 사용이 불가능 하다면? 관련 인덱스를 rebuild 해야 합니다.
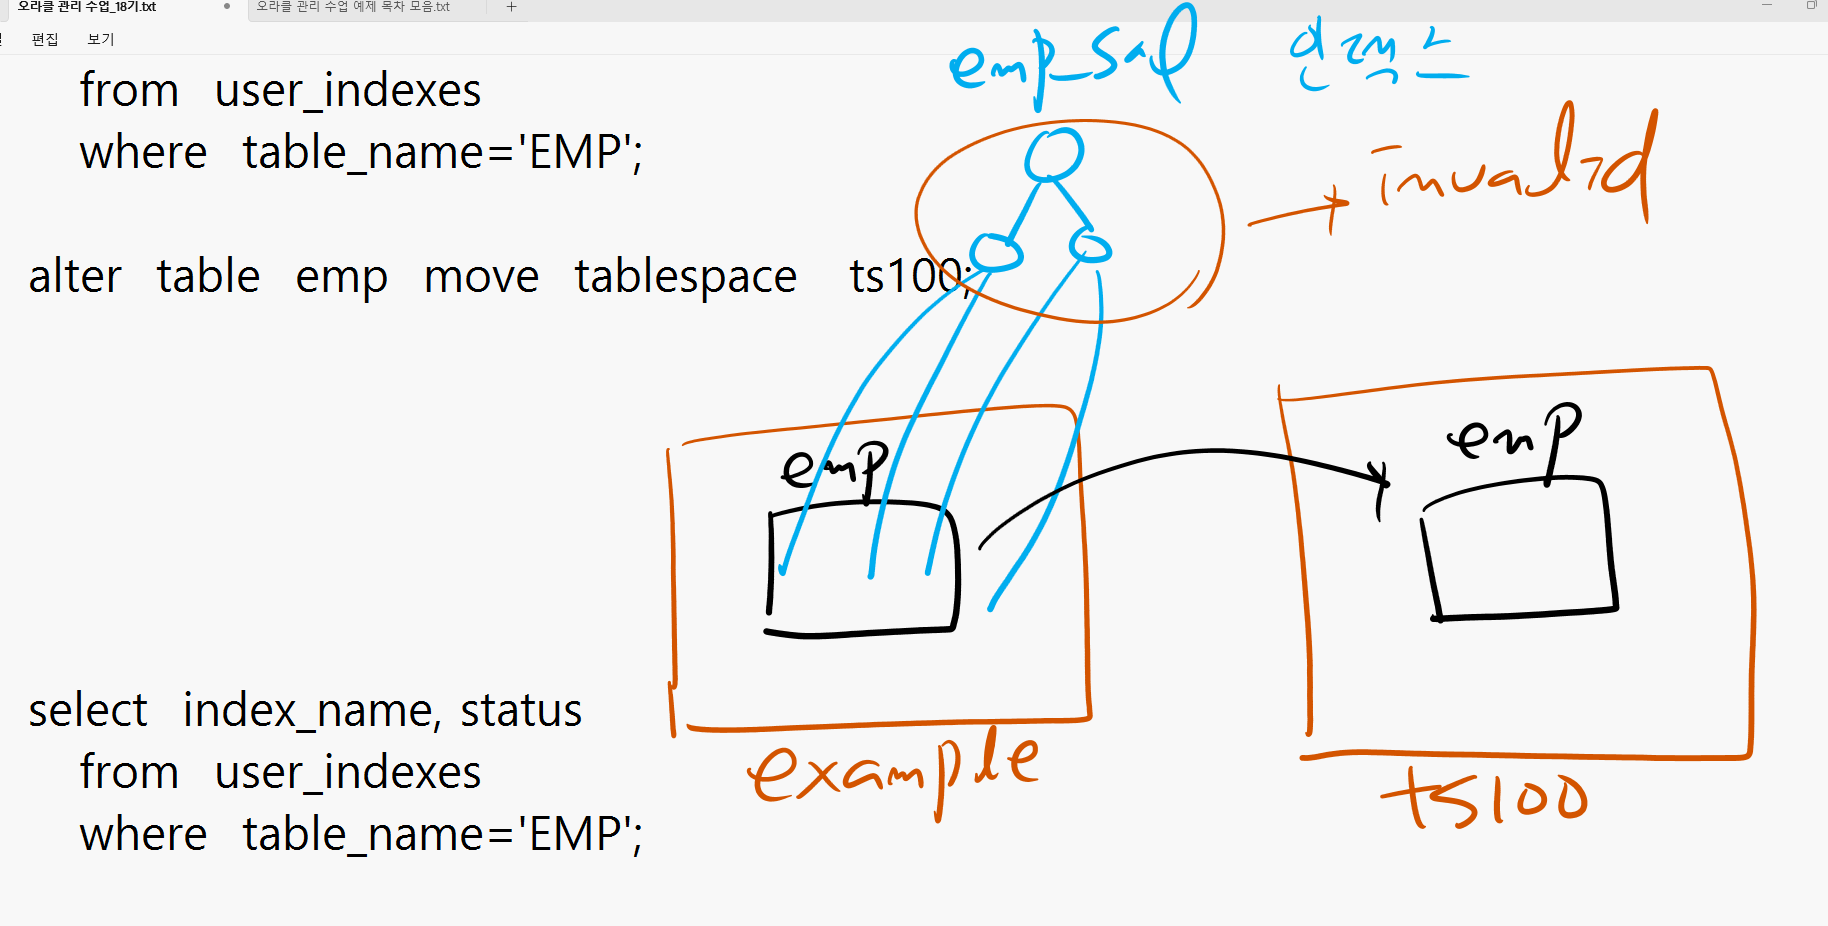
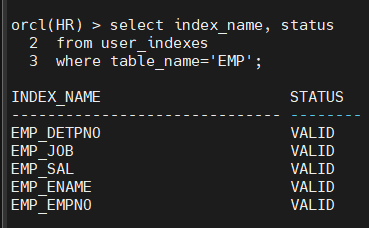
▣ 테이블에 인덱스가 있는 상태에서 테이블 move 시키기
@demobld.sql
create index emp_empno on emp(empno);
create index emp_ename on emp(ename);
create index emp_sal on emp(sal);
create index emp_job on emp(job);
create index emp_detpno on emp(deptno);
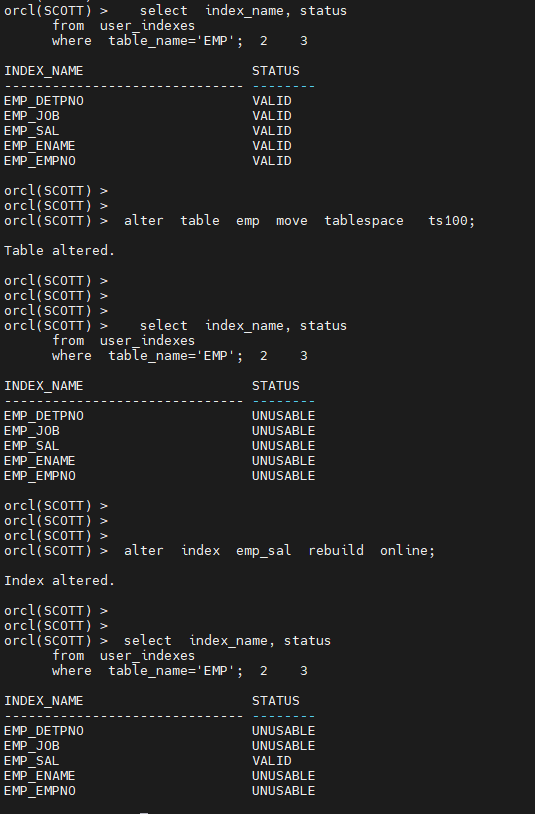
select index_name, status
from user_indexes
where table_name='EMP';
alter table emp move tablespace ts100;
select index_name, status
from user_indexes
where table_name='EMP';
-
emp 테이블과 관련된 인덱스들을 rebuild 하여 valid 한 상태로 만들기
alter index emp_sal rebuild online;
select index_name, status
from user_indexes
where table_name='EMP';
- scott 이 가지고 있는 모든 unusable 된 index 에 대해서 다 rebuild 하는
프로시져를 생성하시오 !
orcl(SCOTT) > connect / as sysdba
Connected.

sys>  grant  select  on  user_indexes  to  scott;
sys>  grant  alter  any  index  to  scott;
scott>
create or replace procedure index_rebuild
authid current_user
is
cursor emp_cursor is
select index_name as name
from user_indexes
where status ='UNUSABLE';
v_stmt varchar2(100);
begin
for emp_record in emp_cursor loop
v_stmt := ' alter index ' || emp_record.name || ' rebuild online';
execute immediate v_stmt ;
end loop;
end;
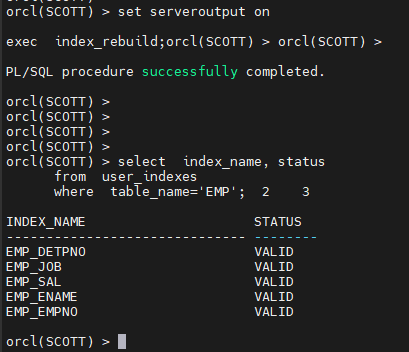
/set serveroutput on
exec index_rebuild;
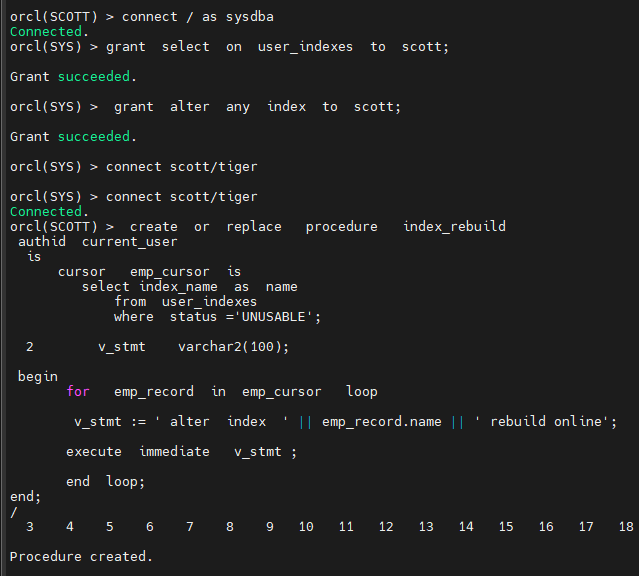
※ authid current_user 는 프로시져를 수행하는 유져의 권한을 따르겠다는것입니다.
user_xxx, all_xxx, dba_xxx 같은 데이터 딕셔너리를 PL/SQL 에서 조회할 때는
프로시져 생성시 authid current_user 옵션을 사용해서 권한 오류를 방지 할 수 있습니다.
select index_name, status
from user_indexes
where table_name='EMP';
문제1. HR 계정으로 접속해서 employees 테이블을 ts100 테이블 스페이스로 이동하고
관련된 인덱스를 전부 rebuild 해서 인덱스를 사용 가능한 상태로 만드시오
hr 계정의 employees 테이블을 db reorg 작업 하시오
employees 테이블이 어느 테이블스페이스에 있는지 조회하시오 !
select table_name, tablespace_name
from user_tables
where table_name='EMPLOYEES';
create tablespace ts100
datafile '/home/oracle/ts100.dbf' size 50m;
employees 테이블을 ts100 테이블스페이스로 move 하시오 !
alter table employees move tablespace ts100;
employees 테이블이 다른 테이블스페이스로 이동했는지 확인한다.
select table_name, tablespace_name
from user_tables
where table_name='EMPLOYEES';
select index_name, status
from user_indexes
where table_name='EMPLOYEES';
INDEX_NAME STATUS
EMP_NAME_IX UNUSABLE
EMP_MANAGER_IX UNUSABLE
EMP_JOB_IX UNUSABLE
EMP_DEPARTMENT_IX UNUSABLE
EMP_EMP_ID_PK UNUSABLE
EMP_EMAIL_UK UNUSABLE
sys> grant select on user_indexes to hr;
sys> grant alter any index to gr;
hr>
create or replace procedure index_rebuild
authid current_user
is
cursor employees_cursor is
select index_name as name
from user_indexes
where status ='UNUSABLE';
v_stmt varchar2(100); begin
for employees_record in employees_cursor loop
v_stmt := ' alter index ' || employees_record.name || ' rebuild online';
execute immediate v_stmt ;
end loop;end;
/
set serveroutput on

exec  index_rebuild;
orcl(HR) > select index_name, status
from user_indexes
where table_name='EMPLOYEES';
INDEX_NAME STATUS
EMP_NAME_IX VALID
EMP_MANAGER_IX VALID
EMP_JOB_IX VALID
EMP_DEPARTMENT_IX VALID
EMP_EMP_ID_PK VALID
EMP_EMAIL_UK VALID
- DB reorg 작업 3가지 ?
- table export ---> table drop ---> table import
- table move ---> 관련된 인덱스 rebuild
- table compact ----> shrink 이거 이수자 평가 할거야
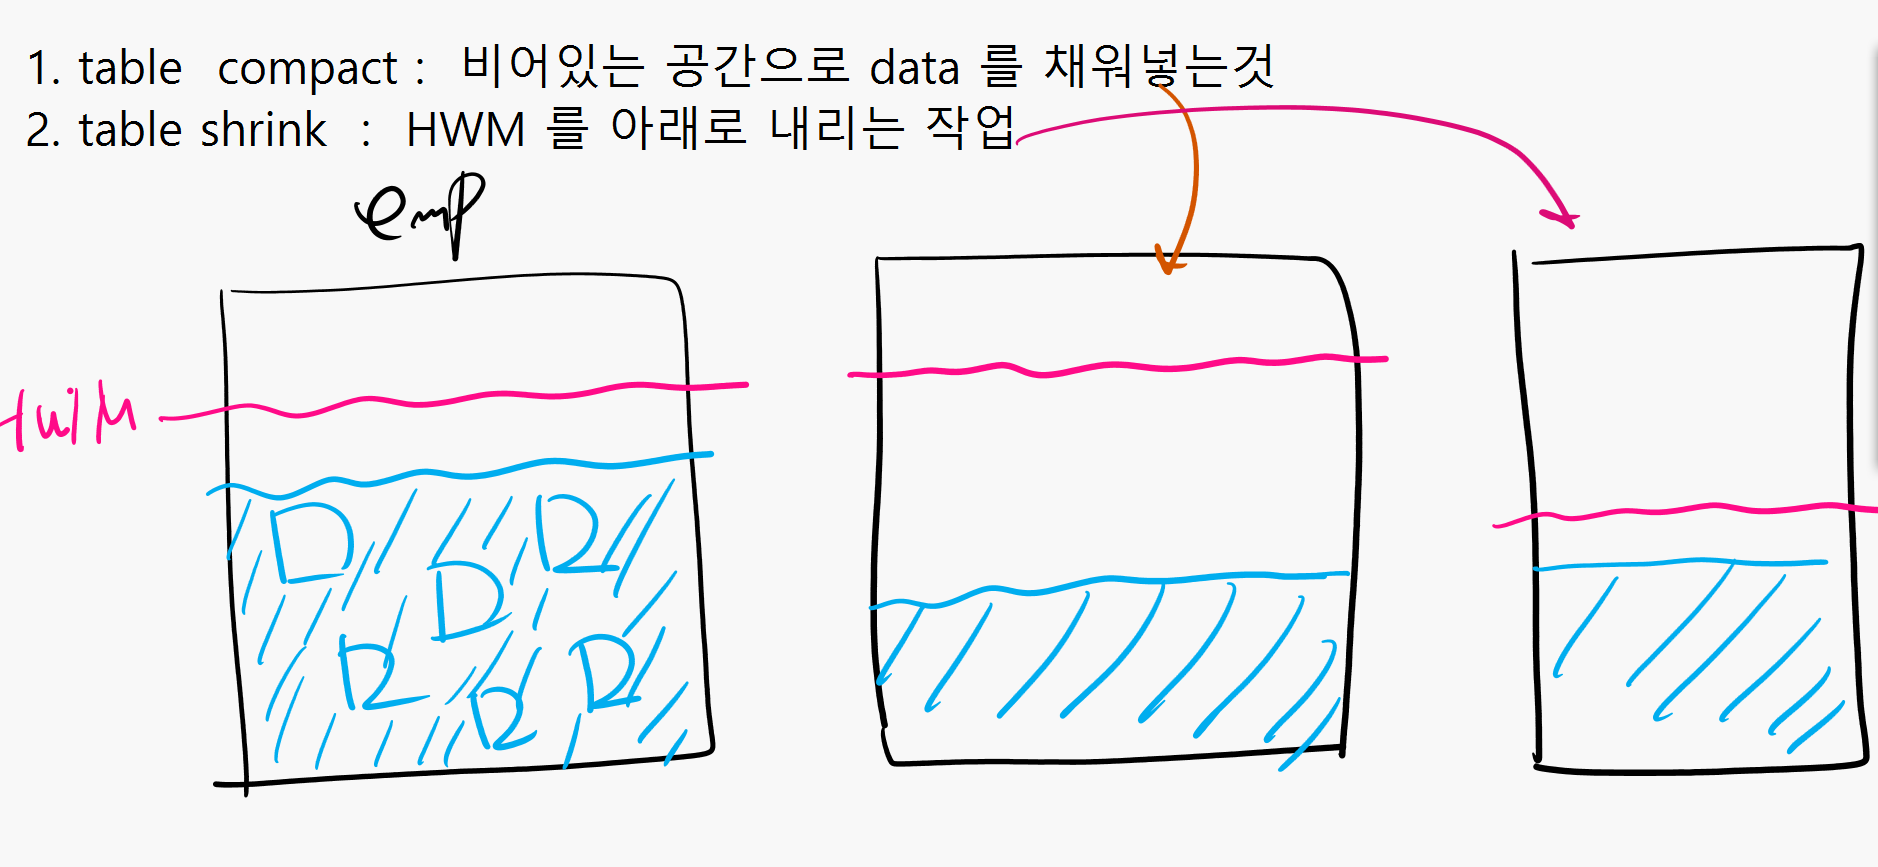
■ table compack 과 shrink 로 db reorg 작업 하기
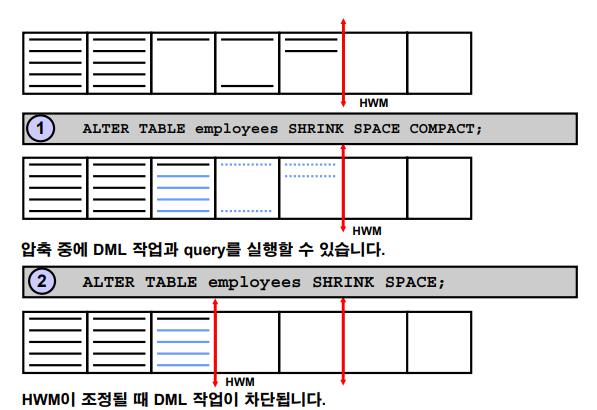
- table compact : 비어있는 공간으로 data 를 채워 넣는 것
- table shrink : HWM 를 아래로 내리는 작업
인덱스 리빌드 안해도 됨 !!!!!!!!!!!!!!!!!!!!!!!!!!!!
■ 새로운 db reorg 작업
-
table 을 준비한다.
@demobld.sql
insert into emp
select *
from emp; <--------- 10번 수행delete from emp where deptno in (10,20);
-
emp 테이블의 실제 사용하고 있는 block 의 갯수
select count(distinct dbms_rowid.rowid_block_number(rowid))
as blocks
from emp;BLOCKS 674
-
High water mark 까지 할당된 block 의 갯수 확인
select blocks
from user_segments
where segment_name='EMP';
-
테이블 compact 작업 수행
alter table emp enable row movement;
alter table emp shrink space compact;
-
emp 테이블의 실제 사용하고 있는 block 의 갯수
select count(distinct dbms_rowid.rowid_block_number(rowid))
as blocks
from emp;BLOCKS 302
-
High water mark 까지 할당된 block 의 갯수 확인
select blocks
from user_segments
where segment_name='EMP';
BLOCKS 256 -
High water mark 를 내려주는 작업 수행
alter table emp shrink space;
select blocks
from user_segments
where segment_name='EMP';BLOCKS 88
마지막문제 이수자평가 제출 용 emp 테이블을 다음과 같이 구성하고 10번과 20 번을 지운 후에
compact 과 shrink 로 HWM 가 내려가는지를 테스트하고 관련 인덱스가 VALID 한지 확인하시오 !
   @demobld.sql
   create  index  emp_empno  on  emp(empno);
   create  index  emp_ename  on  emp(ename);
   create  index  emp_sal    on  emp(sal);
   create  index  emp_job    on  emp(job);
   create  index  emp_detpno on  emp(deptno);
scott 유져에서 emp 테이블의 HWM 를 높인다.
  SQL> insert  into emp
         select  *
           from emp;

  SQL>   /  엔터  <---------  10번 수행
  SQL>  commit;
  SQL>  delete  from  emp  where  deptno in (10,20);
  SQL>  commit;
오라클 이수자 평가 4번 문제 제출물로 결과 캡쳐해서 가지고 있으세요
인덱스 상태가 valid 한지 확인하면 됩니다.
 emp 테이블의 실제 사용하고 있는 block 의 갯수

 select count(distinct dbms_rowid.rowid_block_number(rowid))
        as blocks
    from  emp;

   BLOCKS     337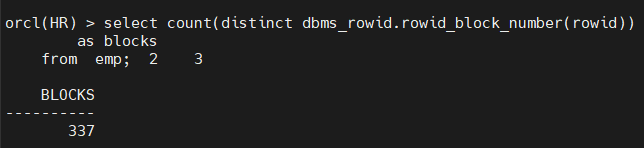
High water mark 까지 할당된 block 의 갯수 확인

  select  blocks
    from   user_segments
    where  segment_name='EMP';

BLOCKS       384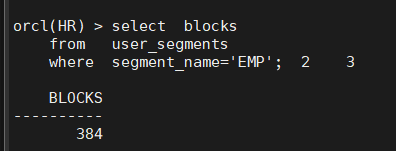
테이블 compact 작업 수행

   alter  table  emp  enable  row  movement;

   alter  table  emp  shrink  space  compact;

  emp 테이블의 실제 사용하고 있는 block 의 갯수

 select count(distinct dbms_rowid.rowid_block_number(rowid))
        as blocks
    from  emp;

  BLOCKS        151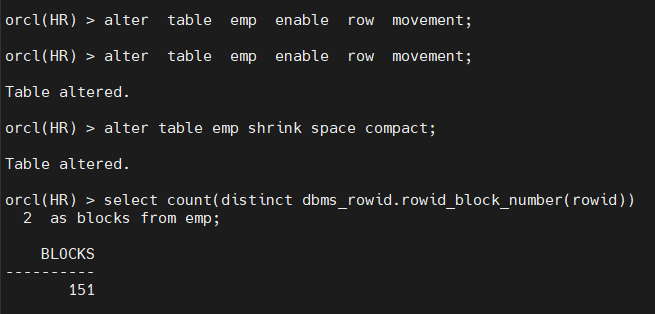
  High water mark 까지 할당된 block 의 갯수 확인

  select  blocks
    from   user_segments
    where  segment_name='EMP';

   BLOCKS       384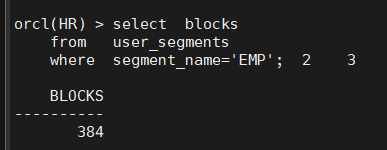
   High water mark 를 내려주는 작업 수행

   alter  table  emp  shrink  space;

  select  blocks
    from   user_segments
    where  segment_name='EMP';

  BLOCKS         168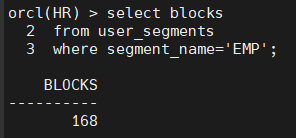
인덱스 유효한지 확인하기
select  index_name, status
      from  user_indexes
      where  table_name='EMPLOYEES';