0226
▩ 복습. 오라클 관리 수업
1장: 오라클 아키텍쳐 (5문제) --------> 오라클 구조 암기(A4지 3~4장)
2장: 오라클 소프트웨어 설치 (1문제) ----> 기본기
3장: 데이터 베이스 생성 (1문제) ----> 기본기
4장: 오라클 인스턴스 관리(파라미터 파일) (3문제) --> 오라클 설정 변경할일
5장: ASM 관리 (3문제)
6장: 오라클 네트워크 관리 ( 3문제) ---> 일하러 나가서 첫날 셋팅해야할 일
7장: 테이블 스페이스 관리(3문제) ---> DBA 가 일상적으로 하는일
8장: 오라클 유져관리와 권한 관리 ---> DBA ( SI(프로젝트)형 DBA )
▣ 예제 116. 한번에 데이터 이관을 끝내는 테이블 스페이스 레벨 펌프 사용법
export / import 4가지
- table level
- user level
- tablespace level
- database level
※ tablespace level 로 데이터 이관할 때 주의 사항 !
export 할 db 의 character set 과 import 할 db 의 character set 이 동일해야 합니다.
※ 실습의 큰 그림
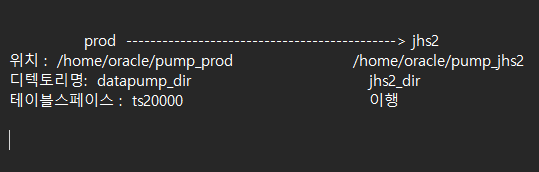
■ 실습
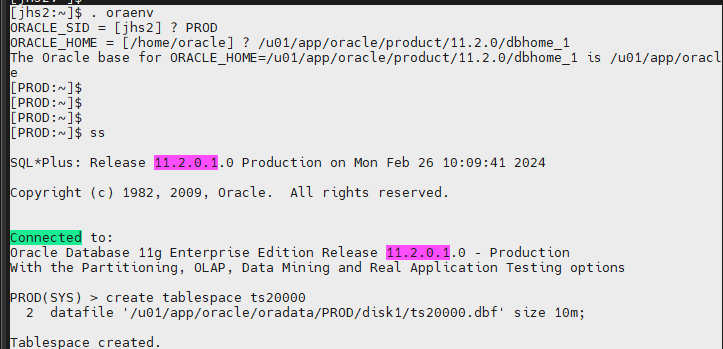
#1. prod db 에서 ts20000 테이블 스페이스를 생성합니다.
. oraenv
ORACLE_SID = [jhs2] ? PROD
ORACLE_HOME = [/home/oracle] ? /u01/app/oracle/product/11.2.0/dbhome_1
The Oracle base for ORACLE_HOME=/u01/app/oracle/product/11.2.0/dbhome_1 is /u01/app/oracle
#2. scott 유져로 접속해서 ts20000 테이블 스페이스에 emp20000 테이블을 생성 후 insert
PROD(SYS) > connect scott/tiger
Connected.
PROD(SCOTT) > create table emp20000
  2  (empno number (10),
  3  ename varchar2(10),
  4  sal number(10)  )
  5  tablespace ts20000;

Table created.
PROD(SCOTT) > insert into emp20000
2 select empno, ename, sal from emp;
14 rows created.
PROD(SCOTT) > commit;
Commit complete.#3. ts20000 테이블 스페이스를 read only 로 변경합니다.
PROD(SCOTT) > connect / as sysdba
Connected.
PROD(SYS) > alter tablespace ts20000 read only
  2  ;

Tablespace altered.
PROD(SYS) > select t.name, d.enabled
from v$tablespace t, v$datafile d
where t.ts# = d.ts#;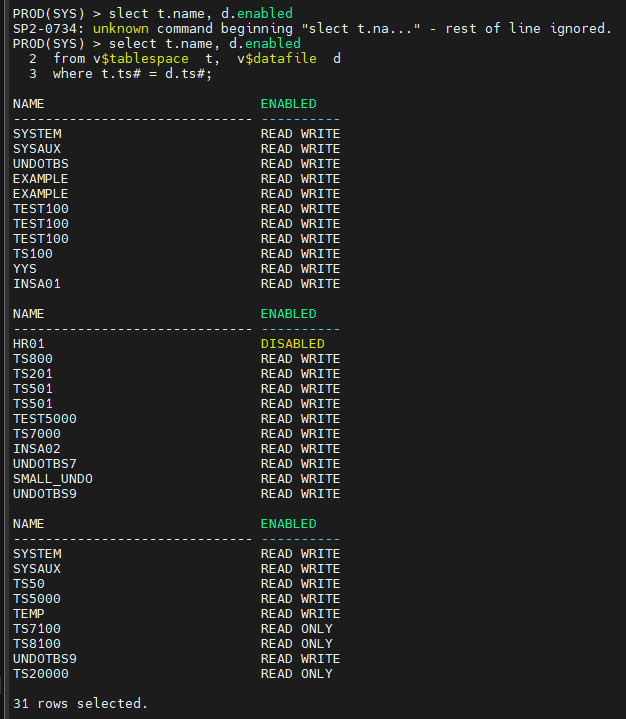
#4. ts20000 테이블 스페이스를 export 합니다.
[PROD:~]$
[PROD:~]$ expdp directory=datapump_dir  dumpfile=ts20000.dmp transport_tablespace=y tablespaces=ts20000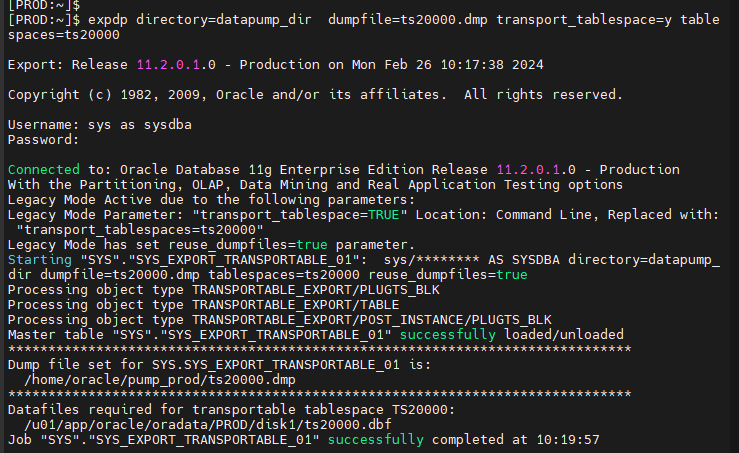
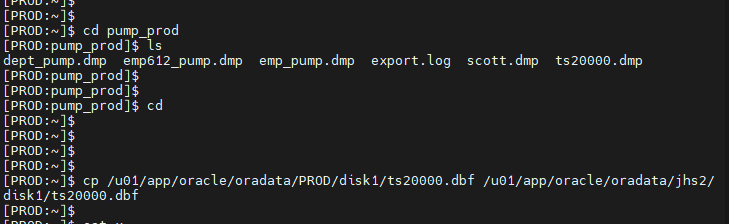
잘 export 됐는지 확인.
[PROD:~]$ cd pump_prod
[PROD:pump_prod]$ ls
dept_pump.dmp  emp612_pump.dmp  emp_pump.dmp  export.log  scott.dmp  ts20000.dmp
#5. ts20000.dbf 를 jhs2 쪽의 data file 이 있는 쪽으로 copy 합니다.
[PROD:~]$ cp /u01/app/oracle/oradata/PROD/disk1/ts20000.dbf /u01/app/oracle/oradata/jhs2/disk1/ts20000.dbf
#6. ts20000.dmp 파일을 jhs2 쪽의 pump 디렉토리로 copy 합니다.
[PROD:~]$ cp /home/oracle/pump_prod/ts20000.dmp /home/oracle/pump_jhs2/ts20000.dmp
#7. jhs2 에 ts20000 테이블 스페이스를 import 합니다.
※ 임폴트 하기 전에 jhs2 쪽에 sys 의 패스워드가 무엇인지 확인하기 , jhs2 에 scott 계정이 있는지 dba 권한이 있는지 확인하기
없으면 만들고, 주면 됨.
jhs2(SCOTT) > select * from session_roles;

$ impdp directory=jhs2_dir dumpfile=ts20000.dmp transport_datafiles='/u01/app/oracle/oradata/jhs2/disk1/ts20000.dbf'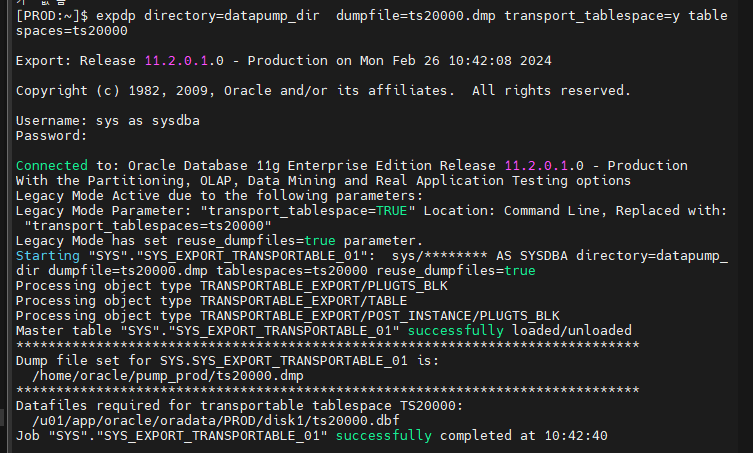
Import: Release 11.2.0.1.0 - Production on Mon Feb 26 10:45:53 2024
Copyright (c) 1982, 2009, Oracle and/or its affiliates. All rights reserved.
Username: sys as sysdba
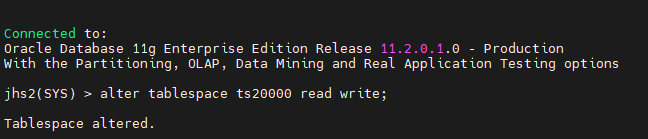
Password: oracle_4U#8. jhs2 에서 ts20000 테이블 스페이스를 read write 로 변경합니다.
jhs2(SYS) > alter tablespace ts20000 read write;
Tablespace altered.
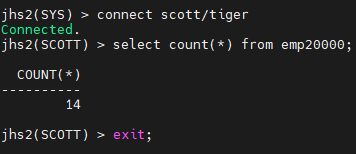
#9. jhs2 에 emp20000 테이블이 잘 조회되는지 확인합니다.
jhs2(SYS) > connect scott/tiger
Connected.
jhs2(SCOTT) > select count(*) from emp20000;
#10. prod db 에서 ts20000 테이블 스페이스를 read write 로 변경합니다.
[jhs2:~]$ . oraenv
ORACLE_SID = [jhs2] ? PROD
ORACLE_HOME = [/home/oracle] ? /u01/app/oracle/product/11.2.0/dbhome_1
The Oracle base for ORACLE_HOME=/u01/app/oracle/product/11.2.0/dbhome_1 is /u01/app/oracle
[PROD:~]$ ss

PROD(SYS) > alter tablespace ts20000 read write
  2  ;

Tablespace altered.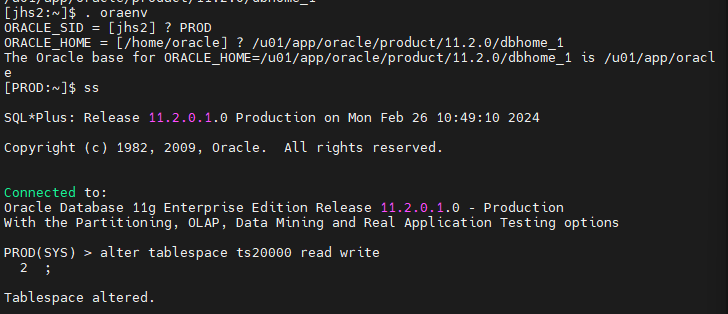
문제 1. yys2 쪽에 ts30000 테이블 스페이스를 생성하고 scott 유져에서
emp30000 테이블을 생성한 후에 ts30000 테이블 스페이스를 export 하고
PROD 쪽에 import 를 하시오 ~ 그리고 잘 임폴트가 되는지 확인하시오 !
yys2 쪽에 ts30000 테이블 스페이스를 생성하고
create tablespace ts30000
datafile '/u01/app/oracle/oradata/jhs2/disk1/ts30000.dbf' size 10m;
scott 유져에서 emp30000 테이블을 생성한 후
connect scott/tiger
create table emp30000
(empno number (10),
ename varchar2(10),
sal number(10) )
tablespace ts30000;
ts30000 테이블 스페이스를 export
expdp directory=jhs2_dir dumpfile=ts30000.dmp transport_tablespace=y tablespaces=ts30000
PROD 쪽에 import
$ cp /u01/app/oracle/oradata/jhs2/disk1/ts30000.dbf /u01/app/oracle/oradata/PROD/disk1/ts30000.dbf
[PROD:~]$ cp /home/oracle/pump_jhs2/ts30000.dmp /home/oracle/pump_prod/ts30000.dmp
#7. jhs2 에 ts20000 테이블 스페이스를 import 합니다.
※ 임폴트 하기 전에 jhs2 쪽에 sys 의 패스워드가 무엇인지 확인하기 , jhs2 에 scott 계정이 있는지 dba 권한이 있는지 확인하기
없으면 만들고, 주면 됨.
$ impdp directory=datapump_dir dumpfile=ts30000.dmp transport_datafiles='/u01/app/oracle/oradata/PROD/disk1/ts30000.dbf'그리고 잘 임폴트가 되는지 확인하오 - 이수자평가 제출물
■ database level 로 export pump 하기
$ expdp directory=datapump_dir full=y file=complete02.dmp
▣ 현업 기준으로 export / import 를 수행하는 방법을 정리
- 가장 빠르고 편한 데이터 이관 ?
-
오라클 골든 게이트(유료) --> 리눅스 화면에서 명령어로 수행하는 툴
-
테이블 스페이스 레벨의 export / import
테이블, 인덱스, 뷰, 시퀀스, 시너님, 권한, 프로시져, 트리거, 기타 등등
한번에 편하게 이관하는것이고 만약 위의 방법이 아니라면 몇 개월 프로젝트 입니다.
※ 요즘 db 엔지니어가 갖추어야할 특별한 기술들? 1. 골든 게이트
2. 엑사 데이터
▣ 예제 117. 고수들이 데이터 이행하는 방법은 이렇습니다.
테이블스페이스 레벨로 이관을 할 수 있으면 이 방법으로 수행하고
만약 character set 이 달라서 테이블 스페이스 레벨로 못하면 유져 레벨로 수행
이행순서 :
#0. (prod) hr 계정과 hr 계정에 관련한 객체들을 생성해야 합니다.
PROD(SCOTT) > connect / as sysdba
Connected.
PROD(SYS) > shutdown immediate
Database closed.
Database dismounted.
ORACLE instance shut down.
[+ASM:~]$ sqlplus / as sysasm
SQL*Plus: Release 11.2.0.1.0 Production on Mon Feb 26 11:55:24 2024
Copyright (c) 1982, 2009, Oracle. All rights reserved.
Connected to:
Oracle Database 11g Enterprise Edition Release 11.2.0.1.0 - Production
With the Automatic Storage Management optionSQL> startup
ORA-01081: cannot start already-running ORACLE - shut it down first
[+ASM:~]$ crs_stat -all위의 명령어 하나로 클러스터 올리고 ASM 올리고 ORCL DB 도 올립니다.
[+ASM:~]$ crs_stat -t
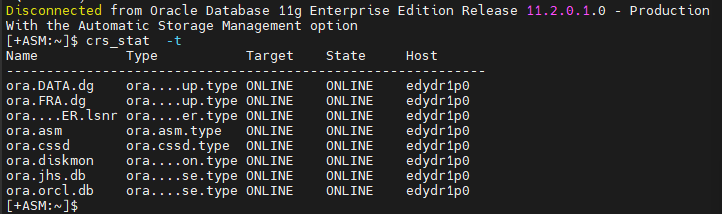
[+ASM:~]$ ps -ef | grep pmon
oracle 1048 1 0 11:55 ? 00:00:00 asmpmon+ASM
oracle 1113 1 0 11:56 ? 00:00:00 ora_pmon_jhs
oracle 1217 1 0 11:56 ? 00:00:00 ora_pmon_orcl
oracle 1404 5619 0 11:57 pts/1 00:00:00 grep pmon
oracle 6169 1 0 10:08 ? 00:00:01 ora_pmon_jhs2 * 세개 필요함.
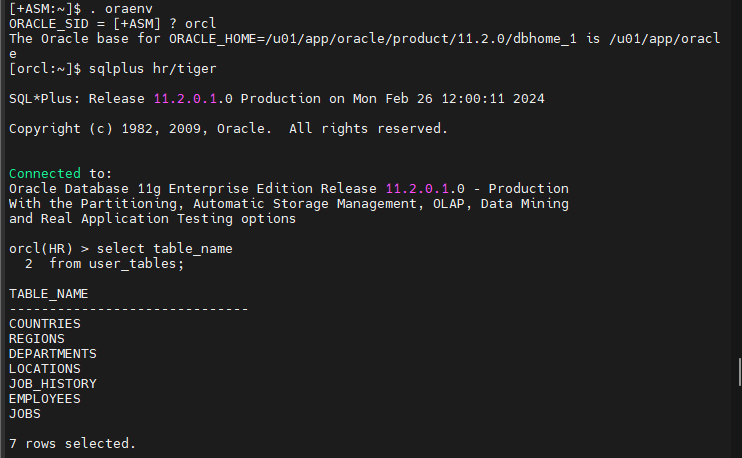
[orcl:~]$ sqlplus hr/tiger
SQL*Plus: Release 11.2.0.1.0 Production on Mon Feb 26 12:00:11 2024
Copyright (c) 1982, 2009, Oracle. All rights reserved.
Connected to:
Oracle Database 11g Enterprise Edition Release 11.2.0.1.0 - Production
With the Partitioning, Automatic Storage Management, OLAP, Data Mining
and Real Application Testing options
orcl(HR) > select table_name
2 from user_tables;
#1. (prod) hr 계정의 데이터를 스키마 단위로 익스폴트 합니다.
[orcl:~]$ exp system/oracle_4U file=hr.dmp owner=hr
Export: Release 11.2.0.1.0 - Production on Mon Feb 26 12:02:36 2024
Copyright (c) 1982, 2009, Oracle and/or its affiliates. All rights reserved.
Connected to: Oracle Database 11g Enterprise Edition Release 11.2.0.1.0 - Production
With the Partitioning, Automatic Storage Management, OLAP, Data Mining
and Real Application Testing options
Export done in US7ASCII character set and AL16UTF16 NCHAR character set
server uses AL32UTF8 character set (possible charset conversion)
Export terminated successfully with warnings.
[orcl:~]$ ls -lh hr.dmp
-rw-r--r-- 1 oracle oinstall 64K 2월 26 12:02 hr.dmp
#2. (prod) hr 계정의 테이블 생성 스크립트를 뽑아냅니다.(contraint=n)
[orcl:~]$ cat x
/u01/app/oracle/product/11.2.0/dbhome_1
[orcl:~]$ . oraenv
ORACLE_SID = [orcl] ? jhs2
ORACLE_HOME = [/home/oracle] ? /u01/app/oracle/product/11.2.0/dbhome_1
The Oracle base for ORACLE_HOME=/u01/app/oracle/product/11.2.0/dbhome_1 is /u01/app/oracle
[jhs2:~]$ ss
jhs2(SYS) > create user hr2 identified by tiger;
jhs2(SYS) > grant connect, resource to hr2;
jhs2(SYS) > create user oe identified by oe;
jhs2(SYS) > grant connect, resource to oe;
[jhs2:~]$ imp system/oracle file=hr.dmp fromuser=hr touser=hr2 indexes=n constraints=n indexfile=hr_table.sql
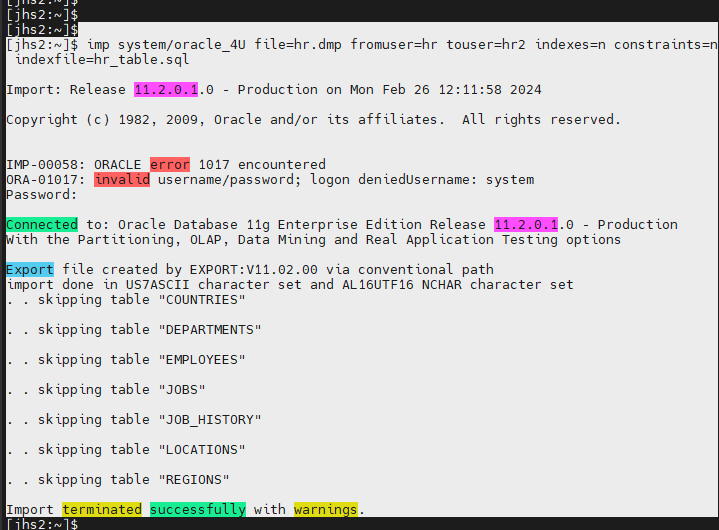
설명 : 위의 명령어는 hr.dmp 파일에서 table 생성 스크립트를 뽑아내는 명령어 입니다.
인덱스랑 제약 만드는 문법은 없고 오직 테이블 생성 스크립트만 만듭니다.
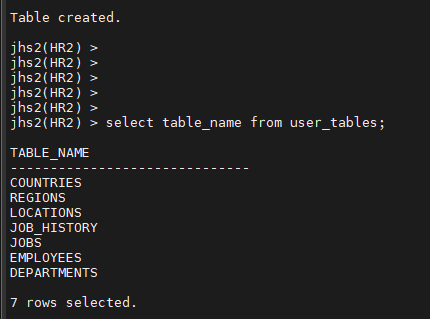
#3. (yys2) hr2 계정으로 접속해서 2번에서 생성한 테이블 생성 스크립트를 수행
먼저 sys 유져에서 example tablespace 를 생성합니다.
create tablespace example datafile '/u01/app/oracle/oradata/jhs2/disk1/example01.dbf' size 500m;
그리고 테이블 생성 스크립트 7개를 수행합니다.
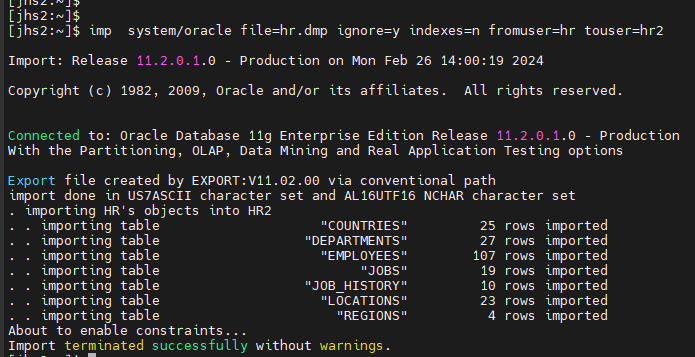
#4. (yys2) hr2 계정에 1번에 받은 export 파일을 임폴트를 수행(indexes=n)
[jhs2:~]$ imp system/oracle file=hr.dmp ignore=y indexes=n fromuser=hr touser=hr2
ignore=y : 빈 구조 테이블에 데이터만 입력함
위의 작업은 빈 구조만 있는 테이블에 데이터만 입력하는 명령어 입니다.
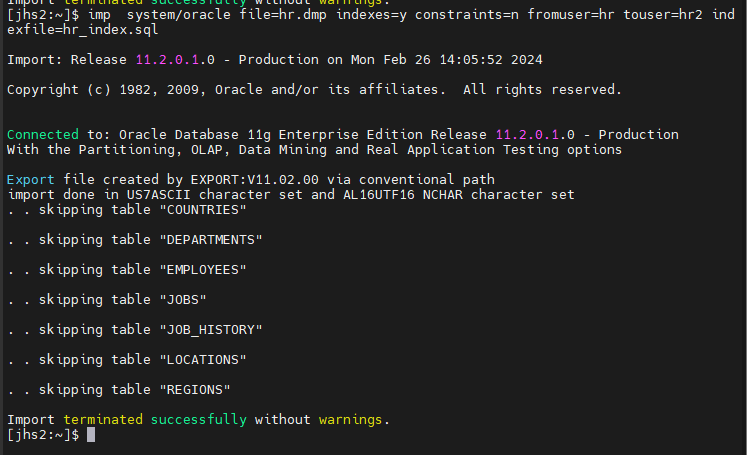
#5. (yys2) hr2 계정에서 인덱스를 생성합니다.
인덱스는 따로 만들어줘야하는 상황입니다.
[jhs2:~]$ imp system/oracle file=hr.dmp indexes=y constraints=n fromuser=hr touser=hr2 indexfile=hr_index.sql
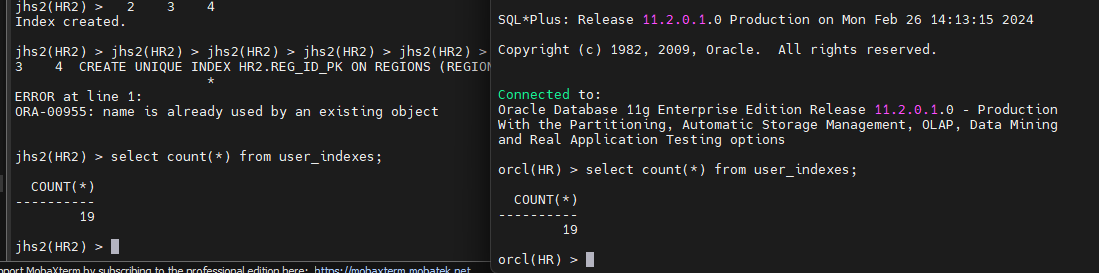
#5. (yys2) hr2 계정에서 인덱스를 생성합니다.
인덱스는 따로 만들어줘야하는 상황입니다.
[jhs2:~]$ imp system/oracle file=hr.dmp indexes=y constraints=n fromuser=hr touser=hr2 indexfile=hr_index.sql
임폴트 하고 hr_index.sql 파일을 바탕화면에 다운로드 받기.
수정하고 복사해서
jhs2(HR2) > 에 붙여넣기
[jhs2:~]$ sqlplus hr2/tiger
hr_index.sql 입력하기
jhs2(HR2) > select count(*) from user_indexes;
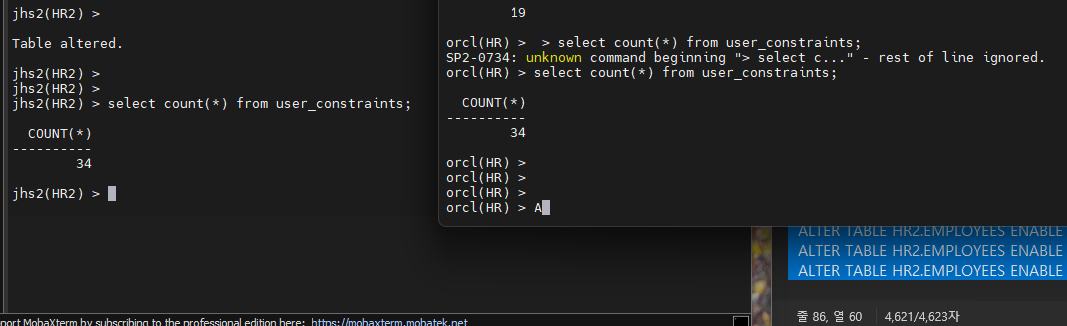
#6. (yys2) hr2 계정에서 제약을 생성합니다.
[jhs2:~]$ imp system/oracle file=hr.dmp indexes=n constraints=y fromuser=hr touser=hr2 indexfile=hr_constraints.sql
Import terminated successfully without warnings.
하고 파일을 바탕화면에 다운로드 받기.
수정하고 복사해서
jhs2(HR2) > 에 붙여넣기
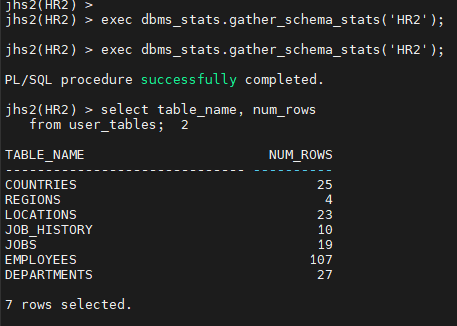
#7. jhs2 와 orcl 간의 데이터의 건수가 동일한지 확인하시오
-- orcl 쪽에서 hr 계정의 통계정보를 수집하고 데이터 건수 확인하기
orcl(HR) > exec dbms_stats.gather_schema_stats('HR');
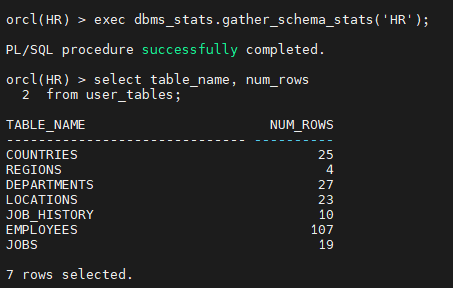
jhs2(HR2) >exec dbms_stats.gather_schema_stats('HR2');
jhs2(HR2) > select table_name, num_rows
from user_tables;
.
.
.
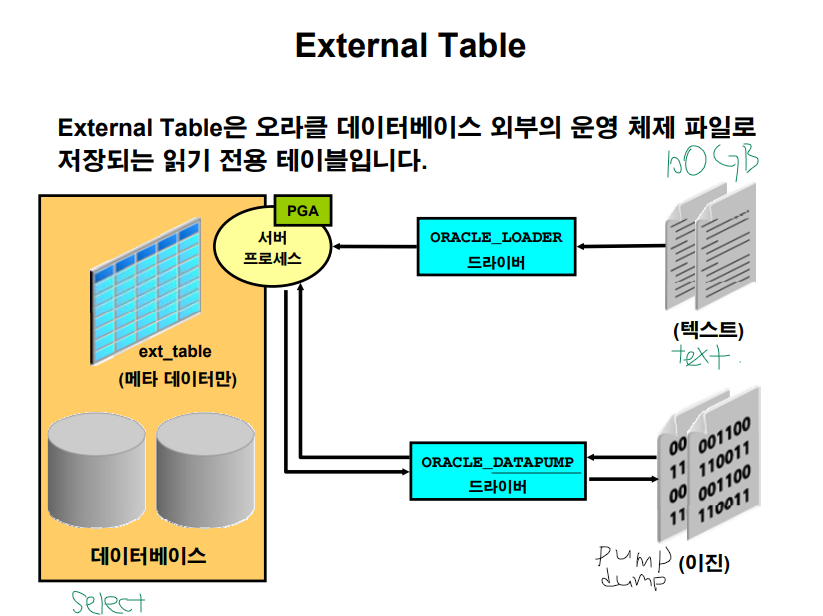
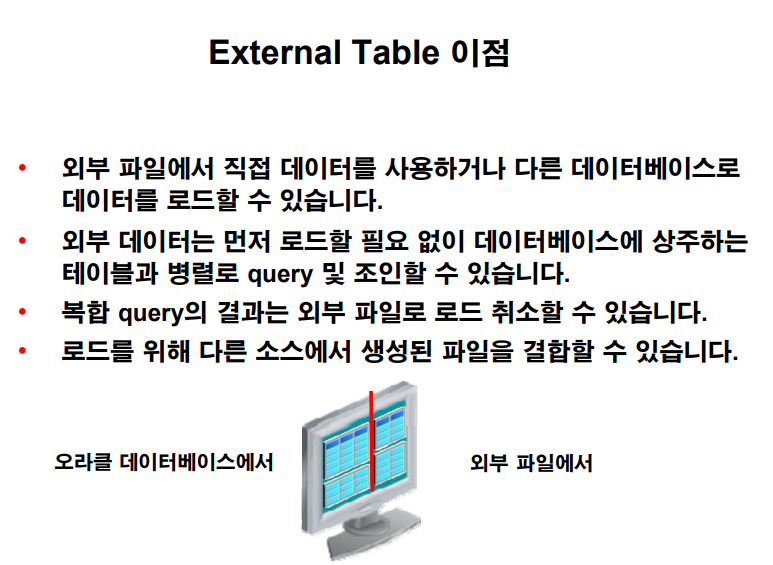
▣ 예제 118. 외부 테이블을 생성할 줄 알아야 해요.
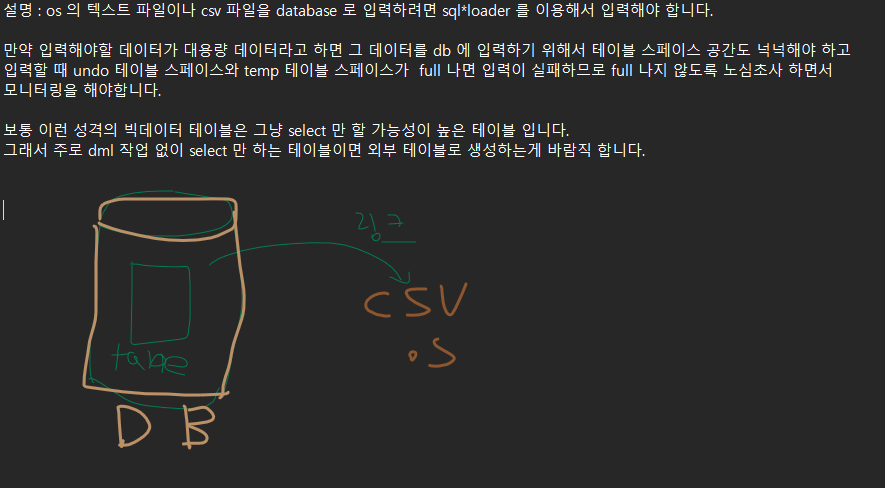
설명 : os 의 텍스트 파일이나 csv 파일을 database 로 입력하려면 sql*loader 를 이용해서 입력해야 합니다.
만약 입력해야할 데이터가 대용량 데이터라고 하면 그 데이터를 db 에 입력하기 위해서 테이블 스페이스 공간도 넉넉해야 하고
입력할 때 undo 테이블 스페이스와 temp 테이블 스페이스가 full 나면 입력이 실패하므로 full 나지 않도록 노심초사 하면서
모니터링을 해야합니다.
보통 이런 성격의 빅데이터 테이블은 그냥 select 만 할 가능성이 높은 테이블 입니다.
그래서 주로 dml 작업 없이 select 만 하는 테이블이면 외부 테이블로 생성하는게 바람직 합니다.
■ external table (외부 테이블) 이 사용하는 엔진 2가지
- SQL*loader
- PUMP
- SQL*loader 를 엔진으로 하는 external table 실습
- emp1.txt 편집(/home/oracle/emp1.txt)
[orcl:~]$ vi emp1.txt
SMITH,101,2001/03/15
JOHN,102,2002/04/15
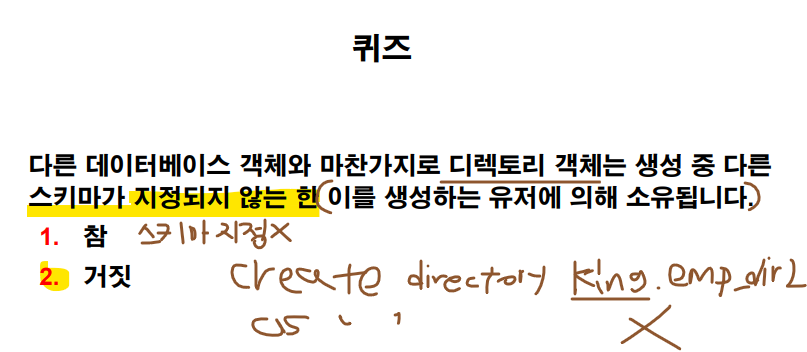
- Directory 생성
orcl(SYS) > grant create any directory to scott;
orcl(SYS) > connect scott/tiger
orcl(SCOTT) > create directory emp_dir as '/home/oracle/';
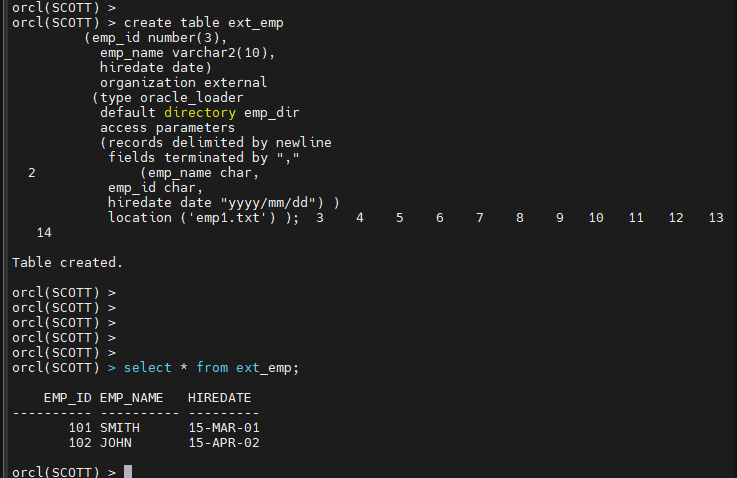
- External table 생성
orcl(SCOTT) > create table ext_emp
         (emp_id number(3),
           emp_name varchar2(10),
           hiredate date)
           organization external
          (type oracle_loader
           default directory emp_dir
           access parameters
           (records delimited by newline
            fields terminated by ","
           (emp_name char,
            emp_id char,
            hiredate date "yyyy/mm/dd") )
            location ('emp1.txt') );
records delimited by newline : 줄과 줄은 엔터로 구분하겠다.
fields terminated by "," : 값은 콤마로 구분하겠다.
emp_dir 를 읽어다가 ext_emp를 만든다
- Select & DML 테스트
SQL> select * from ext_emp;
링크만 걸고 데이터를 입력하지 않았는데 바로 나온다.
db 에 공간도 절약되고 시간도 엄청 절약 됩니다.
조인 가능합니다.
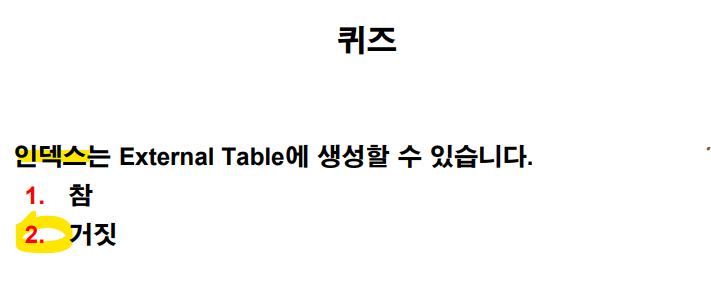
인덱스 생성은 불가능 합니다.
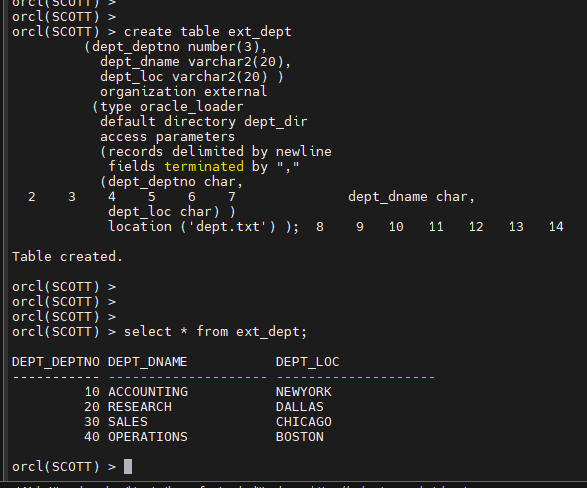
문제1. dept.txt 파일을 가지고 exp_dept 라는 외부 테이블을 생성하시오 !
$ vi dept.txt
10,ACCOUNTING,NEWYORK
20,RESEARCH,DALLAS
30,SALES,CHICAGO
40,OPERATIONS,BOSTON
orcl(SCOTT) > create directory dept_dir as '/home/oracle/';
External table 생성
orcl(SCOTT) > create table ext_dept
         (dept_deptno number(3),
           dept_dname varchar2(20),
           dept_loc varchar2(20) )
           organization external
          (type oracle_loader
           default directory dept_dir
           access parameters
           (records delimited by newline
            fields terminated by ","
           (dept_deptno char,
            dept_dname char,
            dept_loc char) )
            location ('dept.txt') );
select * from ext_dept;
▣ 예제 119. pump 엔진을 이용해서 외부 테이블을 생성하기
#1. orcl 쪽 scott 유져에서 emp 와 dept 테이블을 조인한 결과로 pump 파일을 생성하면서 바로 외부 테이블을 생성합니다.
scott > create table ext_emp_dept
(ename, sal, loc)
organization external
(
 type oracle_datapump
default directory emp_dir
location('empdept.dmp')  )
as
select e.ename, e.sal, d.loc
from emp e, dept d
where e.deptno = d.deptno;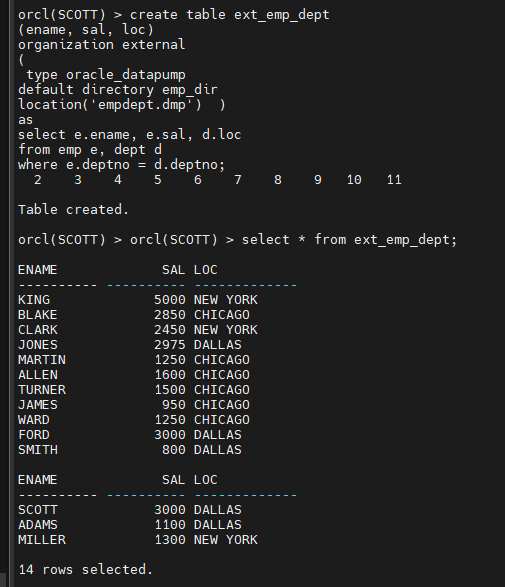
문제1. emp 와 dept 와 salgrade 를 조인해서 이름과 월급과 부서위치와 grade 를 출력하는 external 테이블을
ext_e_grade 로 생성하시오 !
펌프 파일은 empgrade.dmp 라는 이름으로 생성되게 하시오
orcl 쪽에서 생성하세요
orcl(SCOTT) >
create table ext_e_grade
(ename, sal, loc, grade)
organization external
(
 type oracle_datapump
default directory emp_dir
location('empdeptgrade.dmp')  )
as
select e.ename, e.sal, d.loc, s.grade
from emp e, dept d, salgrade s
where e.deptno = d.deptno
and e.sal between s.losal and s.hisal;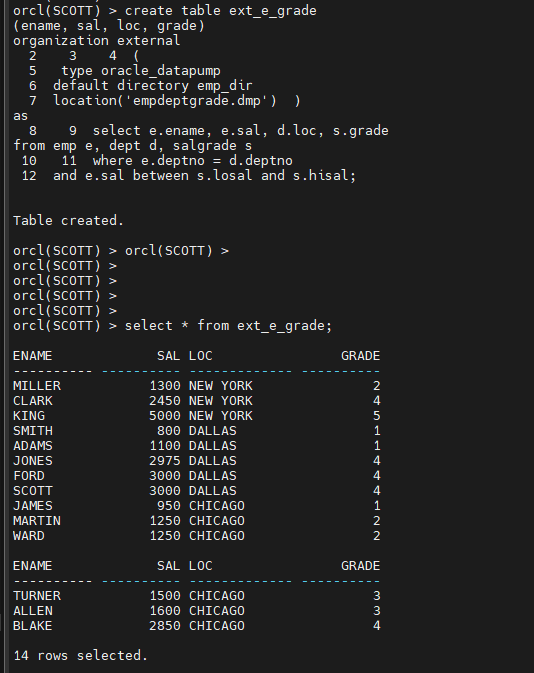
문제2. empdeptgrade.dmp 파일을 가지고 jhs2 쪽에 external 테이블을 생성하시오
OWNER DIRECTORY_NAME DIRECTORY_PATH
SYS JHS2_DIR /home/oracle/pump_jhs2
[jhs2:~]$ cp empdeptgrade.dmp /home/oracle/pump_jhs2/empdeptgrade.dmpscott 으로 접속
jhs2(SCOTT) > create table ext_e_grade
		( ename varchar2(50),
		  sal number(10),
		   loc varchar2(50),
		   grade number(10) )
		organization external
		(
		  type oracle_datapump
		default directory jhs2_dir
		location('empdeptgrade.dmp')
		);

단점
insert update delete 안됨.
인덱스 생성 또한 안됨.
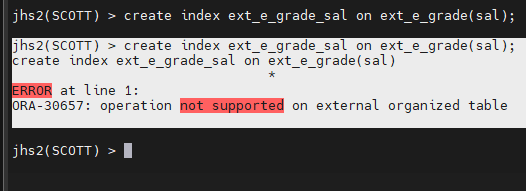
문제3. 방금 생성한 ext_e_grade 의 sal 컬럼에 인덱스를 생성하시오
jhs2(SCOTT) > create index ext_e_grade_sal on ext_e_grade(sal);
jhs2(SCOTT) > create index ext_e_grade_sal on ext_e_grade(sal);
create index ext_e_grade_sal on ext_e_grade(sal)
*
ERROR at line 1:
ORA-30657: operation not supported on external organized table
문제4. (ocp 시험 문제) ext_e_grade 에서 월급이 3000 이상의 모든 컬럼의 데이터를 조회하는 쿼리문으로 view 를 생성하면 되는지
확인하시오 view 이름은 ext_e_grade_view
create view ext_e_grade_view
as
select * from ext_e_grade
where sal >= 3000;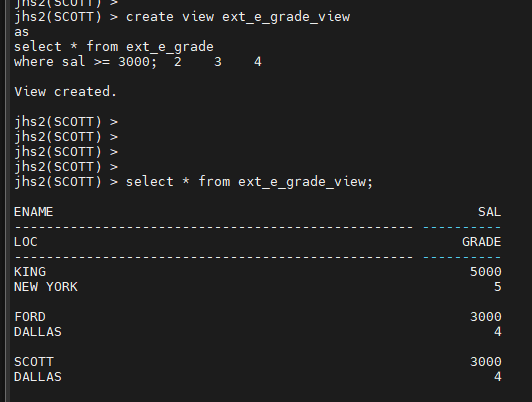
view 생성 가능, 조인도 가능한데
dml 안되고 index 생성이 불가능하다.
정리 퀴즈
오늘의 마지막 문제
orcl 쪽에서 아래의 쿼리에 대한 결과를 dump 파일로 생성해서
yys2 에 external 테이블로 생성하시오 !
( 외부 테이블명은 여러분들 편하게 만드세요)
orcl(SCOTT) > select ename, sal from emp where sal > (select max(sal) from emp where deptno = 30 );
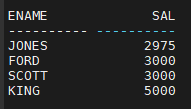
create table max_sal_dump
(ename, sal)
organization external
(
 type oracle_datapump
default directory emp_dir
location('empmaxsal.dmp')  )
as
 ( select ename, sal
from emp
where sal > (select max(sal) from emp where deptno = 30 ) );
jhs2 에 external 테이블로 생성하기.
[orcl:~]$ cp empmaxsal.dmp /home/oracle/pump_jhs2/empmaxsal.dmp
scott 으로 접속
jhs2(SCOTT) > create table max_sal_dump
( ename varchar2(50),
sal number(10) )
organization external
(
type oracle_datapump
default directory jhs2_dir
location('empmaxsal.dmp')
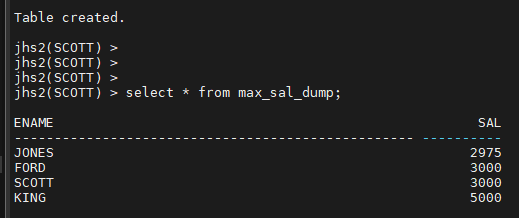
);jhs2(SCOTT) >
jhs2(SCOTT) > select * from max_sal_dump;
■ 16장. resource manager
리소스 관리 (resource manager) : 프로파일 보다 더 많은 자원 사용에 대한 제한을 걸 수 있습니다.
어떠한 제한을 할 수 있는가 ? (dba 의 방어기제의 방법들)
-
악성 SQL 이 실행 안되도록 제한
-
Lock waiting 현상에 대한 제한
-
병렬 처리에 대한 제한(병렬도를 크게 못주게 설정)
-
undo 사용에 대한 제한( 과도한 DML 작업을 못하게)
-
Active session (waiting 하는 세션) 들에 대한 제한
지금 현재 db 에 20명이 대기하고 있는 상황이라고 하면 21번째는 그냥 바로 에러나면서 실패하게 합니다.
-
idle 시간에 대한 제한( db 접속해놓고 아무것도 안하면 세션을 끊어버림)
-
execution time(실행시간) 에 대한 제한
