여전히 player 구현 중......
seek bar 구현이 이렇게 어렵고 까다로울거란 생각은 하지도 못했다.
지금까지 구현했다 삭제했다 수정했다의 히스토리를 정리해보자면,
1. 기존 legacy 코드대로 rc-slider 라이브러리 사용하기
2. seek bar에 마우스 오버 시 마우스가 올라가 있는 시간을 tool tip으로 띄우기 위해 rc-slider 걷어내고 ant design 라이브러리 사용하기
3. ant design tool tip의 경우 children의 width에 따라 position을 잡는 특징이 있어 마우스 위치에 따라 tool tip이 따라다녀야 하는 상황에 맞지 않으므로 라이브러리 없이 seek bar + tool tip 구현하기
아직까지 최종적으로 안정적인 seek bar를 구현하진 않았지만, 이 과정을 통해 많은 역경과 고난을 겪었으므로...
라이브러리를 걷어내고 생 seek bar + tool tip을 구현한 과정을 이 글에 정리해두고자 한다.
📌 seek bar (progress bar) 구현하기
📍 BottomController.tsx
export default function bottomController() {
  const [playPercent, setPlayPercent] = useState(0);

  window.callUpdatePlaybackTime = async (playerPlayTime: number) => {
    setPlayTime(Math.floor(playerPlayTime * 1000));
    const percent = (playTime / duration) * 100;
    setPlayPercent(percent);
  };

  const onChangeSeekBar = (event: any) => {
    if (duration > 0) {
      const seekTime = duration * event.target.value * 0.00001;
      setPlayPercent(event.target.value);
      player.seek(seekTime);
    }
  };

  return (
    <S.SeekBarContainer>
        <S.SeekBarRail>
            <S.SeekBarTrack isLivePlay={isLivePlay} playPercent={playPercent} />
            <S.SeekBarRange
              type="range"
              min="0"
              max="100"
              step="1"
              value={isLivePlay ? 100 : playPercent}
              onChange={onChangeSeekBar}
              id="seekBar"
            />
        </S.SeekBarRail>
    </S.SeekBarContainer>
	)
};
seek bar에 직접적으로 영향을 끼치는 변수들만 가져와봤다.
우리 회사의 Player는 지금 현재 play 되고 있는 시간을 던져주기 때문에, 해당 play 시간을 이용하여 playPercent를 계산해준다.
보통 player들이 재생시간에 따라 빨간색, 파란색 등등의 색깔로 어느 시점을 재생 중이라는 track을 표시해주므로 playPercent를 SeekBarTrack에 전달해준다.
seek bar는 현 재생시간을 보여주는 것 뿐만 아니라, 내가 원하는 시점을 seek하는 기능도 제공해야 하므로 input range를 넣어줘야 한다.
📍 BottomController.styles.ts
export const SeekBarContainer = styled.div`
  display: flex;
  align-items: center;
  width: 100%;
  height: 100%;
`;

export const SeekBarRail = styled.div`
  position: relative;
  width: 100%;
  height: 5px;
  background-color: #90918d;
  border-radius: 10px;
  cursor: pointer;
`;

interface ISeekBarTrack {
  isLivePlay: boolean;
  playPercent: number;
}

export const SeekBarTrack = styled.div.attrs<ISeekBarTrack>(
  ({ isLivePlay, playPercent }) => ({
    style: {
      width: isLivePlay ? "100%" : `${playPercent}%`,
    },
  }),
)<ISeekBarTrack>`
  position: absolute;
  height: 5px;
  top: -0.01px;
  background-color: #e31414;
  border-radius: 10px;
`;

export const SeekBarRange = styled.input`
  position: absolute;
  width: 100%;
  height: 20px;
  top: -10px;
  left: -2px;
  -webkit-appearance: none;
  background: none;
  cursor: pointer;

  &::-webkit-slider-thumb {
    height: 15px;
    width: 15px;
    top: -10px;
    border-radius: 50%;
    background-color: #e31414;
    -webkit-appearance: none;
  }
`;
BottomController.tsx에서 전달해주는 playPercent에 따라 SeekBarTrack div의 넓이를 설정해준다. 그럼 play time에 따라 따라다니는 div가 된다!
❓ 왜 attrs를 사용했나
사실 이번에 attrs를 처음 알게 되었고, 처음 사용해보았다.
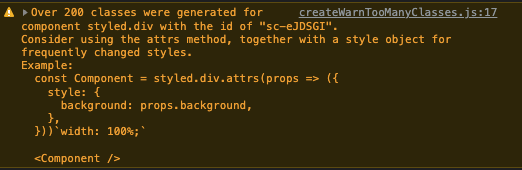
styled-component는 class명을 랜덤으로 생성하여 해당 element가 생성될 때마다 class명을 지정해준다.
그런데... SeekBarTrack이 실시간으로 play time을 따라다니며 width를 결정하면서 class명이 무한으로 변경되는 문제점이 있었다.
(이런 경고 문구 처음 봤네..^^)
원인을 몰랐는데 폭풍 구글링을 해보니 유동적인 width 문제가 맞았다. (결정적으로 원인을 알려준 링크)
원인도 해결책도 알았겠다... 더러운 inline style 대신 attrs 속성을 먹이려고 하니 typescript가 문제였고^^
이번엔 stack overflow 도움을 받아 무사히 해결했다.
결론적으로 attrs는 inline style을 쓰는 것과 같은 효과를 준다는 것!
📌 custom tool tip 구현하기
📍 ToolTip.tsx
import styled, { keyframes } from "styled-components";

interface IToolTip {
  message: string;
  mouseWidth?: number;
  isLivePlay?: boolean;
  playPercent?: number;
  isToolTip?: boolean;
}

export default function ToolTip(props: IToolTip) {
  return (
    <Container isLivePlay={props.isLivePlay} playPercent={props.playPercent}>
      <CustomToolTip
        className="tooltip"
        isToolTip={props.isToolTip}
        mouseWidth={props.mouseWidth}
      >
        {props.message}
      </CustomToolTip>
    </Container>
  );
}

interface IContainer {
  isLivePlay: boolean | undefined;
  playPercent: number | undefined;
}

const Container = styled.div<IContainer>`
  position: relative;
  height: 1px;
  z-index: 999;
  cursor: auto;
`;

const tooltipCustom = keyframes`
    0% { opacity: 0; }
    40% { opacity: 0; }
    50% { opacity: 1; }
    100% { opacity: 1;}
`;

interface ICustomToolTip {
  isToolTip: boolean | undefined;
  mouseWidth: number | undefined;
}

const CustomToolTip = styled.div.attrs<ICustomToolTip>(
  ({ isToolTip, mouseWidth }) => ({
    style: {
      opacity: isToolTip ? 100 : 0,
      marginLeft: mouseWidth ? `${mouseWidth}%` : 0,
    },
  }),
)<ICustomToolTip>`
  background-color: black;
  border: black solid 1px;
  border-radius: 7px;
  color: #fff;
  font-size: 0.8rem;
  font-weight: 500;
  height: auto;
  letter-spacing: -0.25px;
  padding: 8px 9px;
  position: relative;
  width: fit-content;
  z-index: 100;
  display: flex;
  justify-content: center;
  animation: ${tooltipCustom};
  bottom: 43px;
  left: -25px;

  ::before {
    border-color: black transparent;
    border-style: solid;
    border-width: 8px 6.5px 0 6px;
    content: "";
    display: block;
    position: absolute;
    top: 28px;
    width: 0;
    z-index: 0;
  }

  ::after {
    border-color: black transparent;
    border-style: solid;
    border-width: 8px 6.5px 0 6px;
    content: "";
    display: block;
    position: absolute;
    top: 28px;
    width: 0;
    z-index: 1;
  }
`;
SeekBar Track에 mouse over를 할 경우 해당 시간을 tool tip으로 보여주고 싶었다.
antd tooltip을 써보려 했더만 children width를 자꾸 따라다닌다.
꾀를 써서 play time에 쫓아다니는 작은 div를 하나 더 추가해봤더니, range랑 div가 겹쳐지면서 seek을 시도하면 클릭이 잘 안되는 문제가 생겼다.
결국 tool tip을 직접 구현하였고, 역시나 구글링을 통해 큰 도움을 받았다!
참고한 링크이며, 여기서 가져온 툴팁 방향을 수정하고 custom해서 사용했다.
tool tip이 SeekBarRange 위에서 마우스 위치에 따라 뜨길 원했기 때문에 style을 위해 props를 받고 있다.
위에서 언급한 것처럼 tool tip 역시 margin left를 user의 마우스 위치에 따라 달리 가져오고 있어, 무한 class명 생성을 막기 위해 attrs 안에 작성하였다.
📍 BottomController.tsx (tool tip 추가 ver)
export default function bottomController() {
  const [playPercent, setPlayPercent] = useState(0);
  const [, setIsOnMouse] = useState(false);

  window.callUpdatePlaybackTime = async (playerPlayTime: number) => {
    setPlayTime(Math.floor(playerPlayTime * 1000));
    const percent = (playTime / duration) * 100;
    setPlayPercent(percent);
  };

  const onChangeSeekBar = (event: any) => {
    if (duration > 0) {
      const seekTime = duration * event.target.value * 0.00001;
      setPlayPercent(event.target.value);
      player.seek(seekTime);
    }
  };

  const onMouseOutToolTip = () => {
    setIsToolTip(false);
  };

  const onMouseOverToolTip = () => {
    setIsToolTip(true);
  };

  return (
    <S.SeekBarContainer>
        <S.SeekBarRail>
    		<ToolTip
              message={mouseMove}
              mouseWidth={mouseWidth}
              isToolTip={isToolTip}
            />
            <S.SeekBarTrack isLivePlay={isLivePlay} playPercent={playPercent} />
            <S.SeekBarRange
              type="range"
              min="0"
              max="100"
              step="1"
              value={isLivePlay ? 100 : playPercent}
              onChange={onChangeSeekBar}
              id="seekBar"
            />
        </S.SeekBarRail>
    </S.SeekBarContainer>
	)
};
진짜 여러모로 속 많이 썩은 seek bar 구현...
아직 깜빡임 현상이 있어 디버깅은 더 해야 한다😭
내 피땀눈물과 함께 만들어지는 player......