📑 DataBinding 적용 전의 소스코드
(ViewBinding만 적용한 상태)
MainActivity.java
public class MainActivity extends AppCompatActivity {

	private ActivityMainBinding binding;

    @Override
    protected void onCreate(Bundle savedInstanceState) {
    	super.onCreate(savedInstanceState);
        binding = ActivityMinBinding.inflate(getLayoutInflater());
        setContentView(binding.getRoot());

        fetchUserProfile();
    }

    private void fetchUserProfile() {
    	UserProfile userProfile = new UserProfile();
        userProfile.name = "홍길동";
        userProfile.phone = "010-0000-0000";
        userProfile.address = "서울시 강남구 대치동";

        updateUI(userProfile);
    }

    private void updateUI(UserProfile useProfile) {
		binding.name.setText(userProfile.name);
    	binding.phone.setText(userProfile.phone);
    	binding.address.setText(userProfile.address);
	}
}
UserProfile.java
public class UserProfile {
	public String name;
	public String phone;
	public String address;
}
activity_main.xml
<?xml version="1.0" encoding="utf-8"?>
<LinearLayout xmlns:android="http://schemas.android.com/apk/res/android"
    xmlns:app="http://schemas.android.com/apk/res-auto"
    xmlns:tools="http://schemas.android.com/tools"
    android:layout_width="match_parent"
    android:layout_height="match_parent"
    android:orientation="vertical"
    tools:context=".MainActivity">

    <TextView
        android:id="@+id/name"
        android:layout_width="wrap_content"
        android:layout_height="wrap_content" />

    <TextView
        android:id="@+id/phone"
        android:layout_width="wrap_content"
        android:layout_height="wrap_content" />

    <TextView
        android:id="@+id/address"
        android:layout_width="wrap_content"
        android:layout_height="wrap_content" />

</LinearLayout>
데이터를 화면에 표시하는 일반적인 절차
- onCreate에서 뷰바인딩을 진행한다.
- fetchUserProfile에서는 데이터를 로딩해온다.
- updateUI에서는 가져온 데이터를 레퍼런스에 세팅한다. (데이터바인딩)
📚 DataBinding (Java)
데이터바인딩을 통해 레퍼런스에 데이터를 세팅하는 작업을 MainActivity의 소스코드에서 빼내서 activity_main.xml 레이아웃 파일 안으로 옮겨줄 수 있다.
build.gradle (module)
android {
	…
    dataBinding {
    	enabled true
    }
}
위 줄을 추가하고 Sync Now까지 완료하면 안드로이드 스튜디오가 클래스를 자동으로 만들어준다.
activity_main.xml
<?xml version="1.0" encoding="utf-8"?>
<layout xmlns:android="http://schemas.android.com/apk/res/android"
    xmlns:app="http://schemas.android.com/apk/res-auto"
    xmlns:tools="http://schemas.android.com/tools">

    <data>
        <variable
            name="userProfile"
            type="com.example.androidpractice.UserProfile" />
    </data>

    <LinearLayout
        android:layout_width="match_parent"
        android:layout_height="match_parent"
        android:orientation="vertical"
        tools:context=".MainActivity">

        <TextView
            android:id="@+id/name"
            android:layout_width="wrap_content"
            android:layout_height="wrap_content"
            android:text="@{userProfile.name}"/>

        <TextView
            android:id="@+id/phone"
            android:layout_width="wrap_content"
            android:layout_height="wrap_content"
            android:text="@{userProfile.phone}"/>

        <TextView
            android:id="@+id/address"
            android:layout_width="wrap_content"
            android:layout_height="wrap_content"
            android:text="@{userProfile.address}"/>

    </LinearLayout>

</layout>
LinearLayout 영역 외에 data 영역을 새로 만들어 주고, 두 영역을 layout이라는 루트 엘리먼트로 감싸준다.
- data 영역: variable은 데이터와 뷰를 연결하는 태그이다. type에 연결하고 싶은 객체가 있는 경로를 적어주고 name에 사용할 변수명을 정해주면 된다.
- layout 영역: 데이터를 변경해줄 텍스트뷰에 text속성을 "@{userProfile.address}" 형태로 추가한다.
MainActivity.java
public class MainActivity extends AppCompatActivity {

	private ActivityMainBinding binding;

    @Override
    protected void onCreate(Bundle savedInstanceState) {
    	super.onCreate(savedInstanceState);
        binding = ActivityMinBinding.inflate(getLayoutInflater());
        setContentView(binding.getRoot());

        fetchUserProfile();
    }

    private void fetchUserProfile() {
    	UserProfile userProfile = new UserProfile();
        userProfile.name = "홍길동";
        userProfile.phone = "010-0000-0000";
        userProfile.address = "서울시 강남구 대치동";

        binding.setUserProfile(userProfile);
    }
}
binding에 setUserProfile 메서드가 생성되어 있을 것이다. setUserProfile에 userProfile 변수를 세팅해주면 userProfile 데이터가 레이아웃 파일의 variable userProfile에 설정되고, 레이아웃 파일은 받은 데이터로 뷰들을 업데이트한다.
비로소 MainActivity에 UI에 대한 코드 없이 순수한 로직만 남게 되었다. 뷰바인딩과 데이터바인딩을 통해 화면과 데이터를 분리하는 작업 완료 🌠
그런데 말입니다, 업데이트 해줄 항목이 꼭 String이라는 보장이 있을까?
💡 Int값을 업데이트해주려면?
UserProfile.java
public class UserProfile {
	public String name;
	public String phone;
	public String address;
    public int gender;
    public String getGenderAsText() { // 요 코드 추가
    	return (gender == 0) ? "남성" : "여성";
    }
}
gender를 int로 선언하고 0인 경우 남성, 1인 경우 여성으로 표시하고 싶은 경우가 존재할 수 있다.
activity_main.xml
<?xml version="1.0" encoding="utf-8"?>
<layout xmlns:android="http://schemas.android.com/apk/res/android"
    xmlns:app="http://schemas.android.com/apk/res-auto"
    xmlns:tools="http://schemas.android.com/tools">

    <data>
        <variable
            name="userProfile"
            type="com.example.kotlinpractice.UserProfile" />
    </data>

    <LinearLayout
        android:layout_width="match_parent"
        android:layout_height="match_parent"
        android:orientation="vertical"
        tools:context=".MainActivity">

        <TextView
            android:id="@+id/name"
            android:layout_width="wrap_content"
            android:layout_height="wrap_content"
            android:text="@{userProfile.name}"/>

        <TextView
            android:id="@+id/phone"
            android:layout_width="wrap_content"
            android:layout_height="wrap_content"
            android:text="@{userProfile.phone}"/>

        <TextView
            android:id="@+id/address"
            android:layout_width="wrap_content"
            android:layout_height="wrap_content"
            android:text="@{userProfile.address}"/>

        <TextView
            android:id="@+id/gender"
            android:layout_width="wrap_content"
            android:layout_height="wrap_content"
            android:text="@{userProfile.genderAsText}"/>

    </LinearLayout>

</layout>
텍스트뷰를 하나 더 추가하고 text 속성에서 getGenderAsText 메서드로 지정해주면 int를 String으로 변환시켜 사용할 수 있다.
또한, UserProfile 클래스에 작성한 함수를 삭제하고 그냥 xml에 작성해줄 수도 있다.
<TextView
android:id="@+id/gender"
android:layout_width="wrap_content"
android:layout_height="wrap_content"
android:text="@{(userProfile.gender == 0) ? "남성" : "여성"}"/>요렇게! 다만 따옴표(")는 이스케이프문자로 바꿔서 작성해줘야 한다.
그런데 여기서 또 의문점. 보통 0, 1과 같은 값들을 사용할 때는 상수로 정의해서 사용하는 경우가 많다. 그럼 이 상수값을 xml에서 사용하려면 어떻게 해야 할까?
💡 xml에서 상수값 사용하려면?
UserProfile.java
public class UserProfile {
    public static final int GENDER_MALE = 0; // 요 코드 추가
    public static final int GENDER_FEMALE = 1; // 요 코드 추가

	public String name;
	public String phone;
	public String address;
    public int gender;
}
activity_main.xml
<data>
        <import type="com.example.kotlinpractice.UserProfile" />
        <variable
            name="userProfile"
            type="com.example.kotlinpractice.UserProfile" />
</data>
import태그를 위와 같이 추가해주면 클래스 UserProfile에 정의된 상수들도 사용할 수 있게 된다.
<TextView
android:id="@+id/gender"
android:layout_width="wrap_content"
android:layout_height="wrap_content"
android:text="@{(userProfile.gender == UserProfile.GENDER_MALE) ? "남성" : "여성"}"/>요렇겡~
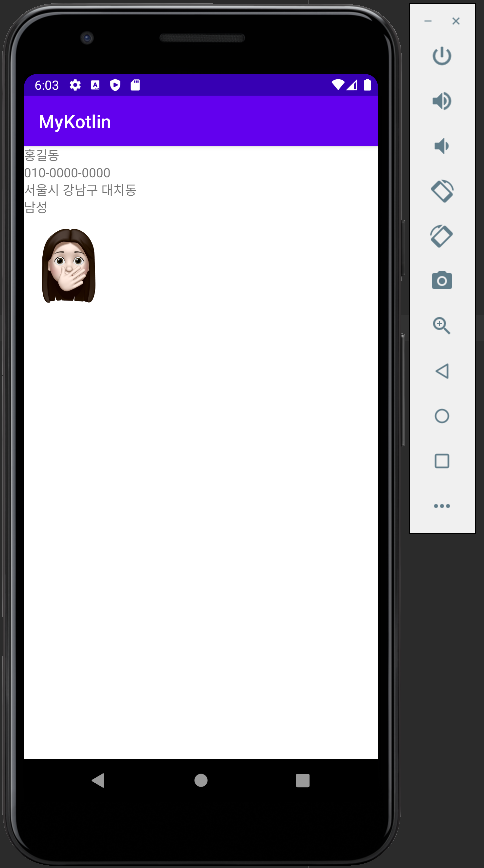
💡 Url을 String으로 받고 이미지로 업데이트하려면?
UserProfile.java
public class UserProfile {
    public static final int GENDER_MALE = 0;
    public static final int GENDER_FEMALE = 1;

	public String name;
	public String phone;
	public String address;
    public int gender;
    public String profileImageUrl; // 요 코드 추가
}
MainActivity.java
public class MainActivity extends AppCompatActivity {

	private ActivityMainBinding binding;

    @Override
    protected void onCreate(Bundle savedInstanceState) {
    	super.onCreate(savedInstanceState);
        binding = ActivityMinBinding.inflate(getLayoutInflater());
        setContentView(binding.getRoot());

        fetchUserProfile();
    }

    private void fetchUserProfile() {
    	UserProfile userProfile = new UserProfile();
        userProfile.name = "홍길동";
        userProfile.phone = "010-0000-0000";
        userProfile.address = "서울시 강남구 대치동";
        userProfile.profileImageUrl = "https://i.ibb.co/Sv6S5DB/profile-Image.png" // 요 코드 추가

        binding.setUserProfile(userProfile);
    }
}
activity_main.xml
<ImageView
	android:layout_width="100dp"
    android:layout_height="100dp"
    imageUrl="@{userProfile.profileImageUrl}"/>
ImageView에는 src라는 리소스아이디를 받는 속성은 있지만, url을 받는 속성은 없어서 url로 이미지를 업데이트하려면 Gilde같은 라이브러리를 활용해주어야 한다. 우리는 지금 dataBinding의 컨셉에 충실하기 때문에, xml에서 이 url을 받아 업데이트하고 싶다.
따라서 imageUrl이라는 커스텀 속성을 만들어줄 것이다. 이 imageUrl에 대한 동작은 BindingAdapter를 이용해 구현해보자.
AndroidManifest.xml
<manifest
    …
    <uses-permission android:name="android.permission.INTERNET" />
    …
</manifest>
이미지를 url을 통해 가져올 것이므로 인터넷 연결을 허용해줘야 한다.
build.gradle (module)
dependencies {
    …
    implementation 'com.github.bumptech.glide:glide:4.12.0'
    annotationProcessor 'com.github.bumptech.glide:compiler:4.12.0'
}
요거 두 줄 추가해서 먼저 Glide를 사용할 수 있도록 해주자.
MyBindingAdapter.java
public class MyBindingAdapter {
	@BindingAdapter("imageUrl")
    public static void loadImageUrl(ImageView view, String url) {
    	GlideApp.with(view.getContext()).load(url).into(view);
    }
}
imageUrl이라는 커스텀 속성을 정의했고, imageUrl이 호출될 때 loadImageUrl이 호출된다. 인자로 뷰와 url값을 전달받아서 Glide의 도움을 받아 이미지를 업데이트한다.
📚 DataBinding (Kotlin)
build.gradle (module)
plugins {
    …
    id 'kotlin-kapt'
}

android {
	…
    buildFeatures {
        dataBinding true
    }
}
코틀린에서는 viewBinding이 dataBinding에 포함되는 개념이기 때문에 dataBinding을 추가해주면 viewBinding을 따로 선언하지 않아도 된다.
참고로, 이렇게 추가하고 바로 MainActivity로 넘어가서 ActivityMainBinding을 쓰려고 하면 자동 import가 되지 않는다. activity_main.xml 레이아웃 파일로 가서 먼저 <layout> 태그로 감싸서 dataBinding의 뼈대를 만들어 준 후에야 ActivityMainBinding이 자동 import된다.
참고: 유튜브 Aaviskar Infotech
activity_main.xml
<?xml version="1.0" encoding="utf-8"?>
<layout xmlns:android="http://schemas.android.com/apk/res/android"
xmlns:app="http://schemas.android.com/apk/res-auto"
xmlns:tools="http://schemas.android.com/tools">
<data>
<variable
name="userProfile"
type="com.example.mykotlin.UserProfile" />
</data>
<LinearLayout
android:layout_width="match_parent"
android:layout_height="match_parent"
android:orientation="vertical"
tools:context=".MainActivity">
<TextView
android:id="@+id/name"
android:layout_width="wrap_content"
android:layout_height="wrap_content"
android:text="@{userProfile.name}"/>
<TextView
android:id="@+id/phone"
android:layout_width="wrap_content"
android:layout_height="wrap_content"
android:text="@{userProfile.phone}"/>
<TextView
android:id="@+id/address"
android:layout_width="wrap_content"
android:layout_height="wrap_content"
android:text="@{userProfile.address}"/>
<TextView
android:id="@+id/gender"
android:layout_width="wrap_content"
android:layout_height="wrap_content"
android:text="@{(userProfile.gender == 0) ? "남성" : "여성"}"/>
<ImageView
android:layout_width="100dp"
android:layout_height="100dp"
imageUrl="@{userProfile.profileImageUrl}"/>
</LinearLayout>
</layout>MyBindingAdapter.kt
object MyBindingAdapter {
    @JvmStatic
    @BindingAdapter("imageUrl")
    fun loadImageUrl(view: ImageView, url: String?) {
        Glide.with(view.context).load(url).into(view)
    }
}
자바에서와 달리 어댑터를 object로 만들어주어야 한다. 그리고 @BindingAdapter 어노테이션을 사용한 함수의 경우 static으로 접근이 가능해야 하기 때문에 static 함수로 설정해주기 위한 어노테이션인 @JvmStatic을 추가해준다. 이를 추가해주지 않으면 에러가 발생한다.
MainActivity.kt
class MainActivity : AppCompatActivity() {

    lateinit var binding: ActivityMainBinding

    override fun onCreate(savedInstanceState: Bundle?) {
        super.onCreate(savedInstanceState)
        binding = ActivityMainBinding.inflate(layoutInflater)
        setContentView(binding.root)
        fetchUserProfile()
    }

    private fun fetchUserProfile() {
        val userProfile = UserProfile()
        userProfile.name = "홍길동"
        userProfile.phone = "010-0000-0000"
        userProfile.address = "서울시 강남구 대치동"
        userProfile.profileImageUrl = "https://i.ibb.co/Sv6S5DB/profile-Image.png"
        binding.userProfile = userProfile
    }
}
UserProfile.kt
class UserProfile {
    var name: String? = null
    var phone: String? = null
    var address: String? = null
    var gender = 0
    var profileImageUrl: String? = null
}

