Module이란?
Node.js에서 module은 '필요한 함수들의 집합'을 의미한다.
사용하고자 하는 모든 기능을 다 자신이 처음부터 만들어서 사용할 수 없다.
그래서 누군가가 이미 만들어 놓은 모듈을 이용해서 사용하면 된다.
노드JS에서 제공해주는 많은 모듈들을 손쉽게 사용할 수 있다.
모듈을 가져와서 사용할 때는 require모듈을 이용해서 다른 모듈들을 가져올 수 있다.
모듈 종류
Core Module
Local Module
Third Party Module
Core Module(핵심 모듈)
- Node.js에 기본적으로 포함되어 있는 모듈이다.
- 별도의 설치 없이 사용할 수 있다.
- 예: http, fs, path, os, utl, querystring, util 등.
- 이 모듈들은 Node.js의 기본 API의 일부이며, Node.js를 설치할 때 함께 제공된다.
const fs = require('fs');Local Module(로컬 모듈)
- 사용자가 직접 작성한 모듈
- 프로젝트 내에서 특정 기능을 수행하는 로직을 모듈화하여 다른 파일에서 재사용할 수 있도록 만든 코드조각이다.
예를들어, 'userModule.js'라는 파일에 다음과 같은 코드가 있다고 가정해보자.
// userModule.js
const sayHello = (name) => {
    console.log(`Hello, ${name}`);
}

module.exports = sayHello;
다른 파일에서 이 로컬 모듈을 불러와 사용할 수 있다.
const greet = require('./userModule');
greet('John');
예제1
// log.js
const log = {
  info: function(info) {
    console.log('Info ' + info);
  },
  warning: function(warning) {
    console.log('Warning ' + warning);
  },
  error: function(error) {
    console.log('Error ' + error);
  }
}

module.exports = log;
// main.js
const myLogModule = require('./log.js');
myLogModule.info('Node.js started');
// Info Node.js startedThird Party Module (제3자 모듈)
- 커뮤니티에 의해 개발되고, npm (Node Package Manager)를 통해 배포되는 모듈이다.
- 이러한 모듈들은 일반적으로 특정 작업을 쉽게 처리하기 위해 사용된다.
- 예: express, lodash, moment, axios, mongoose 등.
- 이러한 모듈을 사용하기 전에 npm을 통해 설치해야 한다.
설치 예
npm install express사용 예
const express = require('express');
const app = express();
모듈을 불러오는 법
const module = require("module_name");require()함수를 이용해서 자바스크립트 파일을 읽고 그 파일을 실행시켜 객체를 반환한다.
이렇게 모듈을 가져와서 변수 또는 상수에 할당해서 사용할 수 있다.
HTTP서버 구축하기
HTTP모듈 이용하기
Node.js Built-in 모듈 중에서 HTTP모듈을 이용해서 서버를 구현해 보자.
아래와 같이 3000번 포트를 이용해서 로컬 호스트에 브라우저로 접근하면 Hello World!라는 문구가 나오게 해보자.
// http built-in 모듈 가져오기
const http = require('http')

// 3000번 포트 이용
const port = 3000

// 모듈을 사용하여 HTTP 서버를 만든다.
const server = http.createServer((req, res) => {
  res.statusCode = 200
  res.setHeader('Content-Type', 'text/html')
  // res.setHeader('콘텐츠 유형', '텍스트/html')
  res.end('<h1>Hello, World!</h1>')
})

// 서버는 지정된 포트 3000에서 수신 대기하도록 설정된다.
// 서버가 준비되면 수신 콜백 함수가 호출한다.
server.listen(port, () => {
  console.log(`Server running at port ${port}`)
})
코드 해석
http모듈 가져오기
const http = require('http')Node.js에는 기본적으로 제공되는 여러 내장 모듈 중 하나인 http모듈을 가져온다. 이 모듈을 통해 HTTP서버와 클라이언트의 기능을 구현할 수 있다.
포트 번호 설정
const port = 3000서버가 수신 대기할 포트 번호로 '3000'을 지정한다.
서버 생성
const server = http.createServer((req, res) => {
  res.statusCode = 200
  res.setHeader('Content-Type', 'text/html')
  res.end('<h1>Hello, World!</h1>')
})
http.createServer() 메서드를 사용하여 HTTP 서버 인스턴스를 생성한다. 이 메서드는 요청 리스너 함수를 인수로 받는다. 이 함수는 서버가 요청을 받을 때마다 호출된다.
- req: 클라이언트로부터의 요청에 관한 정보를 담고 있는 객체이다.
- res: 서버의 응답에 관한 정보와 메서드를 담고 있는 객체이다.
이 예제에서는 모든 요청에 대해 200 OK 상태 코드와 HTML 형식의 응답을 전송한다.
서버 시작
server.listen(port, () => {
  console.log(`Server running at port ${port}`)
})
server.listen() 메서드를 사용하여 서버가 지정된 포트에서 수신 대기하도록 한다. 서버가 준비되면 주어진 콜백 함수가 호출되어 콘솔에 메시지가 출력된다.
결론적으로, 이 코드를 실행하면 포트 3000에서 작동하는 HTTP 웹 서버가 생성된다. 웹 브라우저에서 http://localhost:3000/ 주소로 접속하면 "Hello, World!"라는 메시지가 출력된다.
모듈을 사용하는 이유
http,axios,path와 같은 모듈들을 활용하여 프로그램이 만들어진다.
모듈의 장점
- 존재하는(이미 작성한)코드를 재사용 할 수 있다.
- 관계가 있는 코드 끼리 모아 놓아서 코드를 정리할 수 있다.
- 관계없는 디테일한 부분을 숨기고 직접 사용되는 코드만 가져와서 보여줄 수 있다.
(해당 모듈 전체를 가져오는 게 아닌 특정 함수나 변수, 클래스만을 가져와서 사용)
HTTPS모듈
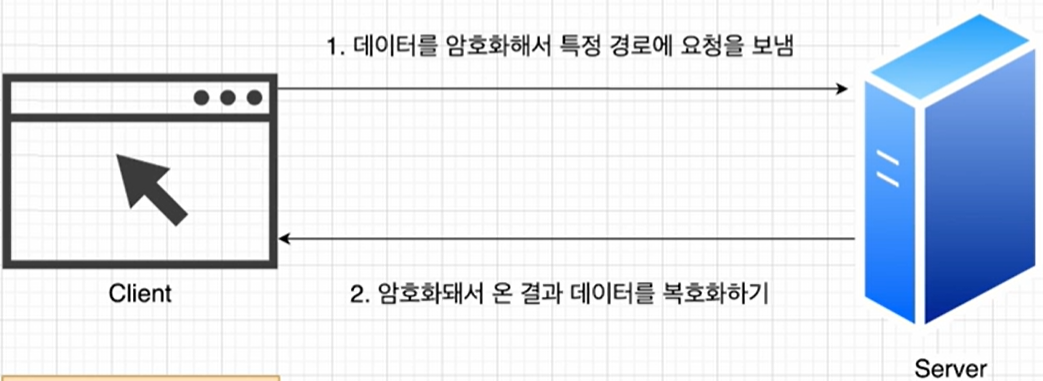
https는 Node.js의 내장 모듈 중 하나로, http 모듈과 유사한 기능을 제공하지만, HTTPS (HTTP Secure) 프로토콜을 사용하여 데이터를 암호화하여 전송한다. HTTPS는 웹 트래픽을 암호화하는 SSL(Secure Sockets Layer) 또는 TLS(Transport Layer Security) 프로토콜 위에서 작동한다.
서버 및 클라이언트 생성
https 모듈을 사용하여 HTTPS 서버 또는 클라이언트를 생성할 수 있다. http 모듈과 유사한 방식으로 동작하지만, 인증서와 키를 제공해야 한다.
const https = require('https');
const fs = require('fs');

const options = {
  key: fs.readFileSync('path/to/key.pem'),
  cert: fs.readFileSync('path/to/cert.pem')
};

https.createServer(options, (req, res) => {
  res.writeHead(200);
  res.end('Hello, HTTPS World!');
}).listen(8000);
위의 코드는 인증서(cert.pem)와 개인 키(key.pem)를 사용하여 HTTPS 서버를 생성한다.
요청 보내기
https 모듈을 사용하여 HTTPS를 통해 다른 서버로 요청을 보낼 수 있다.
const https = require('https');

https.get('https://example.com/', (res) => {
  let data = '';

  res.on('data', (chunk) => {
    data += chunk;
  });

  res.on('end', () => {
    console.log(data);
  });

}).on('error', (err) => {
  console.error("Error:", err);
});
위의 코드는 https://example.com/로 GET 요청을 보내고 응답을 콘솔에 출력한다.
보안
https는 데이터의 기밀성과 무결성을 유지하기 위해 암호화를 사용한다. 이를 위해 SSL/TLS 인증서가 필요하다. 인증서는 인증 기관(CA)에 의해 서명되거나 자체 서명(self-signed)될 수 있다. 하지만 자체 서명된 인증서를 사용하면 브라우저가 경고 메시지를 표시할 수 있다.
요약하면, https 모듈은 암호화된 연결을 통해 데이터를 안전하게 전송할 수 있게 해주는 Node.js의 내장 모듈이다. 실제 프로덕션 환경에서는 도메인에 맞는 유효한 SSL/TLS 인증서를 획득하고 사용하는 것이 좋다.
모듈 생성하기
HTTPS모듈 생성하기
주로 모듈은 이미 만들어져 있는 것을 이용하지만 직접 만들어서 사용할 수도 있다.
이번엔 https모듈을 직접 생성해보자.
모듈을 위한 파일 생성

https.js
function makeRequest(url, data) {
    // 요청을 보내기
    // 데이터 return 하기
}
request.js
데이터를 암호화해서 특정 경로에 보냄
function encrypt(data) {
    return "encrypted data";
}

function send(url, data) {
    const encryptedData = encrypt(data);
    console.log(`${encryptedData} is being sent to ${url}`);
}
return.js
암호화되서 온 결과 데이터를 복호화하기
function decrypt(data) {
return 'decrypted data';
}
function read() {
return decrypt('data');
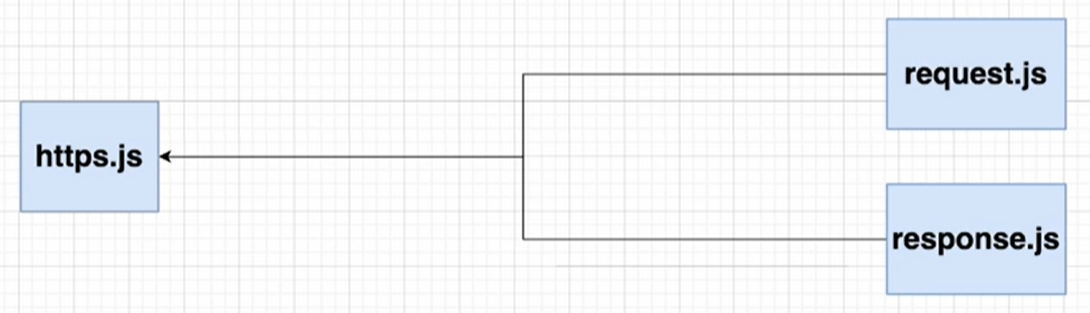
}module키워드를 이용해서 필요한 함수 가져오기
https에서 request에 있는 함수와 response에 있는 함수를 가져와야 한다.
https.js
const request = require('./request');
const response = require('./response');

function makeRequest(url, data) {
    // 요청을 보내기
    request.send(url, data);
    // 데이터 return 하기
    return response.read();
}

const responseData = makeRequest('https://www.naver.com', 'any data');
request.js
function encrypt(data) {
    return "encrypted data";
}

function send(url, data) {
    const encryptedData = encrypt(data);
    console.log(`${encryptedData} is being sent to ${url}`);
}

module.exports = {
    send
}
return.js
function decrypt(data) {
    return 'decrypted data';
}

function read() {
    return decrypt('data');
}

module.exports = {
    read
}
모듈에서 export하는 방법
모듈을 export하는 방법은 여러가지가 있다.
// 상수도 export 가능
module.exports.A = 1

// 이런 식으로도 export 가능
module.exports.encrypt = function encrypt(data) {
  return "encrypted data";
}

// module 생략해도 가능
exports.someFunction = function someFunction() {

}

function send(url, data) {
  const encryptedData = encrypt(data);
  console.log(`${encryptedData} is being sent to ${url}`);
}

module.exports = {
  // send: send
  send
}
이 방법이 제일 좋은 것 같다.
처음에 사용한 module.exports = {}가 가장 좋은 방법이다.
왜냐하면 아래에 어떤 게 export되어 있는지 정리되어 있기 때문이다
// const request = require('./request');
// const response = require('./response');

const { send } = require('./request');
const { read } = require('./response');
function makeRequest(url, data) {
// 요청을 보내기
send(url);
// 데이터를 return 하기
return read();
}CommonJS와 ECMAScript 모듈의 차이
CommonJS Module
지금까지 Node.js에서 우리가 사용한 모듈은 CommonJS였다.
이것은 바로 module.exports로 내보내고 require로 가져오는 것이었다.
이 CommonJS는 노드 js에서 기본 모듈로 사용되고 있다.
CommonJS는 주로 서버 측에서 사용하기 위해 설계되었다. Node.js에서는 기본 모듈 시스템으로 CommonJS를 사용한다.
-
동적 임포트: CommonJS는 런타임에 모듈을 불러올 수 있다. 이는 조건부로 모듈을 불러오는 동적 임포트가 가능하다는 것을 의미한다.
-
동기적 로딩: CommonJS 모듈은 기본적으로 동기적으로 로드된다. 그러나 Node.js는 파일 시스템에 접근하는 것이 빠르기 때문에 이는 큰 문제가 되지 않는다. 그럼에도 불구하고, 브라우저 환경에서는 이러한 동기적 로딩 방식이 최적이 아닐 수 있다.
내보내기: module.exports 또는 exports를 사용한다.
module.exports = function() {
  //...
};불러오기: require() 함수를 사용한다.
const myModule = require('./myModule');ECMAScript Modules (ESM)
ECMAScript Modules는 ES6 (ECMAScript 2015)에서 소개된 공식적인 JavaScript 모듈 시스템이다. 브라우저와 서버 모두에서 동작하도록 설계되었다.
-
정적 임포트: ESM은 정적 임포트만 지원한다. 이는 모듈과 그 종속성이 초기 평가 단계에서 파싱되고 해석되어야 한다는 것을 의미한다.
-
비동기적 로딩: ESM은 비동기적으로 로드될 수 있다. 브라우저는
<script type="module">을 통해 비동기적으로 ESM을 로드하고 해석할 수 있다.
내보내기
export function myFunction() {
  //...
}
불러오기
import { myFunction } from './myModule.mjs';비교
-
환경: CommonJS는 주로 Node.js에서 사용되는 반면, ESM은 브라우저와 최신 버전의 Node.js에서 모두 사용된다.
-
불러오기/내보내기 방식: CommonJS는 require()와 module.exports를 사용하며, ESM은 import와 export 구문을 사용한다.
-
동적 vs 정적: CommonJS는 동적으로 모듈을 불러올 수 있다. ESM은 모든 임포트가 정적으로 해석되기 때문에 동적 임포트를 지원하지 않는다 (그러나 import() 구문을 통해 동적 임포트가 가능하다).
-
비동기 로딩: ESM은 비동기적 로딩을 기본으로 지원하며, CommonJS는 동기적 로딩을 사용한다.
두 모듈 시스템 모두 각각의 장점과 적절한 사용 사례가 있다. 현재의 추세는 점점 더 ESM 방향으로 이동하고 있지만, 많은 기존 라이브러리와 프로젝트는 여전히 CommonJS를 사용하고 있다.
Node.js에서 ECMAScript모듈 사용하기
현재 CommonJS앱으로 되어 있는 것을 ECMAScript모듈을 사용해 구현해보자.
변경하기
const { send } = require('./request');
const { read } = require('./response');module.exports = {
read
}위 코드를 다음과 같이 변경한다.
import { send } from './request';
import { read } from './response';
export {
read
}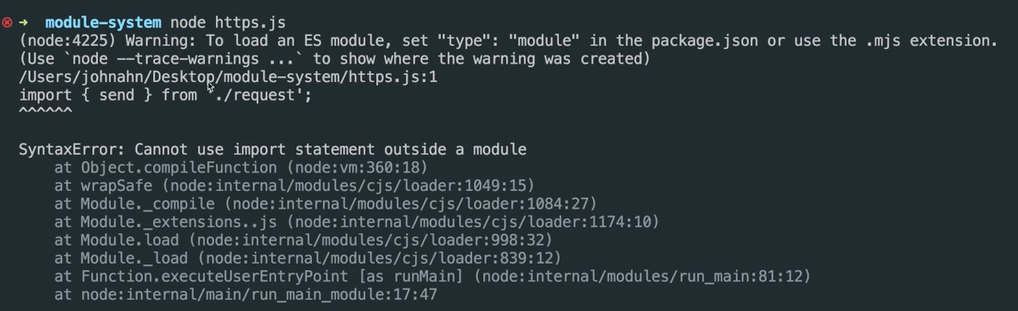
실행하면 위와 같은 에러가 발생하는데, 아래와 같이 파일 확장자를 변경해야 한다.
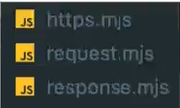
import { send } from './request.mjs';
import { read } from './response.mjs';
mjs파일 사용 시 import할 때 확장자의 이름을 위처럼 꼭 써줘야 한다.
모듈 캐싱
모듈 캐싱이란
모듈에서 다른 모듈을 가져올 때 (load) ECMAScript모듈을 사용하든지 CommonJS 모듈을 사용하든지 해당 모듈을 캐싱하게 된다.
Node.js에서 모듈은 한 번 불러올 때마다 다시 불러오는 것이 아닌 캐시에 저장된다. 이러한 특징은 성능 최적화의 중요한 부분이며, 동일한 모듈이 여러 번 require 되더라도 파일 시스템에서 한 번만 읽히게 된다.
모듈 캐싱의 주요 포인트들은 다음과 같다.
-
캐시 키: 모듈의 캐시 키는 해당 모듈의 전체 경로이다. 따라서, 동일한 경로로 require가 호출되면 캐시된 객체를 반환한다.
-
단일 객체 반환: 모듈이 캐시되면 항상 동일한 객체를 반환한다. 이는 모듈의 상태를 여러 파일 사이에서 공유할 수 있음을 의미한다. 예를 들어, 한 모듈에서 특정 변수의 값을 변경하면, 이 모듈을 사용하는 다른 모든 파일에서도 이 변경된 값을 볼 수 있다.
-
캐시 초기화: 특정 조건에서는 Node.js의 모듈 캐시를 초기화하거나 특정 모듈을 캐시에서 제거하고 싶을 수 있다. 이를 위해 require.cache 객체를 사용할 수 있다. 예를 들어, 모듈을 캐시에서 제거하려면
delete require.cache[require.resolve('module-name')]를 사용한다. -
실행 최적화: 모듈 캐싱 덕분에 Node.js 어플리케이션은 여러 번 동일한 모듈을 불러오더라도 그 모듈의 코드를 한 번만 실행하면 된다. 이로 인해 어플리케이션의 부팅 시간이 단축되고, 메모리 사용량도 최적화된다.
요약하면, Node.js의 모듈 캐싱은 성능을 향상시키기 위한 중요한 메커니즘이다. 이로 인해 동일한 모듈을 여러 번 불러오더라도 성능 저하 없이 빠르게 동작하게 된다.
예시
https.js
const { send } = require('./request.js');
const { read } = require('./response.js');
const { decrypt } = require('./response');

function makeRequest(url, data) {
    // 요청을 보내기
    request.send(url, data);
    // 데이터 return 하기
    return response.read();
}

const responseData = makeRequest('https://www.naver.com', 'any data');
console.log(responseData);
request.js
function encrypt(data) {
    return "encrypted data";
}

function send(url, data) {
    const encryptedData = encrypt(data);
    console.log(`${encryptedData} is being sent to ${url}`);
}

module.exports = {
    send
}
response.js
function decrypt(data) {
return 'decrypted data';
}
function read() {
return decrypt('data');
}
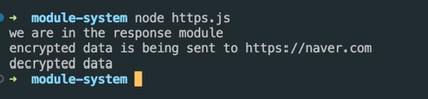
console.log('we are in the response module')
module.exports = {
read,
decrypt
}캐싱을 하기 때문에,
터미널 창에서 we are in the response module이 한번만 나오는 것을 볼 수 있다.
(decrypt와 read를 사용하여 두번 호출했음에도 한번만 나옴)
예시2
request.js
const {read} = require('./response');

function encrypt(data) {
    return "encrypted data";
}

function send(url, data) {
    const encryptedData = encrypt(data);
    console.log(`${encryptedData} is being sent to ${url}`);
}

module.exports = {
    send
}
로 코드를 변경해도 터미널엔 한번만 출력된다.
caching된 정보 살펴보기
console.log(require.cache);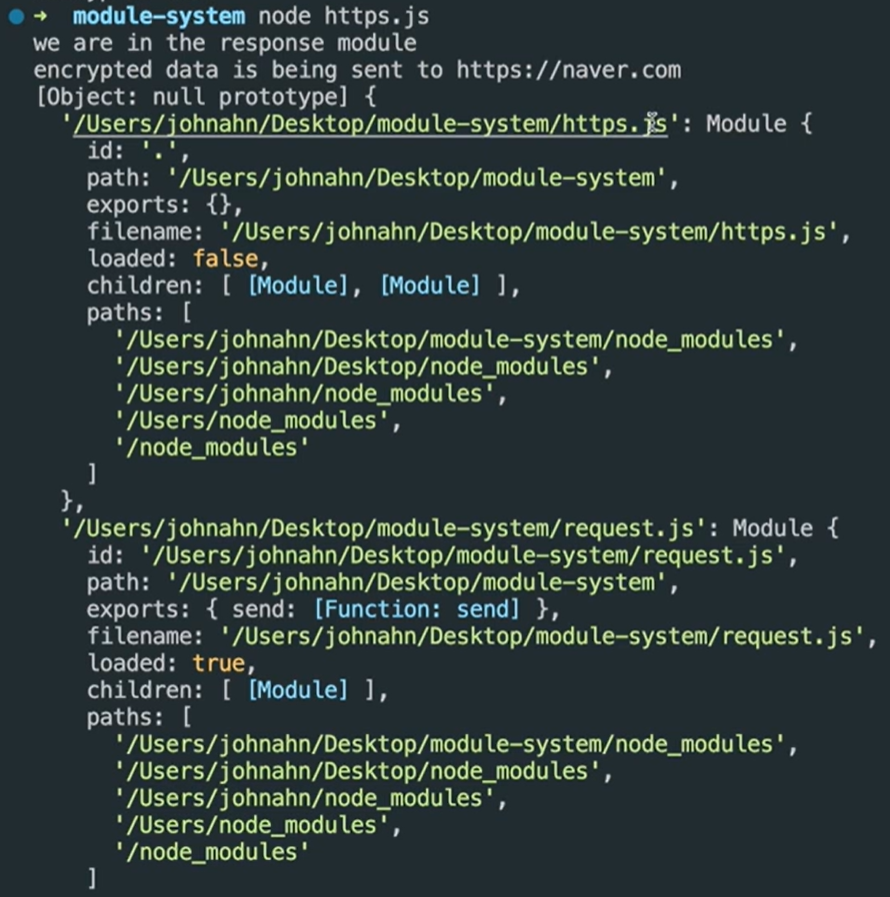
index.js파일에 대하여
index.js는 Node.js 프로젝트나 많은 JavaScript 프로젝트에서 흔히 볼 수 있는 특별한 파일 이름이다. 그 기능과 목적은 주로 다음과 같다.
-
진입점 (Entry Point): Node.js 애플리케이션에서 index.js는 대체로 프로젝트의 시작점이나 "메인 파일"로 간주된다. 여러분이 터미널에서 node . 명령어를 실행하면, Node.js는 현재 디렉토리의 index.js 파일을 실행하려고 시도한다.
-
디렉토리 모듈: Node.js에서 디렉토리를 require()로 불러오려고 할 때 (예: require('./myDirectory')), Node.js는 그 디렉토리 내의 index.js 파일을 기본적으로 찾아서 불러온다. 따라서, index.js는 해당 디렉토리의 "대표" 파일이나 "기본" 모듈로 작용한다.
-
패키지 의존성: npm 패키지의 경우, package.json 파일 내의 main 필드가 지정되지 않은 경우, index.js 파일이 패키지의 진입점으로 간주된다. 이는 다른 개발자들이 그 패키지를 불러올 때 첫 번째로 실행되는 파일이 된다.
-
명시적이지 않은 방식의 구조: 개발자들이 특별한 설정 없이 프로젝트 구조를 만들 때, index.js를 진입점으로 사용하는 것은 명시적이지 않은, 컨벤션을 따르는 방식이다. 이는 다른 개발자들이 프로젝트를 볼 때 시작점을 쉽게 찾을 수 있게 도와준다.
요약하면, index.js는 Node.js와 많은 JavaScript 프로젝트에서 중요한 역할을 하는 특별한 파일 이름이다. 그것은 프로젝트의 메인 파일이거나, 디렉토리의 기본 모듈로 작동하는 역할을 한다.
코드 리팩토링
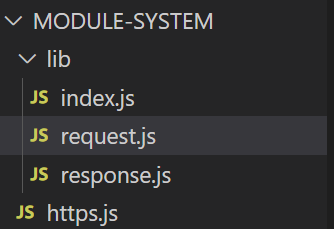
위와 같은 디렉토리 구조로 리팩토링을 해보자.
(index에서 모아서 실행하는 거다.)
https.js
const lib = require('./lib');

function makeRequest(url, data) {
    // 요청을 보내기
    lib.request.send(url, data);
    // 데이터 return 하기
    return lib.response.read();
}

const responseData = makeRequest('https://www.naver.com', 'any data');
console.log(responseData);
index.js
module.exports = {
    request: require('./request'),
    response: require('./response')
}
request.js
const {read} = require('./response');

function encrypt(data) {
    return "encrypted data";
}

function send(url, data) {
    const encryptedData = encrypt(data);
    console.log(`${encryptedData} is being sent to ${url}`);
}

module.exports = {
    send
}
response.js
function decrypt(data) {
    return 'decrypted data';
}

function read() {
    return decrypt('data');
}

console.log('we are in the response module')

module.exports = {
    read,
    decrypt
}
또다른 예시
추천하는 방법은 아니다.
https.js
const lib = require('./lib');

function makeRequest(url, data) {
    // 요청을 보내기
    lib.send(url, data);
    // 데이터 return 하기
    return lib.read();
}

const responseData = makeRequest('https://www.naver.com', 'any data');
console.log(responseData);
index.js
const request = require('./request');
const response = require('./response');

module.exports = {
    send: request.send,
    read: Response.read
}