
목차
DAG의 개념
Apache Airflow에서 DAG(Directed Acyclic Graph, 방향성 비순환 그래프)는 워크플로우를 정의하는 핵심 개념입니다. 쉽게 말해 DAG는 '실행해야 할 작업들의 모음'이라고 할 수 있습니다. 이 작업들은 서로 의존성을 가지며, 특정 순서대로 실행되어야 합니다.
'방향성 비순환 그래프'라는 용어를 풀어서 설명하면:
- 방향성(Directed): 각 작업은 특정 방향으로 연결됩니다. 즉, A 작업이 B 작업 이전에 실행되어야 한다면, A에서 B로 향하는 화살표로 표현됩니다.
- 비순환(Acyclic): 작업들 사이에 순환 루프가 없습니다. 이는 작업 A가 작업 B에 의존하고, 동시에 작업 B가 작업 A에 의존할 수 없음을 의미합니다.
- 그래프(Graph): 노드(작업)와 에지(의존성)로 구성된 구조입니다.
아래 이미지는 간단한 DAG의 예시입니다:
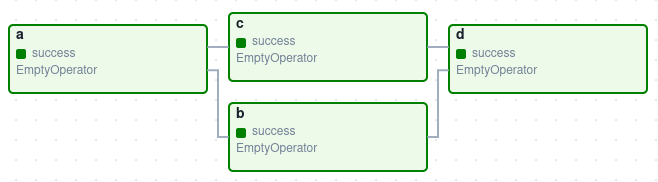
이 DAG는 A, B, C, D 네 개의 작업(Task)을 정의하고, 이들이 어떤 순서로 실행되어야 하는지를 나타냅니다. 화살표는 의존성을 나타내며, 예를 들어 B는 A가 성공적으로 완료된 후에만 실행됩니다.
DAG 자체는 작업 내부에서 어떤 일이 일어나는지에는 관심이 없습니다. 단지 작업을 어떻게 실행할지(실행 순서, 재시도 횟수, 타임아웃 등)에만 관심을 가집니다.
DAG의 기본 구조와 구성요소
Airflow의 DAG는 다음과 같은 주요 구성요소로 이루어져 있습니다:
- DAG 정의: DAG의 ID, 설명, 시작 날짜, 스케줄 간격 등의 메타데이터를 설정합니다.
- Task: DAG 내에서 실행되는 개별 작업 단위입니다.
- Operator: Task를 어떻게 실행할지 정의하는 템플릿입니다.
- Task 간의 의존성: 어떤 Task가 어떤 Task 이후에 실행되어야 하는지 정의합니다.
DAG 정의 예시
Copyfrom datetime import datetime, timedelta
from airflow import DAG

default_args = {
    'owner': 'airflow',
    'depends_on_past': False,
    'email': ['airflow@example.com'],
    'email_on_failure': False,
    'email_on_retry': False,
    'retries': 1,
    'retry_delay': timedelta(minutes=5),
}

dag = DAG(
    'example_dag',
    default_args=default_args,
    description='A simple example DAG',
    schedule='0 0 * * *',  # 매일 자정에 실행
    start_date=datetime(2023, 1, 1),
    catchup=False,
    tags=['example'],
)
이 코드는 'example_dag'라는 ID를 가진 DAG를 정의합니다. 이 DAG는 매일 자정에 실행되며, 2023년 1월 1일부터 시작됩니다.
DAG 작성 방법
Airflow에서 DAG를 작성하는 방법은 크게 세 가지가 있습니다:
1. Context Manager(with 구문) 사용
Copyimport datetime
from airflow import DAG
from airflow.operators.empty import EmptyOperator

with DAG(
    dag_id="my_dag_name",
    start_date=datetime.datetime(2023, 1, 1),
    schedule="@daily",
) as dag:
    task1 = EmptyOperator(task_id="task1")
    task2 = EmptyOperator(task_id="task2")

    task1 >> task2  # task1이 task2보다 먼저 실행됨
2. 명시적 생성자 사용
Copyimport datetime
from airflow import DAG
from airflow.operators.empty import EmptyOperator

my_dag = DAG(
    dag_id="my_dag_name",
    start_date=datetime.datetime(2023, 1, 1),
    schedule="@daily",
)

task1 = EmptyOperator(task_id="task1", dag=my_dag)
task2 = EmptyOperator(task_id="task2", dag=my_dag)

task1 >> task2  # task1이 task2보다 먼저 실행됨
3. @dag 데코레이터 사용
Copyimport datetime
from airflow.decorators import dag, task
from airflow.operators.empty import EmptyOperator

@dag(
    start_date=datetime.datetime(2023, 1, 1),
    schedule="@daily"
)
def generate_dag():
    task1 = EmptyOperator(task_id="task1")
    task2 = EmptyOperator(task_id="task2")

    task1 >> task2

my_dag = generate_dag()
Task와 Operator
DAG에서 가장 중요한 구성 요소는 Task입니다. Task는 실제로 수행되어야 할 작업 단위이며, 주로 Operator를 통해 정의됩니다.
Operator 종류
Airflow는 다양한 유형의 Operator를 제공합니다:
- BashOperator: Bash 명령어를 실행합니다.
- PythonOperator: Python 함수를 실행합니다.
- EmailOperator: 이메일을 보냅니다.
- HttpOperator: HTTP 요청을 보냅니다.
- SqlOperator: SQL 쿼리를 실행합니다.
- DockerOperator: Docker 컨테이너에서 명령을 실행합니다.
- DummyOperator: 아무 작업도 수행하지 않는 더미 작업입니다.
이 외에도 다양한 시스템과 연동되는 수많은 Operator가 있습니다.
Operator 예시
Copy# BashOperator 예시
from airflow.operators.bash import BashOperator

t1 = BashOperator(
    task_id='print_date',
    bash_command='date',
    dag=dag,
)

# PythonOperator 예시
from airflow.operators.python import PythonOperator

def print_hello():
    return 'Hello world!'

t2 = PythonOperator(
    task_id='print_hello',
    python_callable=print_hello,
    dag=dag,
)
Task 간의 의존성 설정
Task 간의 의존성은 DAG의 핵심입니다. Airflow에서는 여러 방법으로 Task 간의 의존성을 설정할 수 있습니다:
1. 비트시프트 연산자 사용
Copytask1 >> task2 >> task3   # task1 -> task2 -> task3
task4 << task5 << task6   # task6 -> task5 -> task4
2. set_upstream/set_downstream 메서드 사용
Copytask1.set_downstream(task2)   # task1 -> task2
task3.set_upstream(task2)     # task2 -> task3
3. 복잡한 의존성을 위한 헬퍼 함수 사용
Copyfrom airflow.models.baseoperator import cross_downstream, chain

# A, B -> C, D 형태의 의존성 설정
cross_downstream([task_a, task_b], [task_c, task_d])

# A -> B -> C -> D 형태의 의존성 설정
chain(task_a, task_b, task_c, task_d)
스케줄링과 실행
Airflow에서는 DAG를 언제 실행할지 스케줄을 정의할 수 있습니다. 스케줄은 schedule 파라미터를 통해 설정합니다.
스케줄 설정 방법
- Cron 표현식 사용:
"0 0 * * *"(매일 자정에 실행) - 미리 정의된 표현식 사용:
"@daily","@weekly","@monthly","@once" - timedelta 객체 사용:
timedelta(days=1)(매일 실행)
스케줄링 예시
Copy# Cron 표현식 사용
dag1 = DAG('dag1', schedule="0 0 * * *")  # 매일 자정에 실행

# 미리 정의된 표현식 사용
dag2 = DAG('dag2', schedule="@daily")  # 매일 실행

# timedelta 객체 사용
from datetime import timedelta
dag3 = DAG('dag3', schedule=timedelta(hours=1))  # 매시간 실행
DAG가 실행될 때마다 하나의 DAG Run이 생성됩니다. DAG Run은 특정 시점에 실행된 DAG의 인스턴스라고 생각할 수 있습니다. 각 DAG Run은 실행 날짜(execution_date)를 가지며, 이를 통해 해당 DAG Run이 어떤 데이터 범위를 처리해야 하는지 알 수 있습니다.
DAG 실행과 모니터링
Airflow는 웹 UI를 통해 DAG의 실행 상태를 모니터링할 수 있는 강력한 도구를 제공합니다.
DAG 실행 방법
- 스케줄에 따른 자동 실행: 정의된 스케줄에 따라 자동으로 실행됩니다.
- 수동 실행(트리거): 웹 UI나 CLI를 통해 수동으로 DAG를 실행할 수 있습니다.
웹 UI를 통한 모니터링
Airflow의 웹 UI는 다음과 같은 기능을 제공합니다:
- DAG 목록: 모든 DAG의 목록과 상태를 확인할 수 있습니다.
- 그래프 뷰: DAG의 그래프 구조를 시각적으로 확인할 수 있습니다.
- 트리 뷰: 과거 실행 이력을 트리 형태로 확인할 수 있습니다.
- 작업 인스턴스 상세 정보: 각 작업의 로그와 상태를 확인할 수 있습니다.
실제 DAG 예제
아래는 ETL(Extract, Transform, Load) 프로세스를 구현한 간단한 DAG 예제입니다:
Copyfrom airflow import DAG
from airflow.operators.python import PythonOperator
from airflow.operators.bash import BashOperator
from datetime import datetime, timedelta

# DAG의 기본 설정
default_args = {
    'owner': 'airflow',
    'depends_on_past': False,
    'email': ['airflow@example.com'],
    'email_on_failure': False,
    'email_on_retry': False,
    'retries': 1,
    'retry_delay': timedelta(minutes=5),
}

# DAG 정의
dag = DAG(
    'simple_etl_example',
    default_args=default_args,
    description='A simple ETL DAG example',
    schedule='@daily',
    start_date=datetime(2023, 1, 1),
    catchup=False,
)

# Extract 작업
def extract_data(**kwargs):
    # 데이터 추출 로직
    data = {'key1': 'value1', 'key2': 'value2'}
    # XCom을 통해 다음 작업으로 데이터 전달
    kwargs['ti'].xcom_push(key='extracted_data', value=data)
    return "Data extracted successfully"

extract_task = PythonOperator(
    task_id='extract',
    python_callable=extract_data,
    provide_context=True,
    dag=dag,
)

# Transform 작업
def transform_data(**kwargs):
    # 이전 작업에서 데이터 가져오기
    ti = kwargs['ti']
    data = ti.xcom_pull(task_ids='extract', key='extracted_data')

    # 데이터 변환 로직
    transformed_data = {k: v.upper() for k, v in data.items()}

    # 변환된 데이터 전달
    ti.xcom_push(key='transformed_data', value=transformed_data)
    return "Data transformed successfully"

transform_task = PythonOperator(
    task_id='transform',
    python_callable=transform_data,
    provide_context=True,
    dag=dag,
)

# Load 작업
def load_data(**kwargs):
    # 이전 작업에서 데이터 가져오기
    ti = kwargs['ti']
    data = ti.xcom_pull(task_ids='transform', key='transformed_data')

    # 데이터 로드 로직
    print(f"Loading data: {data}")

    return "Data loaded successfully"

load_task = PythonOperator(
    task_id='load',
    python_callable=load_data,
    provide_context=True,
    dag=dag,
)

# 작업 완료 알림
notify_task = BashOperator(
    task_id='notify',
    bash_command='echo "ETL process completed"',
    dag=dag,
)

# 작업 간의 의존성 설정
extract_task >> transform_task >> load_task >> notify_task
이 DAG는 매일 실행되며, 데이터를 추출하고(Extract), 변환하고(Transform), 로드하는(Load) ETL 프로세스를 구현한 것입니다. 각 작업은 PythonOperator를 통해 구현되었으며, 작업 간에는 XCom이라는 메커니즘을 통해 데이터를 전달합니다.
마무리
Apache Airflow의 DAG는 복잡한 워크플로우를 관리하기 위한 강력한 도구입니다. DAG를 통해 작업 간의 의존성을 명확하게 정의하고, 작업의 실행을 스케줄링하며, 실패한 작업의 재시도 전략을 설정할 수 있습니다.
Airflow의 DAG는 다음과 같은 장점을 제공합니다:
- 가시성: 복잡한 워크플로우를 시각적으로 표현하고 모니터링할 수 있습니다.
- 유연성: Python 코드로 작성되어 거의 모든 유형의 작업을 구현할 수 있습니다.
- 확장성: 다양한 Operator와 연동을 통해 다양한 시스템과 통합할 수 있습니다.
- 안정성: 실패한 작업의 재시도, 알림 등 안정적인 실행을 위한 기능을 제공합니다.
DAG를 효과적으로 설계하고 구현하는 것은 데이터 파이프라인의 신뢰성과 유지보수성을 크게 향상시킵니다. 특히 데이터 엔지니어링 분야에서 Airflow의 DAG는 ETL 프로세스를 자동화하고 관리하는 필수적인 도구로 자리 잡고 있습니다.
좀 더 깊이 있는 내용을 알고 싶다면 Apache Airflow 공식 문서를 참조하세요.