여는 글
본 글에서는 Terraform을 활용한 NKS 구성방법에 대해 소개하고자 한다.
필자는 terraform에 대한 지식과 경험이 거의 없으며, AWS 환경에서 아주 간단한 리소스 배포 정도만 배포해보았다. 본 글에서는 별도의 커스텀 없이 NCP GitHub에서 제공하는 terraform 파일로 NKS 클러스터를 배포하는 방법에 대해서 공유해보려 한다.
📢참고 : https://github.com/NaverCloudPlatform/terraform-provider-ncloud
사전 준비사항
terraform을 사용하기 위한 로컬 및 NCP 환경에 대한 사전 준비사항이다.
- Terraform 0.13.x
- Go v1.16.x (to build the provider plugin)
GOPATH 설정
필자는 윈도우 10환경에 WSL(Ubuntu) 을 설치하여 테스트를 진행하였다. 이때, GOPATH 가 로컬에 env로 설정되어 있지 않아 다음과 같이 작업 하였다.
go env명령 실행
go env | grep PATH
GOPATH="/home/hyungwook/go"
env로 확인한 경로를 export 하여 환경변수로 설정한다.
- export 명령 실행
export GOPATH="/home/hyungwook/go"
env | grep GOPATH
GOPATH=/home/hyungwook/go
Building The Provider
GOPATH를 활용하여 작업 디렉터리를 생성하고 terraform 빌드를 위한 git source를 받아온다.
$ mkdir -p $GOPATH/src/github.com/NaverCloudPlatform; cd $GOPATH/src/github.com/NaverCloudPlatform
$ git clone git@github.com:NaverCloudPlatform/terraform-provider-ncloud.git
해당 경로로 이동하여 naver cloud go module을 사용할 수 있도록 빌드한다.
$ cd $GOPATH/src/github.com/NaverCloudPlatform/terraform-provider-ncloud
$ make build
📢참고 : 필자는
make build를 진행하는 과정에서 다음과 같은 에러가 발생하여 다음과 같이 조치한 후 진행하였다.
make build이슈 발생
~/go/src/github.com/NaverCloudPlatform/terraform-provider-ncloud master make build
==> Checking that code complies with gofmt requirements...
go install
go: github.com/NaverCloudPlatform/ncloud-sdk-go-v2@v1.3.3: missing go.sum entry; to add it:
go mod download github.com/NaverCloudPlatform/ncloud-sdk-go-v2
make: *** [GNUmakefile:17: build] Error 1-go mod tidy 명령 실행
~/go/src/github.com/NaverCloudPlatform/terraform-provider-ncloud master go mod tidy
go: downloading github.com/hashicorp/terraform-plugin-sdk/v2 v2.10.0
go: downloading github.com/NaverCloudPlatform/ncloud-sdk-go-v2 v1.3.3
go: downloading github.com/hashicorp/go-cty v1.4.1-0.20200414143053-d3edf31b6320
go: downloading gopkg.in/yaml.v3 v3.0.0-20200313102051-9f266ea9e77c
go: downloading github.com/hashicorp/go-hclog v0.16.1
go: downloading github.com/hashicorp/go-plugin v1.4.1
go: downloading github.com/hashicorp/terraform-plugin-go v0.5.0
go: downloading github.com/hashicorp/go-uuid v1.0.2
go: downloading github.com/mitchellh/go-testing-interface v1.14.1
go: downloading google.golang.org/grpc v1.32.0
go: downloading github.com/hashicorp/go-multierror v1.1.1
...go mod tidy 이후 정상적으로 make build가 되는 것을 확인 하였다.
make build실행
make build
==> Checking that code complies with gofmt requirements...
go install
📢참고 : 이 외에 NCP Provider docs를 참고하려면 여기에서 확인 가능하다.
웹 콘솔 작업
필자는 naver cloud 계정을 새롭게 생성하여 terraform에서 사용하기 위한 API 인증키를 다시 만들어 주었다.
다음 작업은 [마이페이지] - [계정 관리] - [인증키 관리] 에서 진행한다.
인증키 발급
- [신규 API 인증키 생성] 클릭 후 acces key, secret key 정보를 메모한다.
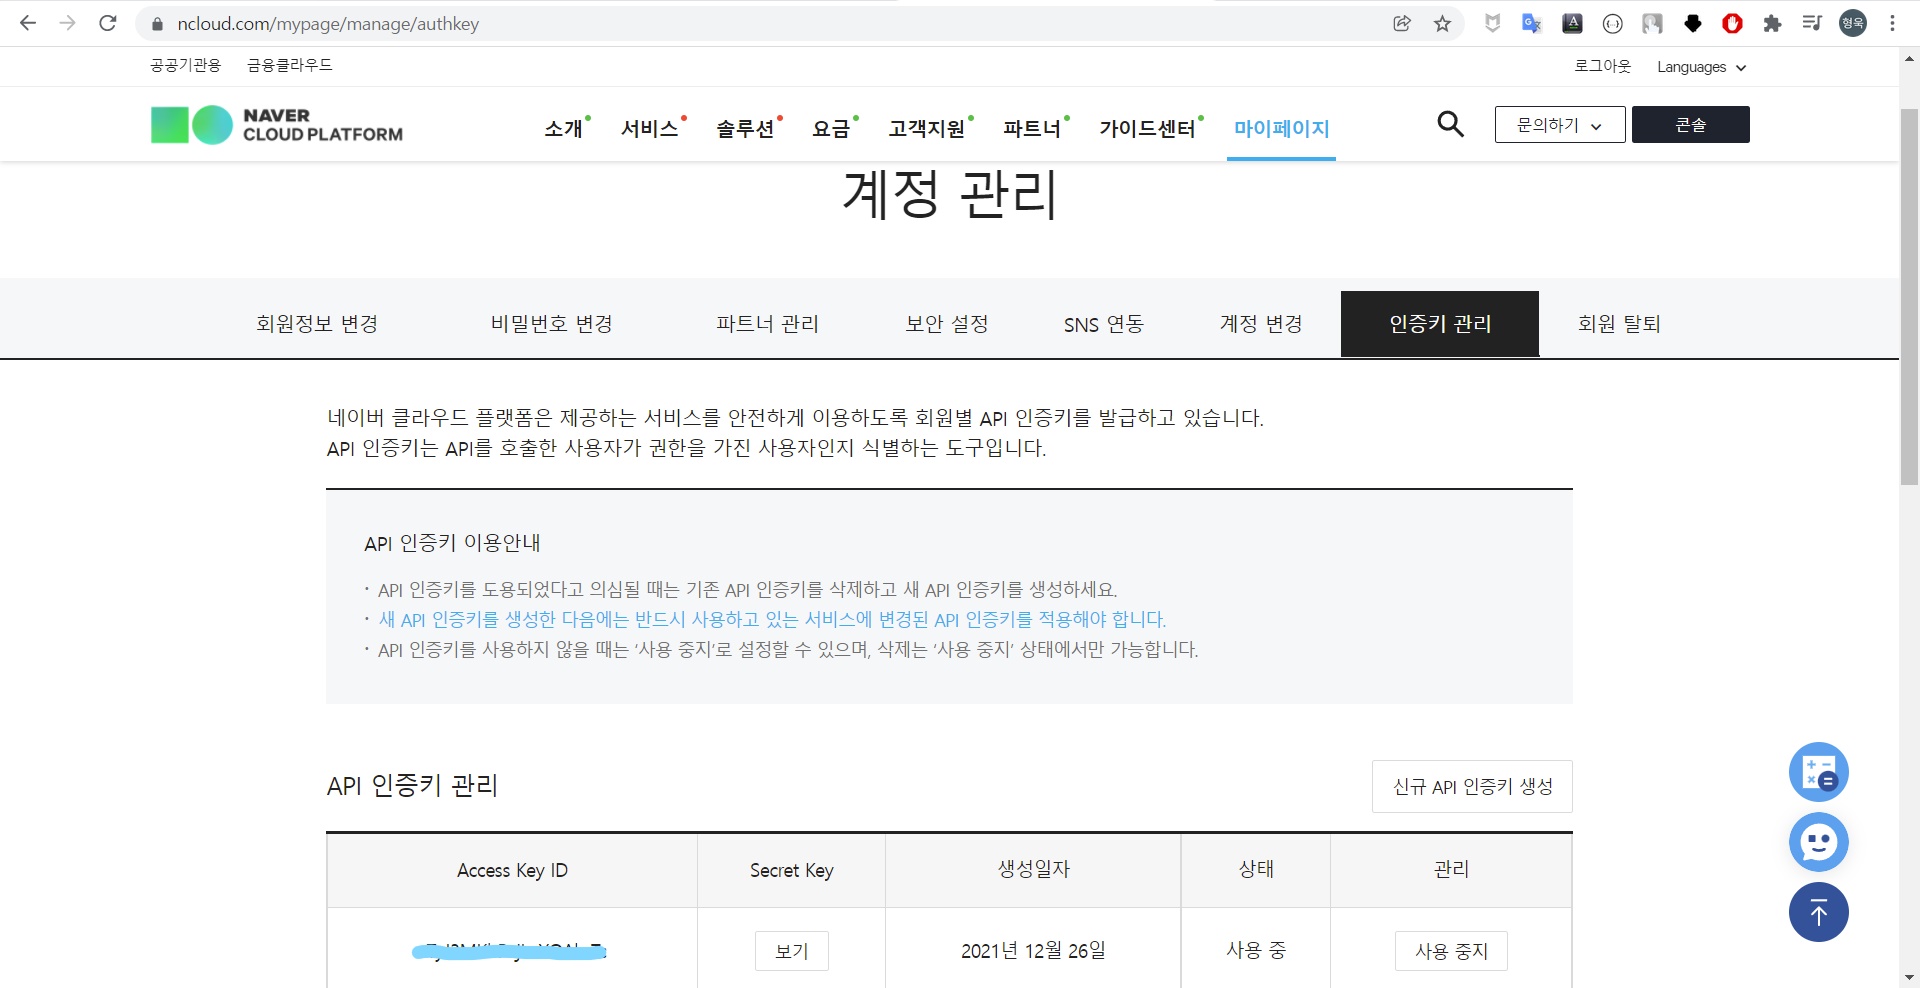
필요한 API 인증키를 생성한 후 terraform에서 사용하기 위해 variables.tf 파일에 해당 값을 넣어준다.
인증키 변수 값 설정
examples/nks로 이동
 $ pwd
/home/hyungwook/go/src/github.com/NaverCloudPlatform/terraform-provider-ncloud/examples/nks- 파일목록 확인
$ ls -lrt
total 24
-rw-r--r-- 1 hyungwook hyungwook  135 Dec 26 16:02 versions.tf
-rw-r--r-- 1 hyungwook hyungwook 2028 Dec 26 16:02 main.tf
-rw-r--r-- 1 hyungwook hyungwook  322 Dec 26 16:19 variables.tf
Cluster 생성(apply)
terraform 초기화 및 실행
- terraform init
$ terraform init

Initializing the backend...

Initializing provider plugins...
- Finding latest version of navercloudplatform/ncloud...
- Installing navercloudplatform/ncloud v2.2.1...
- Installed navercloudplatform/ncloud v2.2.1 (signed by a HashiCorp partner, key ID 9DCE2431234C9)

Partner and community providers are signed by their developers.
If you'd like to know more about provider signing, you can read about it here:
https://www.terraform.io/docs/cli/plugins/signing.html

Terraform has created a lock file .terraform.lock.hcl to record the provider
selections it made above. Include this file in your version control repository
so that Terraform can guarantee to make the same selections by default when
you run "terraform init" in the future.

Terraform has been successfully initialized!

You may now begin working with Terraform. Try running "terraform plan" to see
any changes that are required for your infrastructure. All Terraform commands
should now work.

If you ever set or change modules or backend configuration for Terraform,
rerun this command to reinitialize your working directory. If you forget, other
commands will detect it and remind you to do so if necessary.- terraform plan
$ terraform plan

Terraform used the selected providers to generate the following execution plan. Resource actions are indicated with the following symbols:
  + create

Terraform will perform the following actions:

  # ncloud_login_key.loginkey will be created
  + resource "ncloud_login_key" "loginkey" {
      + fingerprint = (known after apply)
      + id          = (known after apply)
      + key_name    = "my-key"
      + private_key = (sensitive value)
    }

  # ncloud_nks_cluster.cluster will be created
  + resource "ncloud_nks_cluster" "cluster" {
      + cluster_type         = "SVR.VNKS.STAND.C002.M008.NET.SSD.B050.G002"
      + endpoint             = (known after apply)
      + id                   = (known after apply)
      + k8s_version          = "1.20.13-nks.1"
      + kube_network_plugin  = "cilium"
      + lb_private_subnet_no = (known after apply)
      + login_key_name       = "my-key"
      + name                 = "sample-cluster"
      + subnet_no_list       = (known after apply)
      + uuid                 = (known after apply)
      + vpc_no               = (known after apply)
      + zone                 = "KR-1"

      + log {
          + audit = true
        }
    }

  # ncloud_nks_node_pool.node_pool will be created
  + resource "ncloud_nks_node_pool" "node_pool" {
      + cluster_uuid   = (known after apply)
      + id             = (known after apply)
      + instance_no    = (known after apply)
      + k8s_version    = (known after apply)
      + node_count     = 1
      + node_pool_name = "pool1"
      + product_code   = "SVR.VSVR.STAND.C002.M008.NET.SSD.B050.G002"
      + subnet_no      = (known after apply)

      + autoscale {
          + enabled = true
          + max     = 2
          + min     = 1
        }
    }

  # ncloud_subnet.lb_subnet will be created
  + resource "ncloud_subnet" "lb_subnet" {
      + id             = (known after apply)
      + name           = "lb-subnet"
      + network_acl_no = (known after apply)
      + subnet         = "10.0.100.0/24"
      + subnet_no      = (known after apply)
      + subnet_type    = "PRIVATE"
      + usage_type     = "LOADB"
      + vpc_no         = (known after apply)
      + zone           = "KR-1"
    }

  # ncloud_subnet.node_subnet will be created
  + resource "ncloud_subnet" "node_subnet" {
      + id             = (known after apply)
      + name           = "node-subnet"
      + network_acl_no = (known after apply)
      + subnet         = "10.0.1.0/24"
      + subnet_no      = (known after apply)
      + subnet_type    = "PRIVATE"
      + usage_type     = "GEN"
      + vpc_no         = (known after apply)
      + zone           = "KR-1"
    }

  # ncloud_vpc.vpc will be created
  + resource "ncloud_vpc" "vpc" {
      + default_access_control_group_no = (known after apply)
      + default_network_acl_no          = (known after apply)
      + default_private_route_table_no  = (known after apply)
      + default_public_route_table_no   = (known after apply)
      + id                              = (known after apply)
      + ipv4_cidr_block                 = "10.0.0.0/16"
      + name                            = "vpc"
      + vpc_no                          = (known after apply)
    }

Plan: 6 to add, 0 to change, 0 to destroy.
참고 : 필자는 terraform apply 이후 설치중 네트워크가 끊어져 destroy 후 다시 작업하였다. 추가로 destroy 후에 정상적으로 리소스가 삭제되지 않아 콘솔에서 직접 삭제 후 다시 apply 하였다.
- terraform apply
$ terraform apply -auto-approve
ncloud_vpc.vpc: Refreshing state... [id=16240]
ncloud_subnet.node_subnet: Refreshing state... [id=32073]

Note: Objects have changed outside of Terraform

Terraform detected the following changes made outside of Terraform since the last "terraform apply":

  # ncloud_subnet.node_subnet has been deleted
  - resource "ncloud_subnet" "node_subnet" {
      - id             = "32073" -> null
      - name           = "node-subnet" -> null
      - network_acl_no = "23481" -> null
      - subnet         = "10.0.1.0/24" -> null
      - subnet_no      = "32073" -> null
      - subnet_type    = "PRIVATE" -> null
      - usage_type     = "GEN" -> null
      - vpc_no         = "16240" -> null
      - zone           = "KR-1" -> null
    }
  # ncloud_vpc.vpc has been deleted
  - resource "ncloud_vpc" "vpc" {
      - default_access_control_group_no = "33795" -> null
      - default_network_acl_no          = "23481" -> null
      - default_private_route_table_no  = "31502" -> null
      - default_public_route_table_no   = "31501" -> null
      - id                              = "16240" -> null
      - ipv4_cidr_block                 = "10.0.0.0/16" -> null
      - name                            = "vpc" -> null
      - vpc_no                          = "16240" -> null
    }

Unless you have made equivalent changes to your configuration, or ignored the relevant attributes using ignore_changes, the following plan may include actions to undo or respond to these
changes.

──────────────────────────────────────────────────────────────────────

Terraform used the selected providers to generate the following execution plan. Resource actions are indicated with the following symbols:
  + create

Terraform will perform the following actions:

  # ncloud_login_key.loginkey will be created
  + resource "ncloud_login_key" "loginkey" {
      + fingerprint = (known after apply)
      + id          = (known after apply)
      + key_name    = "my-key"
      + private_key = (sensitive value)
    }

  # ncloud_nks_cluster.cluster will be created
  + resource "ncloud_nks_cluster" "cluster" {
      + cluster_type         = "SVR.VNKS.STAND.C002.M008.NET.SSD.B050.G002"
      + endpoint             = (known after apply)
      + id                   = (known after apply)
      + k8s_version          = "1.20.13-nks.1"
      + kube_network_plugin  = "cilium"
      + lb_private_subnet_no = (known after apply)
      + login_key_name       = "my-key"
      + name                 = "sample-cluster"
      + subnet_no_list       = (known after apply)
      + uuid                 = (known after apply)
      + vpc_no               = (known after apply)
      + zone                 = "KR-1"

      + log {
          + audit = true
        }
    }

  # ncloud_nks_node_pool.node_pool will be created
  + resource "ncloud_nks_node_pool" "node_pool" {
      + cluster_uuid   = (known after apply)
      + id             = (known after apply)
      + instance_no    = (known after apply)
      + k8s_version    = (known after apply)
      + node_count     = 1
      + node_pool_name = "pool1"
      + product_code   = "SVR.VSVR.STAND.C002.M008.NET.SSD.B050.G002"
      + subnet_no      = (known after apply)

      + autoscale {
          + enabled = true
          + max     = 2
          + min     = 1
        }
    }

  # ncloud_subnet.lb_subnet will be created
  + resource "ncloud_subnet" "lb_subnet" {
      + id             = (known after apply)
      + name           = "lb-subnet"
      + network_acl_no = (known after apply)
      + subnet         = "10.0.100.0/24"
      + subnet_no      = (known after apply)
      + subnet_type    = "PRIVATE"
      + usage_type     = "LOADB"
      + vpc_no         = (known after apply)
      + zone           = "KR-1"
    }

  # ncloud_subnet.node_subnet will be created
  + resource "ncloud_subnet" "node_subnet" {
      + id             = (known after apply)
      + name           = "node-subnet"
      + network_acl_no = (known after apply)
      + subnet         = "10.0.1.0/24"
      + subnet_no      = (known after apply)
      + subnet_type    = "PRIVATE"
      + usage_type     = "GEN"
      + vpc_no         = (known after apply)
      + zone           = "KR-1"
    }

  # ncloud_vpc.vpc will be created
  + resource "ncloud_vpc" "vpc" {
      + default_access_control_group_no = (known after apply)
      + default_network_acl_no          = (known after apply)
      + default_private_route_table_no  = (known after apply)
      + default_public_route_table_no   = (known after apply)
      + id                              = (known after apply)
      + ipv4_cidr_block                 = "10.0.0.0/16"
      + name                            = "vpc"
      + vpc_no                          = (known after apply)
    }

Plan: 6 to add, 0 to change, 0 to destroy.
ncloud_vpc.vpc: Creating...
ncloud_login_key.loginkey: Creating...
ncloud_login_key.loginkey: Creation complete after 3s [id=my-key]
ncloud_vpc.vpc: Still creating... [10s elapsed]
ncloud_vpc.vpc: Creation complete after 14s [id=16241]
ncloud_subnet.lb_subnet: Creating...
ncloud_subnet.node_subnet: Creating...
ncloud_subnet.node_subnet: Still creating... [10s elapsed]
ncloud_subnet.lb_subnet: Still creating... [10s elapsed]
ncloud_subnet.node_subnet: Creation complete after 13s [id=32076]
ncloud_subnet.lb_subnet: Creation complete after 13s [id=32075]
ncloud_nks_cluster.cluster: Creating...
ncloud_nks_cluster.cluster: Still creating... [10s elapsed]
...
ncloud_nks_cluster.cluster: Still creating... [15m50s elapsed]
ncloud_nks_cluster.cluster: Creation complete after 16m0s [id=b6510323-da50-4f3e-a093-a6111d04a268]
ncloud_nks_node_pool.node_pool: Creating...
ncloud_nks_node_pool.node_pool: Still creating... [10s elapsed]
...
ncloud_nks_node_pool.node_pool: Still creating... [9m20s elapsed]
ncloud_nks_node_pool.node_pool: Creation complete after 9m28s [id=b6510323-da50-4f3e-a093-a6111d04a268:pool1]

Apply complete! Resources: 6 added, 0 changed, 0 destroyed.
리소스 확인
Terraform으로 배포한 리소스가 정상적으로 생성되고 있는지 확인한다.
클러스터 화면
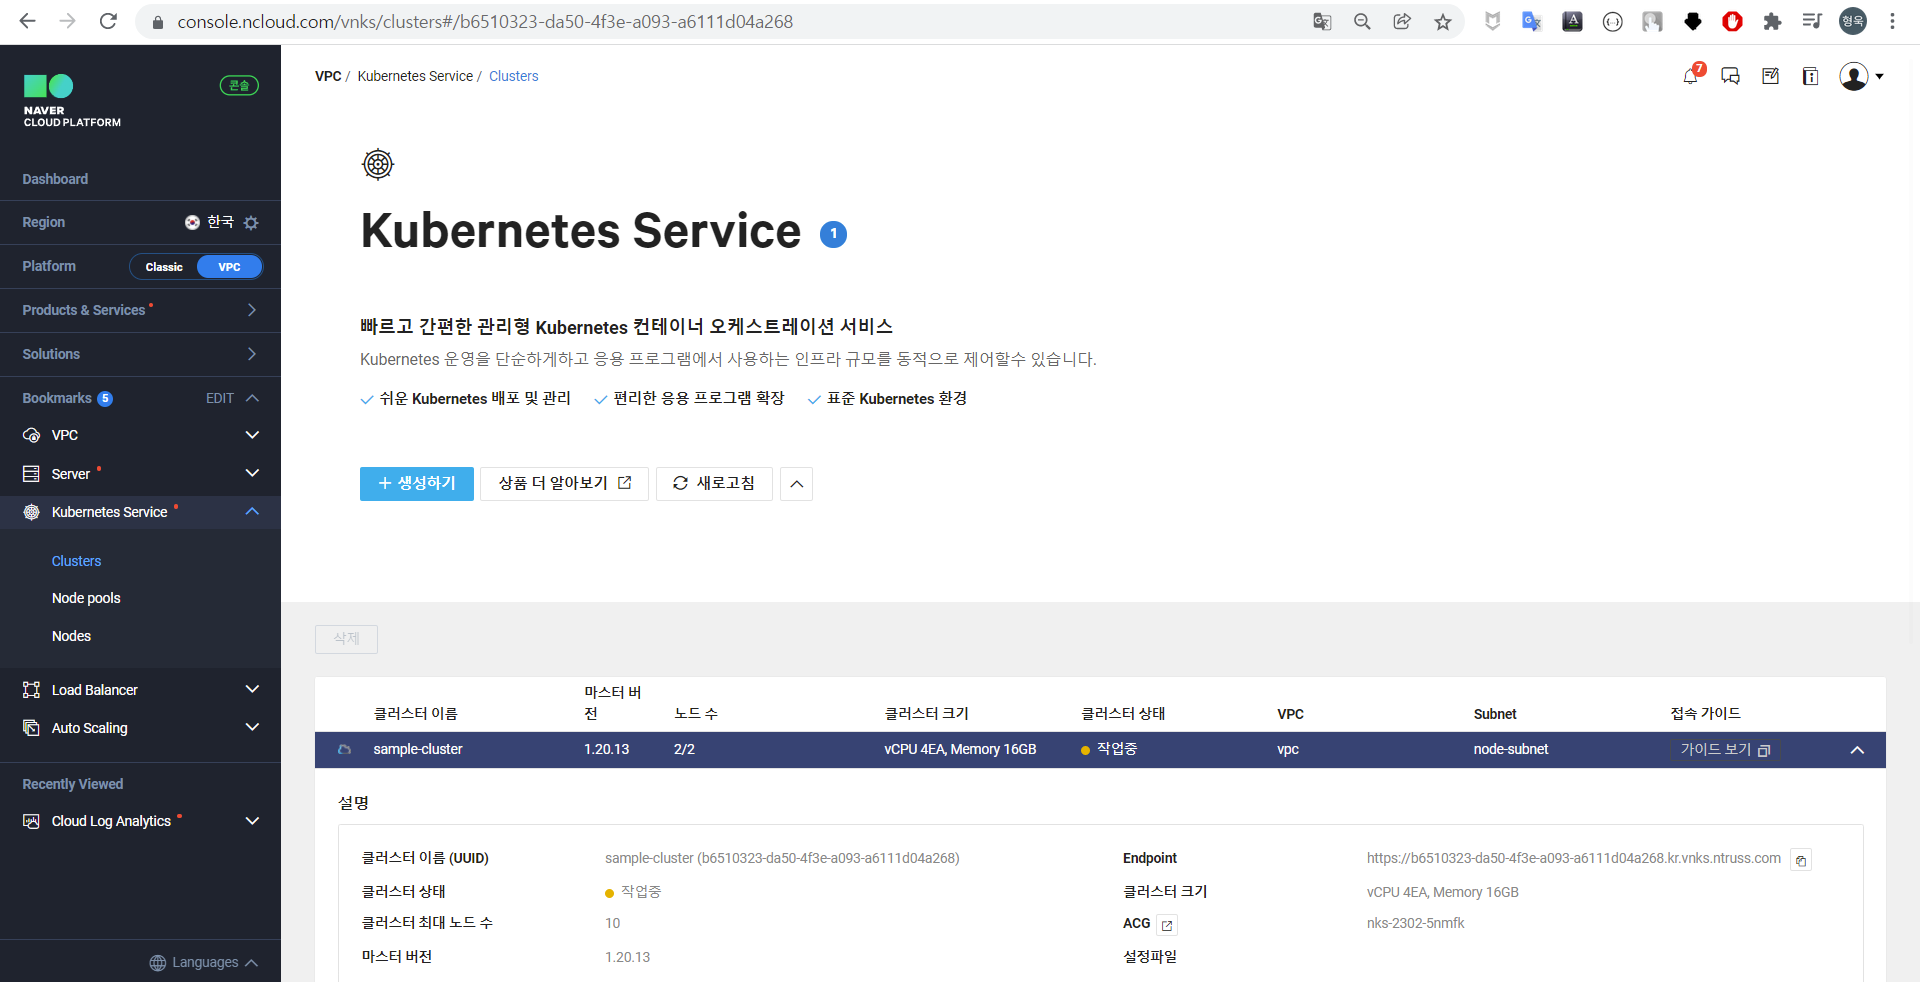
[VPC] - [Kubernetes Servicve] - [Clusters] 에서 생성된 클러스터 목록을 확인할 수 있다.
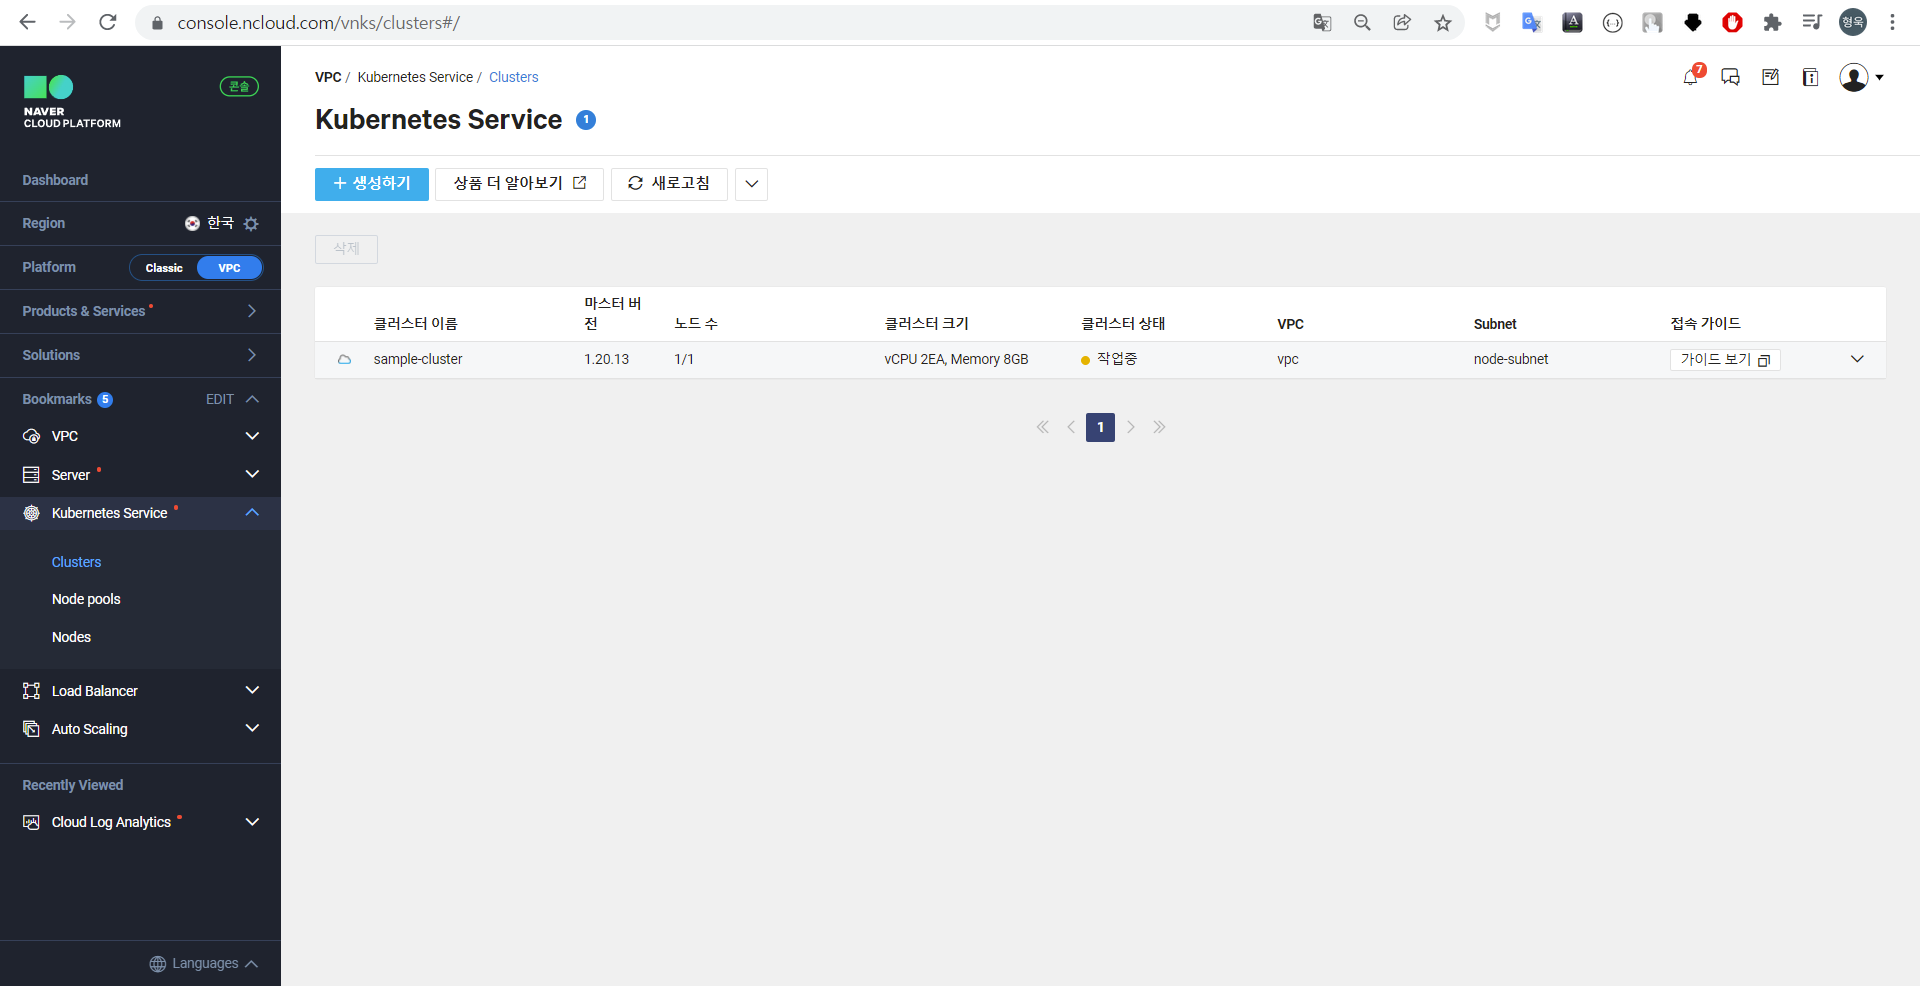
필자가 배포한 sample-cluster를 클릭한 뒤 상세 화면을 확인한다.
노드 및 노드풀
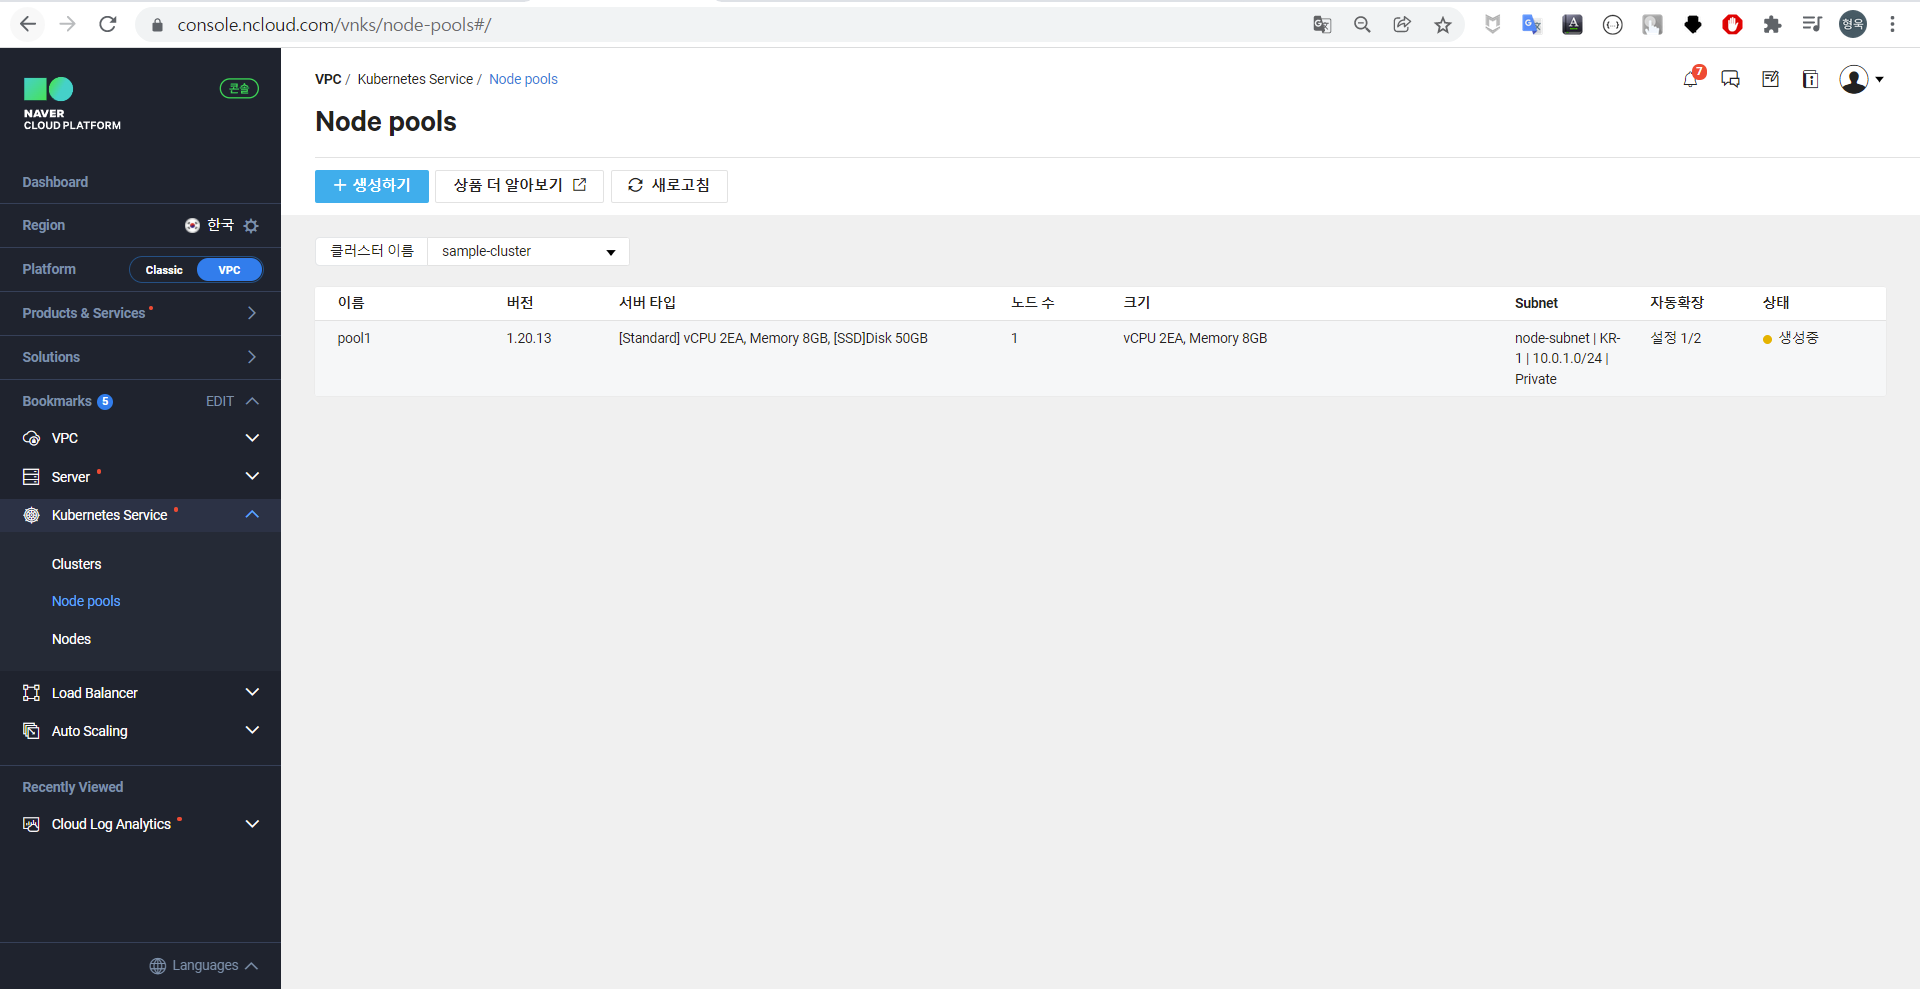
NKS 클러스터를 생성할 노드풀을 등록하여 노드풀 별로 노드의 스펙을 다르게 설정할 수 있다. [VPC] - [Kubernetes Servicve] - [Node Pools] 에서 확인할 수 있으며, 필자는 기본값으로 pool1만 생성하였다.
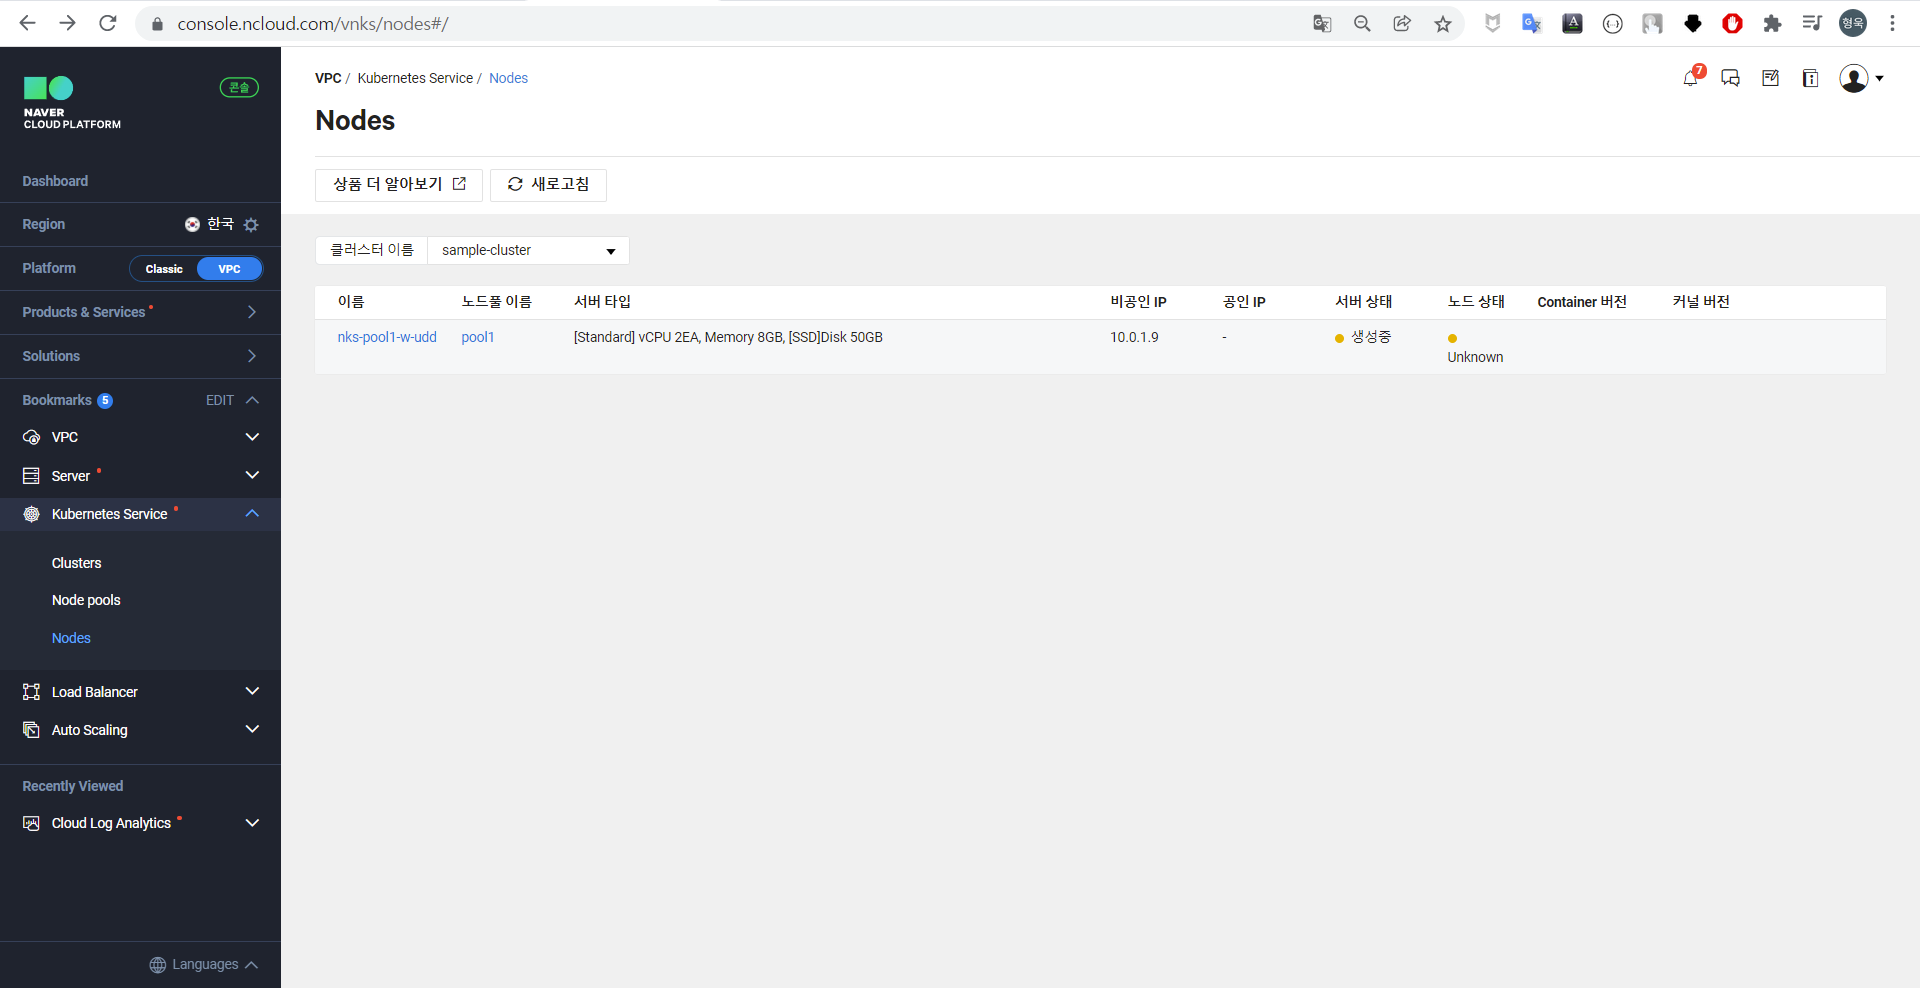
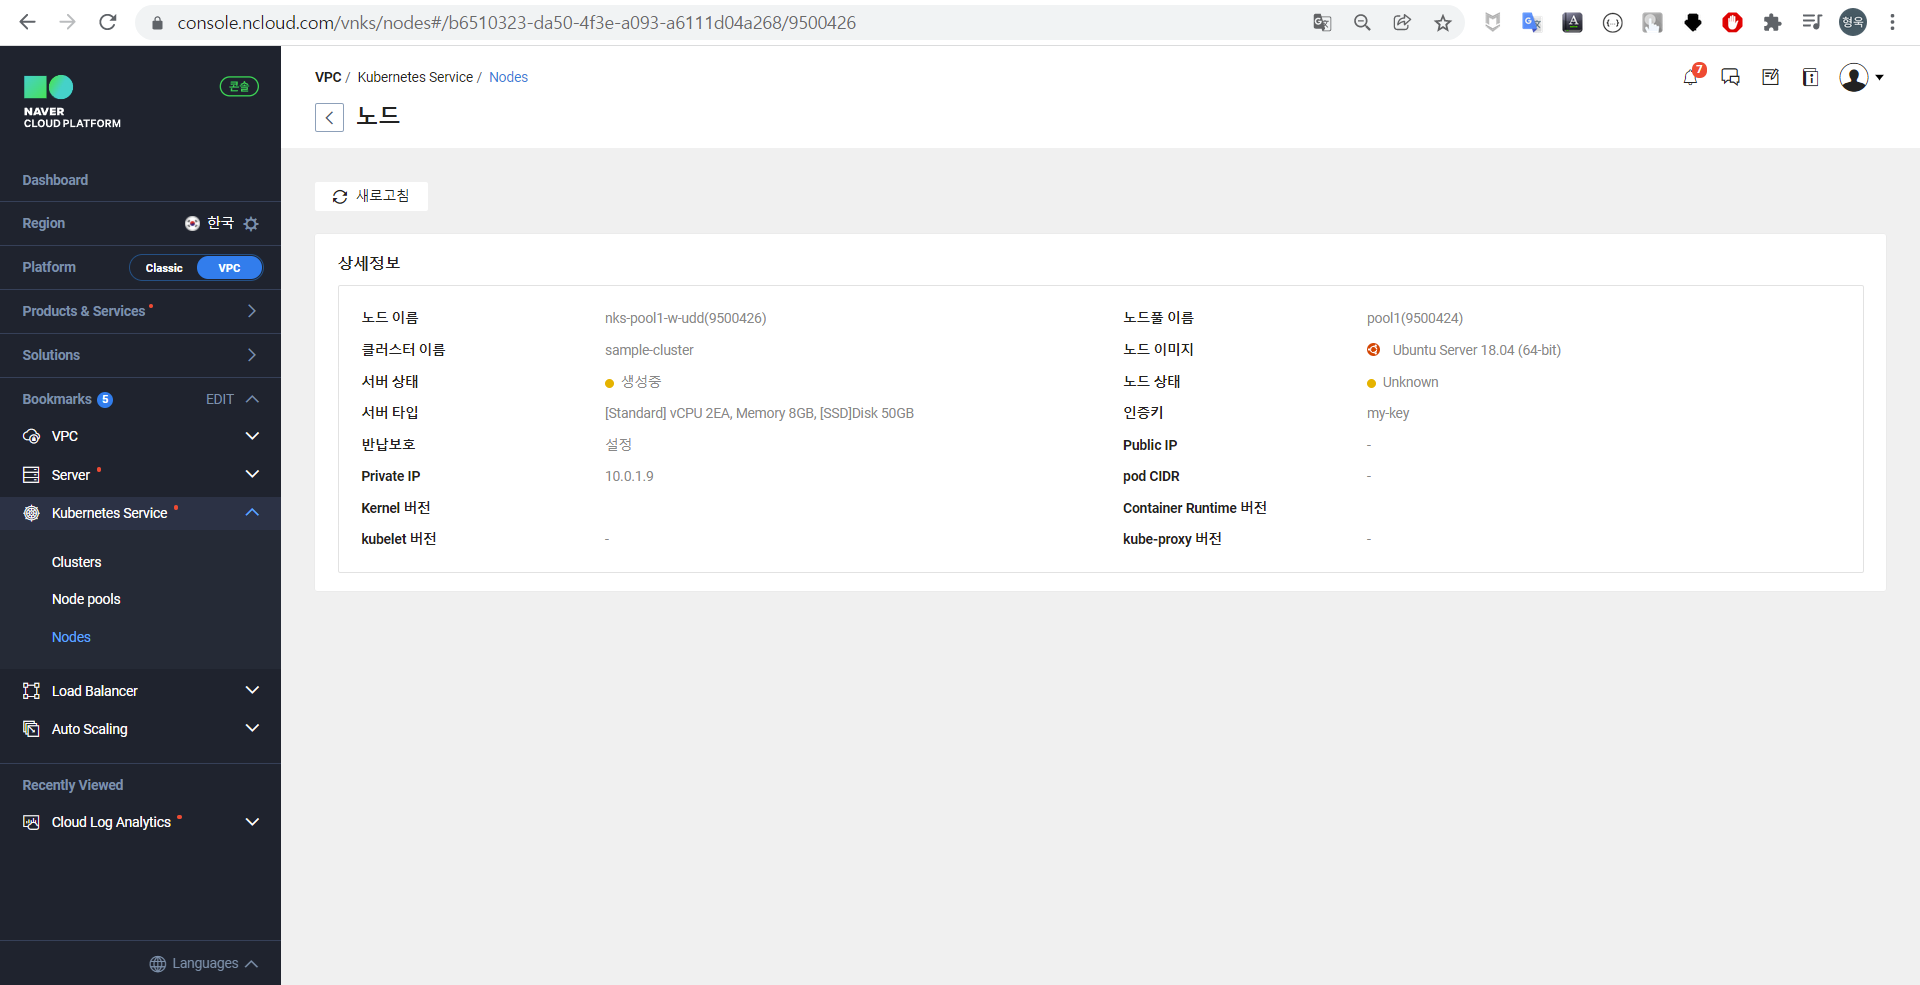
노드 목록에 있는 노드를 클릭하여 상세화면을 확인할 수 있다. 다음은 생성중인 1번 노드의 상세화면이다.
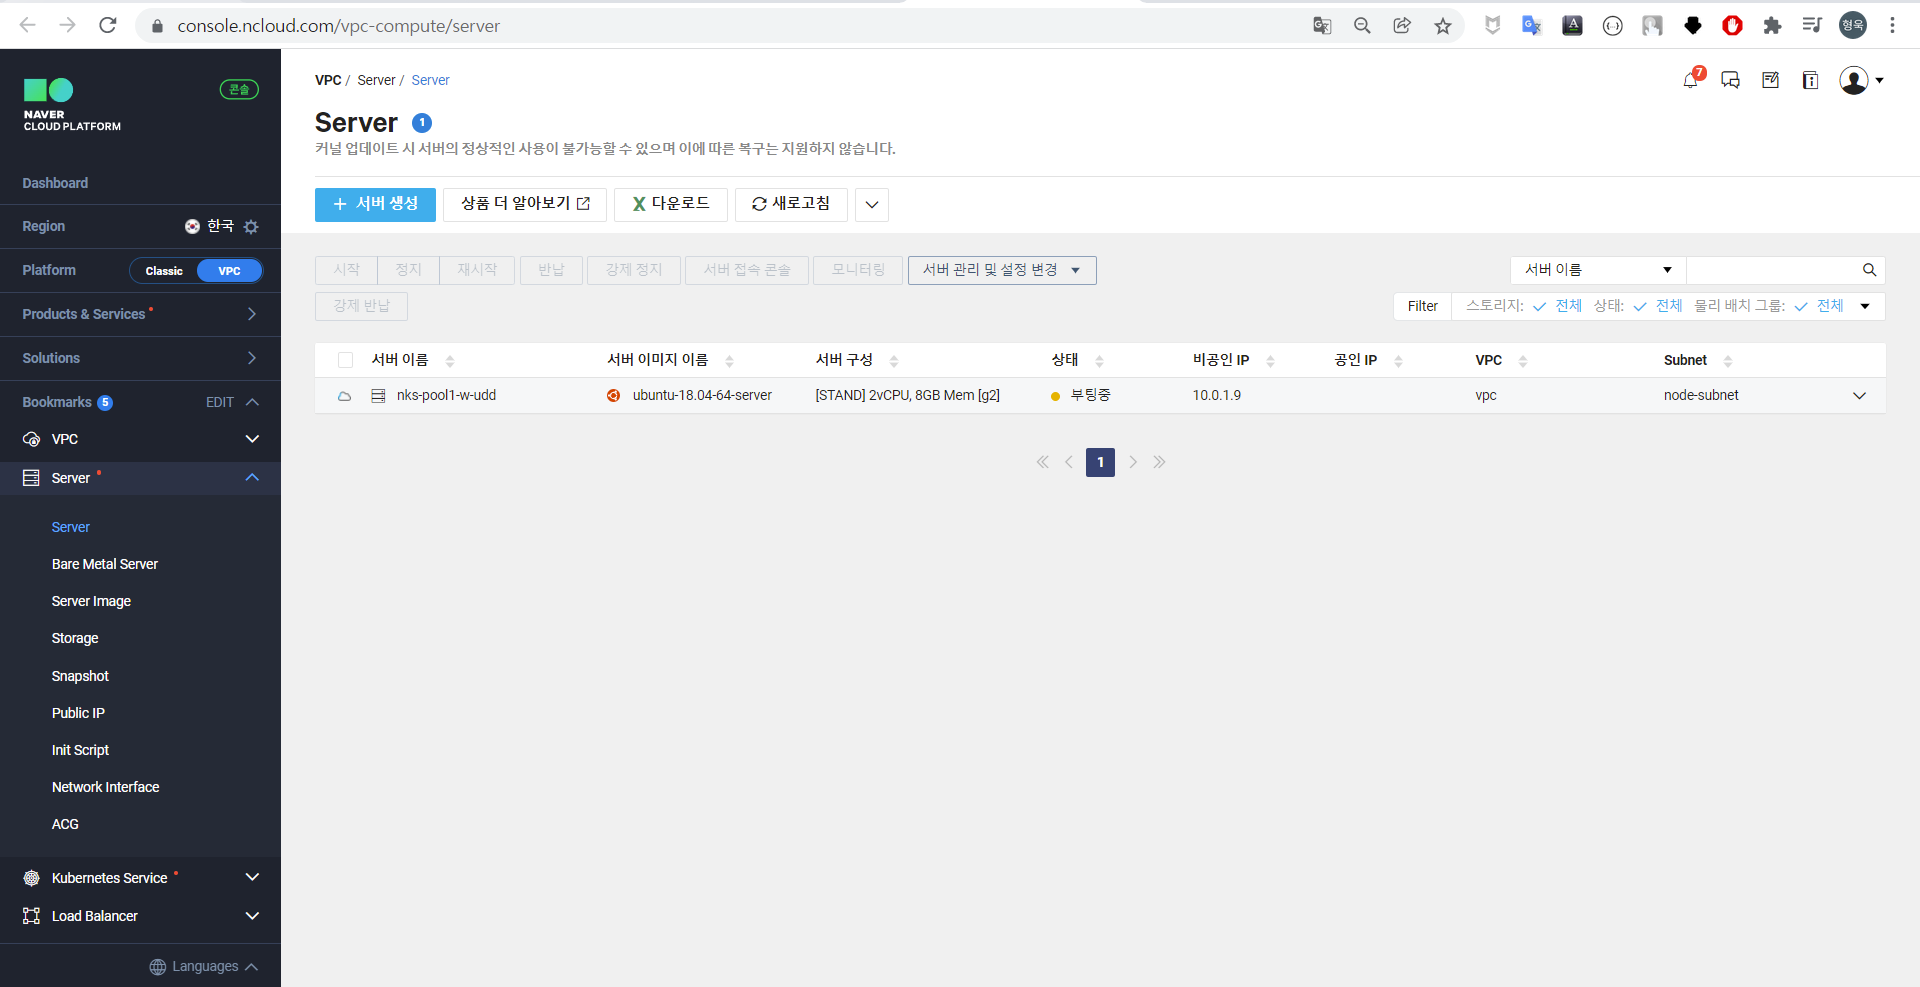
각 노드는 VM으로 생성되므로 [VPC] - [Server] - [Server] 에서 각 Server가 생성됨을 확인할 수 있다.
클러스터 접속 확인
정상적으로 클러스터가 배포된 후에는 다음과 같이 STATUS: Ready로 표기되는 것을 확인할 수 있다.
해당 클러스터를 관리하기 위해 kubeconfig 파일을 다운받고 kubectl명령을 통해 확인한다.
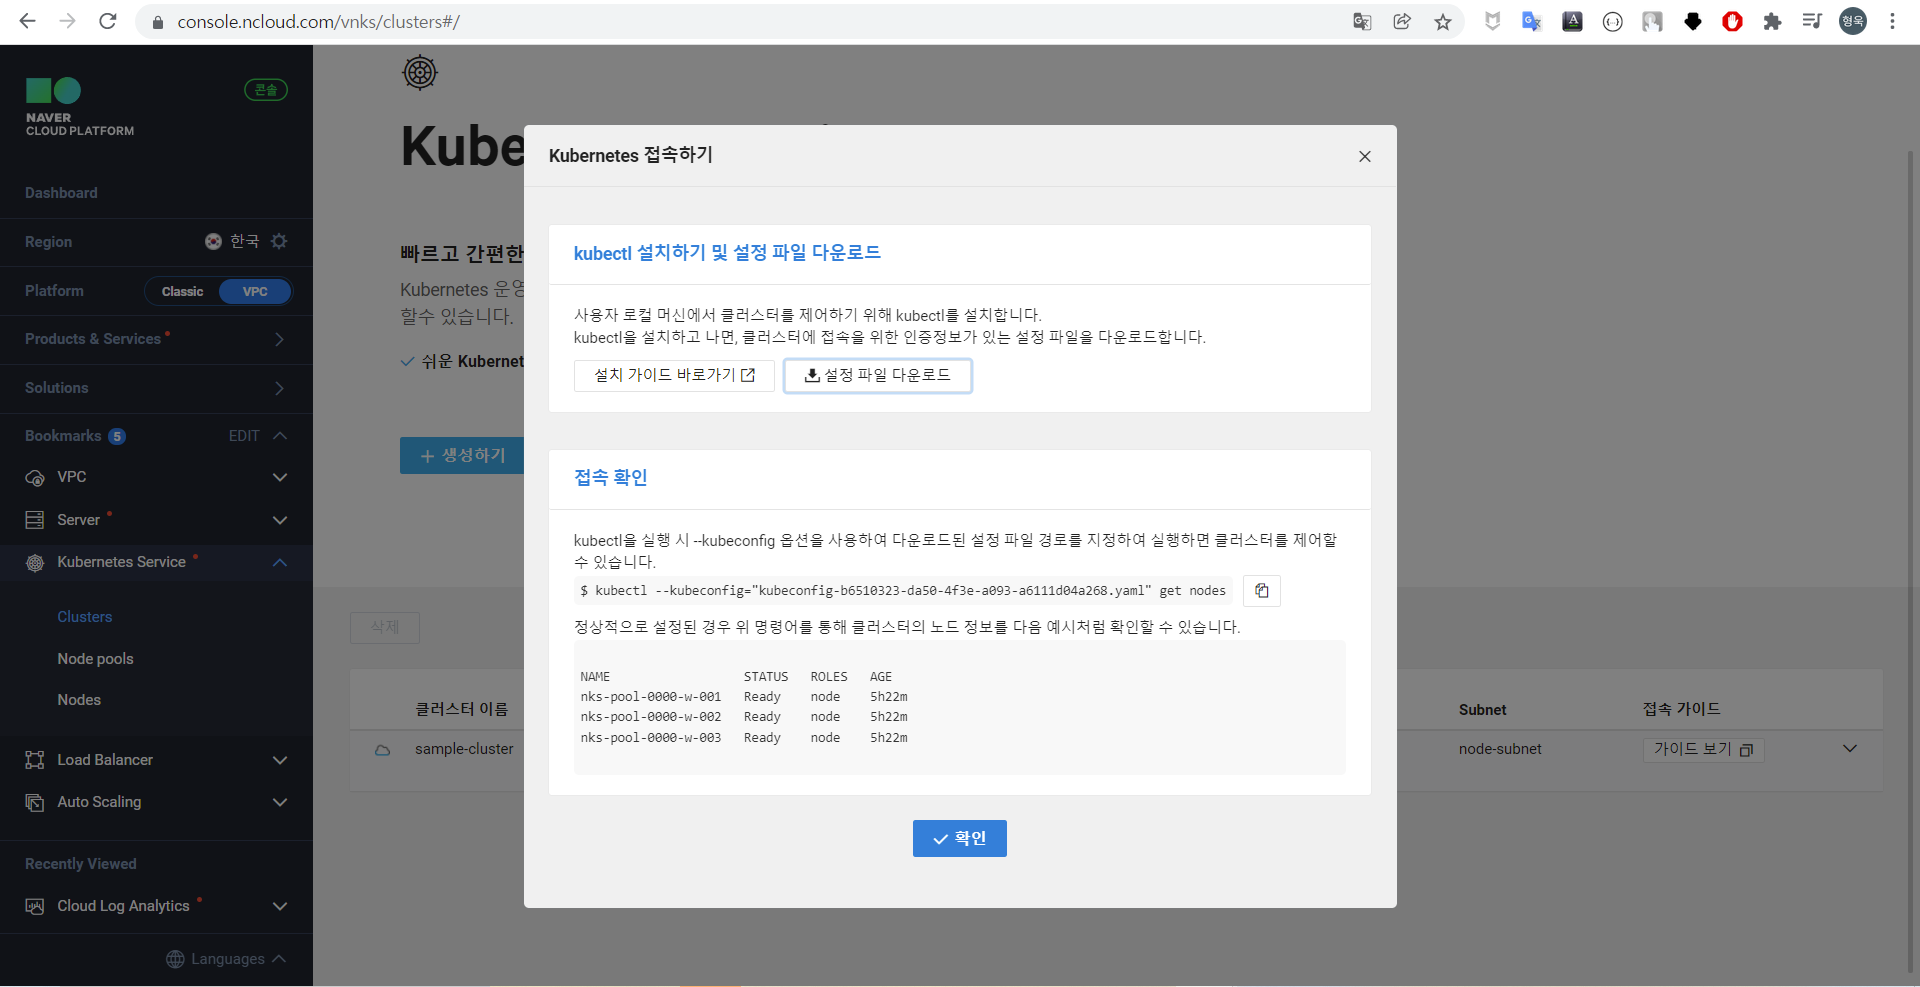
Kubectl 명령 테스트
클러스터가 생성중일 때 해당 명령을 사용하여 확인해본 결과 두 대의 노드 중 한 대만 Ready 상태이고, 아직 생성중인 노드는 NotReady인 것으로 확인된다.
kubectl get nodes -o wide: 노드목록 확인
$ kubectl --kubeconfig="kubeconfig-b6510323-da50-4f3e-a093-a6111d04a268.yaml" get nodes -o wide
NAME              STATUS     ROLES    AGE   VERSION    INTERNAL-IP   EXTERNAL-IP   OS-IMAGE             KERNEL-VERSION     CONTAINER-RUNTIME
nks-pool1-w-udd   Ready      <none>   10m   v1.20.13   10.0.1.9      <none>        Ubuntu 18.04.5 LTS   5.4.0-65-generic   containerd://1.3.7
nks-pool1-w-ude   NotReady   <none>   23s   v1.20.13   10.0.1.10     <none>        Ubuntu 18.04.5 LTS   5.4.0-65-generic   containerd://1.3.7
kubectl version: cluster 버전 정보 확인
$ k version --kubeconfig kubeconfig-b6510323-da50-4f3e-a093-a6111d04a268.yaml
Client Version: version.Info{Major:"1", Minor:"21", GitVersion:"v1.21.0", GitCommit:"cb303e613a121a29364f75cc67d3d580833a7479", GitTreeState:"clean", BuildDate:"2021-04-08T16:31:21Z", GoVersion:"go1.16.1", Compiler:"gc", Platform:"linux/amd64"}
Server Version: version.Info{Major:"1", Minor:"20", GitVersion:"v1.20.13", GitCommit:"2444b3347a2c45eb965b182fb836e1f51dc61b70", GitTreeState:"clean", BuildDate:"2021-11-17T13:00:29Z", GoVersion:"go1.15.15", Compiler:"gc", Platform:"linux/amd64"}
NAT Gateway 추가
본 글에서 확인하지는 않았지만 NKS 기본구성 시 NAT Gateway를 설정하지 않으면 외부 통신이 불가능 하다. 때문에 외부 이미지 다운로드(Image Pull)등이 동작하지 않으며, 별도의 NAT Gateway를 추가 해주어야 한다.
참고 : 다음 글에서는 NAT Gateway를 포함하여 Terraform으로 배포할 수 있는 방법을 소개하겠다.
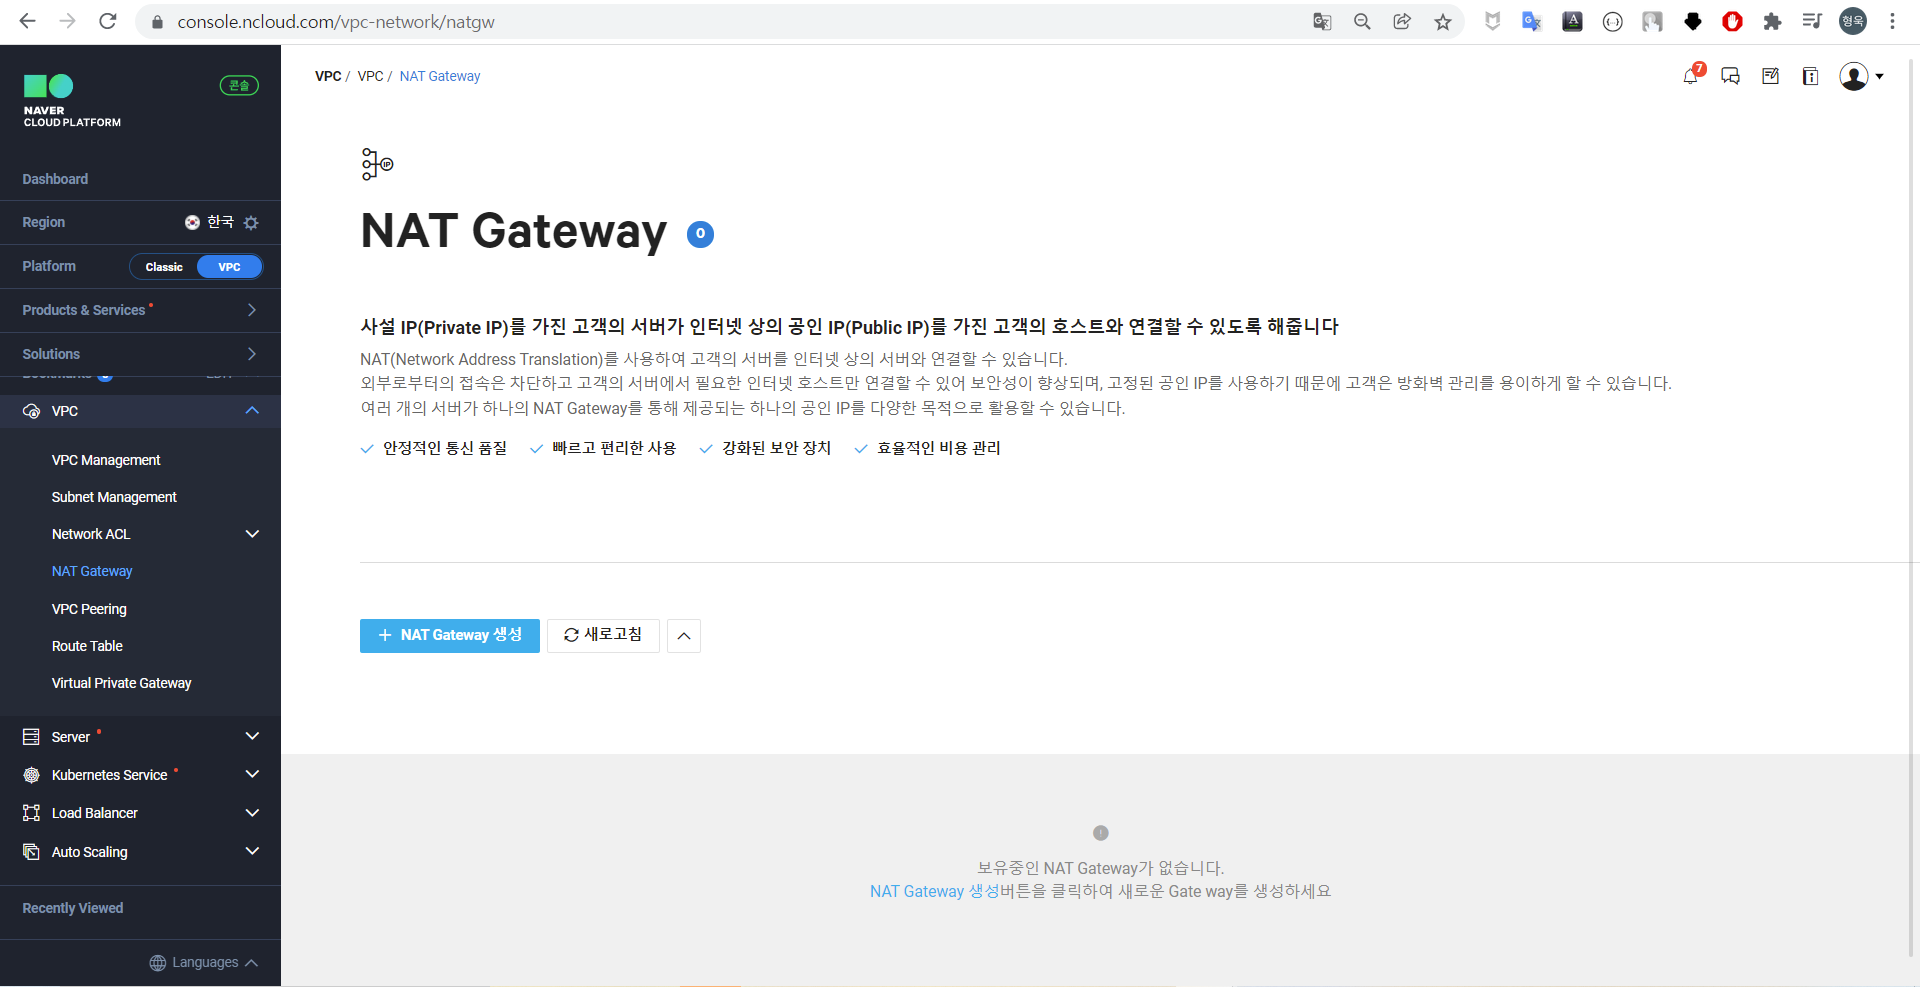
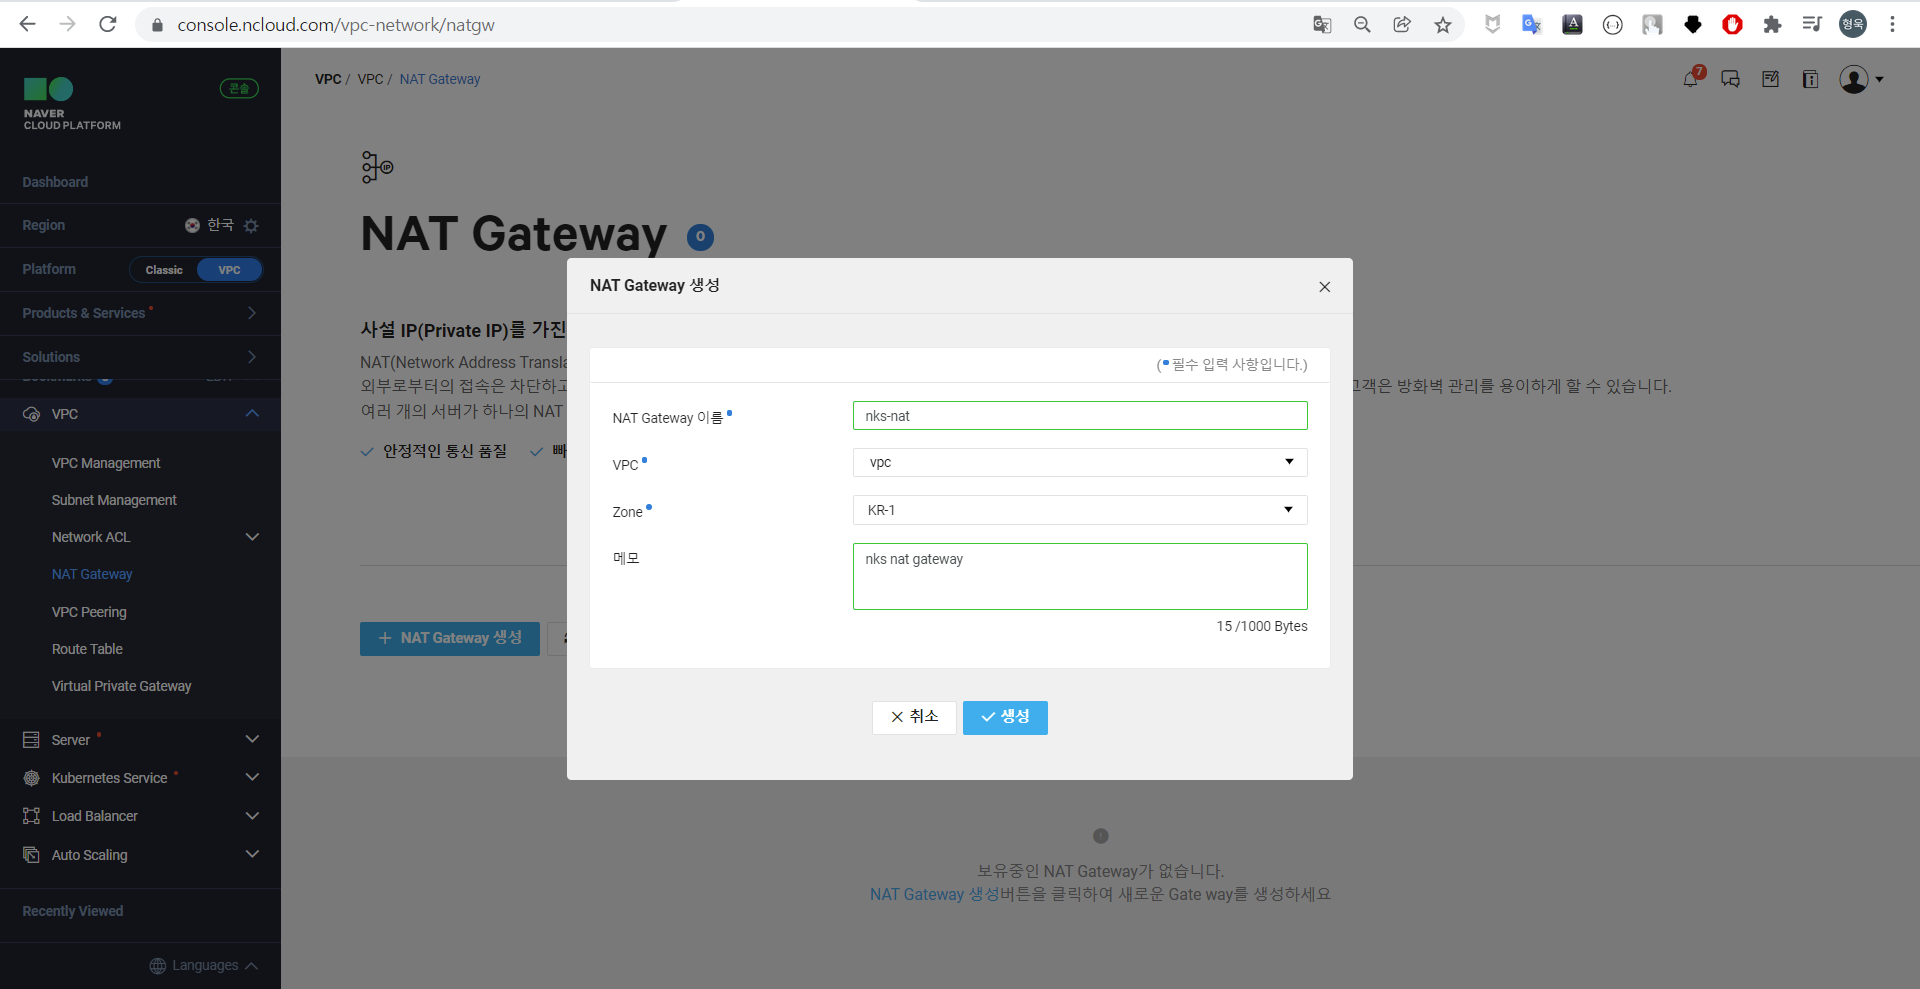
[VPC] - [VPC] - [NAT Gateway] 에서 [+NAT Gateway 생성] 클릭 후 이름, VPC, Zone, 메모를 작성한다.
Route Table 추가
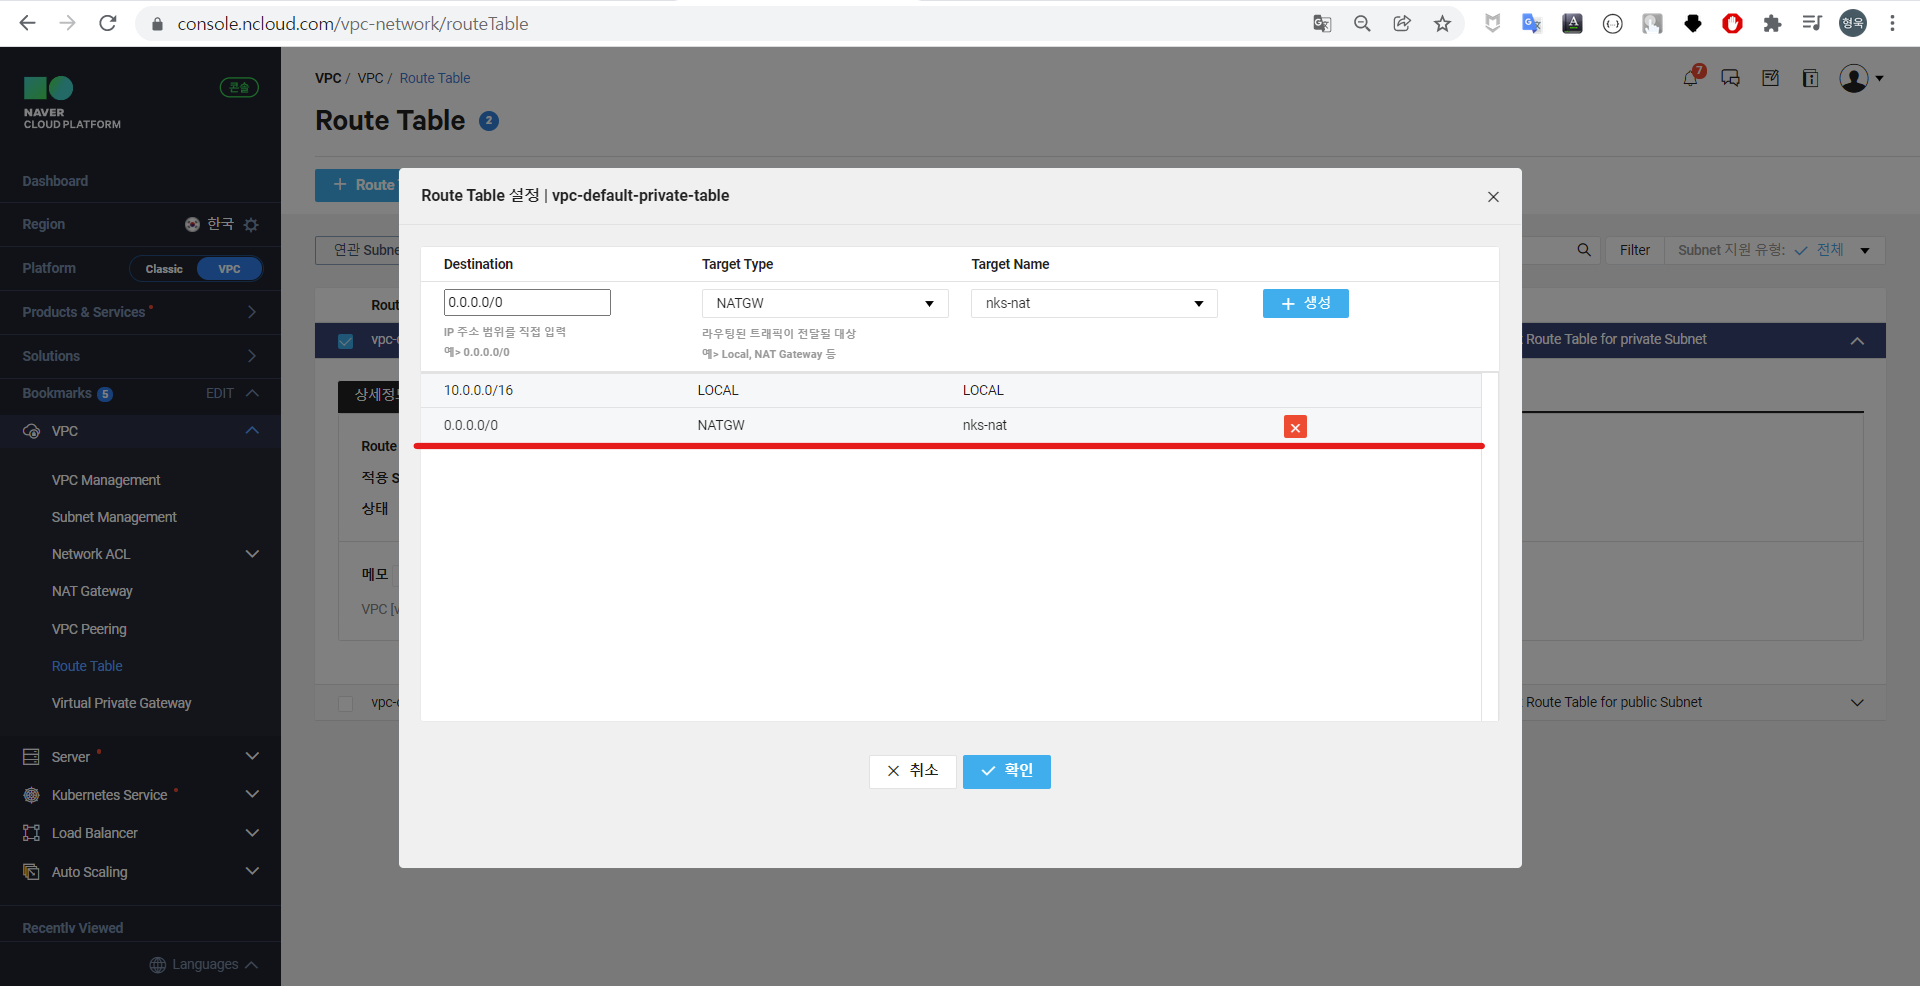
앞서 생성한 NAT Gateway에 연결된 VPC의 외부 통신을 위해 Route Table을 추가한다.
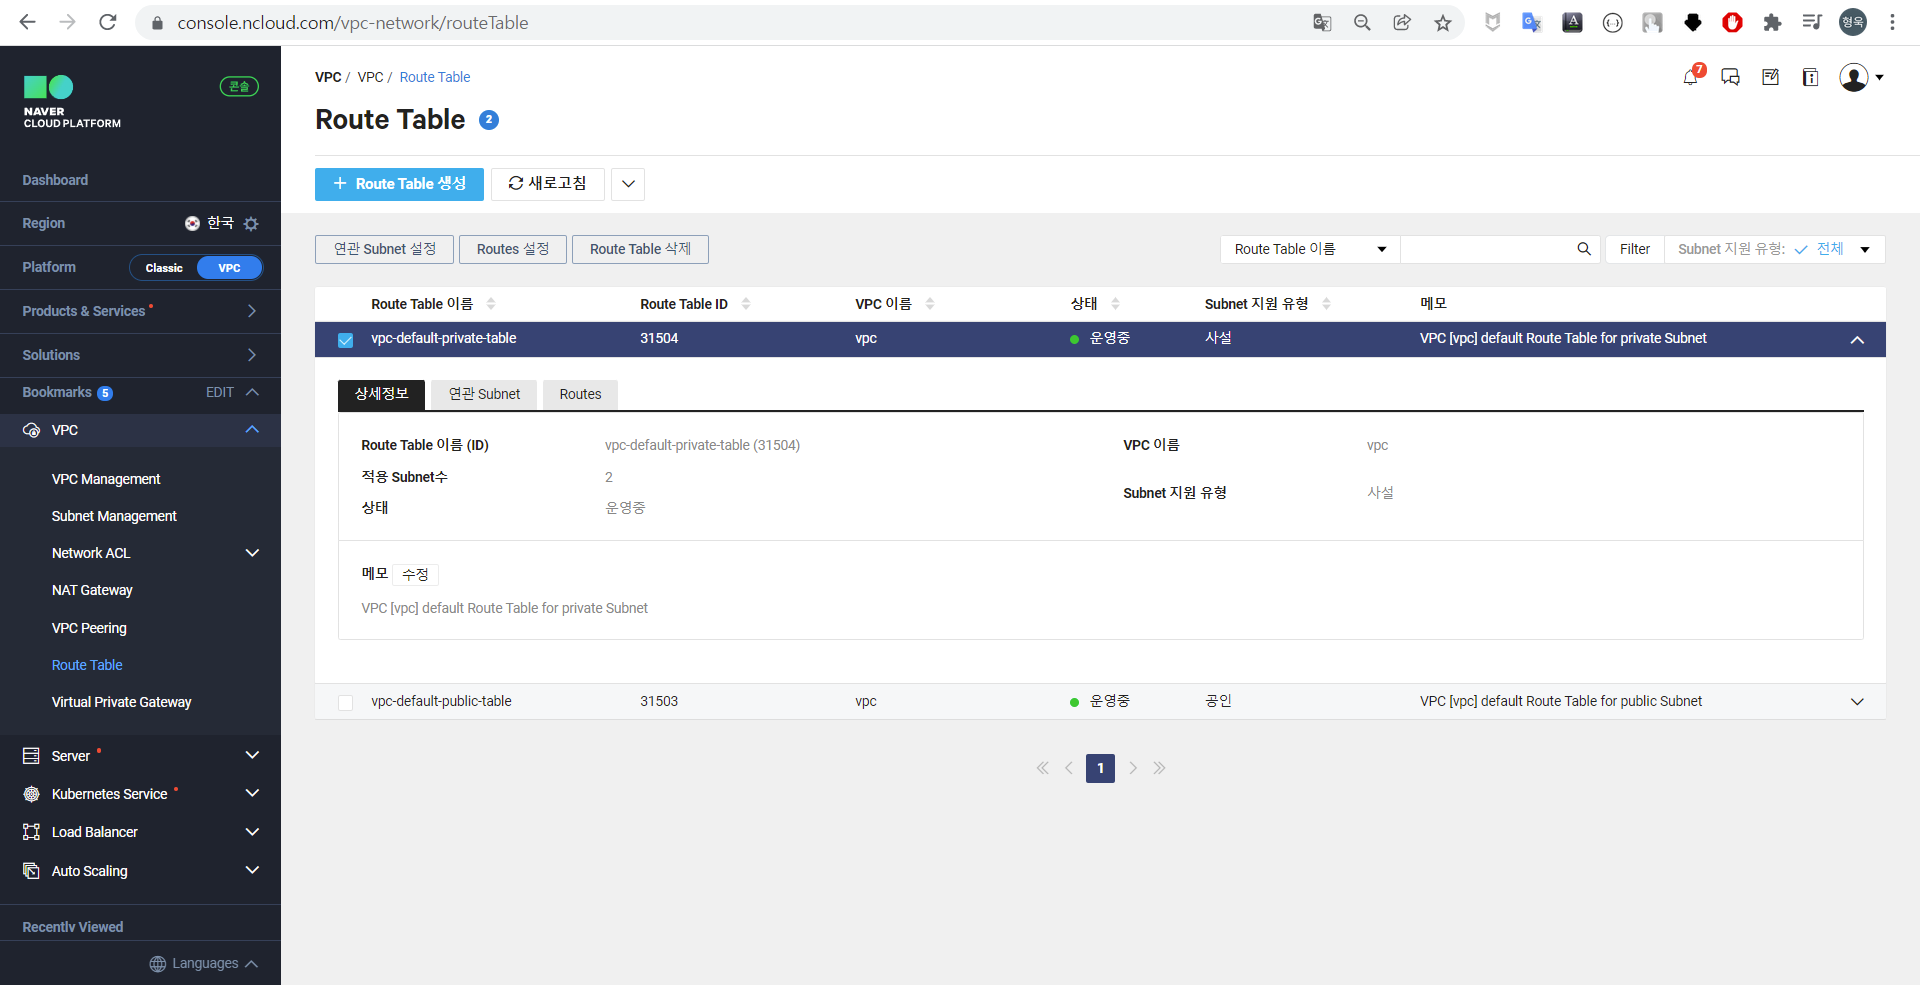
기본적으로 Route Table에는 VPC 생성시 생성한 10.0.0.0/16 대역만 통신 가능하도록 설정되어 있다.
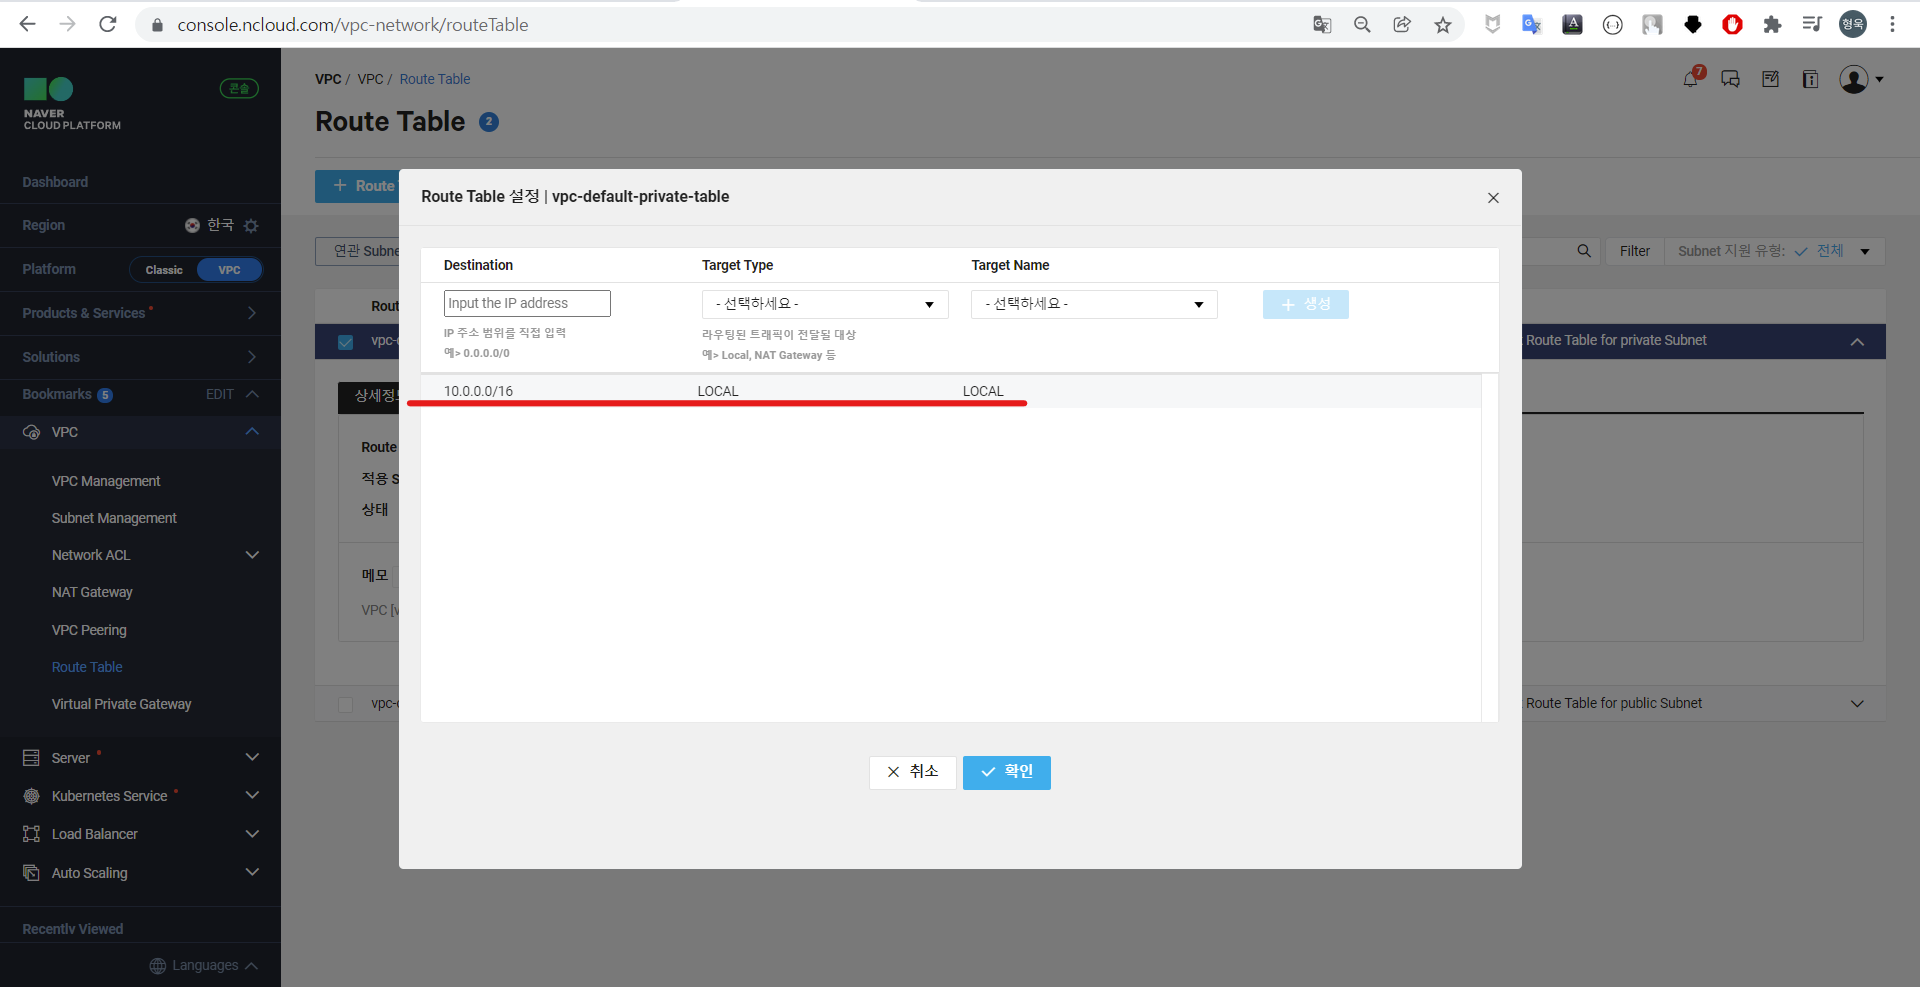
외부 통신을 위해 0.0.0.0/0 대역을 추가한다.
앱 배포 테스트
Route Table을 추가하였기 때문에 NKS 클러스터에서 외부와 통신 가능한 것을 확인할 수 있다.
다음은 간단한 nginx 이미지를 kubectl run명령으로 실행해본다.
kubectl run <파드명> --image <이미지명>
kubectl run nginx-test --image nginx --kubeconfig kubeconfig-b6510323-da50-4f3e-a093-a6111d04a268.yaml
pod/nginx-test created
📢참고 : 필자는 편의상
--kubeconfig옵션을 통해 kubeconfig 파일을 명시했지만, KUBECONFIG 환경변수 또는$HOME/.kube/config에 kubeconfig 파일을 설정 후 작업할 수도 있다. 링크
k get pods -o wide --kubeconfig kubeconfig-b6510323-da50-4f3e-a093-a6111d04a268.yaml
NAME         READY   STATUS    RESTARTS   AGE   IP             NODE              NOMINATED NODE   READINESS GATES
nginx-test 1/1 Running 0 49s 198.18.1.116 nks-pool1-w-ude <none> <none>- port-forward를 통한 접속 테스트
sudo kubectl port-forward  --kubeconfig=kubeconfig-b6510323-da50-4f3e-a093-a6111d04a268.yaml nginx-test 80:80
[sudo] password for hyungwook:
Forwarding from 127.0.0.1:80 -> 80
Forwarding from [::1]:80 -> 80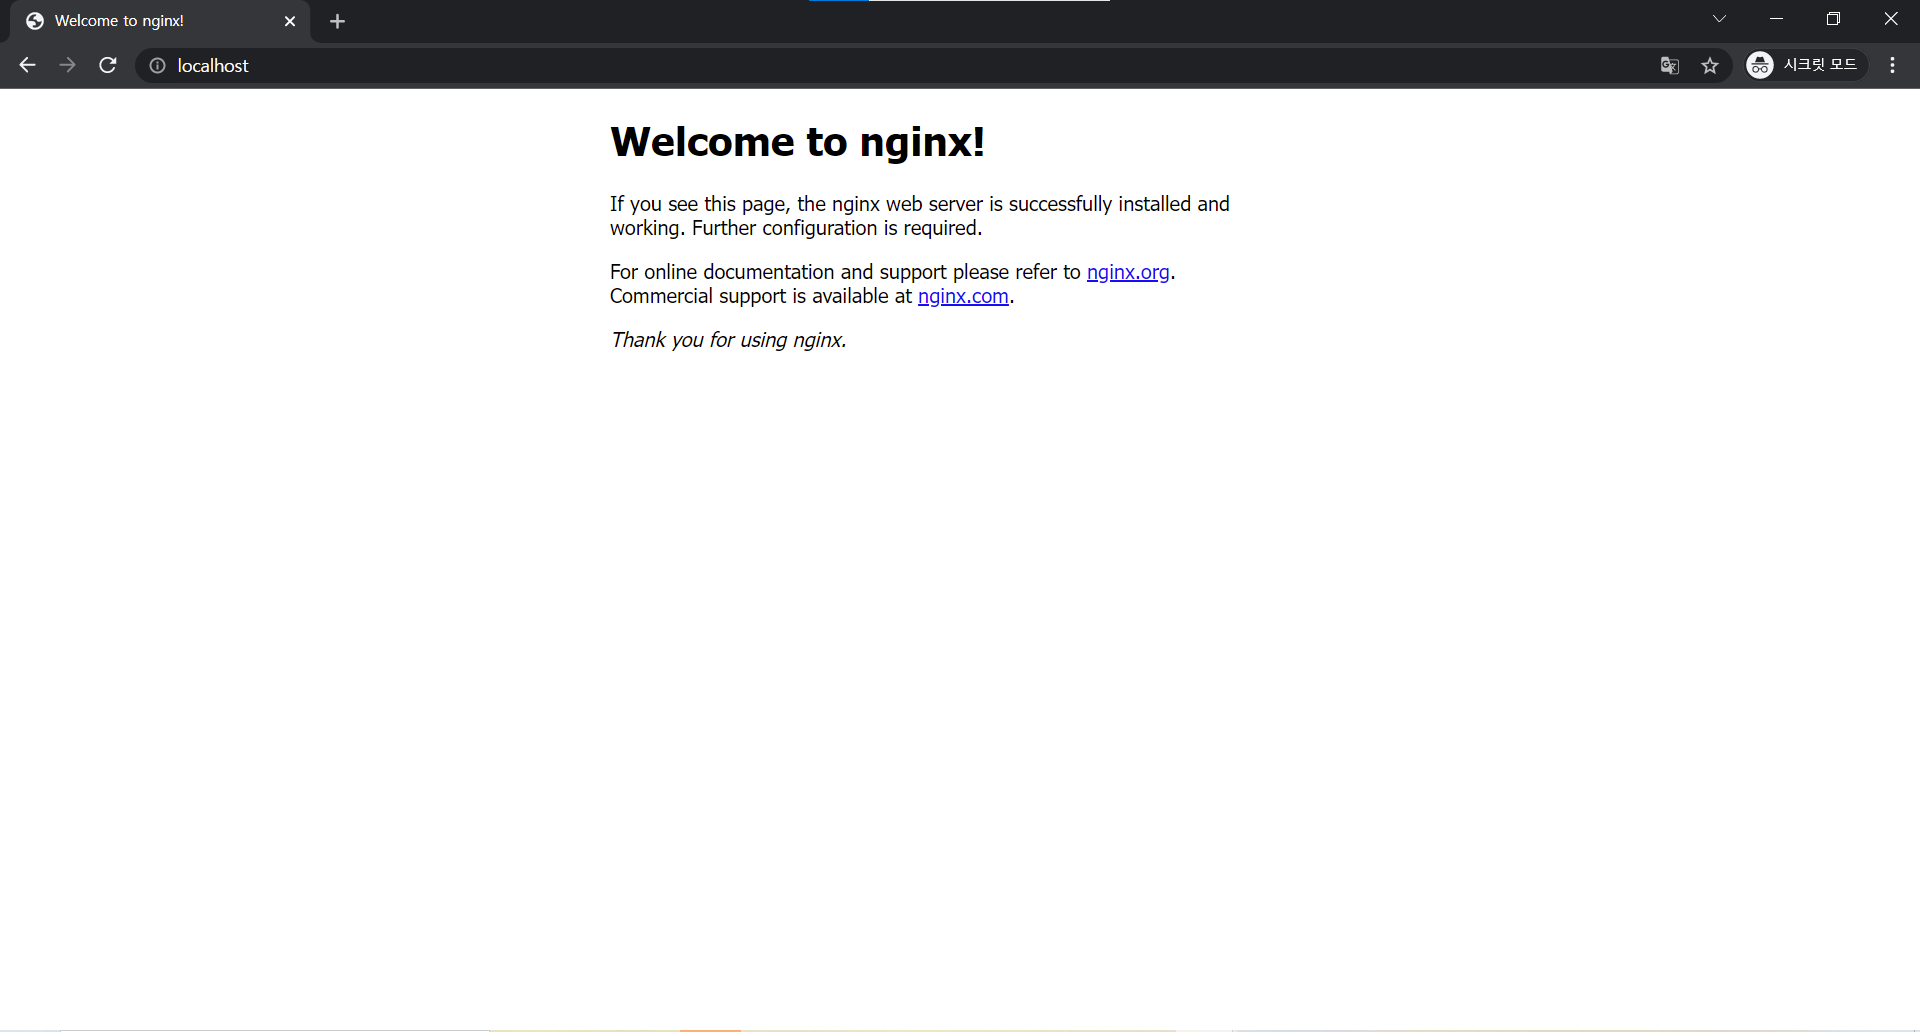
Cluster 삭제(Destroy)
실습을 마쳤다면 terraform destroy 명령을 통해 리소스를 삭제한다.
하지만 다음과 같이 정상적으로 삭제되지 않을 것이다. 그 이유는 NAT Gateway의 경우 직접 추가하였기 때문에, Terraform으로 삭제할 경우 VPC가 정상적으로 삭제되지 않는다. NAT Gateway, Route Tables는 콘솔에서 직접 삭제 후 VPC 삭제해야 한다.
- terraform destroy
terraform destroy -auto-approve
ncloud_vpc.vpc: Refreshing state... [id=16241]
ncloud_login_key.loginkey: Refreshing state... [id=my-key]
ncloud_subnet.lb_subnet: Refreshing state... [id=32075]
ncloud_subnet.node_subnet: Refreshing state... [id=32076]
ncloud_nks_cluster.cluster: Refreshing state... [id=b6510323-da50-4f3e-a093-a6111d04a268]
ncloud_nks_node_pool.node_pool: Refreshing state... [id=b6510323-da50-4f3e-a093-a6111d04a268:pool1]

Note: Objects have changed outside of Terraform

Terraform detected the following changes made outside of Terraform since the last "terraform apply":

  # ncloud_nks_node_pool.node_pool has been changed
  ~ resource "ncloud_nks_node_pool" "node_pool" {
        id             = "b6510323-da50-4f3e-a093-a6111d04a268:pool1"
      ~ node_count     = 1 -> 2
        # (6 unchanged attributes hidden)

        # (1 unchanged block hidden)
    }

Unless you have made equivalent changes to your configuration, or ignored the relevant attributes using ignore_changes, the following plan may include actions to undo or respond to these
changes.

───────────────────────────────────────────────────────────────────────────────────────────────────────────────────────────────────────────────────────────────────────────────────────────

Terraform used the selected providers to generate the following execution plan. Resource actions are indicated with the following symbols:
  - destroy

Terraform will perform the following actions:

  # ncloud_login_key.loginkey will be destroyed
  - resource "ncloud_login_key" "loginkey" {
      - fingerprint = "96:53:da:74:63:69:8d:23:ae:a7:dc:d0:4e:ae:2a:46" -> null
      - id          = "my-key" -> null
      - key_name    = "my-key" -> null
      - private_key = (sensitive value)
    }

  # ncloud_nks_cluster.cluster will be destroyed
  - resource "ncloud_nks_cluster" "cluster" {
      - cluster_type         = "SVR.VNKS.STAND.C002.M008.NET.SSD.B050.G002" -> null
      - endpoint             = "https://b6510323-da50-4f3e-a093-a6111d04a268.kr.vnks.ntruss.com" -> null
      - id                   = "b6510323-da50-4f3e-a093-a6111d04a268" -> null
      - k8s_version          = "1.20.13-nks.1" -> null
      - kube_network_plugin  = "cilium" -> null
      - lb_private_subnet_no = "32075" -> null
      - login_key_name       = "my-key" -> null
      - name                 = "sample-cluster" -> null
      - subnet_no_list       = [
          - "32076",
        ] -> null
      - uuid                 = "b6510323-da50-4f3e-a093-a6111d04a268" -> null
      - vpc_no               = "16241" -> null
      - zone                 = "KR-1" -> null

      - log {
          - audit = true -> null
        }
    }

  # ncloud_nks_node_pool.node_pool will be destroyed
  - resource "ncloud_nks_node_pool" "node_pool" {
      - cluster_uuid   = "b6510323-da50-4f3e-a093-a6111d04a268" -> null
      - id             = "b6510323-da50-4f3e-a093-a6111d04a268:pool1" -> null
      - instance_no    = "9500424" -> null
      - k8s_version    = "1.20.13" -> null
      - node_count     = 2 -> null
      - node_pool_name = "pool1" -> null
      - product_code   = "SVR.VSVR.STAND.C002.M008.NET.SSD.B050.G002" -> null
      - subnet_no      = "32076" -> null

      - autoscale {
          - enabled = true -> null
          - max     = 2 -> null
          - min     = 1 -> null
        }
    }

  # ncloud_subnet.lb_subnet will be destroyed
  - resource "ncloud_subnet" "lb_subnet" {
      - id             = "32075" -> null
      - name           = "lb-subnet" -> null
      - network_acl_no = "23482" -> null
      - subnet         = "10.0.100.0/24" -> null
      - subnet_no      = "32075" -> null
      - subnet_type    = "PRIVATE" -> null
      - usage_type     = "LOADB" -> null
      - vpc_no         = "16241" -> null
      - zone           = "KR-1" -> null
    }

  # ncloud_subnet.node_subnet will be destroyed
  - resource "ncloud_subnet" "node_subnet" {
      - id             = "32076" -> null
      - name           = "node-subnet" -> null
      - network_acl_no = "23482" -> null
      - subnet         = "10.0.1.0/24" -> null
      - subnet_no      = "32076" -> null
      - subnet_type    = "PRIVATE" -> null
      - usage_type     = "GEN" -> null
      - vpc_no         = "16241" -> null
      - zone           = "KR-1" -> null
    }

  # ncloud_vpc.vpc will be destroyed
  - resource "ncloud_vpc" "vpc" {
      - default_access_control_group_no = "33799" -> null
      - default_network_acl_no          = "23482" -> null
      - default_private_route_table_no  = "31504" -> null
      - default_public_route_table_no   = "31503" -> null
      - id                              = "16241" -> null
      - ipv4_cidr_block                 = "10.0.0.0/16" -> null
      - name                            = "vpc" -> null
      - vpc_no                          = "16241" -> null
    }

Plan: 0 to add, 0 to change, 6 to destroy.
ncloud_nks_node_pool.node_pool: Destroying... [id=b6510323-da50-4f3e-a093-a6111d04a268:pool1]
ncloud_nks_node_pool.node_pool: Still destroying... [id=b6510323-da50-4f3e-a093-a6111d04a268:pool1, 10s elapsed]
...
da50-4f3e-a093-a6111d04a268:pool1, 3m50s elapsed]
ncloud_nks_node_pool.node_pool: Destruction complete after 3m57s
ncloud_nks_cluster.cluster: Destroying... [id=b6510323-da50-4f3e-a093-a6111d04a268]
ncloud_nks_cluster.cluster: Still destroying... [id=b6510323-da50-4f3e-a093-a6111d04a268, 10s elapsed]
...
ncloud_nks_cluster.cluster: Still destroying... [id=b6510323-da50-4f3e-a093-a6111d04a268, 2m10s elapsed]
ncloud_nks_cluster.cluster: Destruction complete after 2m15s
ncloud_subnet.lb_subnet: Destroying... [id=32075]
ncloud_login_key.loginkey: Destroying... [id=my-key]
ncloud_subnet.node_subnet: Destroying... [id=32076]
ncloud_login_key.loginkey: Destruction complete after 4s
ncloud_subnet.lb_subnet: Still destroying... [id=32075, 10s elapsed]
ncloud_subnet.node_subnet: Still destroying... [id=32076, 10s elapsed]
ncloud_subnet.lb_subnet: Destruction complete after 13s
ncloud_subnet.node_subnet: Still destroying... [id=32076, 20s elapsed]
ncloud_subnet.node_subnet: Destruction complete after 23s
ncloud_vpc.vpc: Destroying... [id=16241]
╷
│ Error: Status: 400 Bad Request, Body: {"responseError": {
│   "returnCode": "1000036",
│   "returnMessage": "You cannot delete all endpoints because they have not been returned."
│ }}
본 글에서는 NKS 클러스터가 완전히 생성/삭제가 되지 않아 아쉬움이 많았다.
다음 글에서는 NAT Gateway도 함께 생성되도록 .tf 파일을 수정 후 업데이트 하도록 하겠다.👋
