0. 개요
[네이버클라우드] Terraform을 활용한 NKS 배포 - 1편에서 부족했던 Terraform 파일을 수정하여 자동으로 배포/삭제 하는 방법을 소개한다.
그리고 Naver Cloud에서 제공하는 기본 샘플 및 재미있는 샘플을 활용하여 Ingress(ALB) 및 LoadBalancer(NLB)을 연동하는 핸즈온도 함께 해보려 한다.
📢 참고 : 수정된 NKS Terraform 소스코드는 여기서 받을 수 있디.
1. Terraform 배포
기존 main.tf 파일에서 NAT Gateway를 자동으로 추가할 수 있도록 수정한다.
Terraform 배포 전 사전준비
1편에서 작성한 .tf파일에서 NAT-Gateway와 Route Table을 추가하였다. 참고
NAT Gateway를 생성해주고 Route Table은 기본으로 생성되는 default_private_route_table_no에 target_type = NATGW, destination_cidr_block = 0.0.0.0/0을 입력해준다.
- main.tf
resource "ncloud_vpc" "vpc" {
  name            = "vpc"
  ipv4_cidr_block = "10.0.0.0/16"
}

# NAT Gateway
resource "ncloud_nat_gateway" "nat_gateway" {
  vpc_no = ncloud_vpc.vpc.id
  zone   = "KR-2"
  name        = "nat-gw"
  description = "NATGW"
}

# Route Table
resource "ncloud_route" "foo" {
  route_table_no         = ncloud_vpc.vpc.default_private_route_table_no
  destination_cidr_block = "0.0.0.0/0"
  target_type            = "NATGW"
  target_name            = ncloud_nat_gateway.nat_gateway.name
  target_no              = ncloud_nat_gateway.nat_gateway.id
}
💡 참고 : 별도의 Route Table을 생성하려 했으나 정상적으로 반영이 되지않아
default_private_route_table_no에 NATGW을 추가하는 형식으로 작업하였다.
배포
지난 글에서 실행한 것과 동일하게 terraform apply 명령으로 배포해보자.
terraform apply -auto-approve실행
terraform apply -auto-approve

Terraform used the selected providers to generate the following execution plan. Resource actions are indicated with
the following symbols:
  + create

Terraform will perform the following actions:

  # ncloud_login_key.loginkey will be created
  + resource "ncloud_login_key" "loginkey" {
      + fingerprint = (known after apply)
      + id          = (known after apply)
      + key_name    = "my-key"
      + private_key = (sensitive value)
    }

  # ncloud_nat_gateway.nat_gateway will be created
  + resource "ncloud_nat_gateway" "nat_gateway" {
      + description    = "NATGW"
      + id             = (known after apply)
      + name           = "nat-gw"
      + nat_gateway_no = (known after apply)
      + public_ip      = (known after apply)
      + vpc_no         = (known after apply)
      + zone           = "KR-2"
    }

  # ncloud_nks_cluster.cluster will be created
  + resource "ncloud_nks_cluster" "cluster" {
      + cluster_type         = "SVR.VNKS.STAND.C002.M008.NET.SSD.B050.G002"
      + endpoint             = (known after apply)
      + id                   = (known after apply)
      + k8s_version          = "1.20.13-nks.1"
      + kube_network_plugin  = "cilium"
      + lb_private_subnet_no = (known after apply)
      + login_key_name       = "my-key"
      + name                 = "sample-cluster"
      + subnet_no_list       = (known after apply)
      + uuid                 = (known after apply)
      + vpc_no               = (known after apply)
      + zone                 = "KR-2"

      + log {
          + audit = true
        }
    }

  # ncloud_nks_node_pool.node_pool will be created
  + resource "ncloud_nks_node_pool" "node_pool" {
      + cluster_uuid   = (known after apply)
      + id             = (known after apply)
      + instance_no    = (known after apply)
      + k8s_version    = (known after apply)
      + node_count     = 2
      + node_pool_name = "pool1"
      + product_code   = "SVR.VSVR.STAND.C002.M008.NET.SSD.B050.G002"
      + subnet_no      = (known after apply)

      + autoscale {
          + enabled = true
          + max     = 3
          + min     = 2
        }
    }

  # ncloud_route.foo will be created
  + resource "ncloud_route" "foo" {
      + destination_cidr_block = "0.0.0.0/0"
      + id                     = (known after apply)
      + is_default             = (known after apply)
      + route_table_no         = (known after apply)
      + target_name            = "nat-gw"
      + target_no              = (known after apply)
      + target_type            = "NATGW"
      + vpc_no                 = (known after apply)
    }

  # ncloud_subnet.lb_subnet will be created
  + resource "ncloud_subnet" "lb_subnet" {
      + id             = (known after apply)
      + name           = "lb-subnet"
      + network_acl_no = (known after apply)
      + subnet         = "10.0.100.0/24"
      + subnet_no      = (known after apply)
      + subnet_type    = "PRIVATE"
      + usage_type     = "LOADB"
      + vpc_no         = (known after apply)
      + zone           = "KR-2"
    }

  # ncloud_subnet.node_subnet will be created
  + resource "ncloud_subnet" "node_subnet" {
      + id             = (known after apply)
      + name           = "node-subnet"
      + network_acl_no = (known after apply)
      + subnet         = "10.0.1.0/24"
      + subnet_no      = (known after apply)
      + subnet_type    = "PRIVATE"
      + usage_type     = "GEN"
      + vpc_no         = (known after apply)
      + zone           = "KR-2"
    }

  # ncloud_vpc.vpc will be created
  + resource "ncloud_vpc" "vpc" {
      + default_access_control_group_no = (known after apply)
      + default_network_acl_no          = (known after apply)
      + default_private_route_table_no  = (known after apply)
      + default_public_route_table_no   = (known after apply)
      + id                              = (known after apply)
      + ipv4_cidr_block                 = "10.0.0.0/16"
      + name                            = "vpc"
      + vpc_no                          = (known after apply)
    }

Plan: 8 to add, 0 to change, 0 to destroy.
ncloud_vpc.vpc: Creating...
ncloud_login_key.loginkey: Creating...
ncloud_login_key.loginkey: Creation complete after 1s [id=my-key]
ncloud_vpc.vpc: Still creating... [10s elapsed]
ncloud_vpc.vpc: Creation complete after 12s [id=17327]
ncloud_subnet.node_subnet: Creating...
ncloud_nat_gateway.nat_gateway: Creating...
ncloud_subnet.lb_subnet: Creating...
ncloud_nat_gateway.nat_gateway: Still creating... [10s elapsed]
ncloud_subnet.lb_subnet: Still creating... [10s elapsed]
ncloud_subnet.node_subnet: Still creating... [10s elapsed]
ncloud_nat_gateway.nat_gateway: Creation complete after 11s [id=10062380]
ncloud_route.foo: Creating...
ncloud_subnet.node_subnet: Creation complete after 11s [id=35126]
ncloud_subnet.lb_subnet: Still creating... [20s elapsed]
ncloud_route.foo: Still creating... [10s elapsed]
ncloud_subnet.lb_subnet: Creation complete after 21s [id=35127]
ncloud_nks_cluster.cluster: Creating...
ncloud_route.foo: Creation complete after 17s [id=route-3275456290]
ncloud_nks_cluster.cluster: Still creating... [10s elapsed]
ncloud_nks_cluster.cluster: Still creating... [20s elapsed]
...
ncloud_nks_node_pool.node_pool: Still creating... [9m50s elapsed]
ncloud_nks_node_pool.node_pool: Still creating... [10m0s elapsed]
ncloud_nks_node_pool.node_pool: Still creating... [10m10s elapsed]
ncloud_nks_node_pool.node_pool: Still creating... [10m20s elapsed]
ncloud_nks_node_pool.node_pool: Still creating... [10m30s elapsed]
ncloud_nks_node_pool.node_pool: Still creating... [10m40s elapsed]
ncloud_nks_node_pool.node_pool: Creation complete after 10m44s [id=a2041e29-9b80-4d65-8e57-8d2733970508:pool1]

Apply complete! Resources: 8 added, 0 changed, 0 destroyed.
배포 리소스 확인1
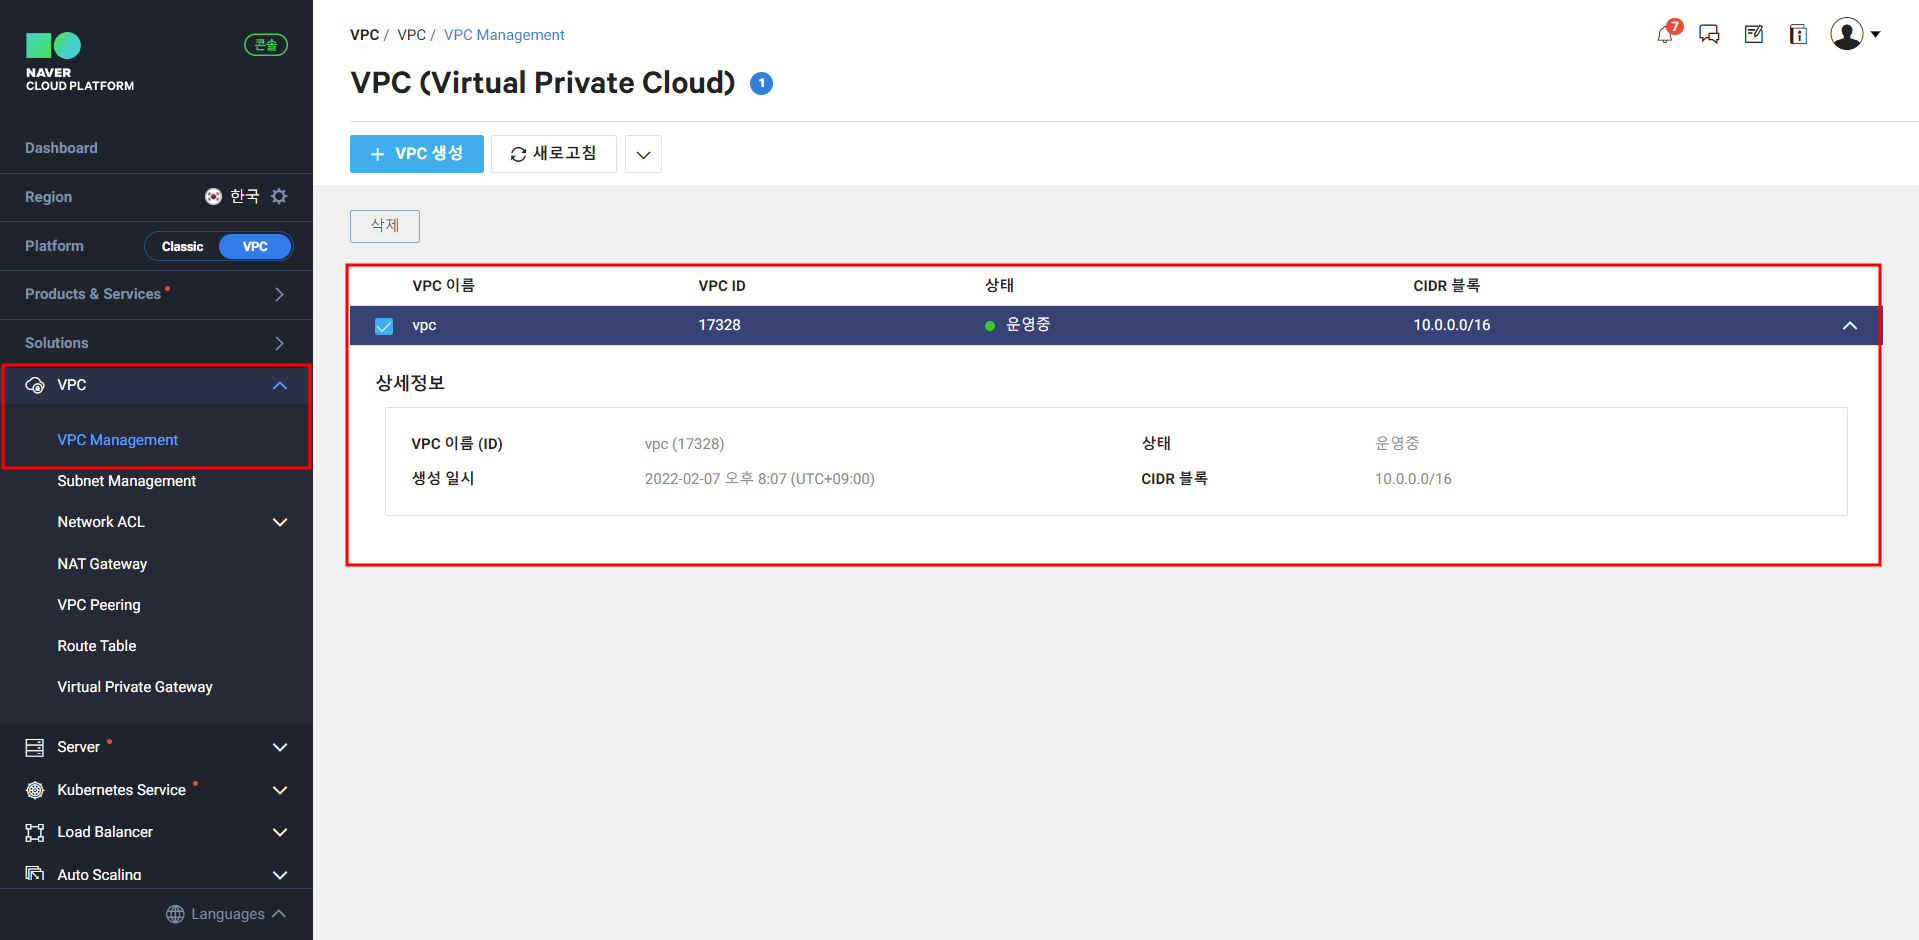
- VPC 확인
기본으로 정의한 10.0.0.0/16 대역의 VPC가 생성된 것을 확인할 수 있다.
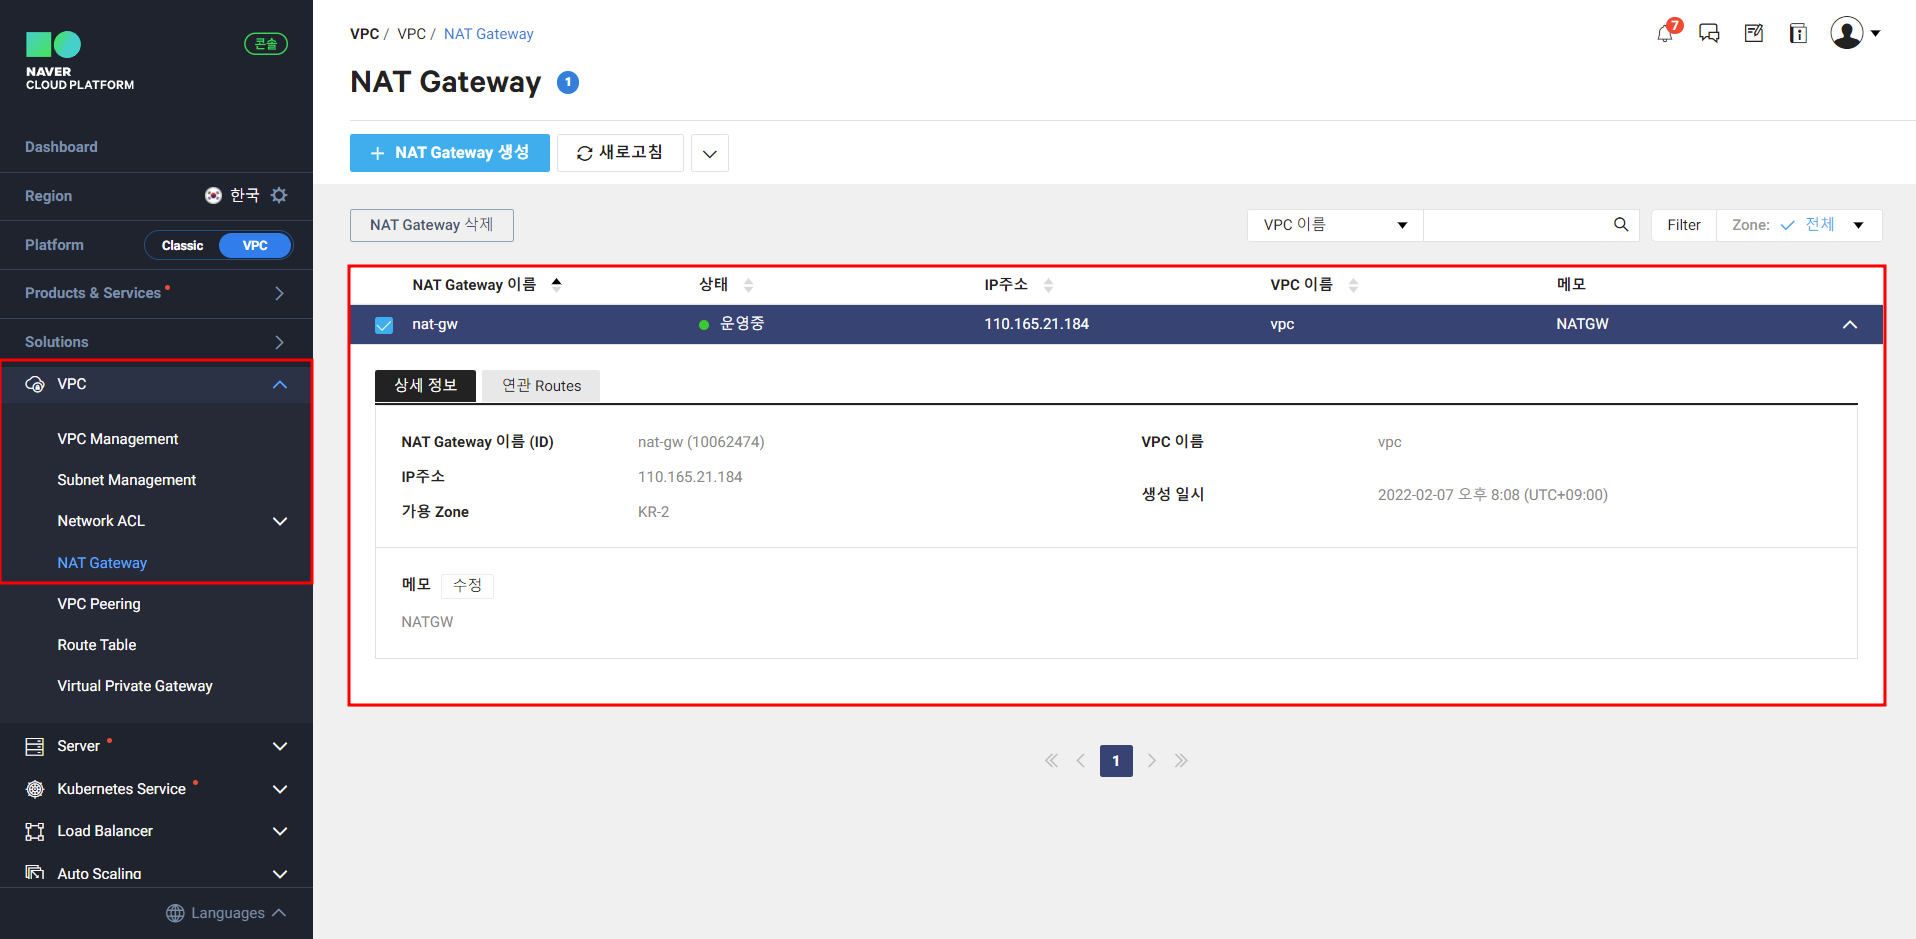
- NAT Gateway 확인
금번 main.tf에 추가한 NAT Gateway가 정상적으로 생성된 것을 확인한다.
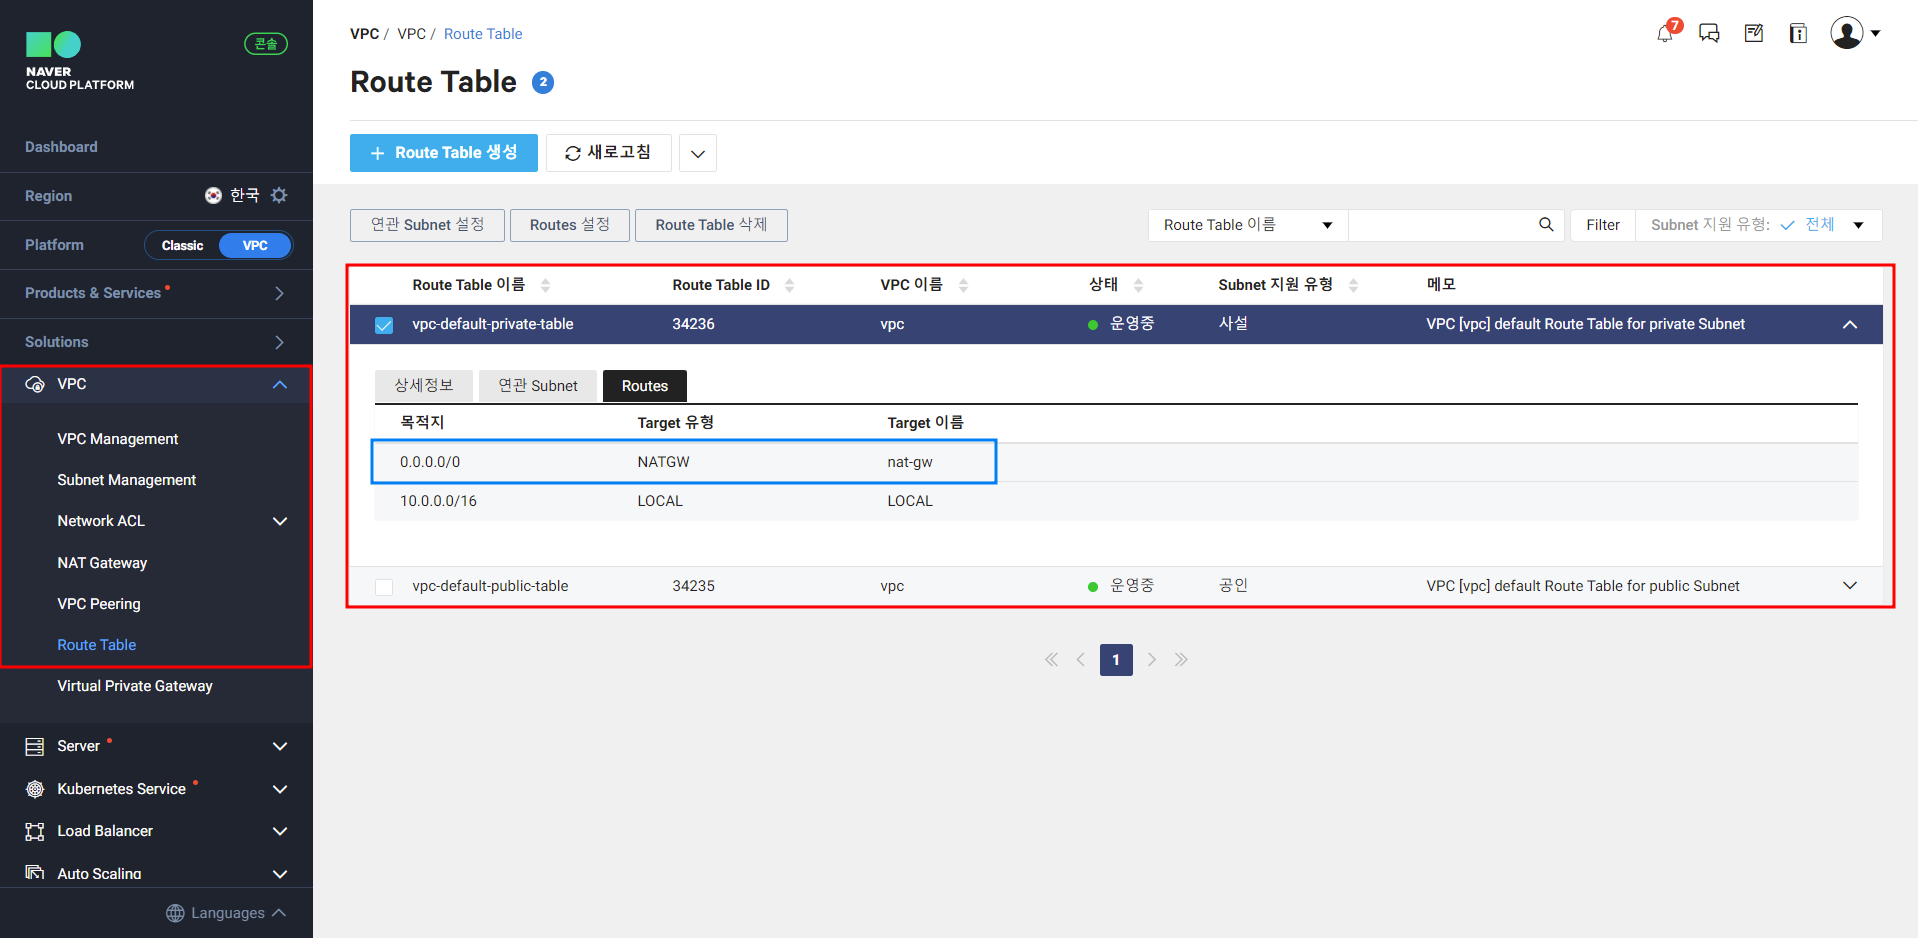
- Route Table 확인
Route Table 역시 목적지 0.0.0.0/0, Target유형 NATGW로 정상작으로 생성된 것으로 확인된다.
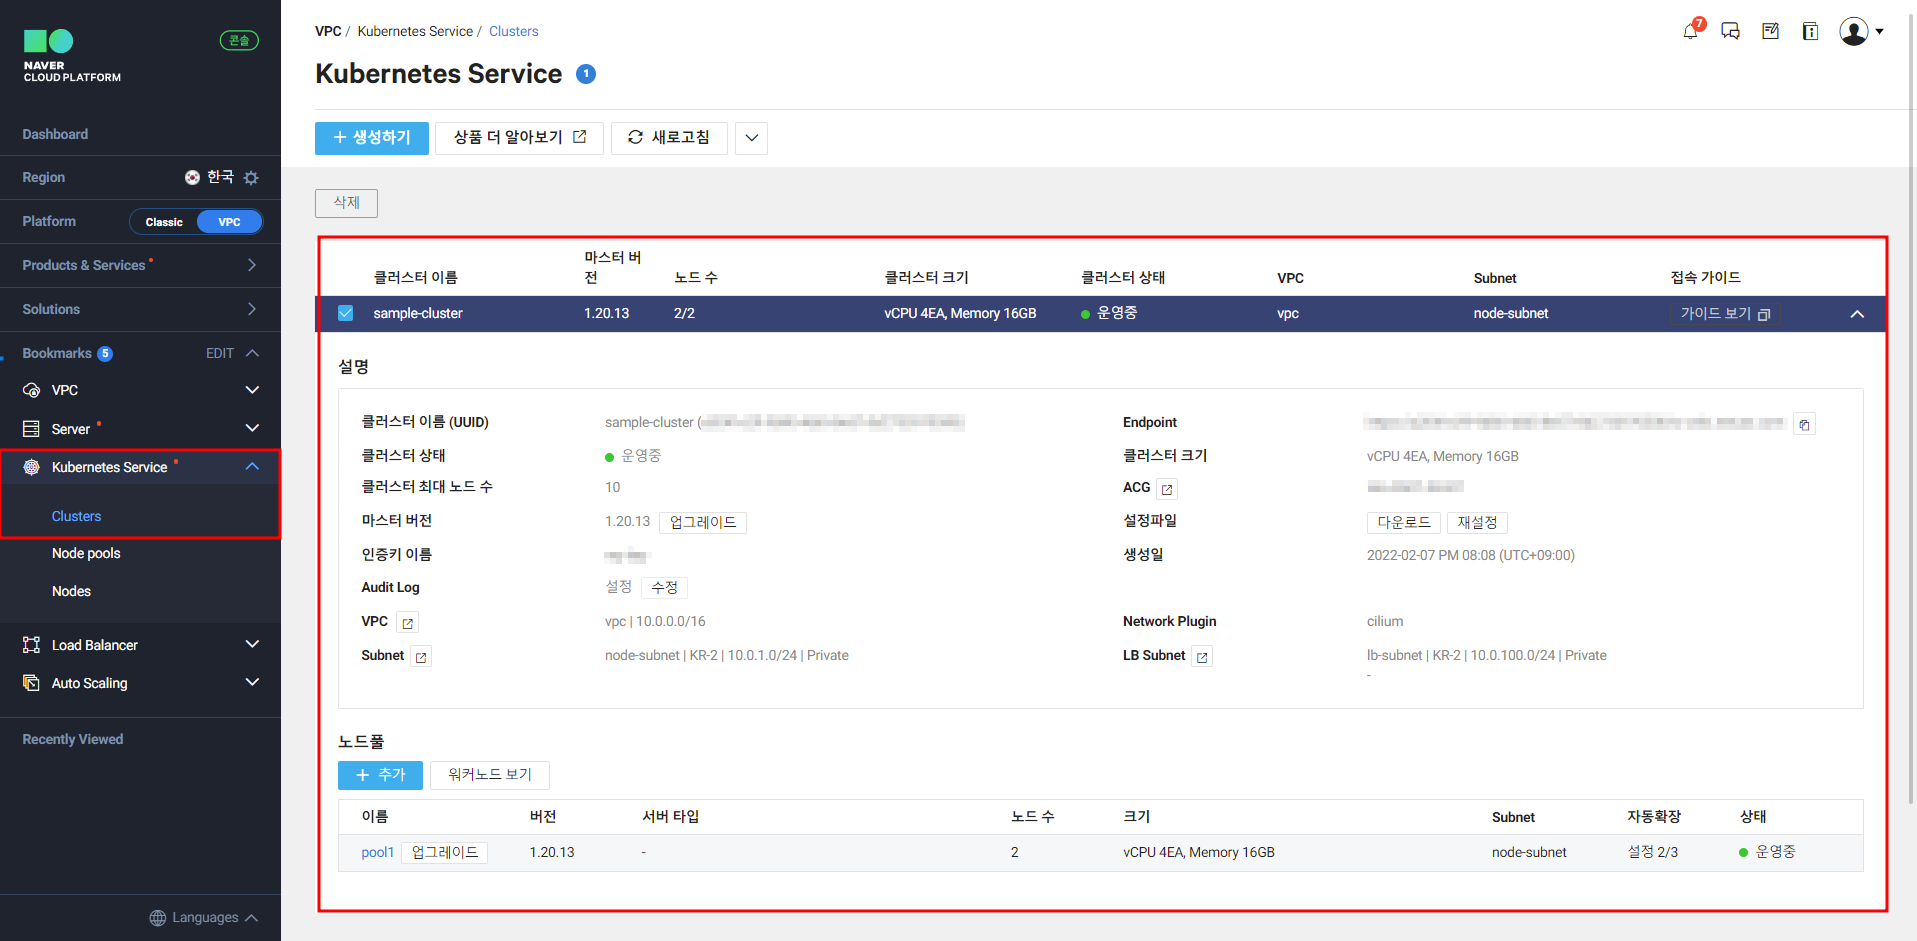
- NKS Cluster 확인
시간이 좀 오래걸리긴 하지만 NKS Cluster도 정상적으로 생성된 것으로 확인이 된다. 사실 10번정도 실패하고 나서 성공했다
🔥 참고 : Terraform으로 배포한 이후에는 Ctrl + C(SIGINT)는 누르지 말고 기다리랄는 교훈을 얻을 수 있었다.
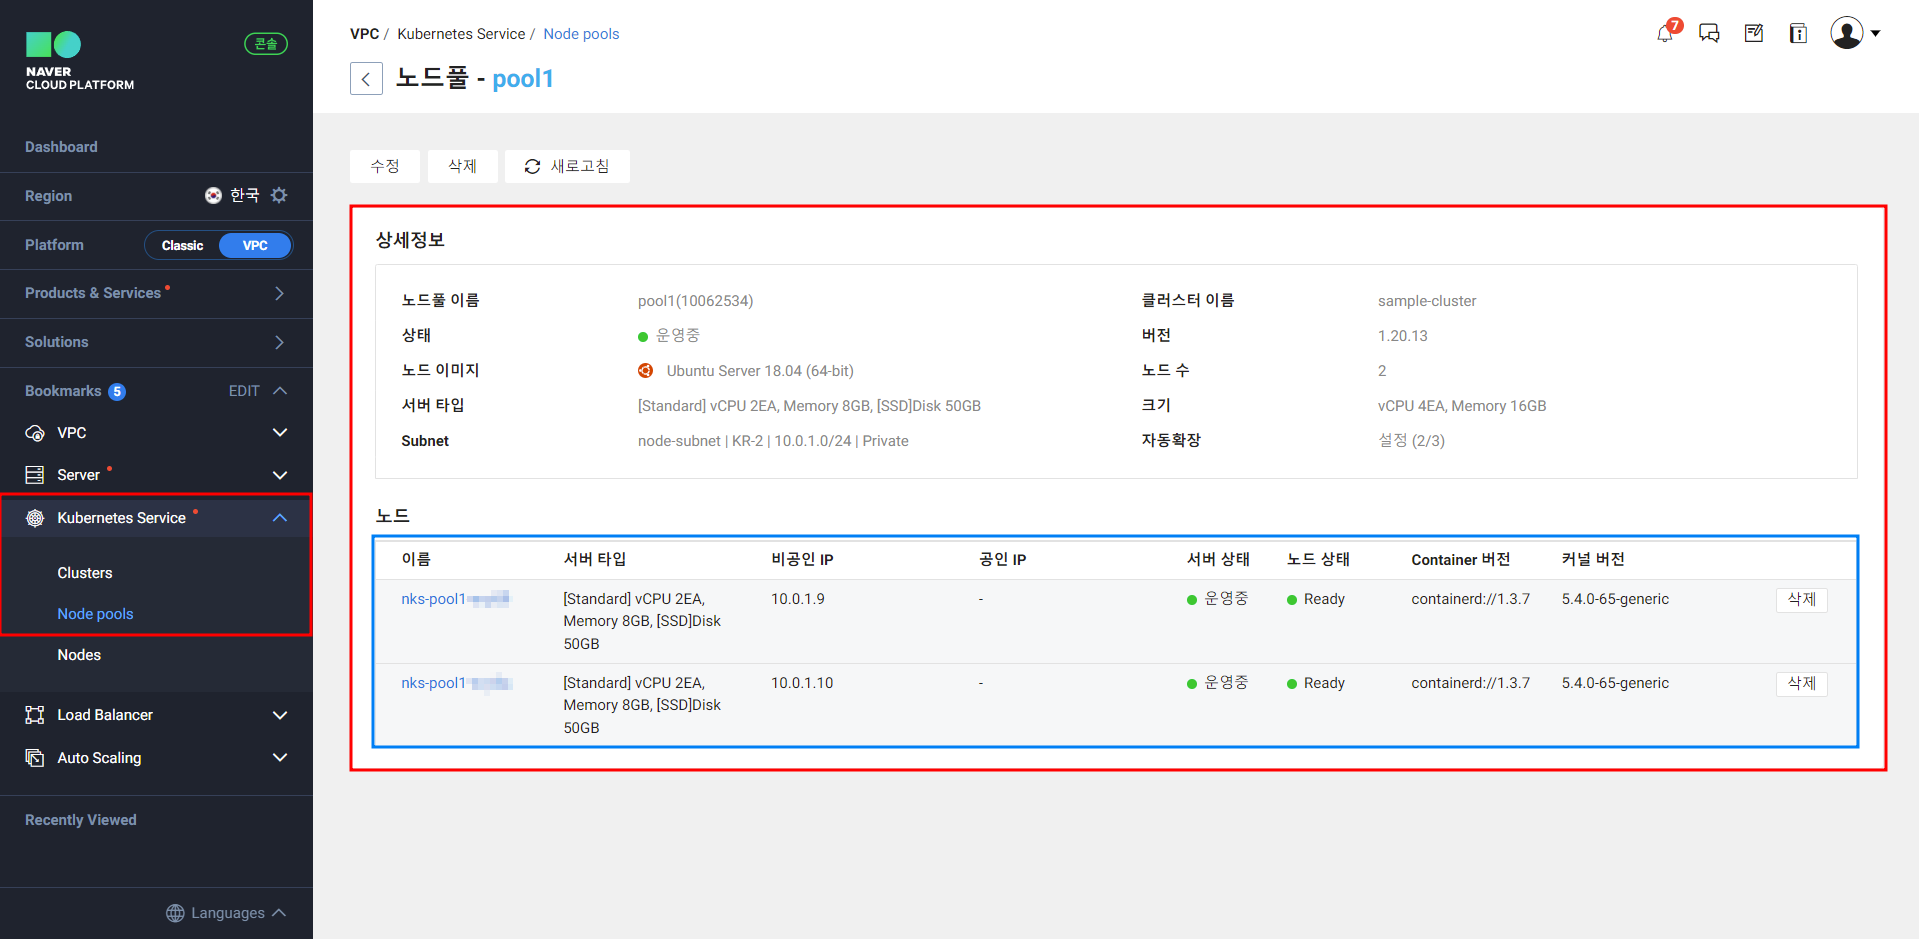
- NKS 노드풀 확인
기본 2개로 설정한 노드풀도 정상적으로 생성된 것을 확인할 수 있다.
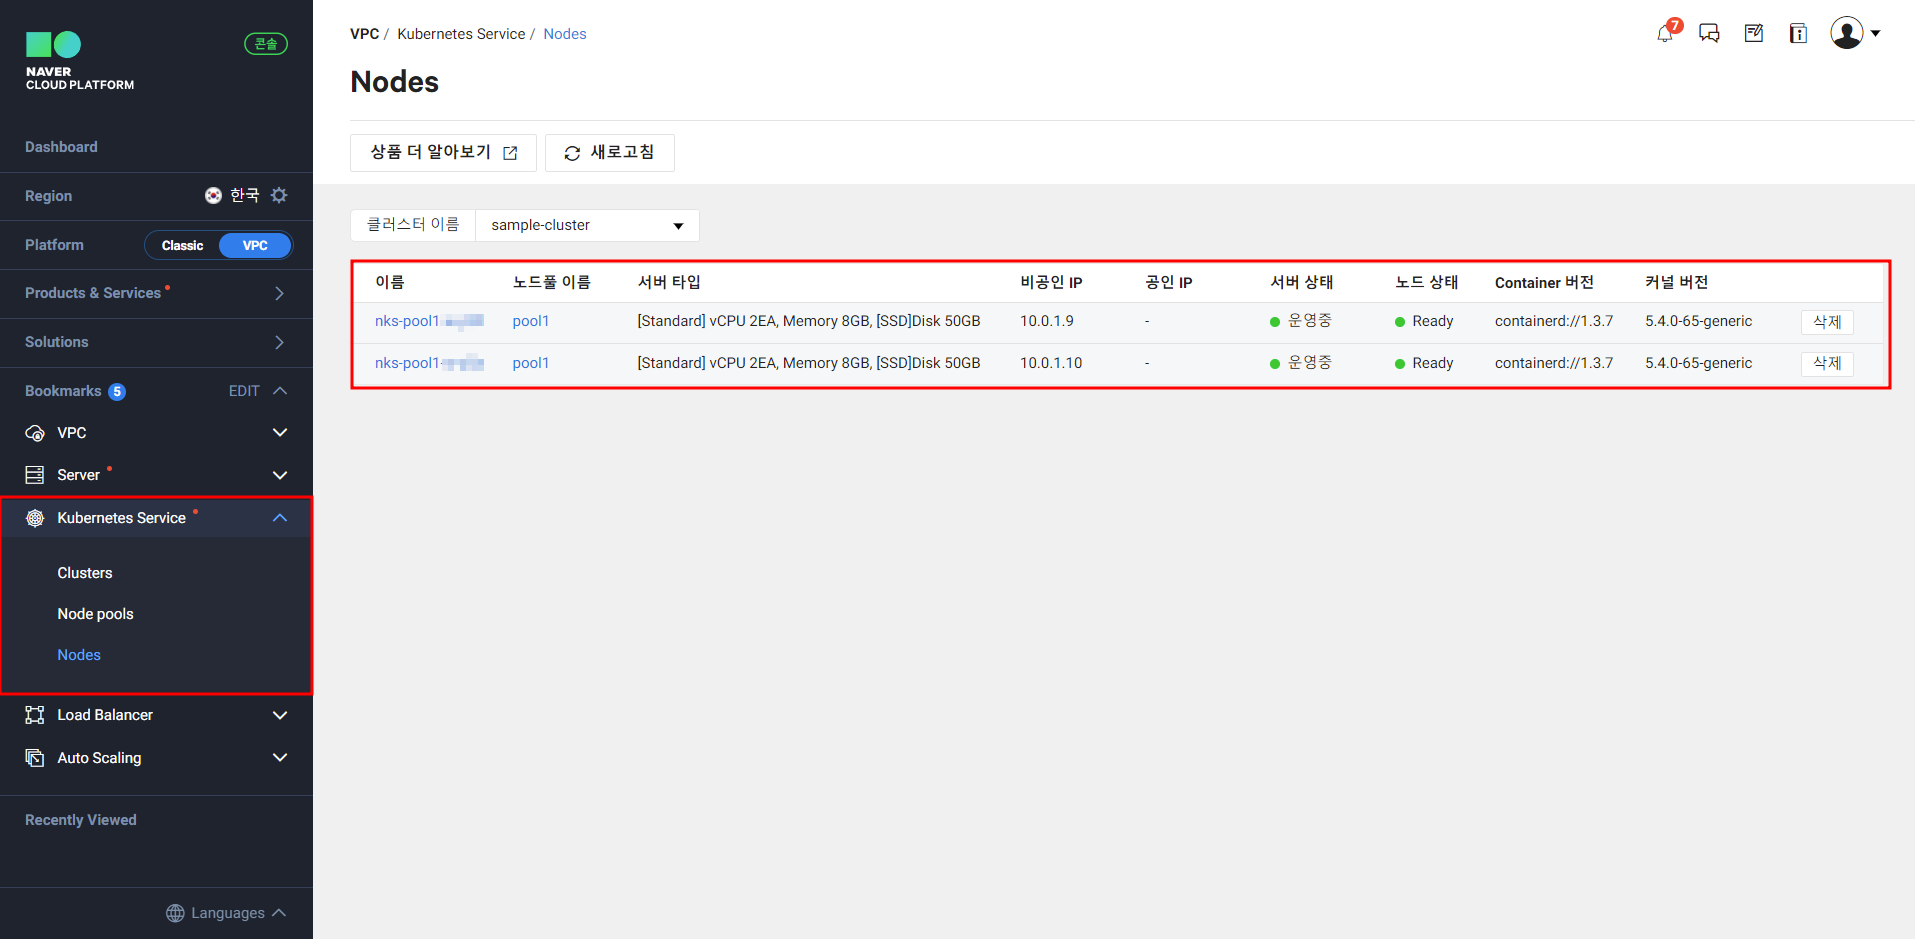
- NKS Nodes 확인
노드풀에서 확인하였지만 실제 NKS Nodes가 잘 생성된 것 까지 확인하였다.
배포 리소스 확인2
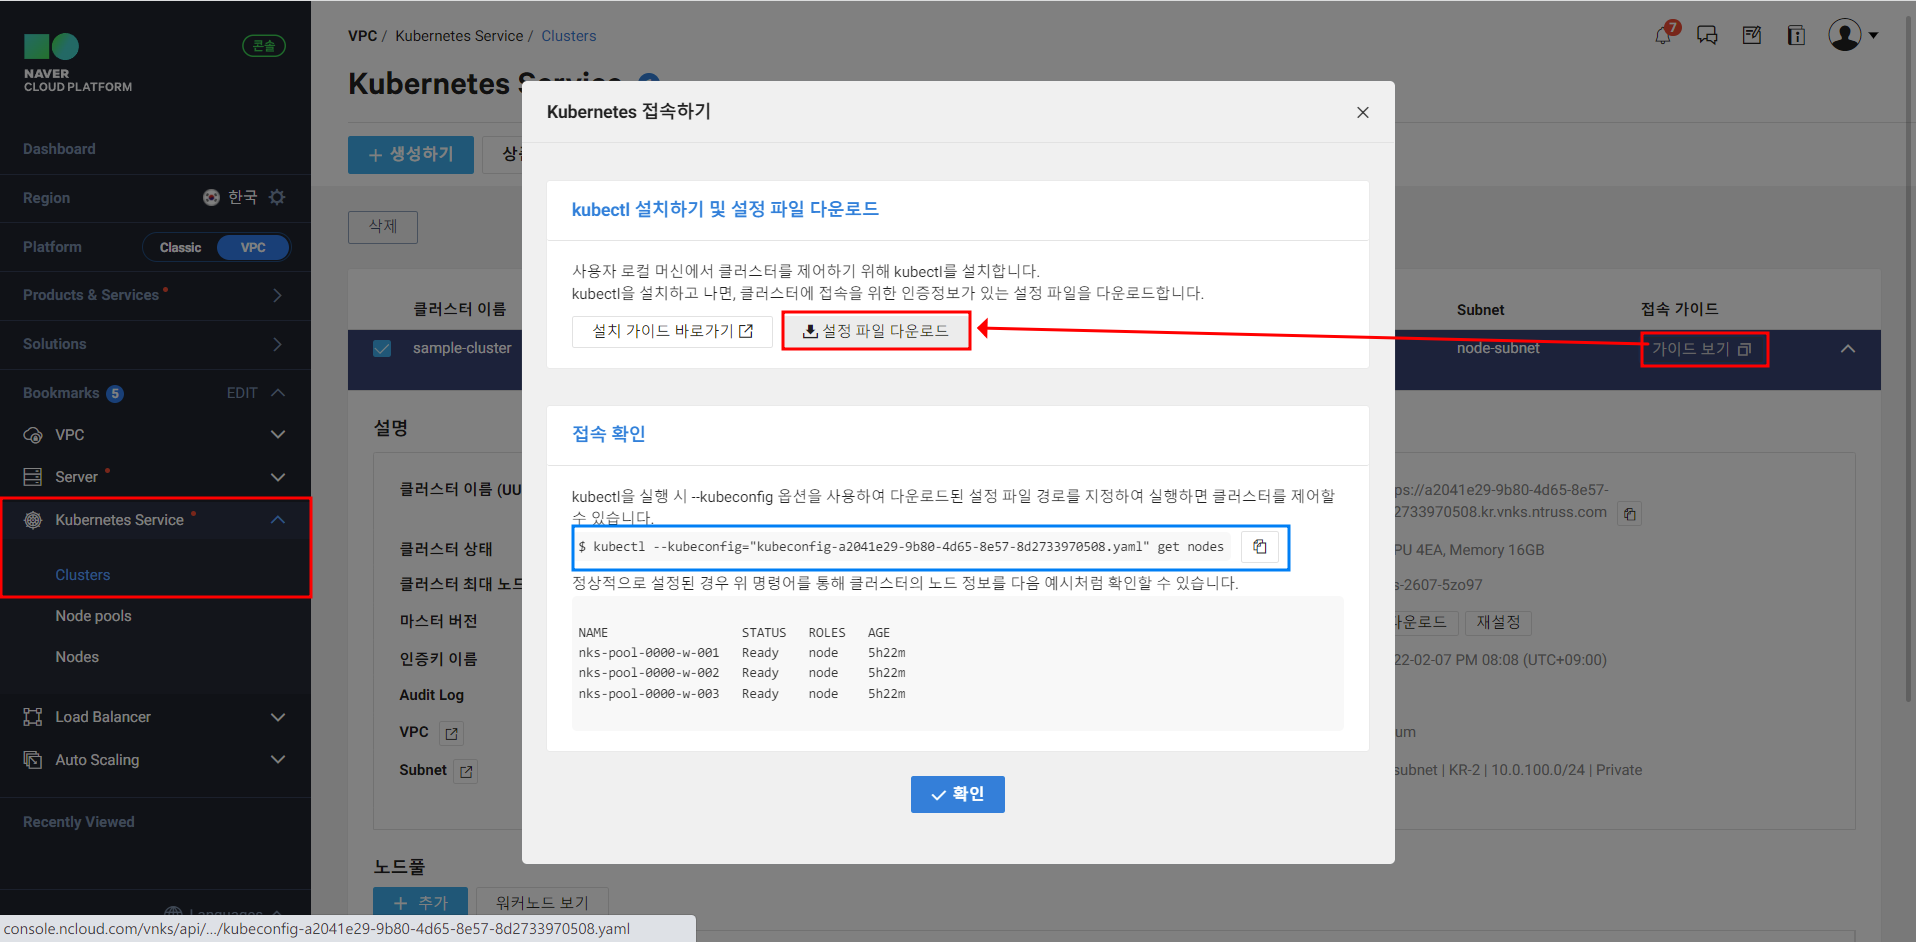
이번에는 kubeconfig 파일을 다운받아서 실제로 NKS 클러스터가 구성되었는지 명령으로 확인해보려 한다.
-
[Kubernetes Service] - [Clusters] - [가이드 보기] - [설정 파일 다운로드] 클릭하면 config.yaml파일을 받을 수 있다.
-
kubectl get node명령으로 노드목록을 확인해보자
k get nodes -o wide --kubeconfig kubeconfig-a2041e29-9b80-4d65-8e57-8d2733970508.yaml
NAME              STATUS   ROLES    AGE   VERSION    INTERNAL-IP   EXTERNAL-IP   OS-IMAGE             KERNEL-VERSION     CONTAINER-RUNTIME
nks-pool1-w-y59   Ready    <none>   17m   v1.20.13   10.0.1.9      <none>        Ubuntu 18.04.5 LTS   5.4.0-65-generic   containerd://1.3.7
nks-pool1-w-y5a   Ready    <none>   18m   v1.20.13   10.0.1.10     <none>        Ubuntu 18.04.5 LTS   5.4.0-65-generic   containerd://1.3.7
kubectl get pod명령으로 파드목록 확인해보자
k get pods -A -o wide --kubeconfig kubeconfig-a2041e29-9b80-4d65-8e57-8d2733970508.yaml
NAMESPACE     NAME                                     READY   STATUS    RESTARTS   AGE   IP             NODE              NOMINATED NODE   READINESS GATES
kube-system   cilium-hx59r                             1/1     Running   0          18m   10.0.1.10      nks-pool1-w-y5a   <none>           <none>
kube-system   cilium-operator-69cdd7dbf6-6x7t2         1/1     Running   0          33m   10.0.1.10      nks-pool1-w-y5a   <none>           <none>
kube-system   cilium-operator-69cdd7dbf6-d2fx9         1/1     Running   0          33m   10.0.1.9       nks-pool1-w-y59   <none>           <none>
kube-system   cilium-qhjr2                             1/1     Running   0          18m   10.0.1.9       nks-pool1-w-y59   <none>           <none>
kube-system   coredns-59df7d9c57-52tks                 1/1     Running   0          32m   198.18.0.86    nks-pool1-w-y5a   <none>           <none>
kube-system   coredns-59df7d9c57-wpmdg                 1/1     Running   0          18m   198.18.1.214   nks-pool1-w-y59   <none>           <none>
kube-system   csi-nks-controller-6db7c56c6f-wvwkw      6/6     Running   0          32m   198.18.1.212   nks-pool1-w-y59   <none>           <none>
kube-system   csi-nks-node-t5zmq                       3/3     Running   0          18m   10.0.1.9       nks-pool1-w-y59   <none>           <none>
kube-system   csi-nks-node-zvgh7                       3/3     Running   0          18m   10.0.1.10      nks-pool1-w-y5a   <none>           <none>
kube-system   dns-autoscaler-58f4c9679-468tx           1/1     Running   0          32m   198.18.0.102   nks-pool1-w-y5a   <none>           <none>
kube-system   kube-proxy-4mf2q                         1/1     Running   0          18m   10.0.1.9       nks-pool1-w-y59   <none>           <none>
kube-system   kube-proxy-mvzvz                         1/1     Running   0          18m   10.0.1.10      nks-pool1-w-y5a   <none>           <none>
kube-system   ncloud-kubernetes-cnnwl                  1/1     Running   0          18m   198.18.1.205   nks-pool1-w-y59   <none>           <none>
kube-system   ncloud-kubernetes-hb46x                  1/1     Running   0          18m   198.18.0.131   nks-pool1-w-y5a   <none>           <none>
kube-system   nks-nas-csi-controller-7cbb68597-njxs8   4/4     Running   0          31m   10.0.1.10      nks-pool1-w-y5a   <none>           <none>
kube-system   nks-nas-csi-node-hm54h                   3/3     Running   0          18m   10.0.1.9       nks-pool1-w-y59   <none>           <none>
kube-system   nks-nas-csi-node-phrtd                   3/3     Running   0          18m   10.0.1.10      nks-pool1-w-y5a   <none>           <none>
kube-system   nodelocaldns-fsm5k                       1/1     Running   0          18m   10.0.1.10      nks-pool1-w-y5a   <none>           <none>
kube-system   nodelocaldns-zcnfz                       1/1     Running   0          18m   10.0.1.9       nks-pool1-w-y59   <none>           <none>
kube-system   snapshot-controller-0                    1/1     Running   0          32m   198.18.0.42    nks-pool1-w-y5a   <none>           <none>
kube-system   startup-script-5nk42                     1/1     Running   0          18m   10.0.1.9       nks-pool1-w-y59   <none>           <none>
kube-system   startup-script-6z46n                     1/1     Running   0          18m   10.0.1.10      nks-pool1-w-y5a   <none>           <none>
정상적으로 클러스터가 구성된 것을 확인할 수 있다.👍 클러스터가 정상적으로 구성되었으니 이제 샘플 애플리케이션을 배포해보자.📕
2. 샘플 애플리케이션을 활용한 Ingress 연동
📢 참고 : NCP ALB Ingress 샘플을 참고하여 배포하였다.
Deployment, SVC 배포
해당 샘플은 naver, cloud, platform 라고하는 앱을 배포해준다.
kubectl apply명령으로 샘플 소스코드 배포
kubectl --kubeconfig=$KUBE_CONFIG apply -f https://gist.githubusercontent.com/NaverCloudPlatformDeveloper/0e6262b996f74229719807cb5ae007fc/raw/3ce72e7961bc2407bfb87e153c94672e6ee6a1cf/nks-alb-ingress-sample-services.yaml

service/naver created
deployment.apps/naver created
service/cloud created
deployment.apps/cloud created
service/platform created
deployment.apps/platform created- Deployments와 SVC가 정상적으로 배포되었는지 확인한다.
# deployments, svc 확인
k get deploy,svc --kubeconfig=$KUBE_CONFIG
NAME                       READY   UP-TO-DATE   AVAILABLE   AGE
deployment.apps/cloud      1/1     1            1           15m
deployment.apps/naver      1/1     1            1           15m
deployment.apps/platform   1/1     1            1           15m

NAME                 TYPE        CLUSTER-IP       EXTERNAL-IP   PORT(S)        AGE
service/cloud        NodePort    198.19.228.59    <none>        80:32683/TCP   15m
service/kubernetes   ClusterIP   198.19.128.1     <none>        443/TCP        54m
service/naver        NodePort    198.19.182.20    <none>        80:31248/TCP   15m
service/platform     NodePort    198.19.237.111   <none>        80:32218/TCP   15m

# pod정보 확인
k get pods -o wide --kubeconfig kubeconfig-a2041e29-9b80-4d65-8e57-8d2733970508.yaml
NAME                        READY   STATUS    RESTARTS   AGE   IP             NODE              NOMINATED NODE   READINESS GATES
cloud-8569cb49bf-rggcm      1/1     Running   0          18m   198.18.0.116   nks-pool1-w-y5a   <none>           <none>
naver-7d855c949f-zbs9w      1/1     Running   0          18m   198.18.0.34    nks-pool1-w-y5a   <none>           <none>
platform-68754dccf9-sfbvm 1/1 Running 0 18m 198.18.0.49 nks-pool1-w-y5a <none> <none>- Ingress Controller 배포
ingress을 사용하기 위해서는 ingress controller가 필요하다. NaverCloud 환경에서는 ALB를 사용하여 Ingress Controller 구현체를 제공하고 있다.
kubectl --kubeconfig=$KUBE_CONFIG apply -f https://raw.githubusercontent.com/NaverCloudPlatform/nks-alb-ingress-controller/main/docs/install/pub/install.yaml

serviceaccount/alb-ingress-controller created
clusterrole.rbac.authorization.k8s.io/alb-ingress-controller created
clusterrolebinding.rbac.authorization.k8s.io/alb-ingress-controller created
deployment.apps/alb-ingress-controller created
📢 참고 : ingress 생성 전 ALB Ingress Controller 배포! ALB Ingress Controller 설치
이제 ALB기반의 Igress 리소스를 배포해보자.
Ingress을 배포할 때 유의할 점은 각종 annotations을 입력해주여야 한다. 기본적으로 ALB을 사용하기 때문에 ingress.class: alb라고 명시해주어야 한다. 그리고 이번 샘플 예제에서는 actions이라는 조건을 사용하는데 해당 부분은 아래와 같다.

- Ingress YAML 작성
apiVersion: extensions/v1beta1
kind: Ingress
metadata:
  name: sample-alb-ingress
  annotations:
    kubernetes.io/ingress.class: alb
    alb.ingress.kubernetes.io/listen-ports: '[{"HTTP": 80}]'
    alb.ingress.kubernetes.io/description: 'alb ingress controller'
    alb.ingress.kubernetes.io/actions.navercloud: >
      {"type":"targetGroup","targetGroup":{"targetGroups":[{"serviceName":"naver","servicePort":80,"weight":50},{"serviceName":"cloud","servicePort":80,"weight":50}]}}
  labels:
    app: sample-alb-ingress
spec:
  backend:
    serviceName: naver
    servicePort: 80
  rules:
    - http:
        paths:
          - path: /platform
            backend:
              serviceName: platform
              servicePort: 80
          - path: /navercloud
            backend:
              serviceName: navercloud
              servicePort: use-annotation
해당 인그레스의 Backend에 연결된 서비스는 platform과 navercloud이다. 여기서 serviceName: navercloud은 위에서 선언한 annotations을 참조한다.
간략하게 annotations 부분을 살펴보면 naver라는 서비스와 cloud라는 서비스에 가중치를 5:5로 부여하겠다는 의미이다.
- Ingress 배포
kubectl --kubeconfig=$KUBE_CONFIG apply -f ./ingress.yaml

Warning: extensions/v1beta1 Ingress is deprecated in v1.14+, unavailable in v1.22+; use networking.k8s.io/v1 Ingress
ingress.extensions/sample-alb-ingress created- Ingress 생성 확인
kubectl --kubeconfig=$KUBE_CONFIG get ingress
NAME                 CLASS    HOSTS   ADDRESS                                                                   PORTS   AGE
sample-alb-ingress   <none>   *       ing-default-samplealbing-99241-10062698-33ddcb743e64.kr.lb.naverncp.com   80      4m59s
통신 테스트
/navercloud: 여러 번 호출하여naver,cloudservice로 각각 라우팅되는지 확인해보자!
# naver pod가 호출된 것 확인
curl ing-default-samplealbing-99241-10062698-33ddcb743e64.kr.lb.naverncp.com/naverclou
d
Server address: 198.18.0.34:80
Server name: naver-7d855c949f-zbs9w
Date: 07/Feb/2022:12:16:57 +0000
URI: /navercloud
Request ID: a0e61f4535d3f937ed8a710a6170e79c

# cloud pod가 호출된 것 확인
curl ing-default-samplealbing-99241-10062698-33ddcb743e64.kr.lb.naverncp.com/navercloud
Server address: 198.18.0.116:80
Server name: cloud-8569cb49bf-rggcm
Date: 07/Feb/2022:12:17:26 +0000
URI: /navercloud
Request ID: 77abd4486959eb6ef210042fa57f265d
앞서 언급했던 것 처럼 5:5의 비율로 트래픽이 전달되는 것을 확인할 수 있다.
/platform: platform Service로 라우팅되는지 확인
# platform pod가 호출된 것 확인
curl ing-default-samplealbing-99241-10062698-33ddcb743e64.kr.lb.naverncp.com/platform
Server address: 198.18.0.49:80
Server name: platform-68754dccf9-sfbvm
Date: 07/Feb/2022:12:19:52 +0000
URI: /platform
Request ID: 392e77db860d09e5d0e1adf6673868b5
별도 annotations을 지정하지 않았던 platform의 경우에도 정상적으로 호출되는 것을 확인할 수 있었다.
ingress 및 deploy, svc 삭제
k delete --all deployments,svc,ingress --kubeconfig=$KUBE_CONFIG
deployment.apps "cloud" deleted
deployment.apps "naver" deleted
deployment.apps "platform" deleted
service "cloud" deleted
service "kubernetes" deleted
service "naver" deleted
service "platform" deleted
ingress.networking.k8s.io "sample-alb-ingress" deleted
실습한 리소스를 삭제하고 LoadBalancer 실습을 진행해보자.
3. 샘플 애플리케이션을 활용한 LoadBalancer 연동
mariao 게임을 배포하고 NKS를 활용해 외부에서 접속할 수 있는 환경을 구성해보려 한다.
Deployment, LoadBalancer SVC 배포
docker-supermario image를 Deployment로 배포하고 네트워크 로드 밸런서(NLB)생성을 위한 LoadBalancer 타입의 Service를 생성해보자
- Deployments, SVC YAML 작성
apiVersion: apps/v1
kind: Deployment
metadata:
  name: mario
  labels:
    app: mario
spec:
  replicas: 1
  selector:
    matchLabels:
      app: mario
  template:
    metadata:
      labels:
        app: mario
    spec:
      containers:
      - name: mario
        image: pengbai/docker-supermario
---
apiVersion: v1
kind: Service
metadata:
  name: mario
  annotations:
    service.beta.kubernetes.io/ncloud-load-balancer-layer-type: "nlb"
    service.beta.kubernetes.io/ncloud-load-balancer-internal: "false"
    service.beta.kubernetes.io/ncloud-load-balancer-size: "SMALL"
spec:
  selector:
    app: mario
  ports:
  - port: 80
    protocol: TCP
    targetPort: 8080
  type: LoadBalancer
EOF
📢 참고 : 이때
ncloud-load-balancer-internal: "false"설정을 통해 외부에서 접속할 수 있도록 한다. Load Balancer 인스턴스 연동
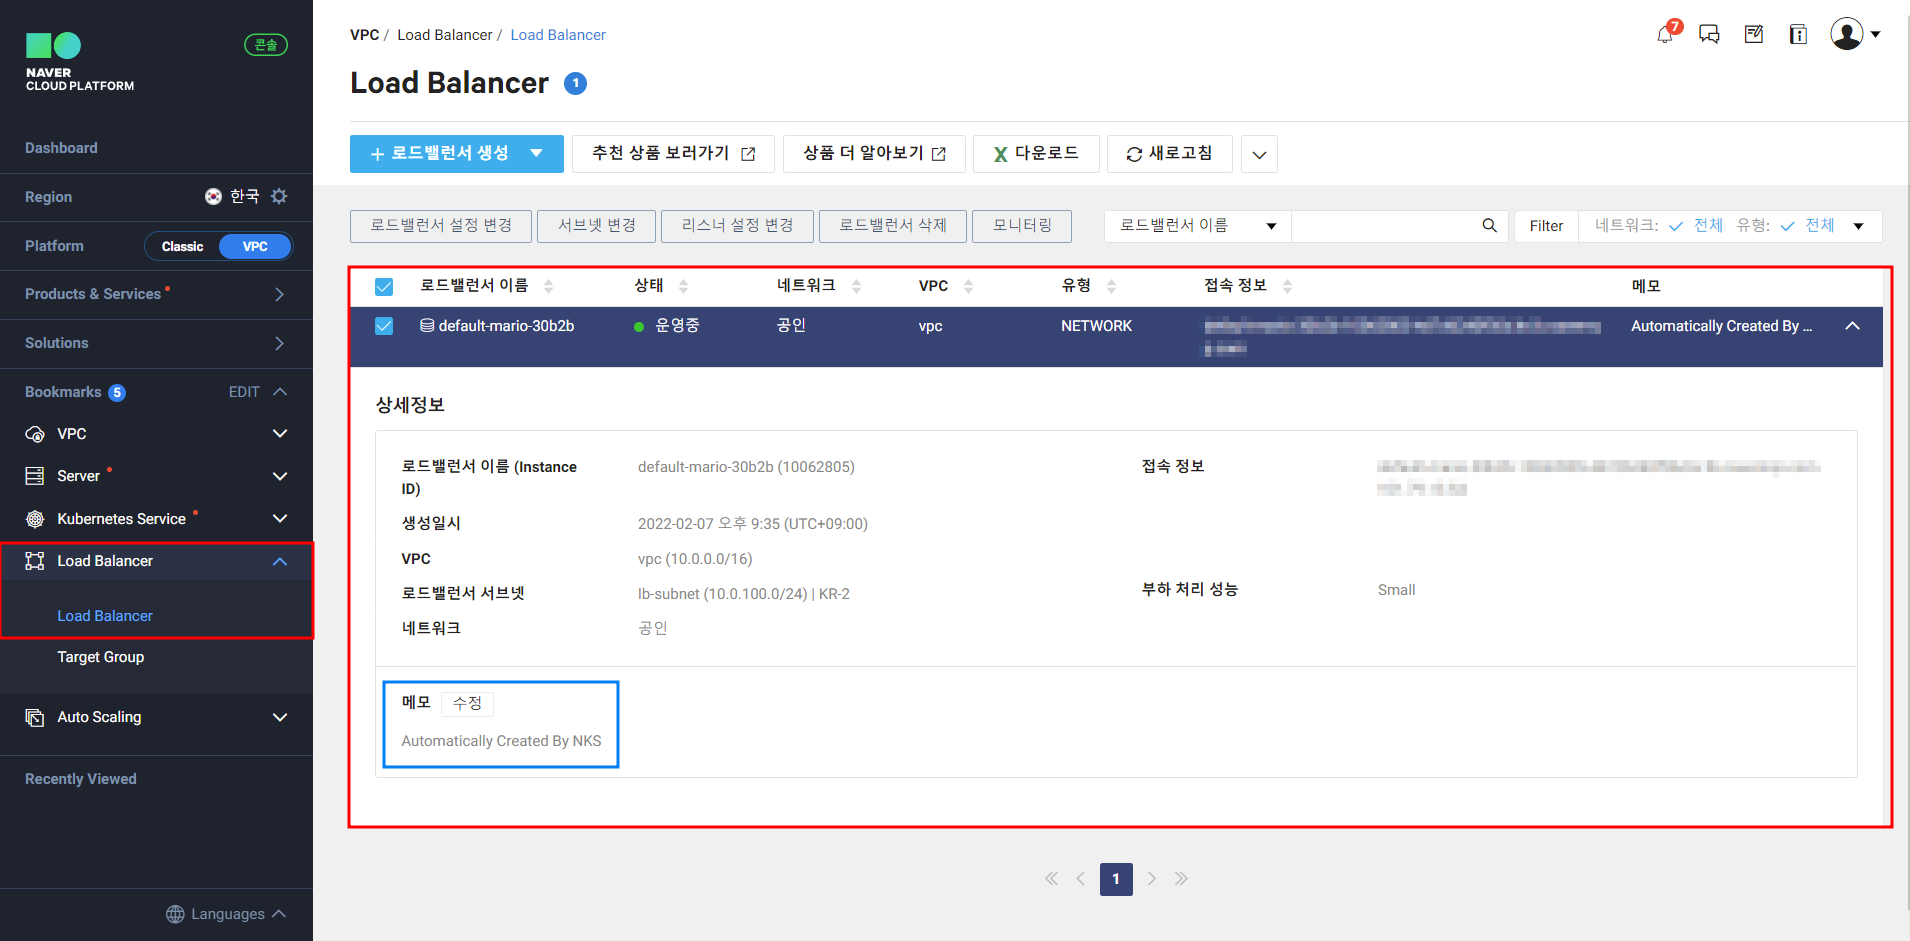
Load Balancer 배포 확인
정상적으로 LoadBalancer가 자동으로 생성된 것을 확인할 수 있다. 이때, 메모 부분에 Automatically Created By NKS 라고 하는 설명도 달려있는 것을 볼 수 있었다.
- 명령어로 pod, svc 확인
k get pods,svc --kubeconfig=$KUBE_CONFIG
NAME                         READY   STATUS    RESTARTS   AGE
pod/mario-79456cfbd9-lqzmf   1/1     Running   0          3m38s

NAME                 TYPE           CLUSTER-IP       EXTERNAL-IP                                                    PORT(S)        AGE
service/kubernetes   ClusterIP      198.19.128.1     <none>                                                         443/TCP        6m10s
service/mario        LoadBalancer   198.19.236.169   default-mario-30b2b-10062805-4d7d6240f56d.kr.lb.naverncp.com   80:30717/TCP   3m38s
확인결과 LoadBalancer 타입의 SVC가 생성되었고 EXTERNAL-IP가 할당된 것을 확인할 수 있다.
접속 테스트
자! 이제 정상적으로 외부에서 서비스가 접속되는지 확인 해보자.
귀여운 마리오 플래쉬 게임을 대외 서비스로 오픈(?) 한 것을 확인할 수 있다.
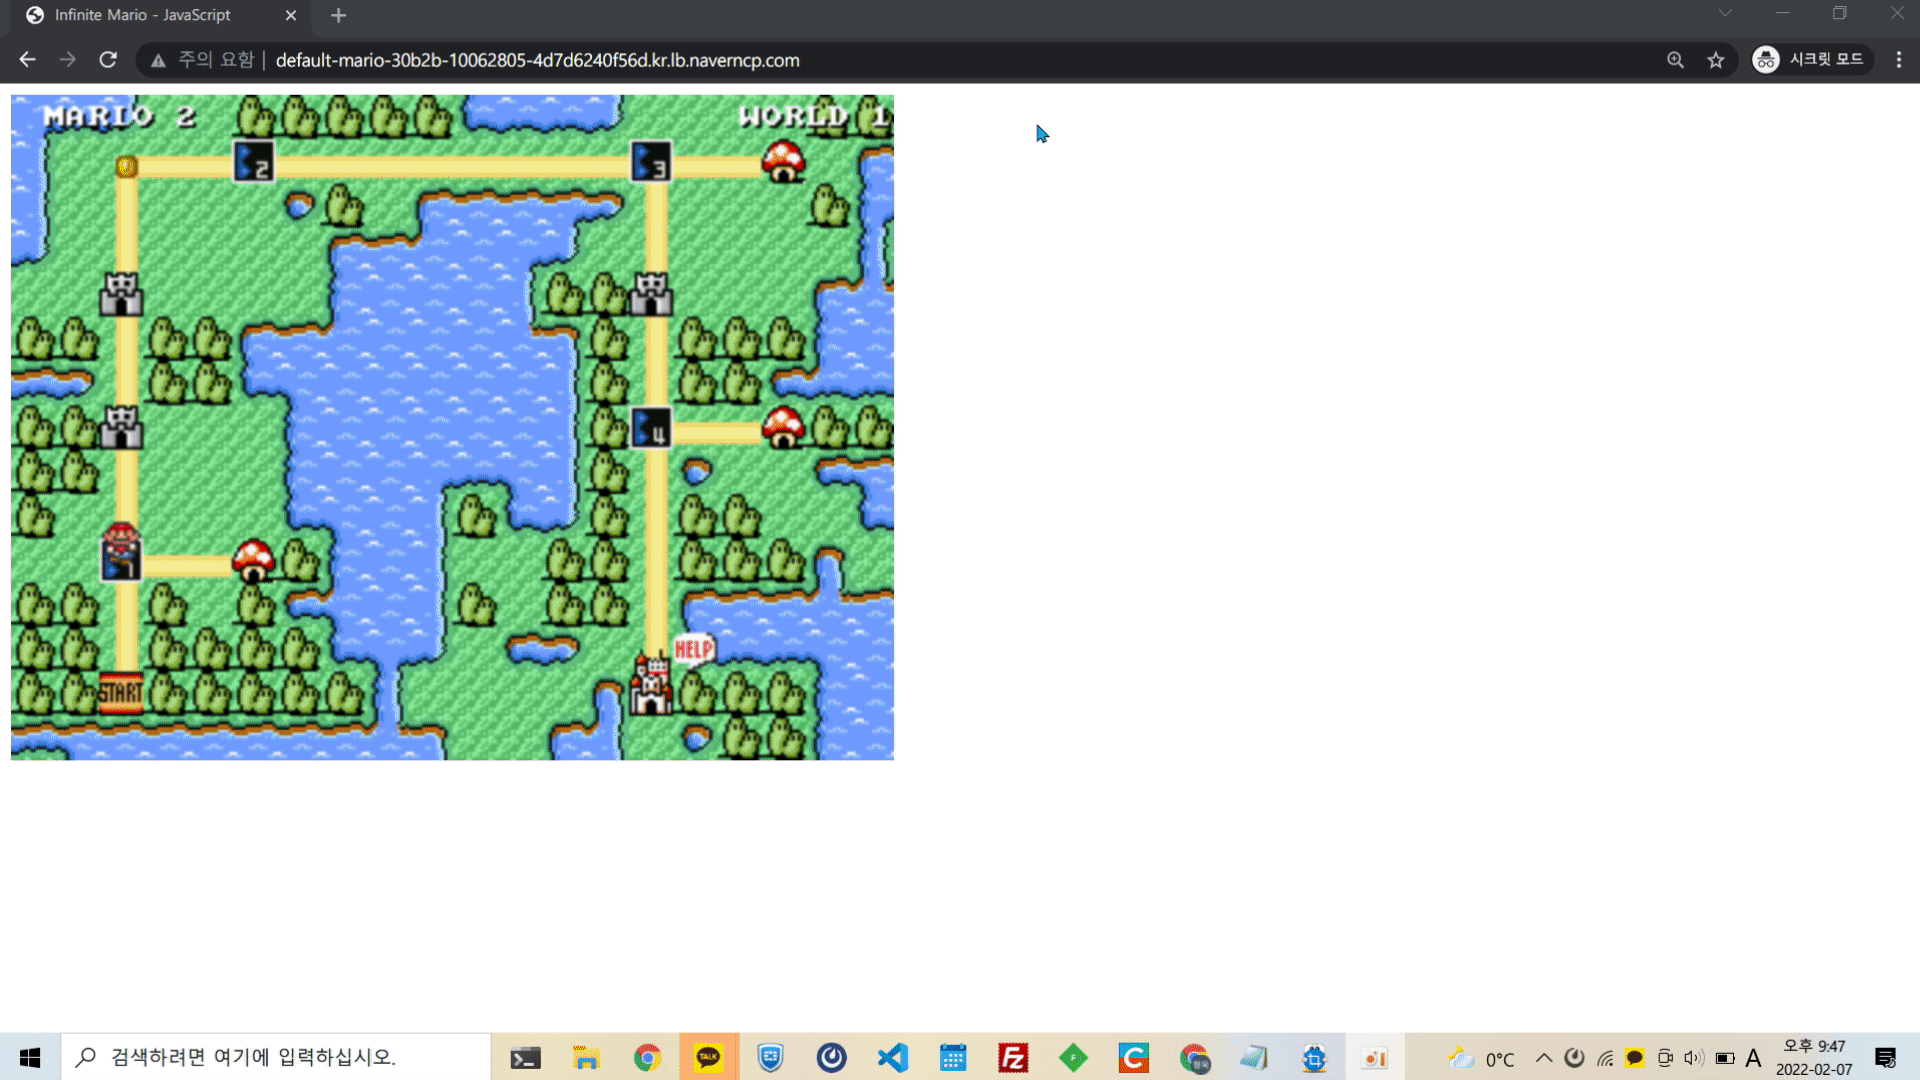
🎶 참고 : GIF라서 소리는 촬영이 되지 않았지만 귀여운 BGM과 함께 게임을 할 수 있다.🤣
리소스 반납
terraform destroy -auto-approve명령 실행
...
ncloud_nks_cluster.cluster: Destruction complete after 2m10s
ncloud_subnet.lb_subnet: Destroying... [id=34827]
ncloud_subnet.node_subnet: Destroying... [id=34828]
ncloud_login_key.loginkey: Destroying... [id=my-key]
ncloud_login_key.loginkey: Destruction complete after 4s
ncloud_subnet.lb_subnet: Still destroying... [id=34827, 10s elapsed]
ncloud_subnet.node_subnet: Still destroying... [id=34828, 10s elapsed]
ncloud_subnet.lb_subnet: Destruction complete after 13s
ncloud_subnet.node_subnet: Destruction complete after 13s
ncloud_vpc.vpc: Destroying... [id=17206]
ncloud_vpc.vpc: Still destroying... [id=17206, 10s elapsed]
ncloud_vpc.vpc: Destruction complete after 13s

Destroy complete! Resources: 8 destroyed.
4. 마무리 🙋♂️
이렇게 Terraform을 활용하여 NKS 클러스터를 자동으로 구축하고 Ingress, LoadBalancer등을 연동하여 외부에서 정상적으로 서비스가 되는지 확인해보았다.
개인적으로 Naver Cloud는 문서와 샘플 예제가 굉장히 잘 되어있는 것 같다. 제공되는 기본 샘플만으로 이렇게 쉽고 편하게 핸즈온을 할 수 있다니...
다음 시간에는 서비스 메쉬기능을 실습해보려 한다. 기회가 된다면 Consul과 연동하는 부분까지 실습해볼 예정이다.

안녕하세요 k8s Ingress 생성 확인 문의 드립니다.
내용대로 따라서 진행을 했는데 Ingress 생성 확인에서 저는 ADDR 주소가 업데이트 되지 않고 공란으로 출력이 되는데 혹시 어디를 더 봐야 하는지 문의드립니다. 여러번 반복해도 ALB주소가 공란으로 출력이 되어서 이렇게 문의드립니다. 조언 주시면 감사하겠습니다. 고맙습니다.