
✏️ Check Point
• web-font 사용
• 특정영역
• svg 활용
• swiper 내 속성 활용
• 스크립트 활용한 스크롤
1. Web-font 가져오는 방법
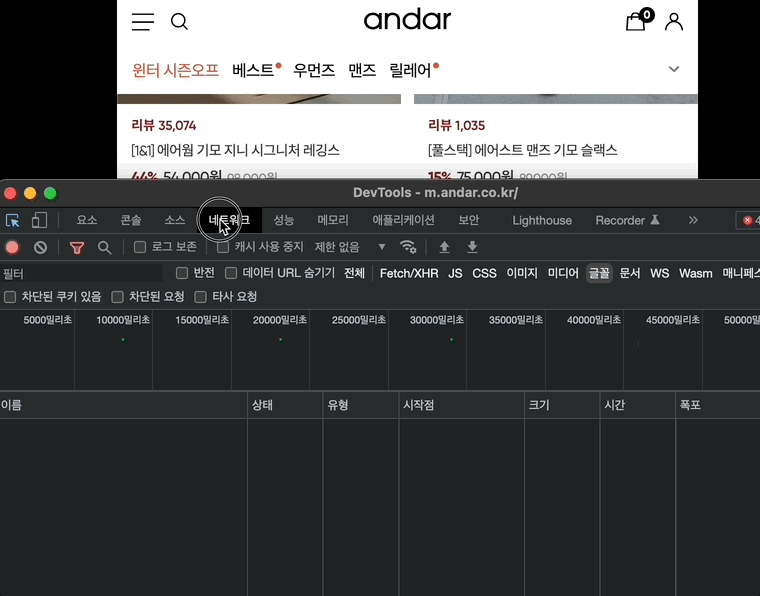
1) 원하는 사이트에서 개발자도구를 킨다.
2) 네트워크 -> 글꼴 선택 -> 새로고침 -> 해당 사이트에서 사용한 웹폰트 파일이 뜬다.
3) 원하는 폰트의 파일 클릭 후, 요청url을 열면 웹폰트 파일을 받을 수 있다.
4) typo.css파일에 @font-face를 기입해준다.
@font-face {
    font-family: 'Gilroy';
    src: url('../font/Gilroy-Regular.woff2') format('.woff2');
    font-weight: 400;
}
@font-face {
    font-family: 'Gilroy';
    src: url('../font/Gilroy-Medium.woff2') format('.woff2');
    font-weight: 500;
}
@font-face {
    font-family: 'Gilroy';
    src: url('../font/Gilroy-SemiBold.woff2') format('.woff2');
    font-weight: 600;
}
@font-face {
    font-family: 'Gilroy';
    src: url('../font/Gilroy-Bold.woff2') format('.woff2');
    font-weight: 700;
}
2. header-스크롤
헤더가
top scroll = 0 에서
current scroll(현재 스크롤) > 0 로 바뀔 때 헤더스타일도 바뀌도록 아래 스크립트로 구현하였다.
//js review


    // header fixed 스크롤
    let lastScroll = 0; //초기화
    $(window).scroll(function(){
        const current = $(this).scrollTop();

        if ($(this).scrollTop() > 0) {
            $('.header').addClass('fixed');
        } else {
            $('.header').removeClass('fixed');
        }

        if(current > lastScroll){ //내릴때
            $('.quick').removeClass('show')
        }else{ //올릴때
            $('.quick').addClass('show')
        }

        lastScroll = current

        if (current < 10) {
            $('.quick').removeClass('show')
        }
    })
    $(window).trigger('scroll');
    // 한번 스크롤 강제로
3.side-menu(특정영역만 스크롤, 특정영역 이외 클릭)
⭐️ 사이드메뉴는 마크업에서 aside로 header 하단에 위치하는것이 베스트!
사이드메뉴만 스크롤 작동
사이드메뉴를 열고 스크롤 했을 때, 바디는 고정된 상태로 작동되어야한다.
이럴때 overflow-y: auto;를 사용하게되면
해당 영역을 넘쳤을 경우 스크롤 되고, 아니면 기존 영역을 유지하게 된다.
특정영역(사이드메뉴) 이외 클릭(닫힘) 작동
body를 클릭했을 때, 사이드메뉴가 닫히게해주기 위해
아래와 같이 특정영역 이외 이벤트인 $(e.target)와 .length로 사이드메뉴의 너비를 제외한 부분을 클릭하면 닫히게끔 조건을 걸어주었다.
$('body').click(function(e){
        // console.log(e.target); 특정영역 이외 클릭(자바스크립트)

        if($(e.target).has('.side-menu').length){
            $('body').removeClass('hidden');
            $('.side-menu').removeClass('on');
        }
     })
4. svg 활용법
😅(기존):안다르 로고 및 아이콘파일은 svg로 되어있는데,
공식사이트에는 svg를 활용하지 않고 background-image를 사용하였다.
그렇게되면 헤더같은경우 color만 변경하면 되는걸 이미지를 중복으로 넣어야하는 상황이 발생한다.
☺️(변화):그래서 본인은 아래와 같이 svg로 마크업을 해주고,
고정클래스명만 추가해서 fill컬러를 변경하였다.
//html review

<header class="header">
	<div class="group-header">
		<h1 class="logo">
      		<a href="">
          		<span class="blind">안다르 로고</span>
              	<svg width='80' height='21' viewBox='0 0 80 21' fill='#fff' xmlns='http://www.w3.org/2000/svg'><path fill-rule='evenodd' clip-rule='evenodd' d='M47.0869 ...' fill='#fff'/></svg>
      		</a>
		</h1>
    </div>
</header>

//css review
.header.fixed .group-header path{fill: #000;}
5. 메인비주얼 타이포 위치 고정
😅(기존):메인 비주얼의 텍스트 위치를 퍼센트(%)로 구현하다보니,
화면의 크기에 따라 유동적이게 변한다.

☺️(변화):시각적 안정감을 위해 화면크기의 변함 없이 위치를 고정시켜주었다.

//css review

.sc-visual{ position: relative; }
.sc-visual .visual{ min-height: 428px; height: calc(100vh - 140px); } //vh는 보이는 창의 높이 기준(100vh는 보이는 창 높이 전체)
.sc-visual .visual a{ display: block; height: 100%; }
.sc-visual .visual img{ width: 100%; height: 100%; object-fit: cover; }

//앱솔루트로 정확한 위치 구현
.sc-visual .text-box{ position: absolute; bottom: 0;left: 0; padding: 100px 40px; color: #fff; }
6. 공통영역 동일 클래스명 적용
안다르 전체 구성은 몇가지 동일한 내용 및 레이아웃으로 구성되어있기 때문에,
효율적인 작업을 위해 클래스명을 통일시키고 각각 필요한 영역에 추가하였다.
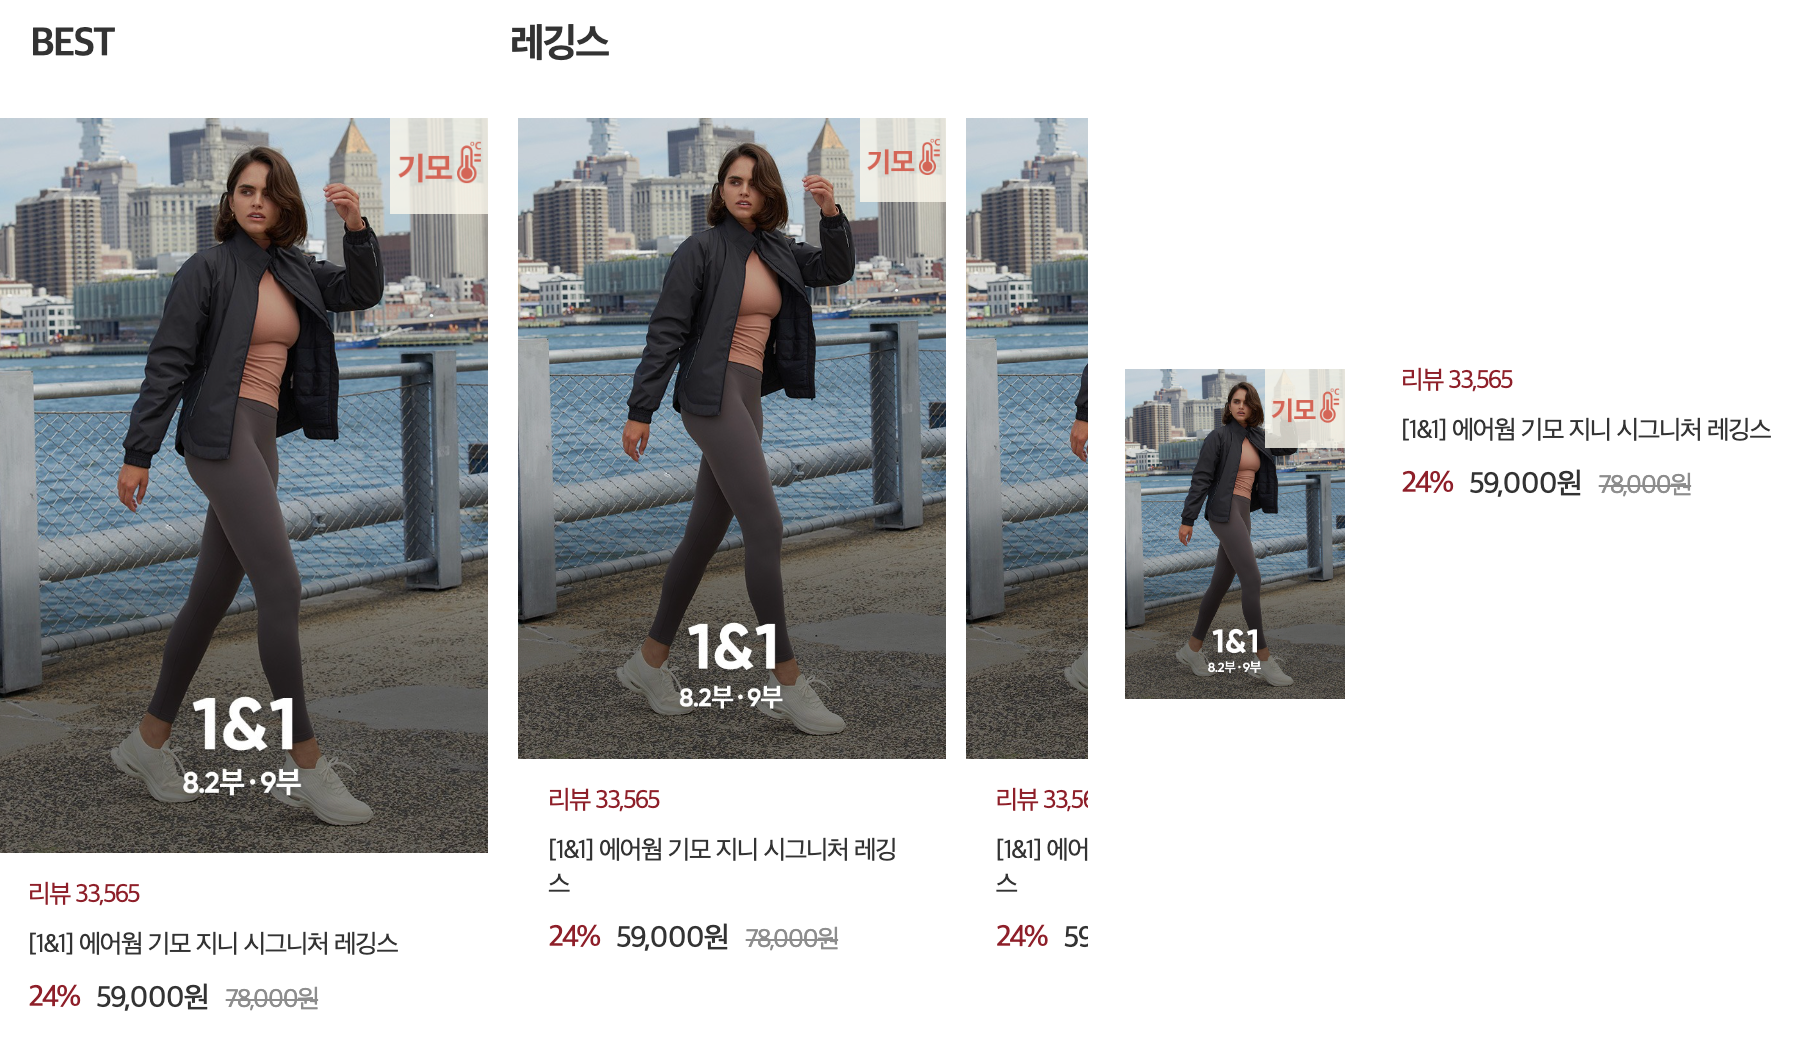
<section class="section sc-best"> //주제별 섹션전체 통일
	<h2 class="title">BEST</h2>
    	<ul class="goods-list list1">
        	<li class="goods-item"> //상품 아이템영역 통일
            	<a href="">
                	//내용생략
                    <div class="price-box"> //상품 가격영역 통일
                    	<strong class="sale">24%</strong>
                        <span class="curr">59,000원</span>
                        <span class="ori">78,000원</span>
                    </div>
                </a>
            </li>
7. swiper->speed,effect
swiper로 슬라이드가 넘어갈 때의 효과와 넘어가는 속도를 조정해주고 싶다면,
👉speed: 슬라이드 넘어가는 속도,
👉effect: 슬라이드 넘어가는 효과를 주면 된다.

//js review

const bannerSlide = new Swiper(".sc-banner", {
    loop:true,
    speed: 500, //페이드 속도
    effect: 'fade', //페이드 효과
    autoplay:{
        delay:3000,
        disableOnInteraction: false,
    },
});
8. swiper->freeMode
슬라이드를 넘길때 원하는대로 자유롭게 넘어가도록 하고 싶다면,
👉freeMode:true를 기입해주면 된다.

//js review

const proslide = new Swiper(".sc-cate .swiper", {
        slidesPerView:2.1,
        spaceBetween:10,
        freeMode:true, // 자유롭게 슬라이드 넘기기
    });
9. 상단이동 클릭(자바스크립트ver.)
상단 이동하는 버튼 이벤트를 자바스크립트 방식인 addEventListener로 해보았다.
부드러운 스크롤링을 하기 위해, behavior를 smooth로 설정하였다.
//상단이동 클릭
//제이쿼리 이벤트를 자바스크립트로 해봄
    const topBtnElement = document .querySelector('.btn-top');

    topBtnElement.addEventListener('click',()=>{
        window.scrollTo({top:0,behavior:'smooth'})
    })
📌 SIDE NOTE
html
- Class명에는 대문자 기입 안된다. (id에만 사용)
- section은 group안에 들어갈 수 없다.(section 먼저 나오고 공통적으로 묶을 것 이 있으면 그 안에 group)
- header,main,footer는 2개이상이 될 수 없다.(단독 사용)
- 뱃지는 영역정도만 "badge"로 잡고, 각각의 명칭은 적지 않는다.(각각의 명칭의 수가 많거나, 다양해질 수 있음을 고려함)
카페 24는 상품에 들어가서 아이콘을 등록할 수 있는데, 여기서 중요한건 클래스명이 등록되지 않기 때문에,
상세한 클래스명이 필요하지 않음.("badge"로 영역만 잡기) - footer에도 로고가 들어갈 때는 [h3][div] 둘 중 사용하면 됨.([h1]은 고유적으로 하나만 사용)
- [address]는 홈페이지 정보에 대한 것 전체 포함할 때 사용(copy도 포함, 주소만 말하는것이 아님)
- gnb는 [nav]로 구성.
- h2.blind를 무작정 넣는 것보다 생각하고 넣기!
예시로 브랜드 스토리를 보자면,
길게 타이틀이 있기 때문에 영역 제목을 또주는것은 무리수. - policy-box : 약관,정책
footer에 들어가는 약관, 정책 등의 내용은 클래스명 policy로 묶기.
script
- Toggle 다방면으로 활용하자. ex)아코디언,슬라이드 메뉴11. trigger -> ''강제로 .trigger('scroll'); : 스크롤 강제로 한번 내리고 시작한다는 의미.
css
- swiper{padding} -> swiper한테 패딩 주면 시작과 끝에 적용(but 마진은 안됨)