헤더 정보 출력하기
- RequestHeader.jsp
<body>
<h2>3. 요청 헤더 정보 출력하기</h2>
<%
    Enumeration headers = request.getHeaderNames();
    while (headers.hasMoreElements()) {
        String headerName = (String)headers.nextElement();
        String headerValue = request.getHeader(headerName);
        out.print("헤더명 : " + headerName + ", 헤더값 : " + headerValue + "<br>");
    }
%>
</body>
</html>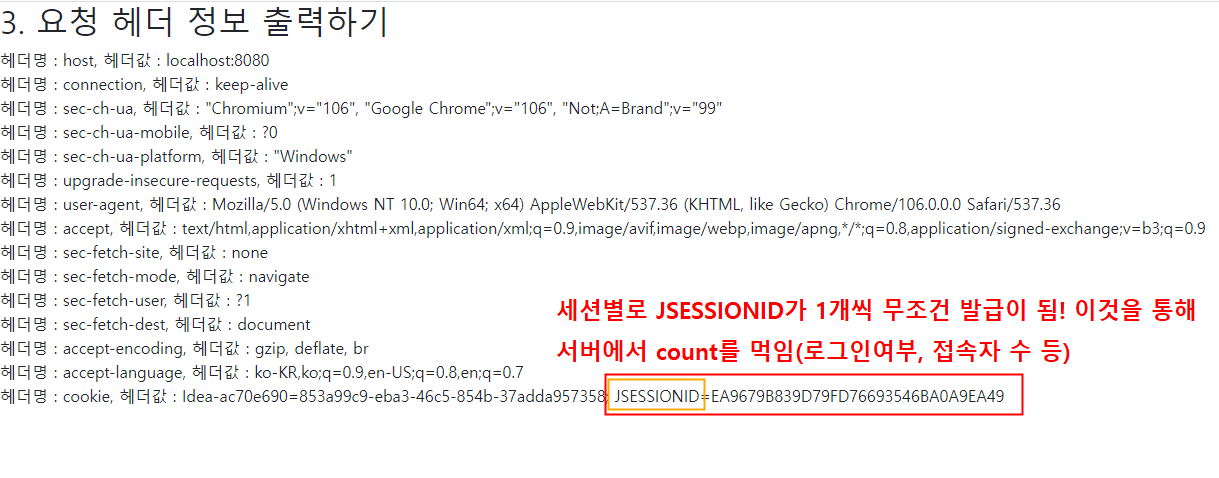
response 객체
request 요청에 대한 응답을 하는것이 response 객체가 하는 일이다.
sendRedirect()로 페이지 이동하기

-
[예제 2-5] 로그인 폼과 응답 헤더 설정 페이지
- loginErr은 로그인 실패 여부를 알려주는 매개변수
- 이 매개변수에 값이 들어 있다면 “로그인 실패”를 출력
- 아이디와 패스워드를 입력받는 간단한 로그인 폼을 구성
- 응답 헤더 추가를 위한 입력 폼을 구성
- 헤더에 추가할 데이터의 형식별로 value 속성에 미리 입력
-
ResponseMain.jsp
<body>
<h2>1. 로그인 폼</h2>
<%
  String loginErr = request.getParameter("loginErr");
  if (loginErr != null) {
    out.print("로그인 실패");
  }
%>

<div class="container">
  <div class="row">
    <div class="col-sm-6 mx-auto">
      <div class="border rounded">
        <form action="ResponseLogin.jsp" method="post">
          <div class="d-grid gap-3">
            <div>
              <label class="form-label">아이디 : </label>
              <input type="text" class="form-control" id="userId" placeholder="아이디를 입력하세요">
            </div>
            <div>
              <label class="form-label">비밀번호 : </label>
              <input type="password" class="form-control" id="userPw" placeholder="비밀번호를 입력하세요">
            </div>
            <div>
              <button class="btn btn-primary" type="submit">로그인</button>
              <button class="btn btn-secondary" type="reset">취소</button>
            </div>
          </div>
        </form>
      </div>
    </div>
  </div>
</div>
</body>
</html>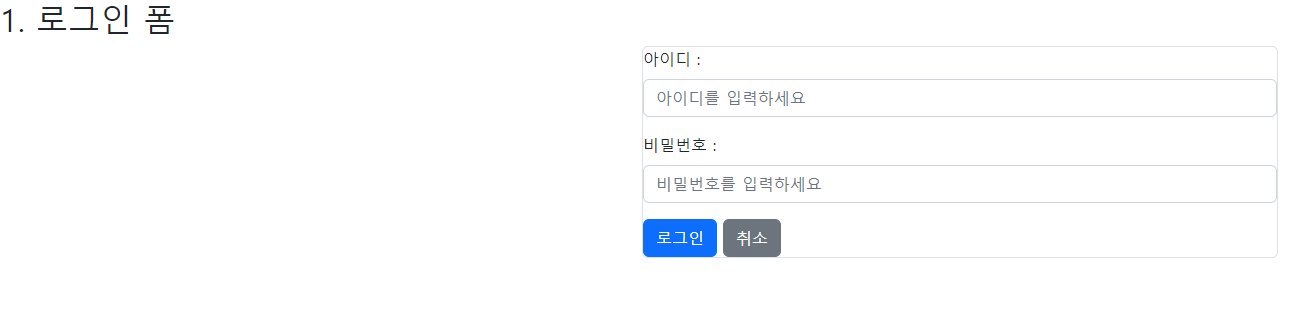
- ResponseMain.jsp
<%@ page contentType="text/html;charset=UTF-8" language="java" pageEncoding="UTF-8" %>
<!DOCTYPE html>
<html>
<head>
    <title>내장 객체 response</title>

    <link rel="stylesheet" href="https://cdn.jsdelivr.net/npm/bootstrap@5.2.2/dist/css/bootstrap.min.css">
    <script src="https://ajax.googleapis.com/ajax/libs/jquery/3.6.1/jquery.min.js"></script>
    <script src="https://cdn.jsdelivr.net/npm/bootstrap@5.2.2/dist/js/bootstrap.bundle.min.js"></script>
</head>
<body>
<h2>1. 로그인 폼</h2>
<%
    String loginErr = request.getParameter("loginErr");
    if (loginErr != null) {
//    out.print("로그인 실패");
        out.print("<script>alert('로그인 실패');</script>");
    }
%>

<div class="container mt-5">
    <div class="row">
        <div class="col-sm-6 mx-auto">
            <div class="border rounded p-3">
                <form action="ResponseLogin.jsp" method="post">
                    <div class="d-grid gap-3">
                        <div>
                            <label class="form-label">아이디 : </label>
                            <input type="text" class="form-control" id="userId" name="userId" placeholder="아이디를 입력하세요">
                        </div>
                        <div>
                            <label class="form-label">비밀번호 : </label>
                            <input type="password" class="form-control" id="userPw" name="userPw" placeholder="비밀번호를 입력하세요">
                        </div>
                        <div>
                            <button class="btn btn-primary" type="submit">로그인</button>
                            <button class="btn btn-secondary" type="reset">취소</button>
                        </div>
                    </div>
                </form>
            </div>
        </div>
    </div>
</div>
</body>
</html>- ResponseLogin.jsp
<%@ page contentType="text/html;charset=UTF-8" language="java" pageEncoding="UTF-8" %>
<!DOCTYPE html>
<html>
<head>
    <title>내장 객체 - response</title>
    <link rel="stylesheet" href="https://cdn.jsdelivr.net/npm/bootstrap@5.2.2/dist/css/bootstrap.min.css">
    <script src="https://ajax.googleapis.com/ajax/libs/jquery/3.6.1/jquery.min.js"></script>
    <script src="https://cdn.jsdelivr.net/npm/bootstrap@5.2.2/dist/js/bootstrap.bundle.min.js"></script>

</head>
<body>
<%
    String id = request.getParameter("userId");
    String pw = request.getParameter("userPw");

    if (id.equals("admin") && pw.equals("1234")) {
//        sendRedirect(url) : 사용자 요청 시 다른 페이지로 강제 이동
        response.sendRedirect("ResponseWelcome.jsp");
    }
    else {
        response.sendRedirect("ResponseMain.jsp?loginErr=1");
    }
%>
</body>
</html>- ResponseWlecome.jsp
<%@ page contentType="text/html;charset=UTF-8" language="java" pageEncoding="UTF-8" %>
<!DOCTYPE html>
<html>
<head>
    <title>내장 객체 response</title>

    <link rel="stylesheet" href="https://cdn.jsdelivr.net/npm/bootstrap@5.2.2/dist/css/bootstrap.min.css">
    <script src="https://ajax.googleapis.com/ajax/libs/jquery/3.6.1/jquery.min.js"></script>
    <script src="https://cdn.jsdelivr.net/npm/bootstrap@5.2.2/dist/js/bootstrap.bundle.min.js"></script>
</head>
<body>
<div class="container">
  <h2 class="text-center">로그인 선공</h2>
  <a href="ResponseMain.jsp" class="btn btn-link">로그인 페이지로</a>
</div>
</body>
</html>- ResponseHeader.jsp
<%@ page contentType="text/html;charset=UTF-8" language="java" pageEncoding="UTF-8" %>
<%@ page import="java.util.Collection" %>
<%@ page import="java.text.SimpleDateFormat" %>
<!DOCTYPE html>
<html>
<head>
    <title>내장객체 response</title>

    <link rel="stylesheet" href="https://cdn.jsdelivr.net/npm/bootstrap@5.2.2/dist/css/bootstrap.min.css">
    <script src="https://ajax.googleapis.com/ajax/libs/jquery/3.6.1/jquery.min.js"></script>
    <script src="https://cdn.jsdelivr.net/npm/bootstrap@5.2.2/dist/js/bootstrap.bundle.min.js"></script>
</head>
<body>
<%
  // SimpleDateFormat : 자바에서 사용하는 날짜 데이터를 사람이 알아보기 쉬운 형태로 변경하는 클래스
  // request는 서버로 데이터를 넘기는 것 -> response 객체에 데이터 집어넣기
  SimpleDateFormat sdf = new SimpleDateFormat("yyyy-mm-dd");
  long add_date = sdf.parse(request.getParameter("add_date")).getTime();
  int add_int = Integer.parseInt(request.getParameter("add_int"));
  String add_str = request.getParameter("add_str");

  response.addDateHeader("myBirthday", add_date);
  response.addIntHeader("myNumber", add_int);
  response.addIntHeader("myNumber", 1004);
  response.addHeader("myName", add_str);
  response.addHeader("myName", "아이유");
%>
<%-- 주소창에 붙여넣기 : http://localhost:8080/ResponseHeader.jsp?add_date=20--10-21&add_int=8282&add_str="홍길동" --%>
<h2>응답 헤더 정보 출력하기</h2>
<ul>
<%
  Collection<String> headerNames = response.getHeaderNames();
  for (String hName: headerNames) {
    // hName 타입으로 response객체 중 헤더를 읽어오는 getHeader를 사용해서 hValue에 값 넣어줌
    String hValue = response.getHeader(hName);
%>
<li><%=hName%> : <%=hValue%></li>
<%
  }
%>
</ul>

<h2>myNumber만 출력하기</h2>
<ul>
<%
  Collection<String> myNumber = response.getHeaders("myNumber");
  for (String myNum : myNumber) {
    out.print("<li>myNumber : " + myNum + "</li>");
  }
  Collection<String> myName = response.getHeaders("myName");
  for (String myNam : myName) {
    out.print("<li>myNumber : " + myNam + "</li>");
  }
%>

<%-- addCookie(Cookie) : 쿠키를 추가 --%>
<%-- addDateHeader(String name, long date) : 설정한 헤더 이름에 날짜 및 시간을 추가 --%>
<%-- addHeader(String name, String value) : 설정한 헤더 이름에 데이터를 추가 --%>
<%-- addIntHeader(String name, int value) : 설정한 헤더 이름에 정수 데이터를 추가 --%>
<%-- setDateHeader(String name, long date) : 설정한 헤더 이름의 날짜 및 시간을 수정 --%>
<%-- setHeader(String name, String value) : 설정한 헤더 이름의 데이터를 수정 --%>
<%-- setIntHeader(String name, int value) : 설정한 헤더 이름의 정수 데이터를 수정 --%>
<%-- containsHeader(String name) : 설정한 헤더 이름이 존재하는지 확인 --%>
<%-- getHeader(String name) : 설정한 헤더 이름의 데이터를 가져옴 (동일한 이름의 헤더가 있을 경우 첫 번째 데이터만 가져옴) --%>
</ul>
</body>
</html>
out 객체
-
out 내장 객체는 웹 브라우저에 변수 등의 값을 출력할 때 주로 사용
-
out 내장 객체는 버퍼를 사용. 즉, 출력되는 모든 정보는 버퍼에 먼저 저장된 후 웹 브라우저에 출력
-
OutMain.jsp
<%@ page contentType="text/html;charset=UTF-8" language="java" pageEncoding="UTF-8" %>
<!DOCTYPE html>
<html>
<head>
    <title>Title</title>

    <link rel="stylesheet" href="https://cdn.jsdelivr.net/npm/bootstrap@5.2.2/dist/css/bootstrap.min.css">
    <script src="https://ajax.googleapis.com/ajax/libs/jquery/3.6.1/jquery.min.js"></script>
    <script src="https://cdn.jsdelivr.net/npm/bootstrap@5.2.2/dist/js/bootstrap.bundle.min.js"></script>
</head>
<body>
<%
  out.print("출력되지 않는 텍스트");
  out.clearBuffer(); // clearBuffer() : 버퍼의 내용 다 비움 -> 위 텍스트가 출력되지 않음

  out.print("<h2>out 내장 객체</h2>");

  out.print("출력 버퍼 크기 : " + out.getBufferSize() + "<br>"); // 8192
  out.print("남은 버퍼 크기 : " + out.getRemaining() + "<br>"); // 8155

  out.flush(); // flush() : 버퍼의 내용을 jsp파일로 출력시키는 것
  out.print("flush 후  버퍼의 크기 : " + out.getRemaining() + "<br>"); // 8192 (버퍼의 크기가 커졌음)

  out.print(1);
  out.print(false);
  out.print('가');

//    print(String str) : 설정된 값을 웹브라우저에 출력
//    println(String str) : 설정된 값을 웹브라우저에 출력, 줄바꿈기능이 동작하지는 않음(print()와 동일하다고 보면 됨)
//    newLine() : 줄바꿈을 출력
//    getBufferSize() : 현재 출력 버퍼 사이즈를 가져옴
//    getRemaining() : 현재 남아있는 버퍼 사이즈를 가져옴
//    clear() : 현재 출력버퍼에 저장되어 있는 내용을 웹 브라우저에 출력하지 않고 비움, 버퍼가 이미 flush 되었으면 IOException 발생 (IOException 발생하지 않을수도있음)
//    clearBuffer() : 현재 출력버퍼에 저장되어 있는 내용을 웹 브라우저에 출력하지 않고 비움, 버퍼가 이미 flush 되었으면 IOException 발생하지 않음 (IOException 발생하지않음)
//    flush() : 출력 버퍼에 저장된 내용을 즉시 웹브라우저로 출력
//    isAutoFlush() : 출력 버퍼가 채워졌을 경우의 동작을 결정(자동출력하려면 true, flush를 눌렀을때만 출력하게 하려면 false. 기본은 true)
//                    print()에는 기본적으로 true로 먹혀있어서 코드가 읽힐때 바로 출력되지만 false로 설정해주면 내가 저장한 값을 내가 원할때 화면에 출력되게 할 수 있음

%>
</body>
</html>
Application
- applicationMain.jsp
<%@ page contentType="text/html;charset=UTF-8" language="java" pageEncoding="UTF-8" %>
<!DOCTYPE html>
<html>
<head>
<title>내장객체 application</title>
<link rel="stylesheet" href="https://cdn.jsdelivr.net/npm/bootstrap@5.2.2/dist/css/bootstrap.min.css">
<script src="https://ajax.googleapis.com/ajax/libs/jquery/3.6.1/jquery.min.js"></script>
<script src="https://cdn.jsdelivr.net/npm/bootstrap@5.2.2/dist/js/bootstrap.bundle.min.js"></script>
</head>
<body>
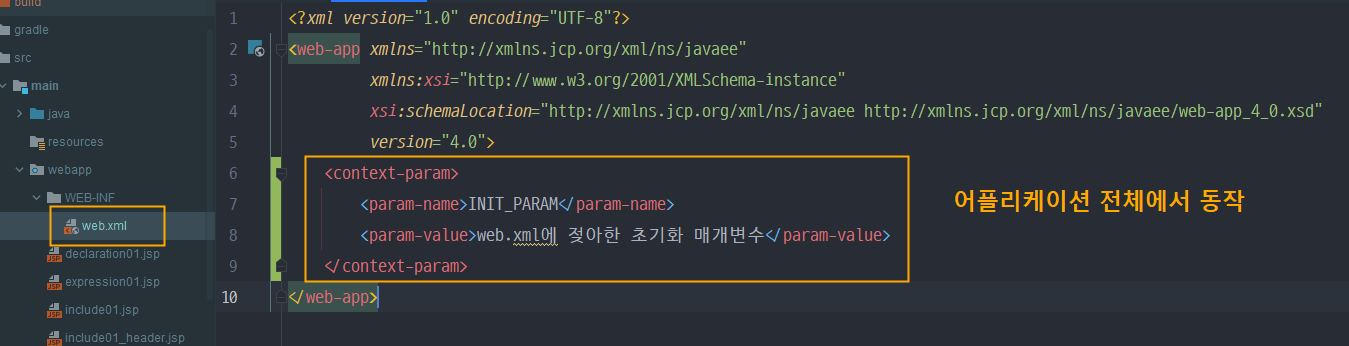
<h2>web.xml에 설정한 내용 읽어오기</h2>
초기화 매개변수 : <%=application.getInitParameter("INIT_PARAM")%>
<h2>서버의 물리적 경로 얻어오기</h2>
application 내장 객체 : <%=application.getRealPath("/")%>
<h2>선언부에서 application 내장 객체 사용하기</h2>
<%!
public String useImplicitObject() {
return this.getServletContext().getRealPath("/");
}
public String useImplicitObject(ServletContext app) {
return app.getRealPath("/");
}
%>
<ul>
<li>this 사용 : <%=useImplicitObject()%></li>
<li>내장 객체를 인수로 전달 : <%=useImplicitObject(application)%></li>
</ul>
</body>
</html>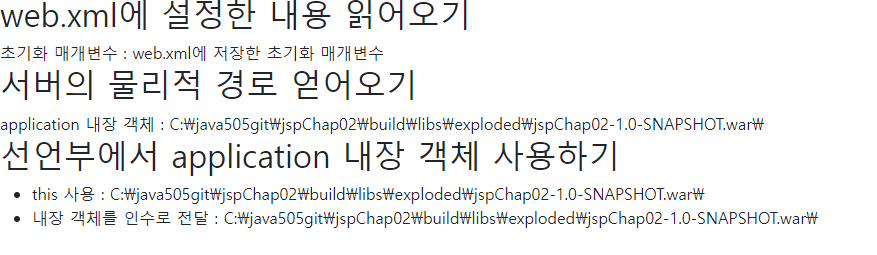
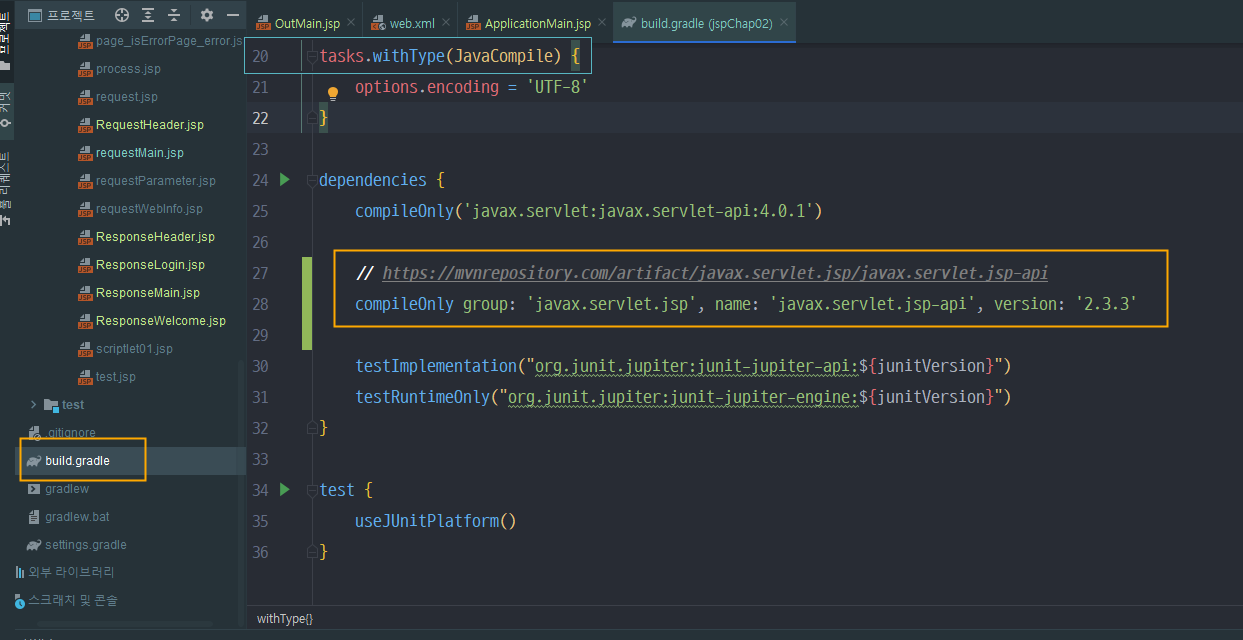
인텔리제이에서 out~ 안먹힐때
https://mvnrepository.com/search?q=jsp-api
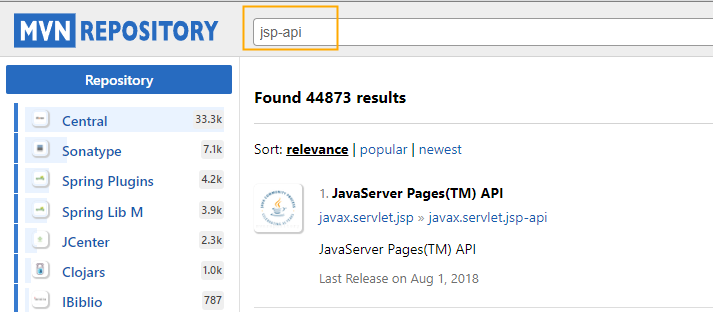
복사해서 아래 그림대로 붙여넣기
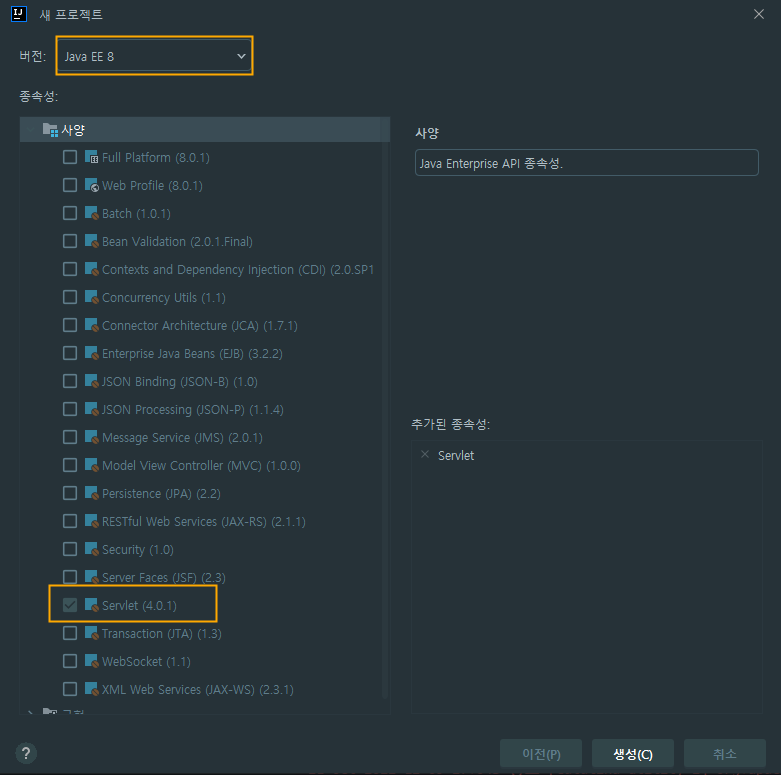
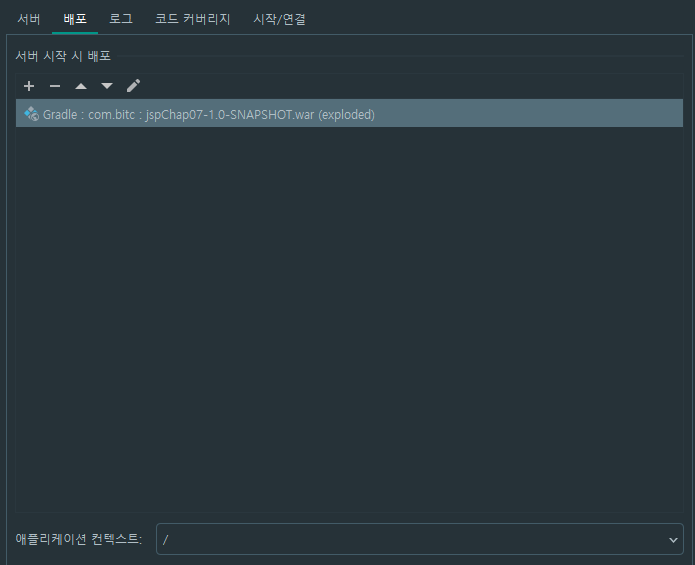
jspChap07 프로젝트 생성

액션 태그
액션 태그의 종류

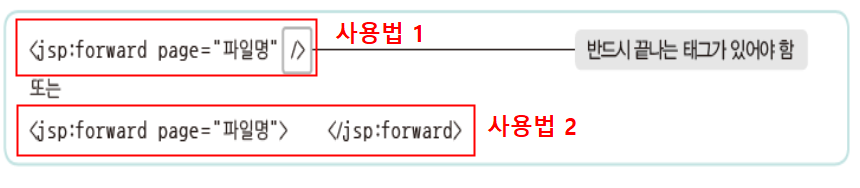
forward 액션 태그
현재 JSP 페이지에서 다른 페이지로 이동하는 태그
- first.jsp
<%@ page contentType="text/html;charset=UTF-8" language="java" pageEncoding="UTF-8" %>
<!DOCTYPE html>
<html>
<head>
    <title>액션 태그 forward</title>

    <link rel="stylesheet" href="https://cdn.jsdelivr.net/npm/bootstrap@5.2.2/dist/css/bootstrap.min.css">
    <script src="https://ajax.googleapis.com/ajax/libs/jquery/3.6.1/jquery.min.js"></script>
    <script src="https://cdn.jsdelivr.net/npm/bootstrap@5.2.2/dist/js/bootstrap.bundle.min.js"></script>
</head>
<body>
<h3>이 파일은 first.jsp 파일입니다.</h3>
<jsp:forward page="second.jsp"></jsp:forward>
<p>--- first.jsp의 페이지</p>

</body>
</html>- second.jsp
<%@ page contentType="text/html;charset=UTF-8" language="java" pageEncoding="UTF-8" %>
<!DOCTYPE html>
<html>
<head>
    <title>액션태그 forward</title>

    <link rel="stylesheet" href="https://cdn.jsdelivr.net/npm/bootstrap@5.2.2/dist/css/bootstrap.min.css">
    <script src="https://ajax.googleapis.com/ajax/libs/jquery/3.6.1/jquery.min.js"></script>
    <script src="https://cdn.jsdelivr.net/npm/bootstrap@5.2.2/dist/js/bootstrap.bundle.min.js"></script>
</head>
<body>
<h3>이 파일은 second.jsp 파일입니다.</h3>
<p>Today is : <%=new java.util.Date()%></p>
</body>
</html>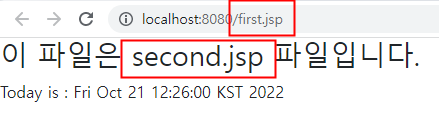
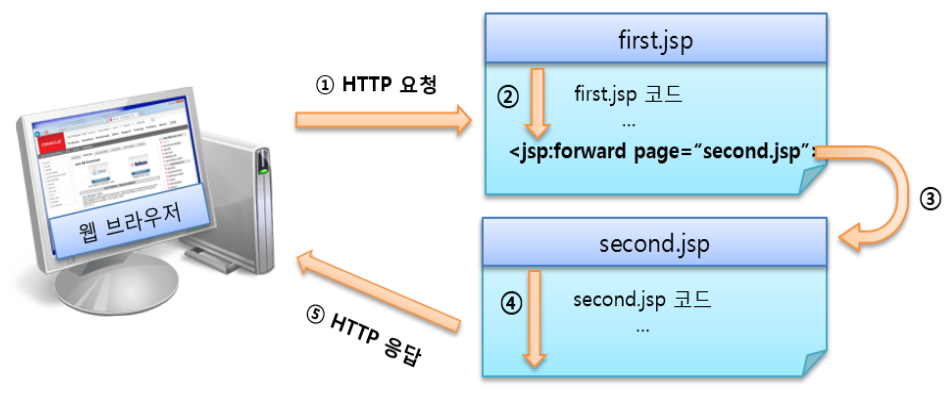
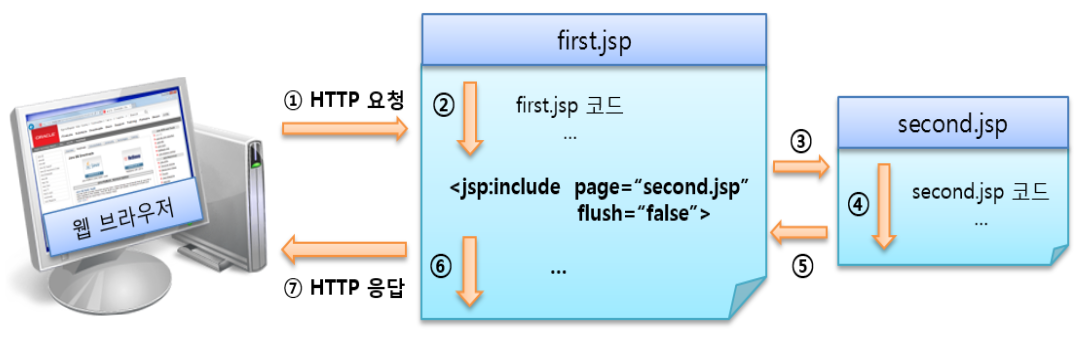
- forward 액션 태그의 페이지 흐름 처리 과정
sendRedirect와의 차이점 : sendRedirect는 아예 페이지가 달라지는거지만
forward는 기존의 페이지를 표시하면서 내용만 다른 페이지로 바뀐(이동한)것.
- 다른 예시
forward.jsp
<body>
<h2>forward 액션 태그</h2>
<jsp:forward page="forward_date.jsp"></jsp:forward>
<p></p>
</body>
forward_date.jsp
<body>
<p>오늘의 날짜 및 시간</p>
<p><%=(new java.util.Date()).toString()%></p>
</body>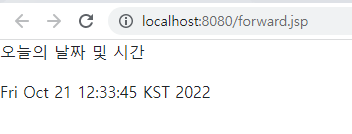
include 액션 태그
include 디렉티브 태그처럼 현재 JSP 페이지의 특정 영역에 외부 파일의 내용을 포함하는 태그
- include.jsp
<body>
<h3>이 파일은 first.jsp 파일입니다.</h3>
<%-- flush의 기본값은 false라서 생략해도 됨. --%>
<jsp:include page="second.jsp" flush="false"></jsp:include>
<p>java server page</p>
</body>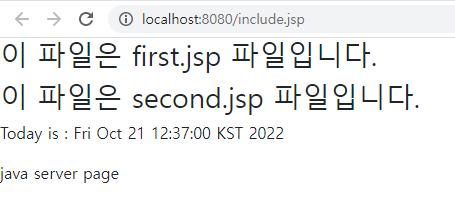
-
include 액션 태그의 처리 과정
-
include 액션태그와 include 디렉티브 태그의 차이점
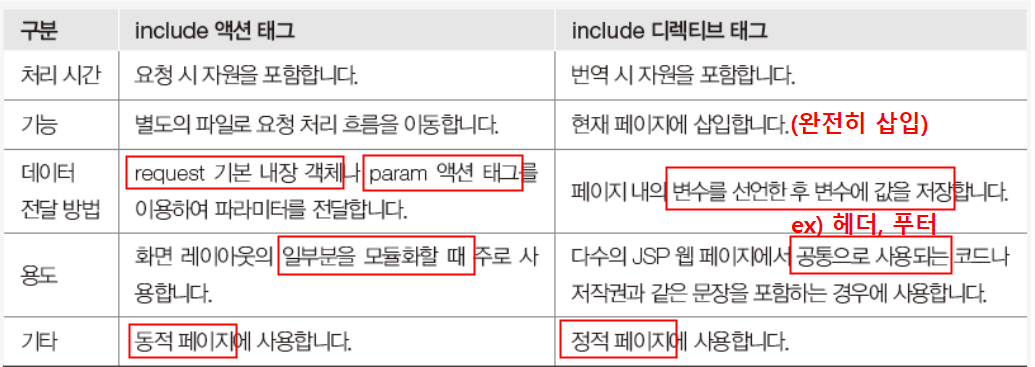
include 액션태그로 날짜 데이터 가져오기
- include2.jsp
<%@ page contentType="text/html;charset=UTF-8" language="java" pageEncoding="UTF-8" %>
<!DOCTYPE html>
<html>
<head>
    <title>액션태그 include</title>

    <link rel="stylesheet" href="https://cdn.jsdelivr.net/npm/bootstrap@5.2.2/dist/css/bootstrap.min.css">
    <script src="https://ajax.googleapis.com/ajax/libs/jquery/3.6.1/jquery.min.js"></script>
    <script src="https://cdn.jsdelivr.net/npm/bootstrap@5.2.2/dist/js/bootstrap.bundle.min.js"></script>
</head>
<body>
<h2>include 액션 태그</h2>
<jsp:include page="include_date.jsp" flush="false"></jsp:include>
<p>--------------------------------</p>
</body>
</html>- include_date.jsp
<%@ page contentType="text/html;charset=UTF-8" language="java" pageEncoding="UTF-8" %>
<%@ page import="java.util.Date" %>
<!DOCTYPE html>
<html>
<head>
    <title>include 액션 태그</title>

    <link rel="stylesheet" href="https://cdn.jsdelivr.net/npm/bootstrap@5.2.2/dist/css/bootstrap.min.css">
    <script src="https://ajax.googleapis.com/ajax/libs/jquery/3.6.1/jquery.min.js"></script>
    <script src="https://cdn.jsdelivr.net/npm/bootstrap@5.2.2/dist/js/bootstrap.bundle.min.js"></script>
</head>
<body>
<%-- new Date사용 방법 1--%>
<%
  Date today = new Date();
%>
<h2>오늘의 날짜 및 시간</h2>
<p><%=today.toString()%></p>

<%-- new Date사용 방법 2--%>
<p><%=(new Date()).toString()%></p>
</body>
</html>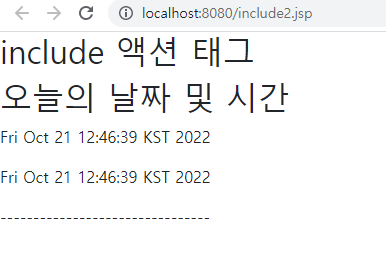
param 액션 태그
- first2.jsp
<body>
<h3>이 파일은 first2.jsp 파일입니다.</h3>
<jsp:include page="second2.jsp">
  <%--    매개변수 date에 현재 시간 정보가 들어가서 서버로 넘어감  --%>
  <jsp:param name="date" value="<%=new java.util.Date()%>"/>
</jsp:include>
</body>- second2.jsp
<body>
<div class="container">
  <div class="mx-auto">
    <%--      넘어온 date를 열어보면 first2에서 넣은 시간 정보가 getParameter로 들어옴 --%>
    <p class = "text-center">Today is : <%=request.getParameter("date")%></p>
  </div>
</div>
</body>
자바빈즈 액션 태그
ppt 참고

↑ Member mem = new Member(); 에서 mem이 id를 의미함

- useBean.jsp
<%@ page contentType="text/html;charset=UTF-8" language="java" pageEncoding="UTF-8" %>
<!DOCTYPE html>
<html>
<head>
    <title>액션태그 useBean</title>

    <link rel="stylesheet" href="https://cdn.jsdelivr.net/npm/bootstrap@5.2.2/dist/css/bootstrap.min.css">
    <script src="https://ajax.googleapis.com/ajax/libs/jquery/3.6.1/jquery.min.js"></script>
    <script src="https://cdn.jsdelivr.net/npm/bootstrap@5.2.2/dist/js/bootstrap.bundle.min.js"></script>
</head>
<body>
<div class="container mt-5 mx-auto">
  <jsp:useBean id="date" class="java.util.Date"></jsp:useBean>
  <p><%
    out.print("오늘의 날짜 및 시간");
  %></p>
  <p><%=date%></p>
</div>
</body>
</html>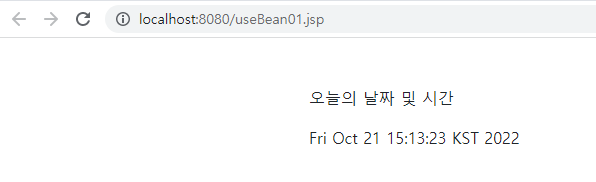
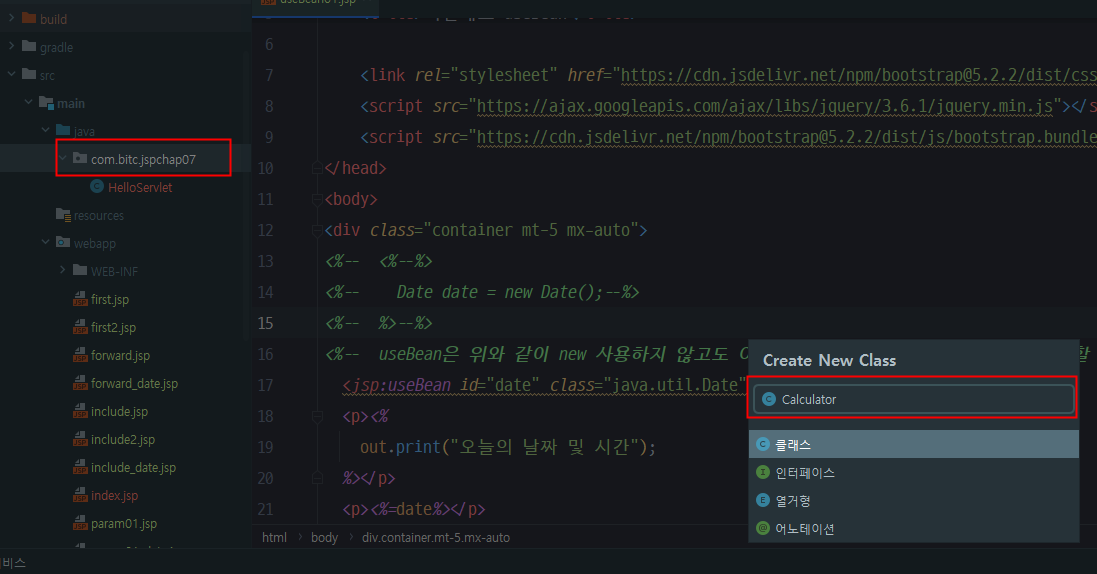
Calculator.class
package com.bitc.jspchap07;

public class Calculator {
    public int process(int n) {
        return n * n * n;
    }

}
useBean02.jsp
<%@ page contentType="text/html;charset=UTF-8" language="java" pageEncoding="UTF-8" %>
<!DOCTYPE html>
<html>
<head>
    <title>Title</title>

    <link rel="stylesheet" href="https://cdn.jsdelivr.net/npm/bootstrap@5.2.2/dist/css/bootstrap.min.css">
    <script src="https://ajax.googleapis.com/ajax/libs/jquery/3.6.1/jquery.min.js"></script>
    <script src="https://cdn.jsdelivr.net/npm/bootstrap@5.2.2/dist/js/bootstrap.bundle.min.js"></script>
</head>
<body>
<jsp:useBean id="bean" class="com.bitc.jspchap07.Calculator"></jsp:useBean>
<%
  int m = bean.process(5);
  out.print("5의 3제곱 : " + m);
%>
</body>
</html>
Person.class
package com.bitc.jspchap07;

public class Person {
    private int id = 20221021;
    private String name = "홍길동";
    // Alt + Enter : Getter, Setter 쉽게 만들 수 있다.
    public Person() {

    }

    public int getId() {
        return id;
    }

    public void setId(int id) {
        this.id = id;
    }

    public String getName() {
        return name;
    }

    public void setName(String name) {
        this.name = name;
    }

}
page : 현재 페이지
request : 요청한 페이지 (forward로 로딩한 페이지까지)
session : 세션 정보가 남아있을때까지