페이징 기법
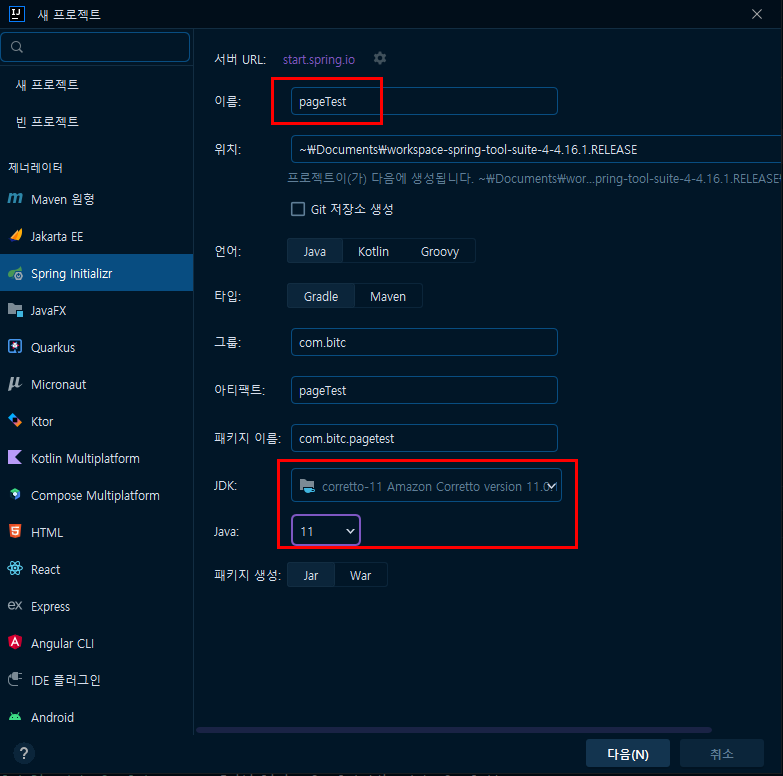
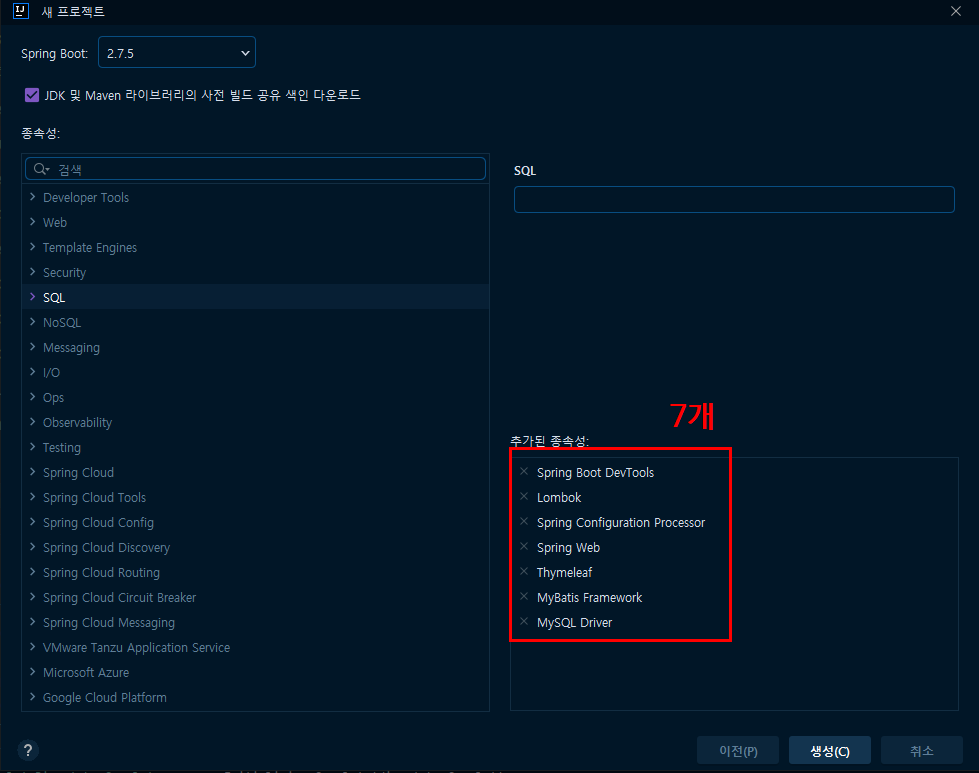
새 프로젝트 생성
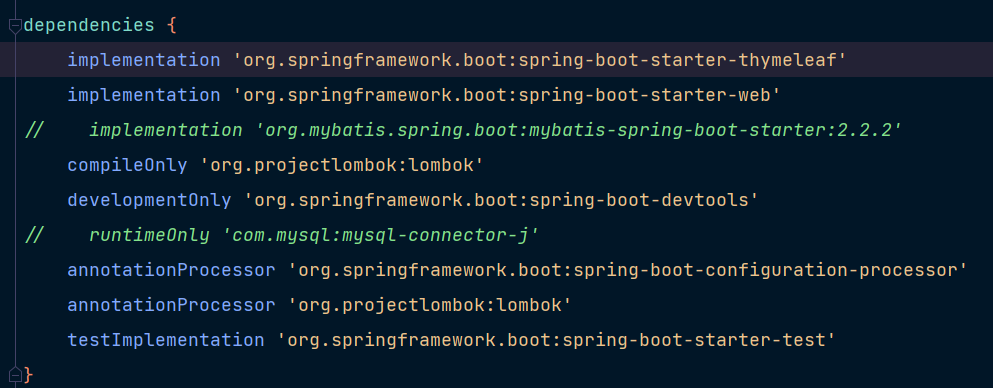
기능 테스트를 위해 두 줄 주석처리
controller 폴더 생성 - PageController.java 생성
package com.bitc.pagetest.controller;

import org.springframework.stereotype.Controller;
import org.springframework.web.bind.annotation.RequestMapping;

@Controller
public class PageController {
  @RequestMapping("/")
  public String index() {
    return "index";
  }
}
templates 폴더 내부에 index.html 생성
<!DOCTYPE html>
<html lang="ko" xmlns:th="http://www.thymeleaf.org">
<head>
    <meta charset="UTF-8">
    <title>Title</title>
    <link rel="stylesheet" href="https://cdn.jsdelivr.net/npm/bootstrap@5.2.2/dist/css/bootstrap.min.css">
    <script src="https://ajax.googleapis.com/ajax/libs/jquery/3.6.1/jquery.min.js"></script>
    <script src="https://cdn.jsdelivr.net/npm/bootstrap@5.2.2/dist/js/bootstrap.bundle.min.js"></script>
    <link rel="stylesheet" href="/css/bootstrap.css" th:href="@{/css/bootstrap.css}">
    <script src="/js/jquery-3.6.1.js" th:src="@{/js/jquery-3.6.1.js}"></script>
    <script src="/js/bootstrap.bundle.js" th:src="@{/js/bootstrap.bundle.js}"></script>
</head>
<body>
<h1>페이징 테스트하기</h1>
</body>
</html>
기본 테스트 성공
DB : sakila 이용

application.properties
server.port=8080
spring.mvc.hiddenmethod.filter.enabled=true
spring.datasource.hikari.driver-class-name=com.mysql.cj.jdbc.Driver
spring.datasource.hikari.jdbc-url=jdbc:mysql://localhost:3306/sakila?useUnicode=true&characterEncoding=utf-8&serverTimezone=UTC
spring.datasource.hikari.username=test1
spring.datasource.hikari.password=java505
spring.datasource.hikari.connection-test-query=SELECT 1

mybatis.configuration.map-underscore-to-camel-case=true
configuration 폴더 내부
DatabaseConfiguration.java
package com.bitc.pagetest.configuration;

import org.springframework.beans.factory.annotation.Autowired;
import org.springframework.boot.context.properties.ConfigurationProperties;
import org.springframework.context.ApplicationContext;
import org.springframework.context.annotation.Bean;
import org.springframework.context.annotation.Configuration;
import org.springframework.context.annotation.PropertySource;

@Configuration
@PropertySource("classpath:/application.properties")
public class DatabaseConfiguration {

  @Autowired
  private ApplicationContext applicationContext;

  @Bean
  @ConfigurationProperties(prefix = "spring.datasource.hikari")
  public HikariConfig hikariConfig() {
    return new HikariConfig();
  }

}
여기까지 생성 후 build.gradle의 주석처리된 부분 주석 풀기
DatabaseConfiguration.java 코드 추가
  @Bean
  DataSource datasource() throws Exception {
    DataSource ds = new HikariDataSource(hikariConfig());
    System.out.println(datasource().toString());
    return ds;
  }

  @Bean
  public SqlSessionFactory sqlSessionFactory(DataSource ds) throws Exception {
    SqlSessionFactoryBean ssfb = new SqlSessionFactoryBean();
    ssfb.setDataSource(ds);
    ssfb.setMapperLocations(appContext.getResources("classpath:/sql/**/sql-*.xml"));
    ssfb.setConfiguration(mybatisConfig());

    return ssfb.getObject();
  }

   @Bean
  public SqlSessionTemplate sqlSessionTemplate(SqlSessionFactory ssf) {
    return new SqlSessionTemplate(ssf);
  }

  @Bean
  @ConfigurationProperties(prefix = "mybatis.configuration")
  public org.apache.ibatis.session.Configuration mybatisConfig () {
    return new org.apache.ibatis.session.Configuration();
  }
sql 폴더 생성 후 sql-customer.xml 파일 생성
<?xml version="1.0" encoding="UTF-8"?>
<!DOCTYPE mapper PUBLIC "-//mybatis.org//DTD Mapper 3.0//EN" "http://mybatis.org/dtd/mybatis-3-mapper.dtd">

<mapper namespace="com.bitc.pagetest.mapper.CustomerMapper">
</mapper>
dto 폴더
Customers.java
package com.bitc.pagetest.dto;

import lombok.Data;

@Data
public class Customers {
  private int customerId;
  private int storeId;
  private String firstName;
  private String lastName;
  private String email;
  private int addressId;
  private int active;
  private String createDate;
  private String lastUpdate;
}
페이지 생성
service 폴더에 인터페이스 생성 PageService.I
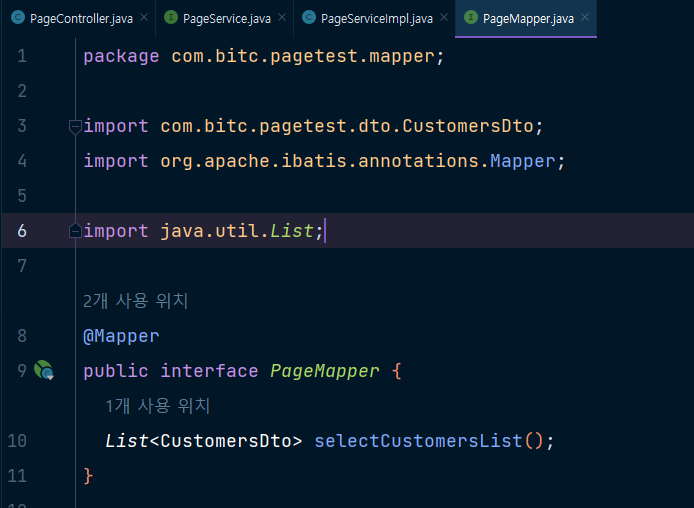
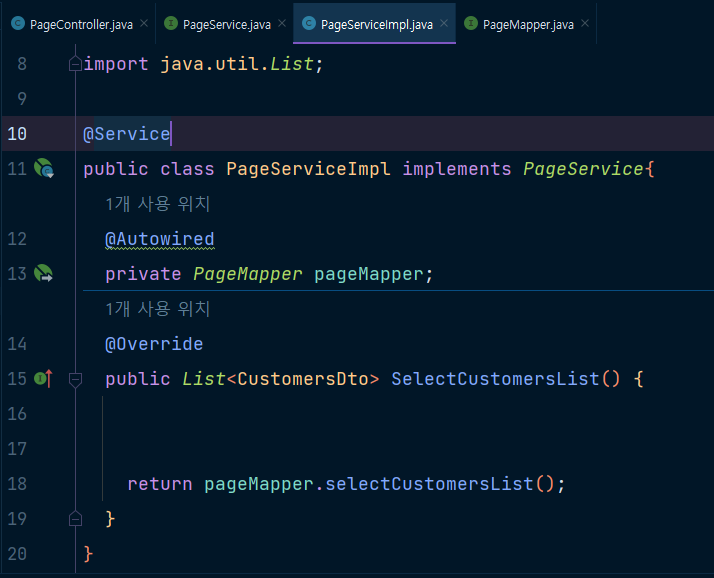
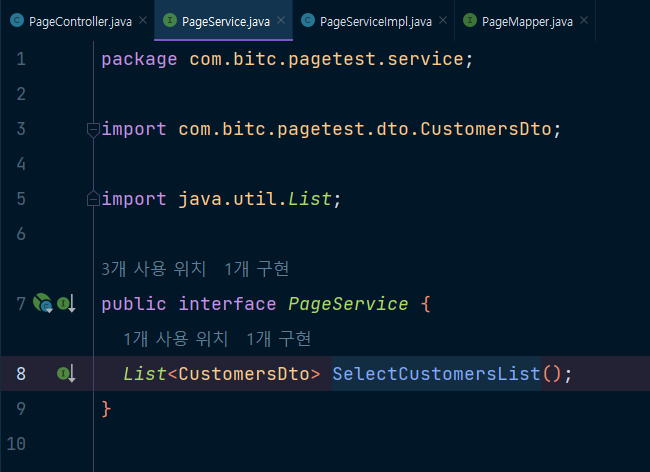

기본 클래스/인터페이스 생성 완료
templates 폴더 - page.html 생성
<!DOCTYPE html>
<html lang="ko" xmlns:th="http://www.thymeleaf.org">
<head>
    <meta charset="UTF-8">
    <title>Title</title>
    <link rel="stylesheet" href="https://cdn.jsdelivr.net/npm/bootstrap@5.2.2/dist/css/bootstrap.min.css">
    <script src="https://ajax.googleapis.com/ajax/libs/jquery/3.6.1/jquery.min.js"></script>
    <script src="https://cdn.jsdelivr.net/npm/bootstrap@5.2.2/dist/js/bootstrap.bundle.min.js"></script>
    <link rel="stylesheet" href="/css/bootstrap.css" th:href="@{/css/bootstrap.css}">
    <script src="/js/jquery-3.6.1.js" th:src="@{/js/jquery-3.6.1.js}"></script>
    <script src="/js/bootstrap.bundle.js" th:src="@{/js/bootstrap.bundle.js}"></script>
</head>
<body>
<div class="container mt-5 p-5">
  <div class="row">
    <div class="col-sm">
      <table class="table table-hover table-striped">
        <thead>
         <tr>
          <th>고객번호</th>
          <th>이름</th>
          <th>이메일</th>
          <th>등록일</th>
          <th>수정일</th>
         </tr>
        </thead>
        <tbody>
          <tr th:if="${#lists.size(customersList)} > 0" th:each="item : ${customersList}">
            <td th:text="${item.customerId}"></td>
            <td th:text="|${item.lastName} ${item.firstName}|"></td>
            <td th:text="${item.email}"></td>
            <td th:text="${item.createDate}"></td>
            <td th:text="${item.lastUpdate}"></td>
          </tr>
          <tr th:unless="${#lists.size(customersList) > 0}">
            <td>조회된 내용이 없습니다.</td>
          </tr>
        </tbody>
      </table>
    </div>
  </div>
</div>
</body>
</html>
페이징을 위한 라이브러리 추가
https://mvnrepository.com/artifact/com.github.pagehelper/pagehelper-spring-boot-starter/1.4.5
build.gradle에 아래 코드 추가
// https://mvnrepository.com/artifact/com.github.pagehelper/pagehelper-spring-boot-starter
implementation 'com.github.pagehelper:pagehelper-spring-boot-starter:1.4.5'
application.properties 에 코드 추가
# 페이징 라이브러리
# 사용할 DB 설정
pagehelper.helper-dialect=mysql
# 범위를 넘어가는 pageNum이 있을 경우 가능한 값으로 변경
# (1페이지로 시작하는데 0 또는 -1로 접근하면 최소페이지인 1페이지로 가게 함)
pagehelper.reasonable=true
controller 수정
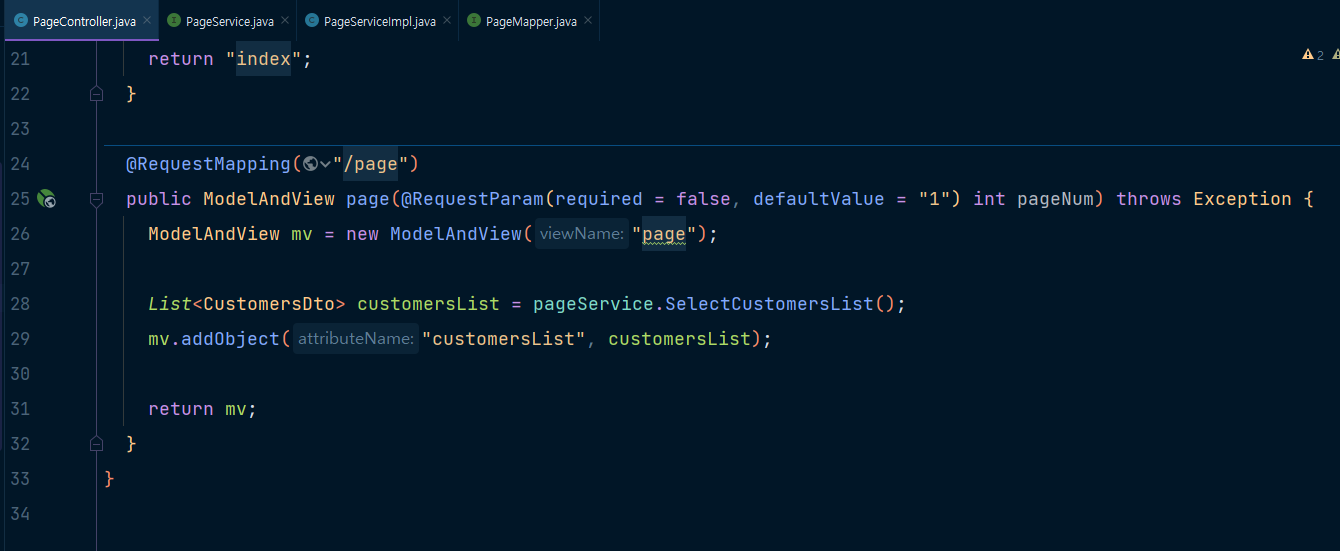
  @RequestMapping("/page")
  public ModelAndView page(@RequestParam(required = false, defaultValue = "1") int pageNum) throws Exception {
    ModelAndView mv = new ModelAndView("page");

    List<CustomersDto> customersList = pageService.SelectCustomersList();
    mv.addObject("customersList", customersList);

    return mv;
  }
pageService 코드 추가
Page<CustomersDto> selectCustomersList(int pageNo);page.html 파일 수정 : .getList() 2군데 추가
<tr th:if="${#lists.size(customersList.getList())} > 0" th:each="item : ${customersList.getList()}">페이지 번호 nav 추가
<nav>
<ul class="pagination justify-content-center">
<li th:classappend="${customersList.getPrePage() == 0} ? 'disabled'">
<a th:href="@{/page(pageNum=${customersList.getPrePage()})}">«</a>
</li>
<li th:each="page : ${#numbers.sequence(customersList.getNavigateFirstPage(), customersList.getNavigateLastPage())}" th:classappend="${page == customersList.getPageNum()} ? 'active'">
<a th:text="${page}" th:href="@{page/(pageNum=${page})}"></a>
</li>
<li th:classappend="${customersList.getNextPage() == 0} ? 'disabled'">
<a th:href="@{/page(pageNum=${customersList.getNextPage()})}">»</a>
</li>
</ul>
</nav>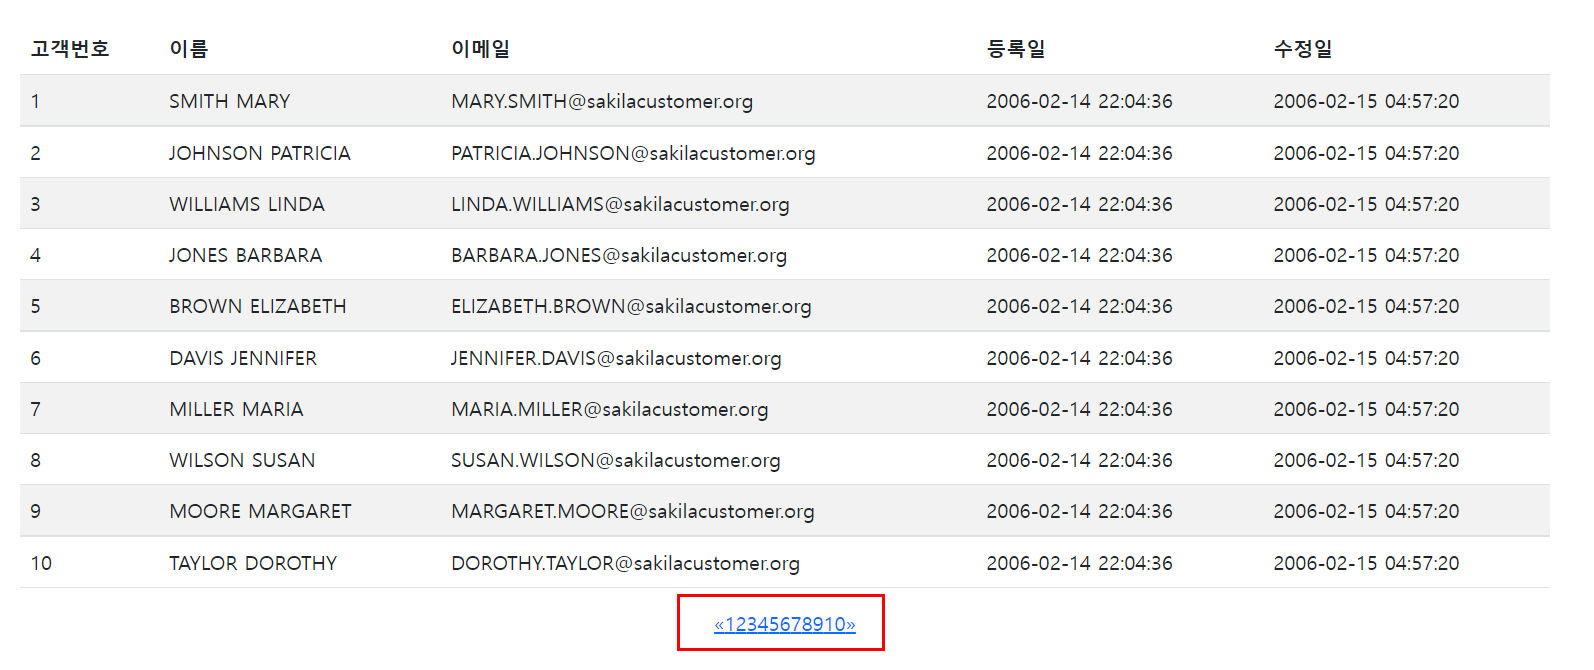
데이터 확인
html 파일의 상단에 코드 추가해봄
<p th:text="${customersList}"></p>
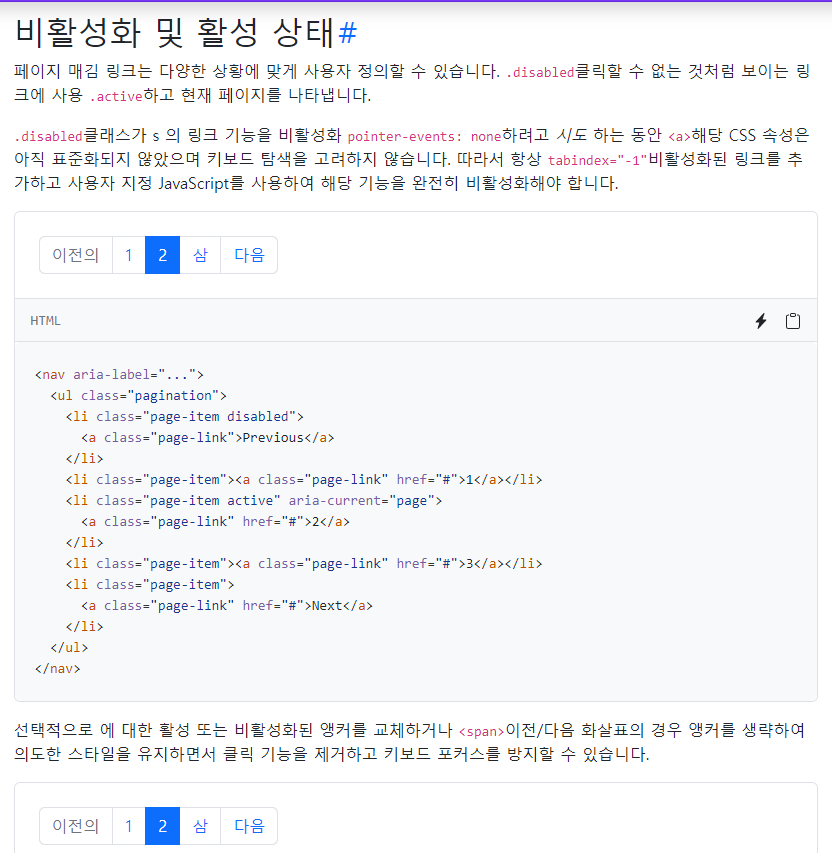
페이지네이션 - disabled
참고 : https://getbootstrap.com/docs/5.2/components/pagination/
JSON 데이터 파싱
데이터 파싱을 위해 Gson 필요함
build.gradle에 추가
사이트 : https://mvnrepository.com/artifact/com.google.code.gson/gson/2.10
https://mvnrepository.com/artifact/com.google.code.gson/gson/2.10데이터 참고 사이트
영화진흥위원회 : https://www.kobis.or.kr/kobisopenapi/homepg/apiservice/searchServiceInfo.do
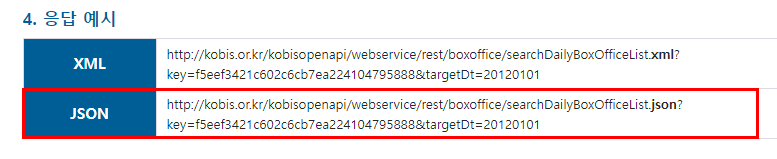
PharmacyController 에 코드 추가 (url은 위의 응답예시 JSON 코드사용, 끝에 날짜만 수정하면 됨 20221112 )
@RequestMapping(value = "/movie/dailyBoxOffice", method = RequestMethod.GET)
  public String dailyBoxOfficeView() {
    return "/movie/dailyBoxOffice";
  }

  @ResponseBody
  @RequestMapping(value = "/movie/dailyBoxOfficeJSON", method = RequestMethod.POST)
  public Object getDailyBoxOfficeListJson() {
    String url = "	http://kobis.or.kr/kobisopenapi/webservice/rest/boxoffice/searchDailyBoxOfficeList.json?key=f5eef3421c602c6cb7ea224104795888&targetDt=20221112";

    List<> dailyBoxOfficeList = null;

    return dailyBoxOfficeList;
  }
포스트맨 실행 -> 위의 url 넣고 send(GET방식)
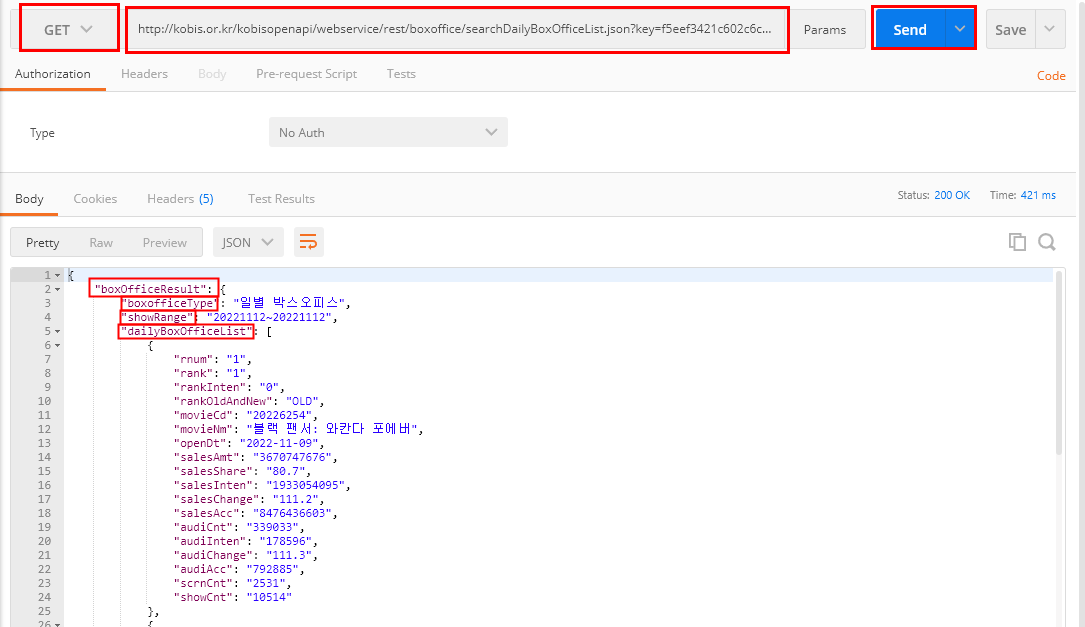
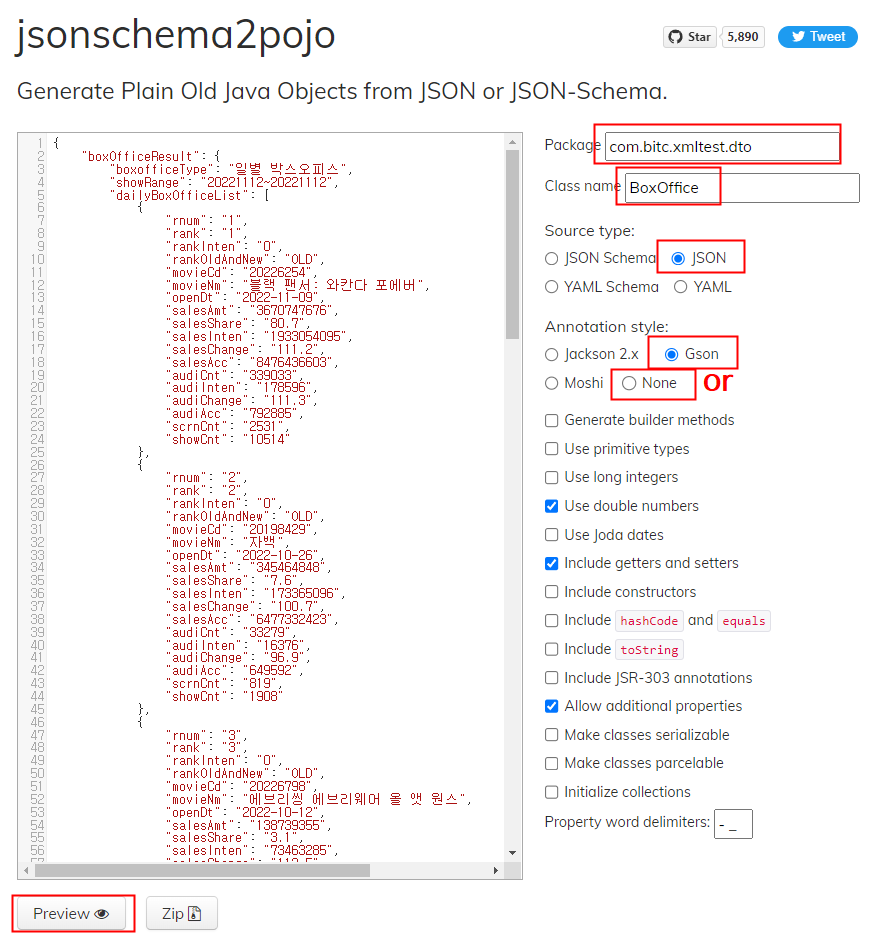
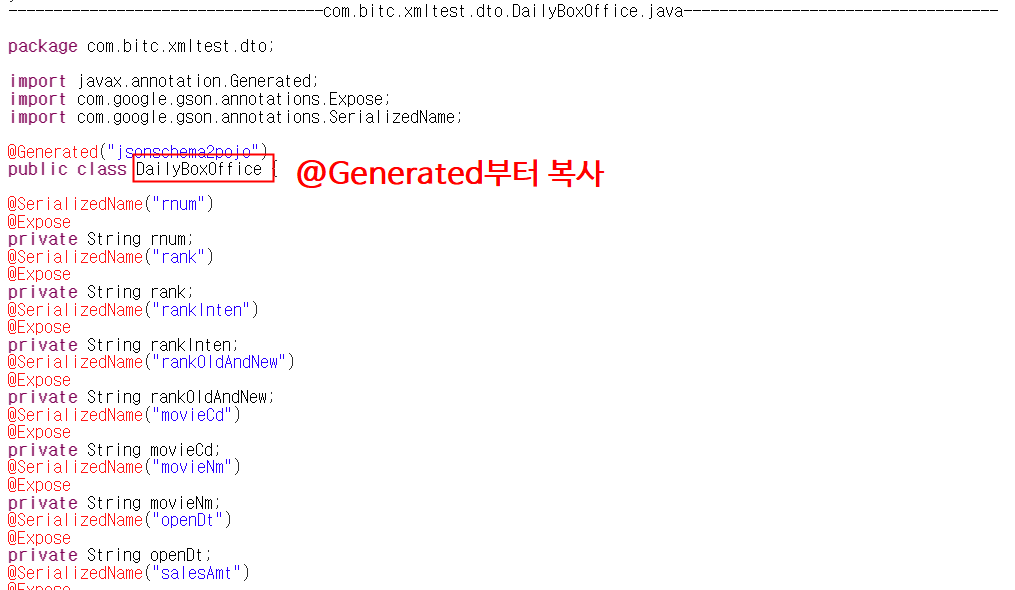
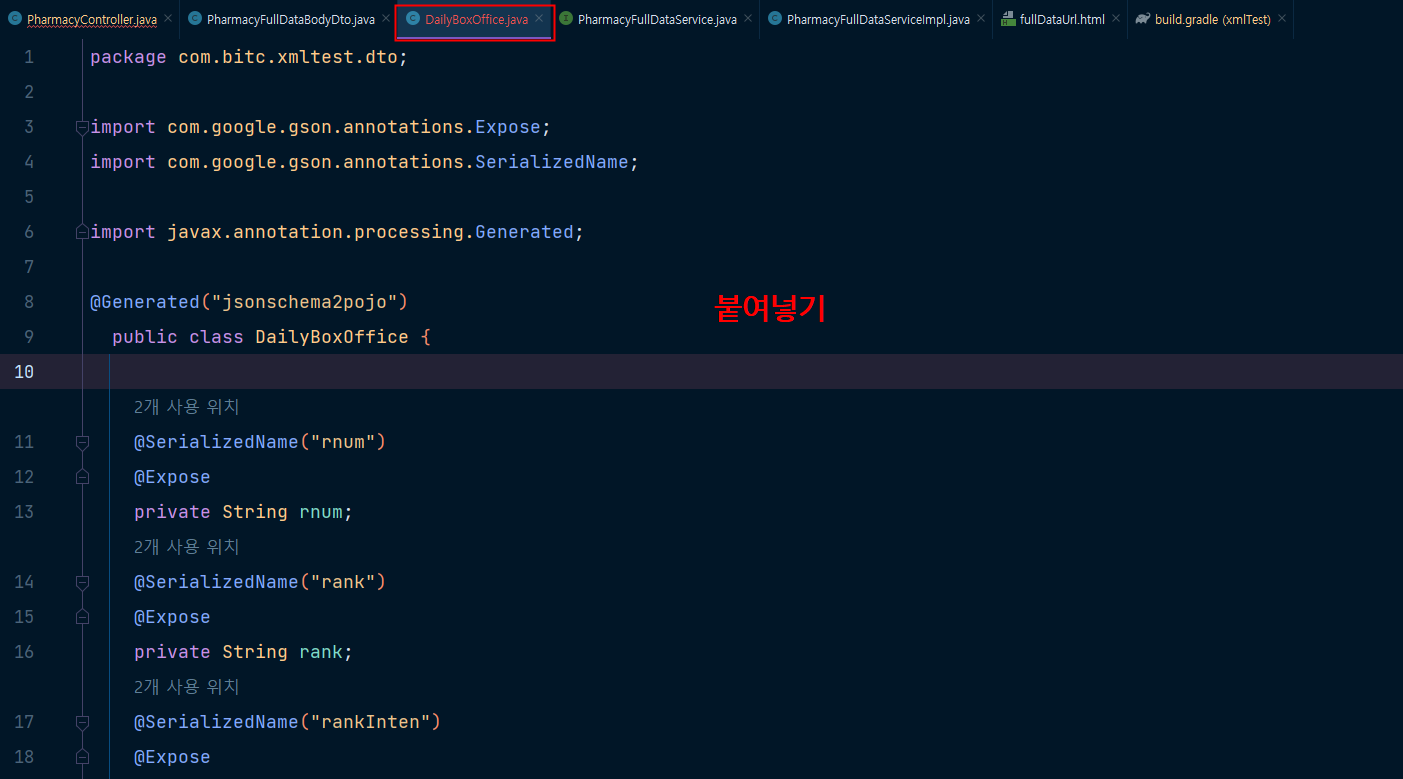
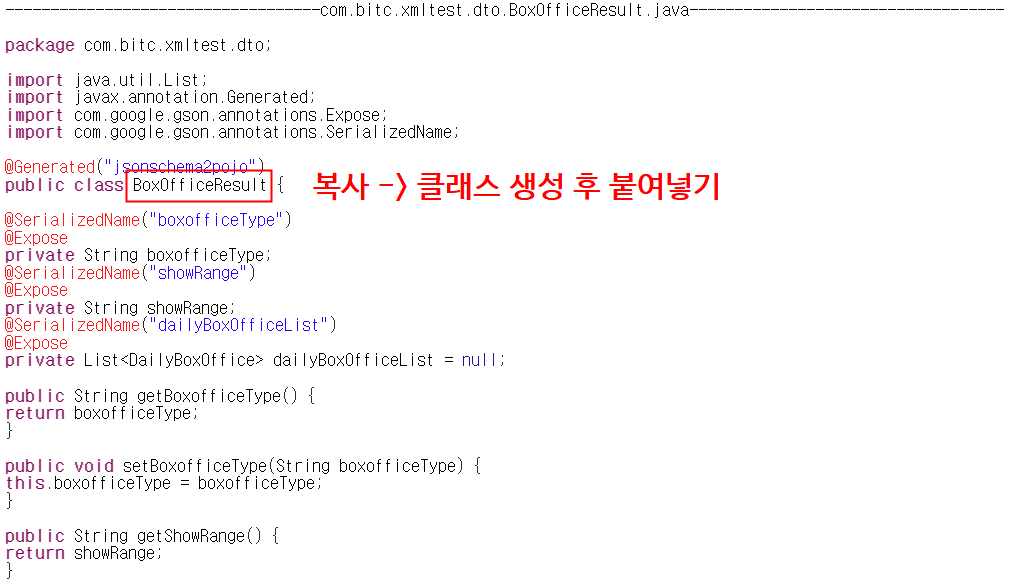
위 결과물 모두 복사해서 JSON으로 넘어온 데이터를 JAVA Class로 변환시켜주는 사이트에 붙여넣기
https://www.jsonschema2pojo.org/

Gson / Xml 파싱의 차이점
Gson을 통해 변환하느냐 / JAXBContext를 통해 unmarshal로 파싱하느냐의 차이밖에 없다.