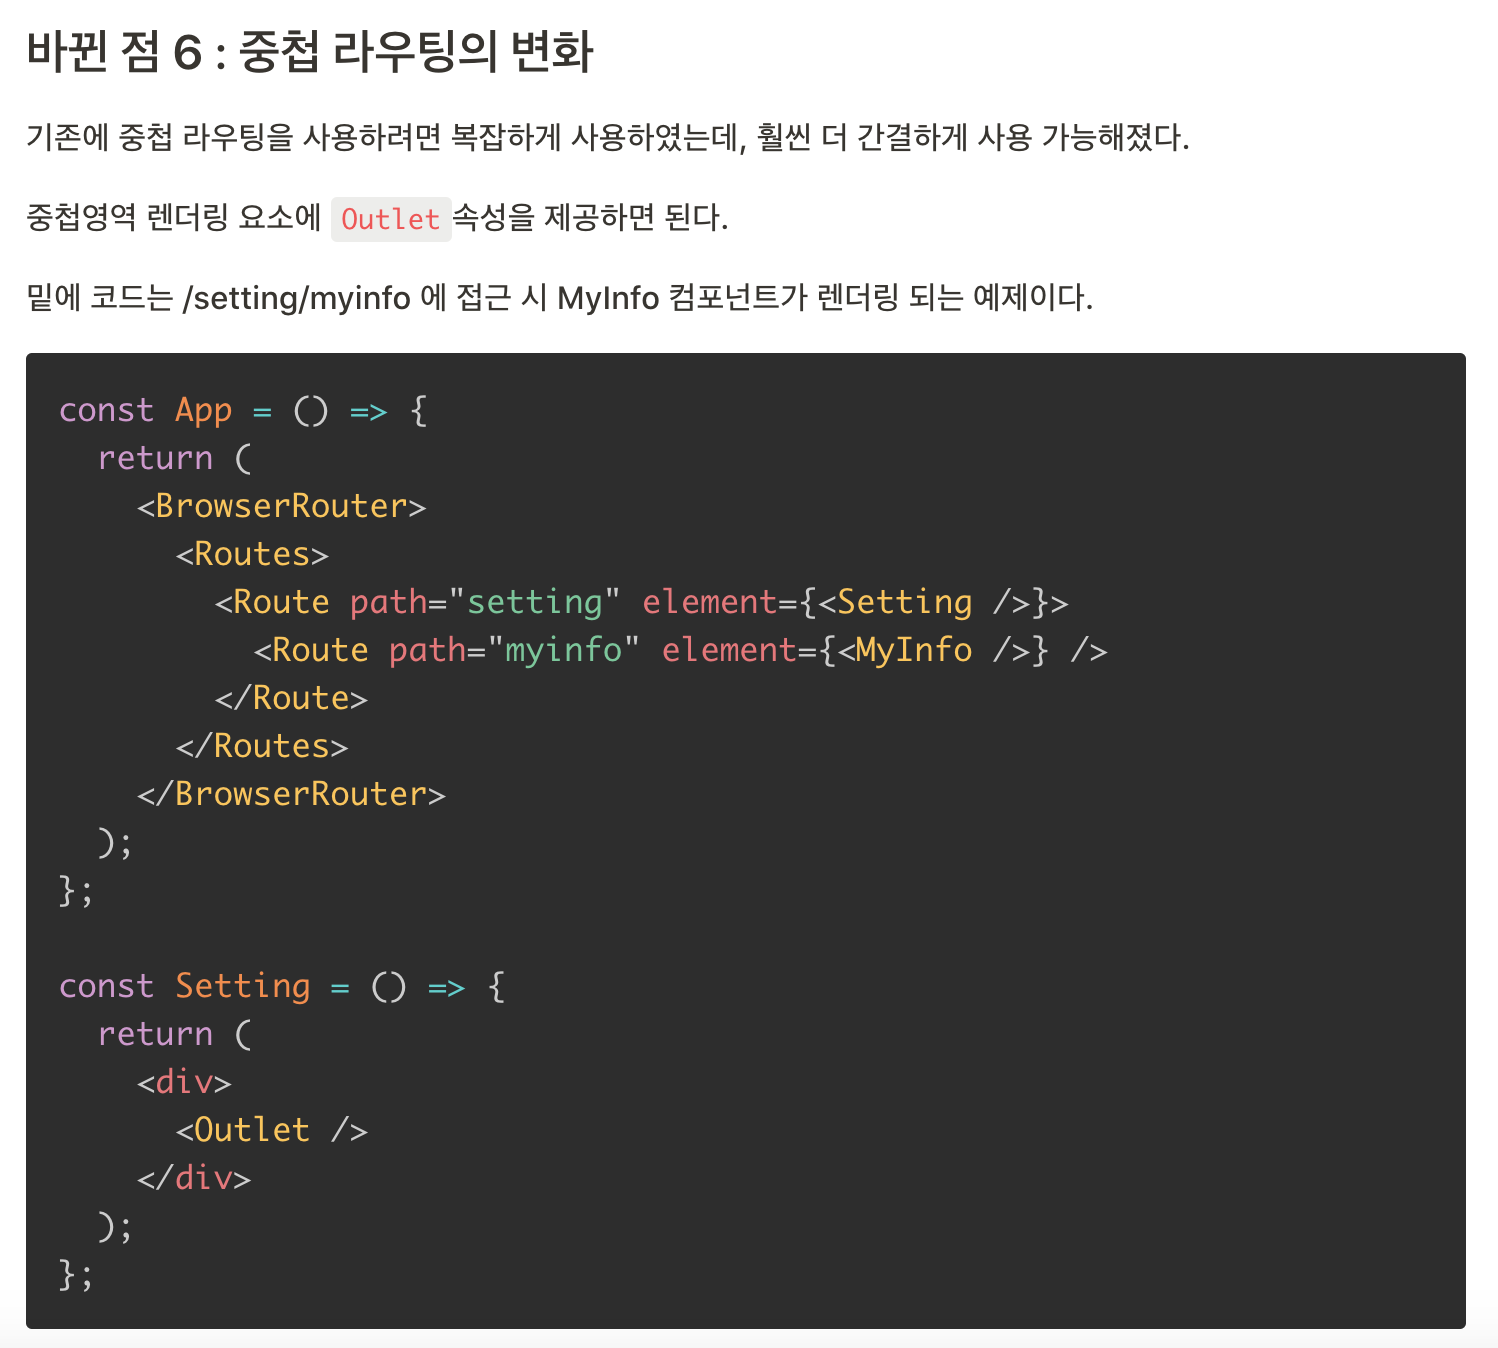
일단 nested routing을 보기 전, 알아야할 컴포넌트가 있다.
바로
< Outlet / >Outlet 컴포넌트는 뭐냐? Jaeme.dev 님의 블로그 참조했습니다.
Data.jsx

let invoices = [
    {
      name: "Santa Monica",
      number: 1995,
      amount: "$10,800",
      due: "12/05/1995",
    },
    {
      name: "Stankonia",
      number: 2000,
      amount: "$8,000",
      due: "10/31/2000",
    },
    {
      name: "Ocean Avenue",
      number: 2003,
      amount: "$9,500",
      due: "07/22/2003",
    },
    {
      name: "Tubthumper",
      number: 1997,
      amount: "$14,000",
      due: "09/01/1997",
    },
    {
      name: "Wide Open Spaces",
      number: 1998,
      amount: "$4,600",
      due: "01/27/1998",
    },
  ];

  export function getInvoices() {
    return invoices;
  }

  export function getInvoice(number) {
    return invoices.find(
      (invoice) => invoice.number === number
    );
}app.js
import { BrowserRouter, Routes, Route } from 'react-router-dom';
import Hello from './page/hello.jsx';
import Invoices from './page/invoices.jsx';
import Invoice from './route/invoice.jsx'
ReactDOM.render(
<React.StrictMode>
<BrowserRouter>
<Routes>
<Route path="/" element={<App />} />
<Route path="/hello" element={<Hello />} />
<Route path="/invoices" element={<Invoices />}>
<Route path=":invoiceId" element={<Invoice />} />
</ Route>
<Route
path="*"
element={
<main style={{ padding: "1rem" }}>
<p>There's nothing here!</p>
</main>
}
/>
</Routes>
</BrowserRouter>
</React.StrictMode>,
document.getElementById('root')
);app.js를 잘 보면, 루트 태그로 감싸져있는 또다른 루트 태그가 있다. 리액트 라우터 최신버전에서 지원하는 nested routing 방식. 하위태그로 작성하니 직관적이다.
invoices.js

import React from 'react';
import { getInvoices } from '../data/data';
import { Link, Outlet } from 'react-router-dom';

const invoices = () => {

    let invoices = getInvoices();

    return (
        <div style={{ display: "flex" }}>
        <nav
          style={{
            borderRight: "solid 1px",
            padding: "1rem",
          }}
        >
          {invoices.map((invoice) => (
            <Link
              style={{ display: "block", margin: "1rem 0" }}
              to={`/invoices/${invoice.number}`}
              key={invoice.number}
            >
              {invoice.name}
            </Link>
          ))}
        </nav>
        <Outlet />
      </div>
    )
}

export default invoices
자 이제 여기서 데이터를 받아서 뿌려줄 거다.
import { getInvoices } from '../data/data'로 getInvoices 함수 (data) 를 import 한다.
변수를 하나 생성해 getInvoices 함수를 실행, 데이터를 반환한다.
.map 메서드를 이용해 데이터 순회, invoice의 name만 화면에 반환.
다시 index.js에서 우리가 어떻게 Nested routing을 구현했는지 생각해보자.
invoices.jsx 에서 보면
          {invoices.map((invoice) => (
            <Link
              style={{ display: "block", margin: "1rem 0" }}
              to={`/invoices/${invoice.number}`}
              key={invoice.number}
            >
              {invoice.name}
            </Link>
          ))}
로 또 다른 링크, to={/invoices/${invoice.number}로 라우팅을 해준다.
여기서 떠올려야 될 것. index.js에서 nested routing을 구현했던 태그다.

invoice.jsx

import { useParams } from "react-router-dom";
import { getInvoice } from '../data/data'
export default function Invoice() {

    let params = useParams();

    let invoice = getInvoice(parseInt(params.invoiceId, 10));


    return (
    <main style={{ padding: "1rem" }}>
        <h2>Total Due: {invoice.amount}</h2>
        <p>
          {invoice.name}: {invoice.number}
        </p>
        <p>Due Date: {invoice.due}</p>
      </main>
    )
  }
여기서 useParams는 뭐에요?
useParams는 react-router의 훅이다.
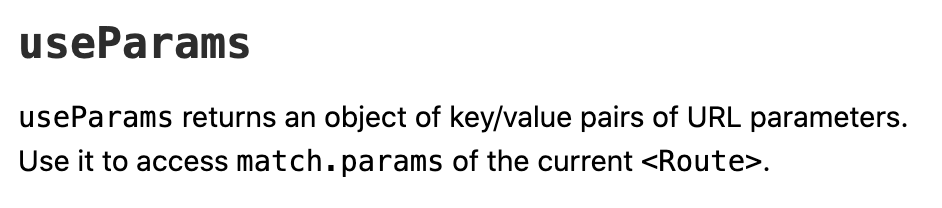
== "님 url path 있죠? 그거 params라는 변수에 저장해서 좀 쓸께요~"
"그리고 params가 아니라, 루트 태그 안에 nested routing 한 태그의 path 값이 필요하니까, params.invoiceId에 맞는 number 값을 갖고있는 객체 반환해주세요. 화면에 렌더링해줘야 돼요."

:invoiceId는 키, 값은 params.invoiceId라 이건가?
data.js

  export function getInvoice(number) {
    return invoices.find(
      (invoice) => invoice.number === number
    );
  }
data.js에선 find메서드로 params.invoiceId의 값과 일치한 객체를 반환한다.
그럼 invoice.js에선 해당 객체를 넘겨받아 화면에 그려준다.

Hello,