OpenStack
오픈스택(OpenStack)은 Private/public 클라우드를 구축하고 관리하는 오픈소스 플랫폼을 의미합니다.
OverView
테스트 목적
회사에 입사하였을때 오픈스택을 packstack, devstack, triple-o, ansible, kolla-ansible 방식으로 배포 테스트 해보았는데 자동화 설치 툴로 설치를 하다보니 각 구성요소가 어떻게 배포되는지 어떤 용도로 쓰이는지 알지 못하는 문제점이 있었음.
현재 업무는 PaaS 플랫폼 구축이 주요 업무이긴 하지만, 계속 궁금했었기에 테스트를 진행하였음.
버전은 이전에 설치해본게 wallaby랑 yoga라 yoga선택.
본문서에서 현재 진행해본 단계는 Dashboard 배포까지의 단계를 테스트 해보았음.
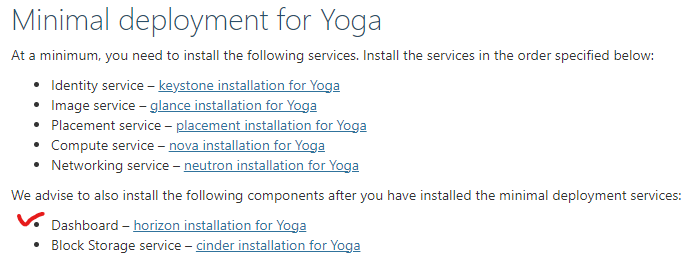
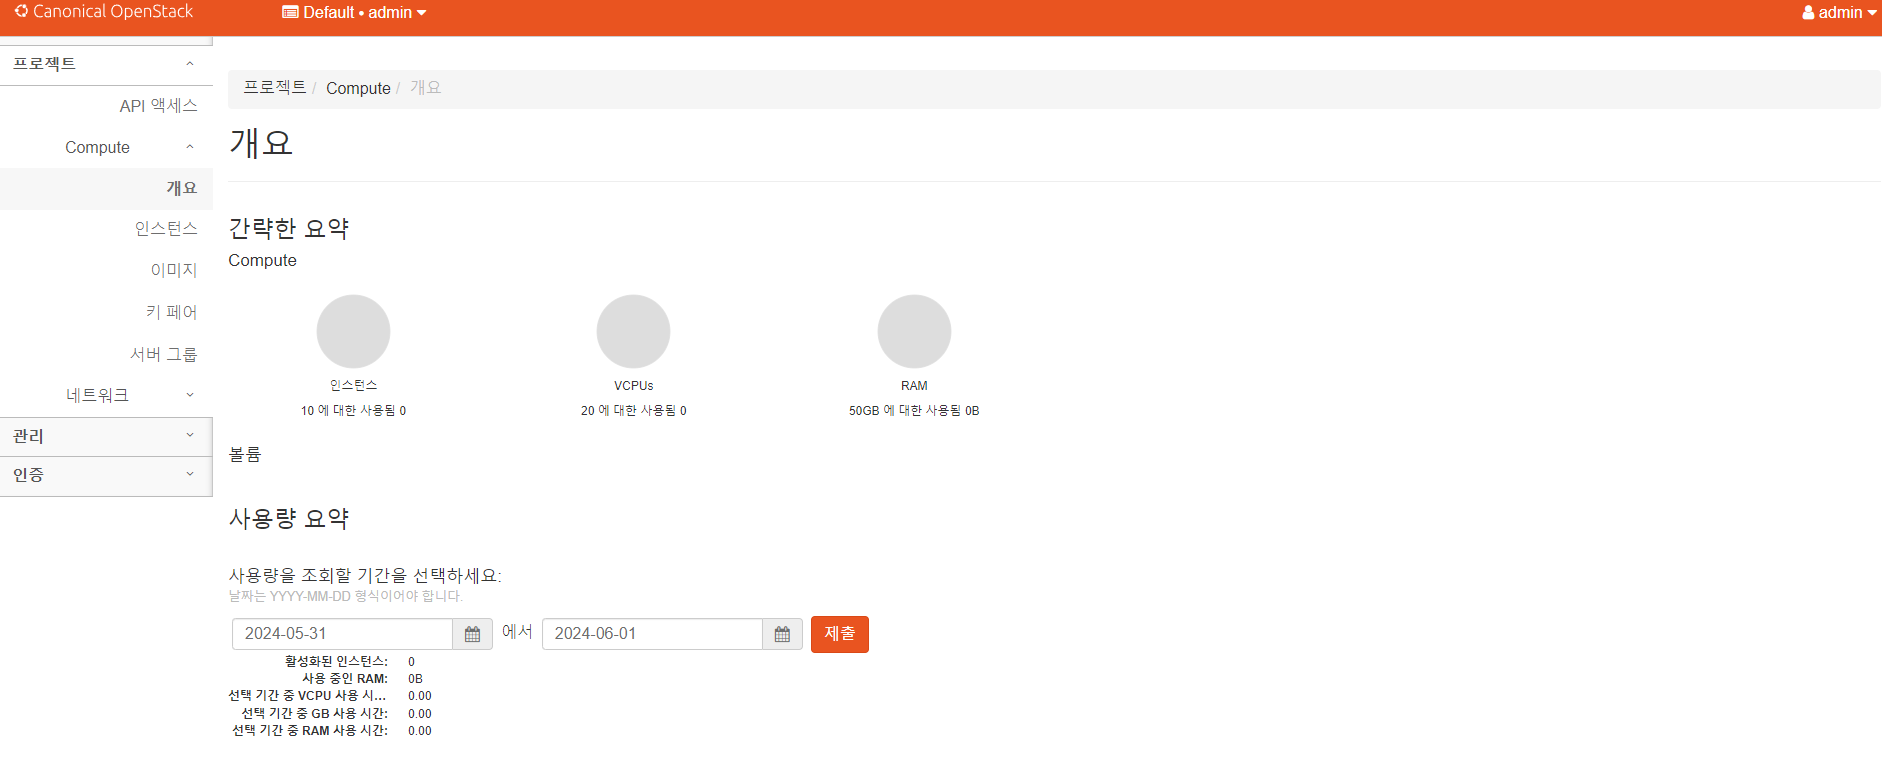
최소 배포 환경 중 Dashboard 단계까지 진행하면 아래와 같은 화면을 만날 수 있다.
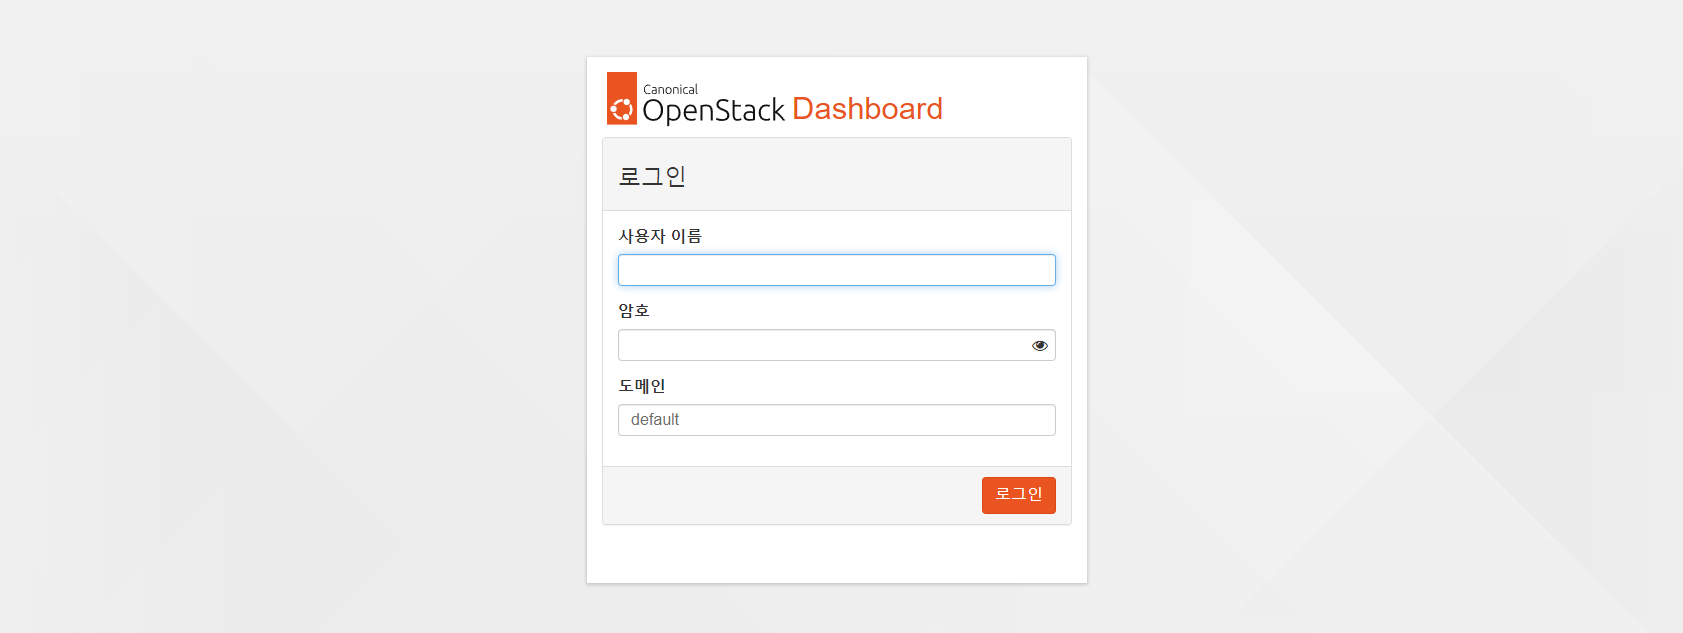
로그인을 하면 아래와 같은 화면을 볼수 있다.
테스트 환경
-
NHN Cloud VM Instance
-
OS는 Ubuntu 22.04 LTS를 이용함.
구분 cpu memory disk public-ip external-ip internal-ip 용도 Bastion 2 4 50 a.a.a.a 10.5.2.32 - 오픈스택서버 ssh 접속 및 제어 OpenStack 8 16 50 b.b.b.b 10.5.2.61 10.5.1.98 오픈스택구성
OpenStack 서버의 external-ip는 아래 내용에서 ${hostIP}로 표기함. 이부분이 텍스트로 표기되어있어 혼란스러울수 있어 변수 처리하여 작성함.
즉, ${hostIP}는 10.5.2.32를 말하며 테스트하는 사용자의 환경에 따라 변경 됨.
테스트 과정에서 생성하는 비밀번호는 icurfer123! 로 통일 하여 생성및 적용하며, 본 문서에서는 ${pw} 로 표기함.
본인이 편한 비밀 번호로 설정하여도 무관함. 문자열의 마지막에 @를 절대 넣지 않도록 할것.
Bastion과 OpenStack 서버는 동일 VPC에 구성되어있어 ssh 접속 가능.
권장 사양 및 환경
코드박스에 sudo가 표시되어있으나 기본적으로 root로 실습하며 sudo 표시가 없는 경우도 있음.
ex) vi 에디터 실행 명령같은경우.
구축을 위한 환경 설정
보안설정
호스트 네트워킹
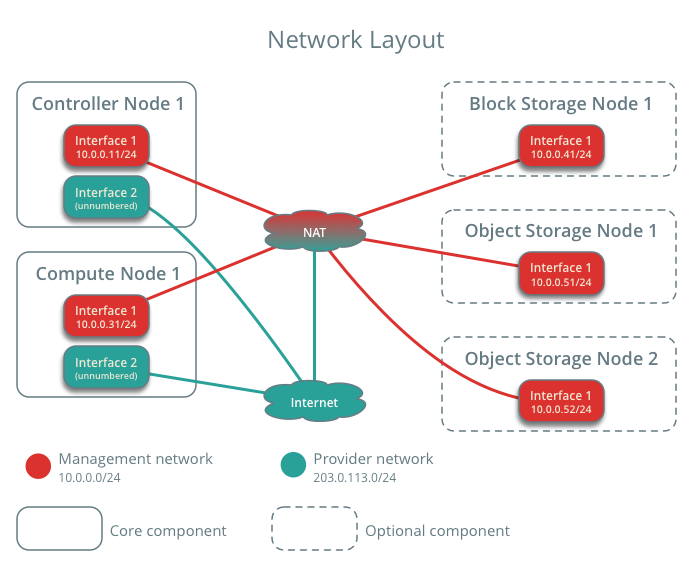
공식문서: 아마 처음 설치해보거나 엔지니어로서 시작한지 얼마 안되었다면 이 내용을 이해하기 어려울 것이니, 뒤에 따라하기 과정부터 진행하도록 한다. 참고로 본 문서의 실습과정은 1대의 VM에 Controller Node와 Compute Node를 구성하는 것이므로 아래 네트워크처럼 복잡하지 않다.
다 구성하고 나서 VM 초기화를하고 다시 구성하면서 각 요소를 분석하며 학습하는 것을 강력하게 권장함.
OpenStack 패키지 설정.
Ubuntu 22.04 LTS는 기본적으로 Yoga버전을 사용한다고 되어 있으므로 별도 설정을 하지 않음.
OpenStack Yoga is available by default using Ubuntu 22.04 LTS.
클라이언트 설치
apt update && apt install python3-openstackclient -yNetwork Time Protocol
SQL 데이터 베이스 구성
mariaDB 설치
sudo apt install mariadb-server python3-pymysql -ymariaDB 설정
vi /etc/mysql/mariadb.conf.d/99-openstack.cnf[mysqld]
bind-address = ${hostIP} # management IP address of the controller node
default-storage-engine = innodb
innodb_file_per_table = on
max_connections = 4096
collation-server = utf8_general_ci
character-set-server = utf8mariaDB 재기동
systemctl restart mariadb.servicemariaDB 초기화
mysql_secure_installation 스크립트를 실행하여 데이터베이스 서비스 보안을 강화합니다. 특히, 데이터베이스 root 계정에 대하여 알맞은 암호를 선택합니다.
mysql_secure_installation출력값...
NOTE: RUNNING ALL PARTS OF THIS SCRIPT IS RECOMMENDED FOR ALL MariaDB
      SERVERS IN PRODUCTION USE!  PLEASE READ EACH STEP CAREFULLY!

In order to log into MariaDB to secure it, we'll need the current
password for the root user. If you've just installed MariaDB, and
haven't set the root password yet, you should just press enter here.

Enter current password for root (enter for none):
OK, successfully used password, moving on...

Setting the root password or using the unix_socket ensures that nobody
can log into the MariaDB root user without the proper authorisation.

You already have your root account protected, so you can safely answer 'n'.

Switch to unix_socket authentication [Y/n] n
 ... skipping.

You already have your root account protected, so you can safely answer 'n'.

Change the root password? [Y/n] Y
New password:
Re-enter new password:
Password updated successfully!
Reloading privilege tables..
 ... Success!


By default, a MariaDB installation has an anonymous user, allowing anyone
to log into MariaDB without having to have a user account created for
them.  This is intended only for testing, and to make the installation
go a bit smoother.  You should remove them before moving into a
production environment.

Remove anonymous users? [Y/n] Y
 ... Success!

Normally, root should only be allowed to connect from 'localhost'.  This
ensures that someone cannot guess at the root password from the network.

Disallow root login remotely? [Y/n] Y
 ... Success!

By default, MariaDB comes with a database named 'test' that anyone can
access.  This is also intended only for testing, and should be removed
before moving into a production environment.

Remove test database and access to it? [Y/n] Y
 - Dropping test database...
 ... Success!
 - Removing privileges on test database...
 ... Success!

Reloading the privilege tables will ensure that all changes made so far
will take effect immediately.

Reload privilege tables now? [Y/n] Y
 ... Success!

Cleaning up...

All done!  If you've completed all of the above steps, your MariaDB
installation should now be secure.

Thanks for using MariaDB!
mariaDB 계정 설정 검증
# local에서 mysql로 root 접속.
mysql
MariaDB [(none)]> select host,user,password from mysql.user;
# root 외부접속 설정 안되어있어도 문제 없음.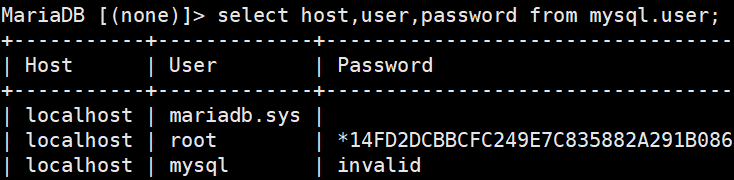
Message queue
MQ: OpenStack은 서비스 간 작업과 상태정보에 대한 상호 교환 및 조정을 위하여 message queue를 사용합니다. OpenStack은 RabbitMQ, Qpid, ZeroMQ 를 포함하는 여러 메시지 큐 서비스들을 지원합니다. 그러나, OpenStack 패키지를 지원하는 대부분의 배포판에서는 특정 메시지 큐 서비스를 지원합니다. 이 가이드에서는 대부분의 배포판에서 지원하는 RabbitMQ 메시지 큐 서비스를 도입합니다.
일반적으로 message queue는 Control Node에서 동작합니다.
rabbit MQ 설치
sudo apt install rabbitmq-server -yrabbit MQ 사용자 추가
rabbitmqctl add_user openstack ${pw}
# openstack은 사용자 이름을 말함.
출력값...
Done. Don't forget to grant the user permissions to some virtual hosts! See 'rabbitmqctl help set_permissions' to learn more.openstack 사용자에게 권한 설정을 합니다.
rabbitmqctl set_permissions openstack ".*" ".*" ".*"출력값...
Setting permissions for user "openstack" in vhost "/" ...rabbit MQ의 비번이 나중에 Nova-compute설정과 맞지않으면 Nova-compute가 정상동작하지 않음.
Etcd
Etcd: OpenStack 서비스들은 분산 키 잠금 관리, 구성 저장, 서비스가 살아있는지 및 다른 시나리오에 대한 지속적인 추적을 위한 안정적인 분산 키-값 저장소.
키: 값 저장소로 사용되는 파일형 데이터베이스이며, 쿠버네티스에서도 사용하니 리서치를 좀 해볼 필요가 있을듯...
Etcd 설치
sudo apt install etcd -yEtcd 설정
vi /etc/default/etcd# ${hostIP}는 숫자로된 IP 주소 입력
ETCD_NAME="controller"
ETCD_DATA_DIR="/var/lib/etcd"
ETCD_INITIAL_CLUSTER_STATE="new"
ETCD_INITIAL_CLUSTER_TOKEN="etcd-cluster-01"
ETCD_INITIAL_CLUSTER="controller=http://${hostIP}:2380"
ETCD_INITIAL_ADVERTISE_PEER_URLS="http://${hostIP}:2380"
ETCD_ADVERTISE_CLIENT_URLS="http://${hostIP}:2379"
ETCD_LISTEN_PEER_URLS="http://0.0.0.0:2380"
ETCD_LISTEN_CLIENT_URLS="http://${hostIP}:2379"/etc/hosts파일에 값을 추가해야한다. 초반 설정에서 빠트렸으면 여기서 설정한다.
vi /etc/hosts# 추가
${hostIP} controllerEtcd 재기동
systemctl enable --now etcd && systemctl restart etcd이제 기본 설정이 끝났다...다음 내용부터가 본격적인 OpenStack 컴포넌트 구성 내용이다.
Install OpenStack Services
공식문서
현재 작성중인 내용이며 급하게 따라해보려면 공식문서와 아래 참고자료의 국내블로그 내용을 참고하면 된다...테스트는 dashboard 배포까지 진행한 내용을 정리중임.
Keystone Installation Tutorial
Keystone: 오픈스택에서 사용하는 단일 통합 인증 서비스 도구 이며, 인증, 권한 부여 및 서비스 카탈로그를 관리하는데 사용됨.
-
Server: RESTful 인터페이스를 사용하여 인증 및 권한 부여 서비스를 제공합니다.
-
드라이버 또는 서비스 백엔드: 중앙 집중식 서버에 통합됩니다. 이는 OpenStack 외부 리포지토리의 ID 정보에 액세스하는 데 사용되며 OpenStack이 배포된 인프라(예: SQL 데이터베이스 또는 LDAP 서버)에 이미 존재할 수 있습니다.
-
모듈 : 미들웨어 모듈은 Identity 서비스를 사용하는 OpenStack 구성 요소의 주소 공간에서 실행됩니다. 이러한 모듈은 서비스 요청을 가로채고 사용자 자격 증명을 추출한 후 인증을 위해 중앙 집중식 서버로 보냅니다. 미들웨어 모듈과 OpenStack 구성 요소 간의 통합에는 Python 웹 서버 게이트웨이 인터페이스가 사용됩니다.
MariaDB 데이터 베이스 생성 및 계정 추가
mariadb실행
mysql데이터베이스 생성
MariaDB [(none)]> CREATE DATABASE keystone;계정 추가
# local
MariaDB [(none)]> GRANT ALL PRIVILEGES ON keystone.* TO 'keystone'@'localhost' IDENTIFIED BY '${pw}';
# external
MariaDB [(none)]> GRANT ALL PRIVILEGES ON keystone.* TO 'keystone'@'%' IDENTIFIED BY '${pw}';flush privileges;keystone 설치
apt install keystone -ykeystone 환경 설정
vi /etc/keystone/keystone.conf주석 처리된 부분은 기본값이 적용되므로 주석이 안되있는 부분만 살리고 공식문서에서 입력하라는 부분만 입력함.
내용 확인 명령
cat /etc/keystone/keystone.conf | grep -v '^#' | grep -v '^$'설정 파일 예시
ServerName controller # 이부분이 추가된것.
DefaultRuntimeDir ${APACHE_RUN_DIR}
PidFile ${APACHE_PID_FILE}
Timeout 300
KeepAlive On
MaxKeepAliveRequests 100
KeepAliveTimeout 5
User ${APACHE_RUN_USER}
Group ${APACHE_RUN_GROUP}
HostnameLookups Off
ErrorLog ${APACHE_LOG_DIR}/error.log
LogLevel warn
IncludeOptional mods-enabled/*.load
IncludeOptional mods-enabled/*.conf
Include ports.conf
<Directory />
	Options FollowSymLinks
	AllowOverride None
	Require all denied
</Directory>
<Directory /usr/share>
	AllowOverride None
	Require all granted
</Directory>
<Directory /var/www/>
	Options Indexes FollowSymLinks
	AllowOverride None
	Require all granted
</Directory>
AccessFileName .htaccess
<FilesMatch "^\.ht">
	Require all denied
</FilesMatch>
LogFormat "%v:%p %h %l %u %t \"%r\" %>s %O \"%{Referer}i\" \"%{User-Agent}i\"" vhost_combined
LogFormat "%h %l %u %t \"%r\" %>s %O \"%{Referer}i\" \"%{User-Agent}i\"" combined
LogFormat "%h %l %u %t \"%r\" %>s %O" common
LogFormat "%{Referer}i -> %U" referer
LogFormat "%{User-agent}i" agent
IncludeOptional conf-enabled/*.conf
IncludeOptional sites-enabled/*.conf
Populate the Identity service database
su -s /bin/sh -c "keystone-manage db_sync" keystoneInitialize Fernet key repositories:
keystone-manage fernet_setup --keystone-user keystone --keystone-group keystonekeystone-manage credential_setup --keystone-user keystone --keystone-group keystoneBootstrap the Identity service
keystone-manage bootstrap --bootstrap-password ${hostIP} \
  --bootstrap-admin-url http://controller:5000/v3/ \
  --bootstrap-internal-url http://controller:5000/v3/ \
  --bootstrap-public-url http://controller:5000/v3/ \
  --bootstrap-region-id RegionOne
Configure the Apache HTTP server
설정 파일 편집 실행
vi /etc/apache2/apache2.conf내용추가
# 추가
ServerName controller
서비스 재시작
systemctl restart apache2.serviceSSL
본 테스트환경에서는 생략
A secure deployment should have the web server configured to use SSL or running behind an SSL terminator.
관리 계정 정보 생성
공식문서에 지역변수로 설정하고 있는데 지역변수도 실행하고, 설정 정보 파일도 생성한다.
지역변수 설정
cat << EOF > admin-openrc.sh
export OS_USERNAME=admin
export OS_PASSWORD=${hostIP}
export OS_PROJECT_NAME=admin
export OS_USER_DOMAIN_NAME=Default
export OS_PROJECT_DOMAIN_NAME=Default
export OS_AUTH_URL=http://controller:5000/v3
export OS_IDENTITY_API_VERSION=3
EOF
domain 생성 방법(옵션)
생성 명령어
openstack domain create --description "An Example Domain" example확인 명령어
openstack domain listproject 생성
각 서비스에 대한 고유한 사용자가 포함된 서비스 프로젝트를 사용합니다.
openstack project create --domain default --description "Service Project" service이 단계를 빼먹으면 다음과 같은 메세지를 볼 수 있다...
No project with a name or ID of 'service' exists.
일반 작업을 위한 계정 생성
이부분은 스크립트 내용만 작성하며 상세내용은 공식문서 참고.
openstack project create --domain default --description "Demo Project" myprojectopenstack user create --domain default --password-prompt myuseropenstack role create myrole# 출력값 없음.
openstack role add --project myproject --user myuser myroleGlance Installation
개요
glance를 통해 사용자는 가상 머신 이미지를 검색, 등록 및 검색할 수 있습니다. 가상 머신 이미지 메타데이터를 쿼리하고 실제 이미지를 검색할 수 있는 REST API를 제공합니다 . 이미지 서비스를 통해 제공되는 가상 머신 이미지를 간단한 파일 시스템부터 OpenStack Object Storage와 같은 개체 스토리지 시스템까지 다양한 위치에 저장할 수 있습니다.
기본적으로 이 디렉터리는 입니다 /var/lib/glance/images/.
MariaDB 데이터 베이스 생성 및 계정 추가
mariadb실행
mysql데이터베이스 생성
MariaDB [(none)]> CREATE DATABASE glance;계정 추가
# local
MariaDB [(none)]> GRANT ALL PRIVILEGES ON glance.* TO 'glance'@'localhost' IDENTIFIED BY '${pw}';
# external
MariaDB [(none)]> GRANT ALL PRIVILEGES ON glance.* TO 'glance'@'%' IDENTIFIED BY '${pw}';flush privileges;OpenStack user 생성 및 role 추가
키스톤에서 생성했던 계정 스크립트 적용.
. admin-openrc.sh적용 검증
echo $OS_USERNAME출력값
admin사용자 생성
openstack user create --domain default --password-prompt glance출력값
User Password:
Repeat User Password:
+---------------------+----------------------------------+
| Field               | Value                            |
+---------------------+----------------------------------+
| domain_id           | default                          |
| enabled             | True                             |
| id                  | 8a0ef8fd569d488eab37366ec03bc6c1 |
| name                | glance                           |
| options             | {}                               |
| password_expires_at | None                             |
+---------------------+----------------------------------+
Add the admin role to the glance user and service project
# 출력값 없음.
openstack role add --project service --user glance admin
Create the glance service entity
openstack service create --name glance --description "OpenStack Image" image출력값
+-------------+----------------------------------+
| Field       | Value                            |
+-------------+----------------------------------+
| description | OpenStack Image                  |
| enabled     | True                             |
| id          | 2f77d140b7d04d73a20f39cbca3dc771 |
| name        | glance                           |
| type        | image                            |
+-------------+----------------------------------+
Create the Image service API endpoints
public 엔드포인트 생성.
openstack endpoint create --region RegionOne image public http://controller:9292출력값
+--------------+----------------------------------+
| Field        | Value                            |
+--------------+----------------------------------+
| enabled      | True                             |
| id           | c1fc2f3621d1415c81cd948796155ad9 |
| interface    | public                           |
| region       | RegionOne                        |
| region_id    | RegionOne                        |
| service_id   | 2f77d140b7d04d73a20f39cbca3dc771 |
| service_name | glance                           |
| service_type | image                            |
| url          | http://controller:9292           |
+--------------+----------------------------------+
internal 엔드포인트 생성.
openstack endpoint create --region RegionOne image internal http://controller:9292출력값
+--------------+----------------------------------+
| Field        | Value                            |
+--------------+----------------------------------+
| enabled      | True                             |
| id           | 12aef4670261416c8cad5631a18ab65b |
| interface    | internal                         |
| region       | RegionOne                        |
| region_id    | RegionOne                        |
| service_id   | 2f77d140b7d04d73a20f39cbca3dc771 |
| service_name | glance                           |
| service_type | image                            |
| url          | http://controller:9292           |
+--------------+----------------------------------+
admin 엔드포인트 생성
openstack endpoint create --region RegionOne image admin http://controller:9292출력값
+--------------+----------------------------------+
| Field        | Value                            |
+--------------+----------------------------------+
| enabled      | True                             |
| id           | 95f4f7083e394186906332aa9582e241 |
| interface    | admin                            |
| region       | RegionOne                        |
| region_id    | RegionOne                        |
| service_id   | 2f77d140b7d04d73a20f39cbca3dc771 |
| service_name | glance                           |
| service_type | image                            |
| url          | http://controller:9292           |
+--------------+----------------------------------+
(옵션)쿼터 제한 설정
미적용
glance 패키지 설치
apt install glance -yglance 설정
vi /etc/glance/glance-api.conf상세 내용은 공식문서를 참고하며, 주석 부분을 기본으로 적용 될 것이라 생각하고 파일 내용을 아래 내용으로 대체하여 진행함.
[DEFAULT]
use_keystone_quotas = True
[barbican]
[barbican_service_user]
[cinder]
[cors]
[database]
connection = mysql+pymysql://glance:${pw}@controller/glance
backend = sqlalchemy
[file]
[glance.store.http.store]
[glance.store.rbd.store]
[glance.store.s3.store]
[glance.store.swift.store]
[glance.store.vmware_datastore.store]
[glance_store]
stores = file,http
default_store = file
filesystem_store_datadir = /var/lib/glance/images/
[healthcheck]
[image_format]
disk_formats = ami,ari,aki,vhd,vhdx,vmdk,raw,qcow2,vdi,iso,ploop.root-tar
[key_manager]
[keystone_authtoken]
www_authenticate_uri = http://controller:5000
auth_url = http://controller:5000
memcached_servers = controller:11211
auth_type = password
project_domain_name = Default
user_domain_name = Default
project_name = service
username = glance
password = ${pw}
[oslo_concurrency]
[oslo_messaging_amqp]
[oslo_messaging_kafka]
[oslo_messaging_notifications]
[oslo_messaging_rabbit]
[oslo_middleware]
[oslo_policy]
[oslo_reports]
[oslo_limit]
auth_url = http://controller:5000
auth_type = password
user_domain_id = default
username = MY_SERVICE # 계정 적용 필요.
system_scope = all
password = ${pw}
endpoint_id = ENDPOINT_ID
region_name = RegionOne
[paste_deploy]
flavor = keystone
[profiler]
[store_type_location_strategy]
[task]
[taskflow_executor]
[vault]
[wsgi]
oslo_limit에 사용할 계정 생성
공식문서에서 이부분이 빠진 것 같음...oslo_limit이 왜필요한 것이지??쿼터 미적용 부분이 이건가?일단 해당 부분 추후 리서치 진행...하고 계정 추가진행.
openstack user create --domain default --password-prompt MY_SERVICEopenstack role add --user MY_SERVICE --user-domain Default --system all readerPopulate the Image service database
database에 적용하기 전에 실제 적용과정을 보기위해 mariaDB database 리스트 및 table 리스트를 확인해본다.
mysqlMariaDB [(none)]> show databases;MariaDB [(none)]> use glance;
Database changedtable 리스트가 아무것도 없는 것을 확인 할 수 있다.
MariaDB [glance]> show tables;
Empty set (0.000 sec)
database sync
su -s /bin/sh -c "glance-manage db_sync" glancedatabase sync 적용 후 테이블 리스트 조회 결과.
MariaDB [glance]> show tables;
+----------------------------------+
| Tables_in_glance                 |
+----------------------------------+
| alembic_version                  |
| image_locations                  |
| image_members                    |
| image_properties                 |
| image_tags                       |
| images                           |
| metadef_namespace_resource_types |
| metadef_namespaces               |
| metadef_objects                  |
| metadef_properties               |
| metadef_resource_types           |
| metadef_tags                     |
| task_info                        |
| tasks                            |
+----------------------------------+
14 rows in set (0.000 sec)
su -s /bin/sh -c "glance-manage db_sync" glance 명령줄이 어떤 동작으로 database와 sync를 한다는 사실을 알게되었다. 좀더 분석을 해보자.
(분석) glance-manage
분석 내용이므로 관심 없으면 다음 단계로 넘어간다.
which glance-manage
# 출력값
# /usr/bin/glance-manage
cat /usr/bin/glance-manage츨력값
#! /usr/bin/python3
# PBR Generated from 'console_scripts'

import sys

from glance.cmd.manage import main


if __name__ == "__main__":
    sys.exit(main())
파이썬 실행 파일이 들어있음을 알 수 있다. 더 파고 들어가려면 파이썬 라이브러리를 좀 파보아야 할것 같다.
pip사용을 위해 pip패키지 설치
apt install python3-pip -ypython패키지 조회
pip list
# 출력값 중 python-openstackclient가 보인다.
# python-openstackclient
pip 패키지 상세조회
pip show python-openstackclient출력값
Name: python-openstackclient
Version: 5.8.0
Summary: OpenStack Command-line Client
Home-page: https://docs.openstack.org/python-openstackclient/latest/
Author: OpenStack
Author-email: openstack-discuss@lists.openstack.org
License: UNKNOWN
Location: /usr/lib/python3/dist-packages
Requires:
Required-by:
/usr/lib/python3/dist-packages 경로에 위치함을 찾을수 있다.
즉, /usr/lib/python3/dist-packages/glance/cmd/manage.py 파일이 sync를 하는 파일이라는 것을 찾을 수 있다.
OpenStack 수동 설치를 하다보면 sync를 종종 하게되는데 알고보면 python프로그램을 실행해서 sync를 한다는 것이다.
glance-api 재기동
systemctl restart glance-api.servicePlacement
개요
Placement는 Nova 프로젝트 에서 시작되었습니다 . 결과적으로 배치 기능의 대부분은 Nova의 요구 사항에 따라 결정되었습니다. 그러나 해당 기능은 리소스 선택 및 소비를 관리해야 하는 모든 서비스에서 사용할 수 있을 만큼 충분히 일반적으로 설계되었습니다.
ubuntu 패키지를 이용한 설치 방식으로 진행함.
MariaDB 데이터 베이스 생성 및 계정 추가
mariadb실행
mysql데이터베이스 생성
MariaDB [(none)]> CREATE DATABASE placement;계정 추가
# local
MariaDB [(none)]> GRANT ALL PRIVILEGES ON placement.* TO 'placement'@'localhost' IDENTIFIED BY '${pw}';
# external
MariaDB [(none)]> GRANT ALL PRIVILEGES ON placement.* TO 'placement'@'%' IDENTIFIED BY '${pw}';flush privileges;User 생성
이전 과정에서 해온 과정과 비슷하므로 출력값은 생략함.
. admin-openrc.shopenstack user create --domain default --password-prompt placementopenstack role add --project service --user placement adminopenstack service create --name placement --description "Placement API" placementopenstack endpoint create --region RegionOne placement public http://controller:8778openstack endpoint create --region RegionOne placement internal http://controller:8778openstack endpoint create --region RegionOne placement admin http://controller:8778placement-api 패키지 설치
apt install placement-api -yplacement-api 설정
vi /etc/placement/placement.conf[DEFAULT]
[api]
auth_strategy = keystone
[cors]
[keystone_authtoken]
auth_url = http://controller:5000/v3
memcached_servers = controller:11211
auth_type = password
project_domain_name = Default
user_domain_name = Default
project_name = service
username = placement
password = ${pw}
[oslo_middleware]
[oslo_policy]
[placement]
[placement_database]
connection = mysql+pymysql://placement:${pw}@controller/placement
[profiler]database sync
su -s /bin/sh -c "placement-manage db sync" placementapache2 재기동
systemctl restart apache2.service
여기까지는 별 어려움 없이 진행이 가능하다. Nova Controller, Compute가 한대로 구성되서 좀 헷갈릴 수 있는데 그냥 따라하면된다...
Nova
2024년 6월6일 작성예정...
Neutron
국내 블로그 참고 하여 설정한다. 공식문서 뒤지면서 설정해보려다 그냥 갖다 넣었는데 테스트는 일단 동작함...문제는 webconsole에서 flat으로 설정을 했다가 네트워크가 꼬였는데 외부 접속이 먹통되서 cli에서 flat으로 생성한 network 삭제를하고 vxlan으로 생성하니 일단 생성은 된다...
오픈스택에서 네트워크 구성이 제일 어려운 부분이 아닐까 싶다...
Horizon
2024년 6월6일 작성예정...
Horizon 사용설정
테마 삭제
# 삭제해봤는데 뭐가 변한건지 잘 모르겠다...
apt-get remove --auto-remove openstack-dashboard-ubuntu-theme -y
systemctl restart apache2.service참고자료
공식문서: 수동 설치 가이드
스택오버플로우: Horizon admin 비밀번호 접속 불가 문제해결
국내 블로그: 번역 잘되어 있음. 공식문서랑 다른 부분이 있으므로 참고용으로 사용
국내 블로그: 추가 참고자료.
국내 블로그: Nova 참고자료.
네이버 블로그: qemu vs kvm 개념이해.
국내 블로그: rabbitmq 사용자관리
국내 블로그: 오픈스택 서비스 요약

안녕하세요.
콜라앤서블 올인원 구성하여 오픈스택 운영하는 과정에서 컴퓨트 노드용 서버를 증설하여 컨트롤러 노드와 분리하고자 합니다.
혹시 이경우에도 multimode 파일에 호스트를 추가하는 것과 위와 같이 root 패스워드 없이 접근가능하도록 조치하는 수순으로 진행이 가능할까요.?