라우팅
IGP
거리 벡터(Distance Vector): RIP, EIGRP(hybrid)
링크 상태(Link State): OSPF, IS-IS
EGP
경로 벡터(Path Vector): BGP
링크 상태 라우팅 프로토콜 특징
네트워크 구조를 정확히 파악해 효율적인 경로를 계산하는 프로토콜
링크 데이터베이스(LSDB) 생성 시
각 라우터는 자신의 연결 정보를 이웃 라우터에게 알림
이 정보는 네트워크 모든 라우터에 전달되어 전체 구조를 공유
- 최적 경로 계산: 공유된 맵을 사용해 독립적으로 최적 경로 계산
- 리소스 사용량: CPU와 메모리 더 많이 사용
- 빠른 반응성: 네트워크 변경 사항에 빠르게 적응
즉, 링크 상태 프로토콜은 네트워크를 더 잘 이해하고 관리하지만, 라우터 성능을 더 많이 요구함
OSPF 개요
라우터는 자신이 만든 LSA 및 네이버로부터 수신한 LSA를 모두 LSDB에 저장
OSPF 영역 내 모든 라우터가 동일한 네트워크 맵(LSDB)을 개발할 때까지 LSA를 플러딩함
OSPF 기본 설정
OSPF 프로세스 ID는 로컬에서 중요하며, 프로세스 ID가 달라도 인접 라우터가 될 수 있음
OSPF network 명령 사용 시 영역(area)을 지정해야 함
OSPF LSA 교환 및 인접 형성 단계
-
동일 세그먼트 라우터와 이웃 형성 (Down, Init, 2-way)
-
이웃 라우터와 LSA 교환 (Exstart, Exchange, Loading) → LSDB 완성
-
라우팅 테이블에 삽입 (Full)
OSPF Area
대규모 네트워크는 영역으로 분할해 관리
-
소규모 네트워크: 단일 영역으로 충분히 운영 가능
-
대규모 네트워크: 단일 영역은 성능 저하를 유발할 수 있음
경로 계산(SPF 알고리즘)에 더 많은 시간과 처리 능력 필요
링크 상태 데이터베이스(LSDB) 크기가 커지면서 메모리 사용 증가
작은 네트워크 변화에도 모든 라우터가 LSA를 전송하고 다시 계산 -
이를 방지하려면 네트워크를 여러 영역으로 나눠서 관리하면 경로 계산 효율이 높아지고, 라우터의 리소스 소모를 줄일 수 있음
OSPF 라우터 유형
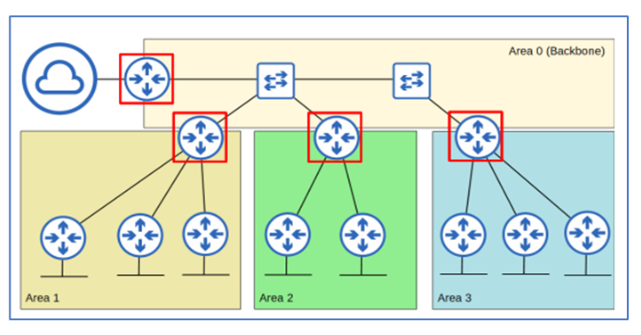
Backbone Router: 백본 영역에 연결된 라우터 (4대)
ABR (Area Border Router): 서로 다른 Area에 인터페이스 있는 라우터 (3대)
ASBR (Autonomous System Boundary Router): 외부 네트워크와 연결된 라우터 (1대)
- AREA: 고유 LSDB를 유지함
- Backbone Area(area 0): 모든 영역과 연결되어야 하는 특별 영역 (단일 영역일 땐 다른 번호 가능)
- Internal Router: 동일 영역 내 모든 인터페이스 존재
- ABR: 여러 영역 연결, 각 영역 별 LSDB 유지, 최대 2개 영역 연결 권장
- Intra-area route: 동일 영역 내 목적지 경로
- Inter-area route: 다른 영역 내 목적지 경로
NAT 설정 예시
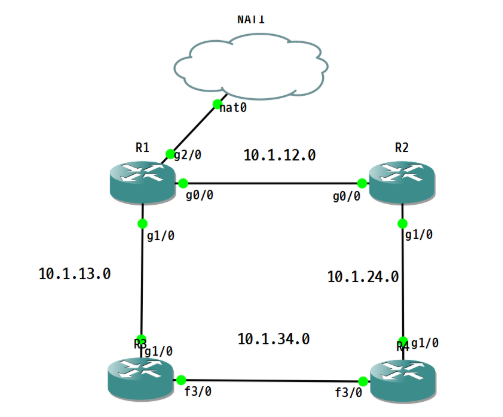
R1(config)# int g0/0
R1(config-if)# ip nat inside
R1(config-if)# int g1/0
R1(config-if)# ip nat inside
R1(config-if)# exit

R1(config)# ip nat inside source list 1 interface g2/0 overload
R1(config)# access-list 1 permit any
R1(config-router)#do sh run | s ospf
router ospf 1
router-id 1.1.1.1
network 10.1.12.0 0.0.0.255 area 0
network 10.1.13.0 0.0.0.255 area 0
R2(config-router)#do sh run | s ospf
router ospf 1
router-id 2.2.2.2
network 10.1.12.0 0.0.0.255 area 0
network 10.1.24.0 0.0.0.255 area 0
R3(config)#router ospf 1
R3(config-router)#router-id 3.3.3.3
R3(config-router)#network 10.1.13.0 0.0.0.255 area 0
R3(config-router)#int f3/0
R3(config-if)#ip ospf 1 area 0
R4(config)#router ospf 1
R4(config-router)#router-id 4.4.4.4
R4(config-router)#network 10.1.24.0 0.0.0.255 area 0
R4(config-router)#int f3/0
R4(config-if)#ip ospf 1 area 0OSPF 실습
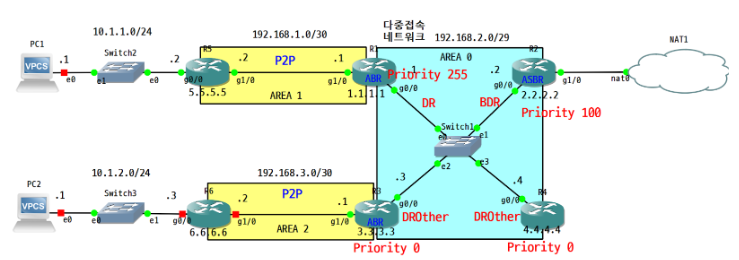
-
(R5, R6)내부망 구성(루프백 영역도 포함) 및 라우팅 설정
1) R5: OSPF 각 AREA 에 추가, network 명령어로 직접 광고
2) R6: 재분배 설정으로, 다른 라우팅 프로토콜(connected) 을 OSPF로 전환해서 광고 -
OSPF cost 설정
1) 모든 라우터: Giga Ethernet interface 의 cost가 10이 되도록 설정(참조 대역폭 변경)
2) R5: Loopback interface 의 cost가 100이 되도록 설정(R5에서 직접 cost 입력) -
확인
1) OSPF설정 및 NAT 등 외부 도메인 연결 확인: PC>ping 8.8.8.8
2) LSDB와 LSA Type 정보 확인: sh ip ospf database
R2(config)#int g1/0
R2(config-if)#ip nat outside
R2(config-if)#int g0/0
R2(config-if)#ip nat inside
R2(config)#ip nat inside source list 1 interface g1/0
R2(config)#access-list 1 permit any
R2(config)#router ospf 1
R2(config-router)#default-information originate
R3(config)#router ospf 1
R3(config-router)#network 192.168.3.0 0.0.0.3 area 2
R3(config-router)#int g1/0
R3(config-if)#ip ospf network point-to-pointR6(config)#router ospf 1
R6(config-router)#network 192.168.3.0 0.0.0.3 area 2R5(config)#router ospf 1
R5(config-router)#network 10.1.1.0 0.0.0.255 area 1R6(config-router)#int g1/0
R6(config-if)#ip ospf network point-to-point
R6(config-router)#redistribute connected subnetsrouter ospf 1
auto-cost reference-bandwidth 10000
R5(config-router)#int l0
R5(config-if)#ip ospf c
R5(config-if)#ip ospf cost 100R1~R6
OSPF 실습 2
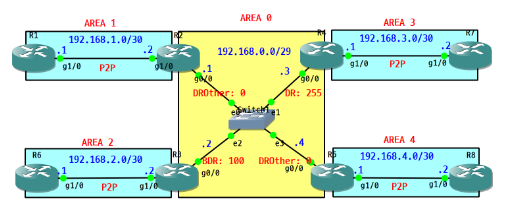
R1(config)#router ospf 1
R1(config-router)#router-id 1.1.1.1
R1(config-router)#network 192.168.1.0 0.0.0.3 area 1
R2(config-if)#router ospf 1
R2(config-router)#router-id 2.2.2.2
R2(config-router)#network 192.168.1.0 0.0.0.3 area 1
R2(config-router)#network 192.168.0.0 0.0.0.7 area 0
R3(config-if)#router ospf 1
R3(config-router)#rou
R3(config-router)#router-id 3.3.3.3
R3(config-router)#network 192.168.2.0 0.0.0.3 area 2
R3(config-router)#network 192.168.0.0 0.0.0.7 area 0
R4(config-if)#router ospf 1
R4(config-router)#router-id 4.4.4.4
R4(config-router)#network 192.168.0.0 0.0.0.7 area 0
R4(config-router)#network 192.168.3.0 0.0.0.3 area 3
R5(config-if)#router ospf 1
R5(config-router)#router-id 5.5.5.5
R5(config-router)#network 192.168.0.0 0.0.0.7 are 0
R5(config-router)#network 192.168.0.0 0.0.0.7 are 4
R6(config-if)#router ospf 1
R6(config-router)#router-id 6.6.6.6
R6(config-router)#network 192.168.2.0 0.0.0.3 area 2
R7(config-if)#router ospf 1
R7(config-router)#router-id 7.7.7.7
R7(config-router)#network 192.168.3.0 0.0.0.3 area 3
R8(config-if)#router ospf 1
R8(config-router)#router-id 8.8.8.8
R8(config-router)#network 192.168.4.0 0.0.0.3 area 4
R4(config-router)#int g0/0
R4(config-if)#ip ospf priority 255
###OSPF 실습 2 수정
R9(config)#router rip
R9(config-router)#ver 2
R9(config-router)#no au
R9(config-router)#no auto-summary
R9(config-router)#network 200.100.1.0
R1(config)#router rip
R1(config-router)#ver 2
R1(config-router)#no au
R1(config-router)#no auto-summary
R1(config-router)#net 200.100.1.0
R1(config-router)#redistribute ospf 1 metric 1
R1(config-router)#router ospf 1
R1(config-router)#redistribute rip subnets metric-type 1 ← E1: 외부cost(20) + 내부cost
R10(config)#router eigrp 10
R10(config-router)#no auto-summary
R10(config-router)#eigrp router-id 10.10.10.10
R10(config-router)#network 200.100.2.0 0.0.0.3
R6(config)#router eigrp 10
R6(config-router)#eigrp router-id 6.6.6.6
R6(config-router)#no auto-summary
R6(config-router)#network 200.100.2.0 0.0.0.3
R6(config-router)#redistribute ospf 1 metric 1000000 1 255 1 1500 ← 포장 방식이 다르기때문에 eigrp 방식으로 수정
R6(config)#router ospf 1
R6(config-router)#redistribute eigrp 10 subnets metric-type 2 ← 고정cost (E2: 외부만cost(20) + 내부cost(생략))