
Drag & Drop을 활용한 Todo List를 만들어 보자!
react-beautiful-dnd를 선택하게 된 계기
- 회사에서 해당 라이브러리를 사용하고 있지만 잘 활용하지 못하는 것 같아 평소 만들고 싶던 Todo List를 만들며 공부하고 싶었다.
우선 라이브러리 설치를 하자.
# yarn
yarn add react-beautiful-dnd

# npm
npm install react-beautiful-dnd --save
DragDropContext
react-beautiful-dnd를 활용할 곳에, DragDropContext를 Import 한후, Wrapper컴포넌트인 DragDropContext를 사용하여 감싸주자. DragDropContext는 react-redux Provider component와 비슷한 용도라고 보면 된다. DragDropContext는 onDragStart와 onDragEnd를 props로 받는다.
import { DragDropContext, DropResult } from "react-beautiful-dnd";

type DragEnd = (result: DropResult) => void;

export default function TodoList() {
  const onDragEnd: DragEnd = (result) => {
    console.log(result);
  };

  return (
    <DragDropContext onDragEnd={onDragEnd}>
      <div></div>
    </DragDropContext>
  );
}
OnDragEnd -1
onDragEnd는 DragDropContext의 필수 props이다. Draggable 컴포넌트의 Children이 Droppable 컴포넌트 안에 있는 children에 Drop 될 때 동작하는 함수이다. 이 함수는 반드시 Draggables 리스트의 동기 방식으로 재정렬해야 합니다. Draggable 컴포넌트 까지 배치시킨 후 이 함수를 완성시켜보자. 일단은 onDragEnd 함수의 인자로 받게 되는 result 값들을 알아보자.
result: DropResult
- result.draggableId: 드래그 되었던 Draggable의 id.
- result.type: 드래그 되었던 Draggable의 type.
- result.source: Draggable 이 시작된 위치(location).
- result.destination: Draggable이 끝난 위치(location). 만약에 Draggable이 시작한 - 위치와 같은 위치로 돌아오면 이 destination값은 null이 될것입니다.
Droppable
DragDropContext에 OndragEnd props까지 적용하고 난 후에는, Droppable 컴포넌트를 만들어야한다. Droppable 컴포넌트에 Draggable한 아이템을 드랍(dropped)할 수 있다. Draggable은 반드시 Droppable안에 포함되어야 한다. Droppable에는 필수 props가 존재하는데 droppableId이다. 이 droppableId는 각각의 Droppable 컴포넌트마다 달라야 한다. 왜냐하면 이 값은 Draggable item들의 드랍 가능 여부를 식별하는 유니크 식별자이기 때문이다. optional로 type을 지정해 줄 수 있는데, Draggable 클래스를 받기 위기 사용 된다. 예를 들어, Type="PERSON"을 사용하면 PERSON타입의 Draggable item들만 드랍될 수 있다. TASK타입 Draggable item은 PERSON Droppable에 드랍될 수 없다. 만약 type이 제공되지 않으면 DEFAULT로 설정 된다. Droppable이 올바르게 작동하려면, 반드시 provided.innerRef를 ReactElement의 최상단 DOM 노드에 바인드(bind)해야 한다.
export type TodoStatus = "todo" | "inProgress" | "done";

export type DroppableField = {
  fieldName: TodoStatus;
  droppableId: TodoStatus;
};

export type Todo = {
  id: string;
  title: string;
  status: TodoStatus;
};

const INITIAL_TODOS: Todo[] = [
  { id: "1", title: "공부", status: "todo" },
  { id: "2", title: "헬스", status: "todo" },
  { id: "3", title: "독서", status: "inProgress" },
  { id: "4", title: "산책", status: "inProgress" },
  { id: "5", title: "요리", status: "done" },
];


const TodoList: React.FC = () => {
  const [todos, setTodos] = useState<Todo[]>(INITIAL_TODOS);

  const onDragEnd: DragEnd = (result) => {
    console.log(result);
  };

  return (
    <div style={{ display: "flex", justifyContent: "center" }}>
      <DragDropContext onDragEnd={onDragEnd}>
        <div style={{ display: "flex" }}>
          {DROPPABLE_FIELDS.map((field) => (
            <Droppable droppableId={field.droppableId} type="TODO">
            {(provided, snapshot) => (
              <div ref={provided.innerRef} {...provided.droppableProps} style={{ width: "300px", height: "700px", background: snapshot.isDraggingOver ? "lightblue" : "lightgrey", textAlign: "center", padding: "10px", borderRadius: "5px" }}>
                <h2>{field.fieldName}</h2>
                  Droppable
                {provided.placeholder}
              </div>
            )}
          </Droppable>
          ))}
        </div>
      </DragDropContext>
    </div>
  );
};
Draggable
Droppable을 성공적으로 배치시켰다면, Draggable 차례이다. Draggable은 draggableId를 필수 props로 필요한다. Drag하고 있는 아이템을 식별하기 위한 고유 ID이다. Draggable 컴포넌트 또한 type을 optional로 설정할 수 있는데, 원하는 Droppable type에만 아이템을 Drag하려면 이 props를 설정해야 한다. Draggable 컴포넌트로 원하는 아이템의 UI를 감쌌다면, 자식의 최상단 DOM 노드에 provided.innerRef를 바인드(bind)해야 한다. UI를 감싼 이 한 덩어리를 map 함수를 활용하여 화면에 랜더링 시켜주면 된다.
--생략--
return (
<div style={{ display: "flex", justifyContent: "center" }}>
<DragDropContext onDragEnd={onDragEnd}>
<div style={{ display: "flex" }}>
{DROPPABLE_FIELDS.map((field) => (
<Droppable droppableId={field.droppableId} type="TODO">
{(provided, snapshot) => (
<div ref={provided.innerRef} {...provided.droppableProps} style={{ width: "300px", height: "700px", background: snapshot.isDraggingOver ? "lightblue" : "lightgrey", textAlign: "center", padding: "10px", borderRadius: "5px" }}>
<h2>{field.fieldName}</h2>
{todos
.filter((todo) => todo.status === field.droppableId)
.map((todo, index) => (
<Draggable draggableId={todo.id} index={index}>
{(provided) => (
<div ref={provided.innerRef} {...provided.draggableProps} {...provided.dragHandleProps} style={{ border: "1px solid black", margin: "3px", padding: "5px", background: "white", borderRadius: "3px", ...provided.draggableProps.style }}>
<h4>{todo.title}</h4>
</div>
)}
</Draggable>
))}
{provided.placeholder}
</div>
)}
</Droppable>
))}
</div>
</DragDropContext>
</div>
);
};
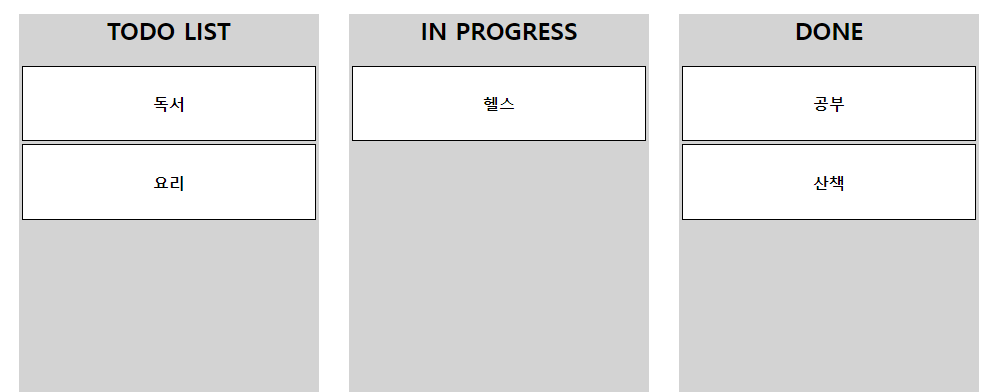
--생략--아래 이미지는 소스코드의 최종 UI이다. 하지만 아직 제대로 작동하지 않는다. 왜냐하면 Draggable한 item이 Droppable한 필드에 드랍되었을 때 실행되는 함수인 OnDragEnd() 함수의 로직이 완성되지 않았기 때문이다.
OnDragEnd -2
--생략--
 const onDragEnd = (result: DropResult) => {
    const { destination, draggableId } = result;
    if (!destination) return;

    const newStatus = destination.droppableId as TodoStatus;

    setTodos((prevTodos) => prevTodos.map((todo) => (todo.id === draggableId ? { ...todo, status: newStatus } : todo)));
  };
  --생략--
완성된 OnDragEnd 함수 로직이다. 이 함수는 인자로 받은 result의 값들 중 destination값이 없다면 아무것도 하지 않고 return 한다. 하지만 destination값이 있다면, 새로운 newStatus 변수를 만들고, 변수에 destination의 droppableId를 저장한다. 마지막으로 state에 담겨있는 todos 리스트를 변경해주면 된다.
이전 state값을 가져와 map함수로 순회하며 drag한 아이템의 아이디(draggableId)와 같은 리스트를 찾아, 해당 아이템의 status를 newStatus로 수정해주면 아래와 같이 잘 작동한다.
참고한 자료
GitHub : https://github.com/atlassian/react-beautiful-dnd
GitHub 한국어 버전 : https://github.com/LeeHyungGeun/react-beautiful-dnd-kr