Django Tutorial part. 1
manage.py
A command-line utility that lets you interact with this Django project in various ways. You can read all the details about manage.py in django-admin and manage.py.
init.py
An empty file that tells Python that this directory should be considered a Python package.
결국, 빈 파일이지만 이 파일이 있어야 이 디렉토리가 파이썬 패키지임을 선언해주는 중요한 역할.
python manage.py runserver
서버를 돌리는 명령. Default 값으로는 Interal IP 뒤에 8000을 사용한다. 만일, 다른 포트를 사용하고 싶을 경우 python manage.py runserver 8080등을 사용한다. 만일, 서버의 IP주소 자체를 변경하고 싶을 경우(혹은 Vagrant 프로그램을 돌리고 있거나 뭔가 현 작업물을 공개하고 싶은 경우)에는 python manage.py runserver 0:8000을 사용하는 것도 좋다. 이 때, 0은 0.0.0.0의 줄임.
python manage.py startapp polls
앱을 시작하는 명령어. 이 명령어는 반드시 manage.py가 있는 단에서 치는 것을 명심하자.
include()
1) mysite/mysite의 urls.py
from django.contrib import admin
from django.urls import include, path

urlpatterns = [
    path('polls/', include('polls.urls')),
    path('admin/', admin.site.urls),
]
2) mysite/polls의 urls.py
from django.urls import path

from . import views

urlpatterns = [
    path('', views.index, name='index'),
]
app단의 urls.py가 아닌 프로젝트단의(mysite/mysite) urls.py에서만 include를 import하고 있는 것을 볼 수 있다.
The include() function allows referencing other URLconfs. Whenever Django encounters include(), it chops off whatever part of the URL matched up to that point and sends the remaining string to the included URLconf for further processing.
The idea behind include() is to make it easy to plug-and-play URLs. Since polls are in their own URLconf (polls/urls.py), they can be placed under “/polls/”, or under “/fun_polls/”, or under “/content/polls/”, or any other path root, and the app will still work.
When to use include()
You should always use include() when you include other URL patterns. admin.site.urls is the only exception to this.
include()가 지향하는 것은 'plug-and-play' URLs이다. 프로젝트 단의 urls.py에 include()를 사용하여 어떤 앱의 url로 연결될지 보여줄 수 있다. admin.site.urls는 유일하게 이 include()의 적용을 받지 않아도 작동이 가능한 경우다.
path()
path()는 네 개의 인자를 받는데 이 중 route와 view는 필수적, 그리고 kwargs와 name은 선택적 요소이다.
mysite/polls의 urls.py를 다시 보자
from django.urls import path

from . import views

urlpatterns = [
    path('', views.index, name='index'),
	#a , #b         , #c
]
a 부분이 route, b부분은 view, 그리고 c는 kwargs에 해당한다. 위코드에서 1, 2차 프로젝트를하며 작성한 urls들에는 kwargs 부분은 모두 빠져있었는데 선택적 요소이기에 문제는 없었다.
route is a string that contains a URL pattern. When processing a request, Django starts at the first pattern in urlpatterns and makes its way down the list, comparing the requested URL against each pattern until it finds one that matches.
Patterns don’t search GET and POST parameters, or the domain name. For example, in a request to https://www.example.com/myapp/, the URLconf will look for myapp/. In a request to https://www.example.com/myapp/?page=3, the URLconf will also look for myapp/.
프론트에서 받아온 요청을 처리할 때, 장고는 요청된 url과 꼭 맞는 pattern의 url을 찾을 때까지 urlpatterns를 하나하나 비교한다. 만일 쿼리 스트링 (엔드포인트 뒤에 ?를 적고 이후 요청할 상세한 정보를 파라미터 값으로 보내는 것)형식으로 요청이 와도 URLconf는 파라미터(? 뒤의 값)가 아닌 urlpatterns 리스트에 적혀진 주소를 찾는다. 그리고 꼭 맞는 route를 발견하면 바로 그 route에 맞게 보여주도록 설계된 views를 보여준다.
Django Tutorial part. 2
Database setup - settings.py
여기서부터 mysite/settings.py를 열어볼 일이 생긴다. 장고를 처음 시작하면 default로 설정되어있는 database는 sqlite3이지만 개인적으로는 mysql을 선호한다. mysql db를 사용할 수 있도록 셋업을 바꾸는 것도 이 settings.py에서 가능하다.
DATABASES = {
    'default': {
        'ENGINE': 'django.db.backends.sqlite3',
        'NAME': os.path.join(BASE_DIR, 'db.sqlite3'),
    }
}
요 부분을 수정한다. ENGINE은 우선 'django.db.backends.mysql'로 바꾸는 것이 좋겠다.
NAME 부분에 대한 수정은 아래 주의사항을 읽은 후 진행한다.
즉, 우선 mysql DB를 켜서 create database mysite를 하여, 이번 튜토리얼용 DB를 만들고 여기에 해당 DB의 이름(아마도 mysite)을 써주는 것이다.
settings.py 상단의 INSTALLED_APPS에 대한 설명은 아래와 같다.
Also, note the INSTALLED_APPS setting at the top of the file. That holds the names of all Django applications that are activated in this Django instance. Apps can be used in multiple projects, and you can package and distribute them for use by others in their projects.
By default, INSTALLED_APPS contains the following apps, all of which come with Django:
django.contrib.admin – The admin site. You’ll use it shortly.
django.contrib.auth – An authentication system.
django.contrib.contenttypes – A framework for content types.
django.contrib.sessions – A session framework.
django.contrib.messages – A messaging framework.
django.contrib.staticfiles – A framework for managing static files.These applications are included by default as a convenience for the common case.
이번 2차 프로젝트를 마치며 Node.js로 작업을 한 팀원들이 나와서 발표를 하며,
Node.js가 뼈대도, 구성도 아무것도 없는 새로운 집을 짓는 것이라면
장고는 모든 체계와 뼈대가 갖추어진 잘 다듬어진 집에 들어가는 것과 같다고 말한 적이 있다.
2차 프로젝트를 진행하면서야 아직 장고가 어렵지만 그래도 편리하긴 하다고 느꼈는데, 아마 이런 부분 때문이었을지도 모르겠다.
이미 장고에서 어느 정도 사용자들이 꽤나 사용할 것 같은 기능(App)을 settings.py에 미리 구축해놓은 것이다.
그리고 이 모든 기능들은 우선 DB와의 연동 작업 이후에 사용하게 되는데, 그럴 때 사용하는 명령어가 python manage.py migrate이다. 이 명령어를 쓰기 전에 만일 INSTALLED_APPS에서 사용하지 않을 것 같은 기능들은 주석처리 혹은 삭제하는 것이 좋다. 왜냐하면 python manage.py migrate 명령어는 INSTALLED_APPS에 적힌 기능들을 대상으로 migrate하기 때문이다.
그런데, python manage.py migrate 명령어가 먹히지 않는다.
DATABASES = {
    'default': {
        'ENGINE': 'django.db.backends.mysql',
        'NAME': 'mysite'),
    }
}
로만 적어놓고 시도하니 에러가 계속해서 발생한다.
뭐지 싶어 에러를 읽어보니 DATABASES 속의 내용이 뭔가 부족한듯하여, 1차 프로젝트 때 작성했던 my_settings.py를 참고하여 좀 더 추가하여 적어보았다.
DATABASES = {
    'default': {
        'ENGINE': 'django.db.backends.mysql',
        'NAME': 'mysite',
        'USER': 'root',
        'PASSWORD': 'mysql비번',
        'HOST': 'localhost',
        'PORT': 3306,
    }
}
이렇게 설정해주고 나니
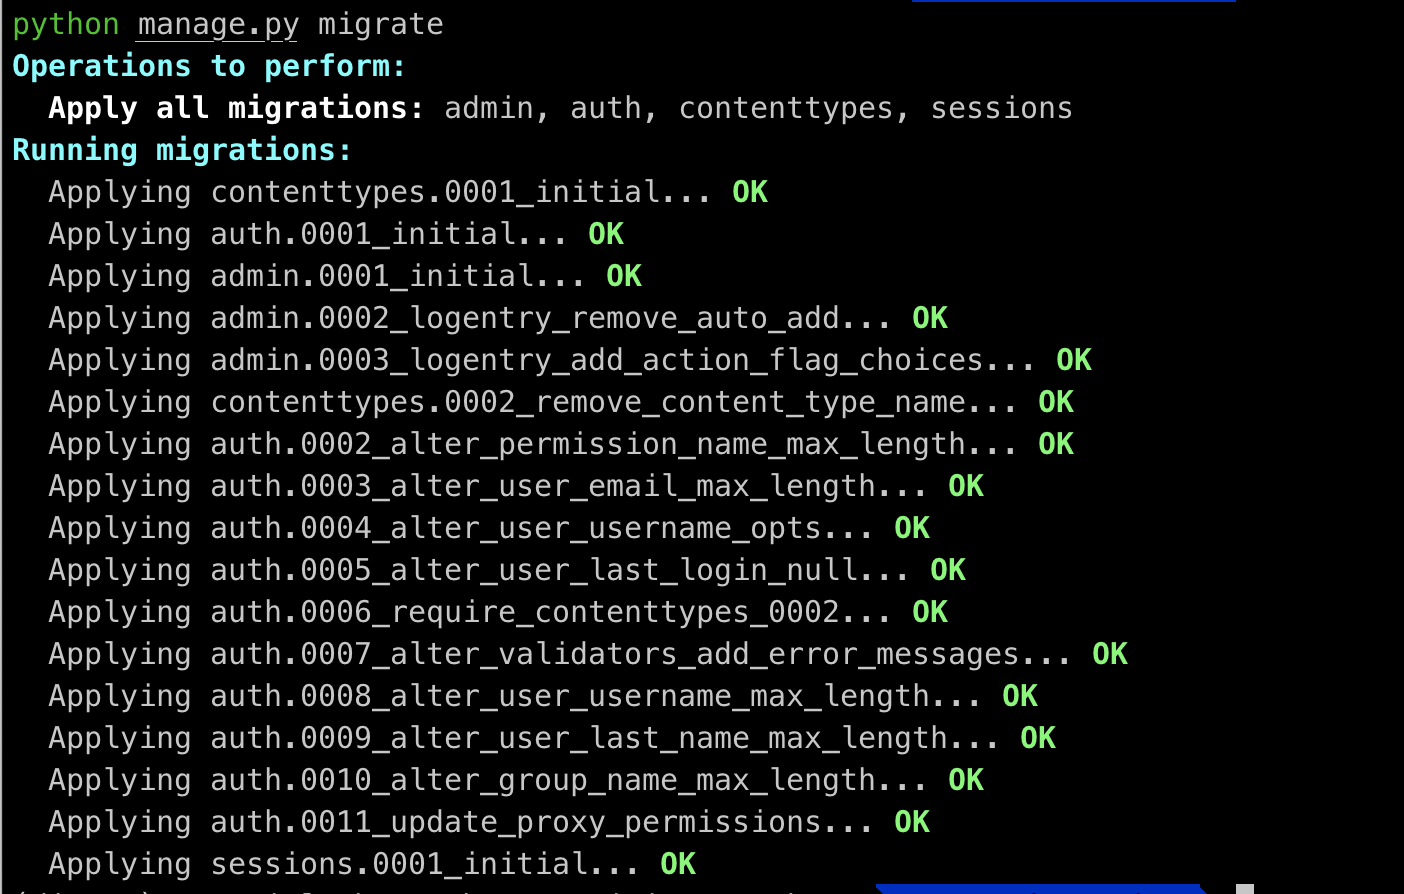
반가운 화면이 떴다.
(근데 여기서 의문,
python manage.py makemigrations와
python manage.py migrate를 순서로 해야한다고 알고 있었는데
왜 후자만 작성했는데도 이렇게 모두 문제 없이 migrate 되었을까?
내가 내린 결론은 이와 같다. 보통 프로젝트 때는 models.py에 모든 모델링을 마친 후, models.py에 생긴 변화를 장고에게 알려주는 과정인 python manage.py makemigrations를 해주었다. 이후, models.py의 변화를 담은 makemigration를 실제로 DB에 적용시키는 명령어인 python manage.py migrate를 해주었던 것. 하지만 지금과 같은 초기세팅의 경우, 딱히 변화랄것 없이 첫 작업으로(?) DB를 연동하기 때문에python manage.py migrate만으로도 마이그레이션이 문제 없이 가능했던 것이다.)
Database setup - models.py
models.py는 실제 내가 사용하게 될 데이터의 실체이다. 즉 내가 쌓게 될 데이터의 필수적인 특성을 정의하는 곳이다. 장고 튜토리얼에서는 Django가 [DRY Principle]을 따른다고하는데, 이 때 DRY는 'Don't repeat yourself'를 의미한다. Redundancy를 거부하고 Normalizagtion을 추구하는 것. (아마도.. 최소한의 것으로 최대한의 효과를 기대하는 것..?)
makemigrations를 하다보면 migrations/0001, migrations/0002 이런식으로 넘버링되며 마이그레이션 파일이 쌓이는 것을 볼 수 있는데, 현재 모델에 맞게 DB 스키마를 수정하면서 참고할 수 있는 장고 내부의 히스토리 같은 것이다.
튜토리얼에서는 두 개의 모델을 만든다. polls 앱이므로 Question과 Choice.
Question은 질문 내용 자체와 발행일을 속성으로 가지고 Choice는 선택 내용 자체와 선택지(IntegerField)를 속성으로 가진다.
그리고 이 때, 각각의 Choice는 반드시 하나의 Question을 그 속성으로 갖게 된다.
이 내용으로 polls/models.py를 작성하면 아래와 같다.
from django.db import models

class Question(models.Model):
    question_text = models.CharField(max_length=200)
    pub_date = models.DateTimeField('date published')

class Choice(models.Model):
    question = models.ForeignKey(Question, on_delete=models.CASCADE)
    choice_text = models.CharField(max_length=200)
    votes = models.IntegerField(default=0)
이 때 Choice의 속성인 question이 ForeignKey로 작성되어 있는 것을 확인할 수 있다. 이런 방식으로 models.py를 작성해야, 우리는 장고에게 각각의 Choice는 하나의 Question에 연결되어 있다고 말할 수 있는 것이다.
(1(Question)대 다(Choice))
Database setup - settings.py
여기까지 했으면 이제는 우리가 polls 앱을 사용하겠다고 장고에게 알려줄 차례이다. 여기서 장고의 앱들이 'pluggable'하게 설계되었음을 알 수 있다. 미리 설계되어 있던 INSTALLED_APPS 이외에도 내가 app을 만들고 마치 플러그를 꽂듯, 사용하겠다 선언만 하면 사용이 가능한 것이다. 다시 settings.py의 INSTALLED_APPS 부분으로 간다.
INSTALLED_APPS = [
    'polls.apps.PollsConfig',
    'django.contrib.admin',
    'django.contrib.auth',
    'django.contrib.contenttypes',
    'django.contrib.sessions',
    'django.contrib.messages',
    'django.contrib.staticfiles',
]
맨 위에 'polls.apps.PollsConfig' 부분을 붙였다. 실제 프로젝트를 할 때에는 앱 이름만(ex. 'polls') 적어줬던 부분인데, 정석은 이렇게 적는 것이었다. 이 과정을 통해 내가 polls앱을 해당 프로젝트에서 사용할 것임을 알려준 것이다. (등록)
이제 여기서 쳐야할 명령어가 python manage.py makemigrations polls이다.

By running makemigrations, you’re telling Django that you’ve made some changes to your models (in this case, you’ve made new ones) and that you’d like the changes to be stored as a migration.
Migrations are how Django stores changes to your models (and thus your database schema) - they’re files on disk. You can read the migration for your new model if you like; it’s the file polls/migrations/0001_initial.py. Don’t worry, you’re not expected to read them every time Django makes one, but they’re designed to be human-editable in case you want to manually tweak how Django changes things.
이제 드디어 내가 작성한 models.py의 테이블인 Question과 Choice에 대한 마이그레이션 틀이 완성되었다!
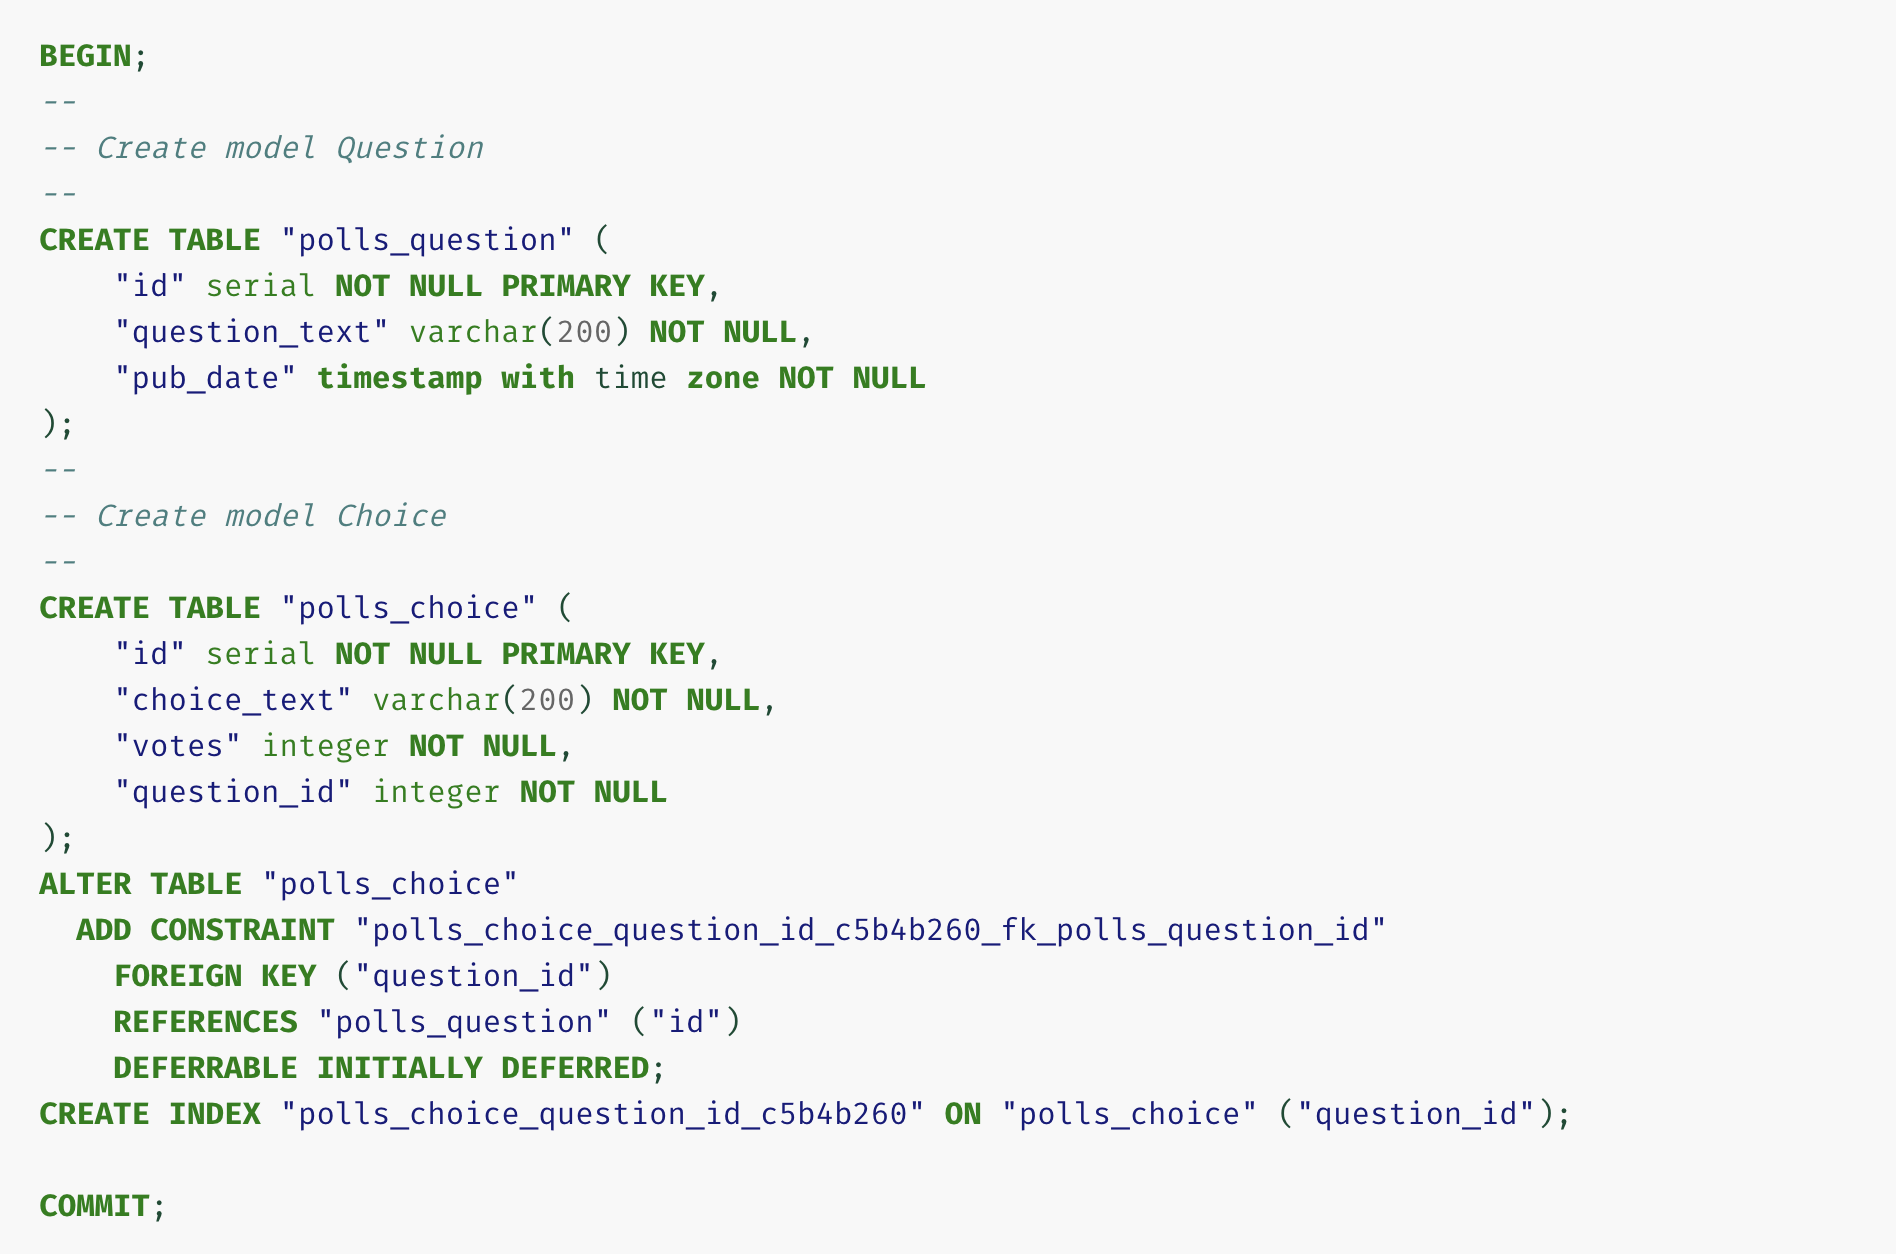
위 사진을 보면 django가 데이터를 구축하는 것이 진짜 편리하다는 것을 알 수 있다.
이렇게 길게 써야했던 것을 models.py에서 각종 Field를 사용하여 아주 쉽게 처리한 것!
또한, 이렇게 만들어진 데이터는 향후 python manage.py shell을 작동시켜 객체 지향적인 관점으로 데이터에 접근할 수 있게 해주기에 절차 지향적으로 설계된 Mysql DB에는 없는 이점을 가지기도 한다. 비즈니스 모델 로직을 구성하는 것만으로도 머리아픈 프로그래머들에게는 상당히 편리한 툴이라고 볼 수 있다. (하지만 장고 ORM만으로는 부족할 때도 있기 때문에 백엔드는 끊임없이 SQL에 대한 연구 및 공부가 필요하다고 한다.)
그리고 지금 이 시점에서 만들어진 틀에 migrations를 적용시키기 위해 python manage.py migrate를 해주면 이 화면을 볼 수 있다.

다시 한 번 migrate 관련 명령어를 짧게 정리하면 아래와 같다.
1) models.py의 내용을 수정한다.
2)python manage.py makemigrations를 하여 해당 변화를 담을 수 있는 틀을 마련한다.
3)python manage.py migrate를 하여 해당 변화를 실제로 DB에 적용시킨다.
변화를 담을 틀을 마련하는 명령어와, 해당 틀에 변화를 담는 명령어가 분리되어 있는 것은
git과 같은 버전 관리 시스템에서 commit을 이용한 버전 관리 시 꼬임이 없게 하려는 것이다.
[tip]
python manage.py check 명령어는 DB를 건들지 않고 현재 프로젝트 내에 이슈가 있는지 확인할 수 있다.
Playing with the API (feat. Django Shell)
shell basic
Django shell을 열기 위한 명령어는 우선 python manage.py shell
from polls.models import Choice, Question을 먼저 입력해서 내가 만든 모델을 이용하겠다고 선언한 후
Question.objects.all()을 하면 당연히
<QuerySet []>이 그 결과로 출력된다. 아직 DB를 담을 통만 만들어놓고 아무것도 넣지 않았으니 당연하다.
이제 Question 객체를 하나 넣기 위해
from django.utils import timezone을 작성한다. (Question table이 속성으로 가지고 있는 pub_date에 현재 시간을 넣기 위함)
q = Question(question_text="What's new?", pub_date=timezone.now())를 입력하면
Question에 드디어 하나의 객체가 생기는 것.
위에서 언급했듯, 객체 중심으로 DB에 접근하는 ORM답게 이제 속성에 접근할 때에는 아래와 같이 명령한다.
q.id (출력값: 1)
q.question_text (출력값: "What's new?")
q.pub_date (출력값: datetime.datetime(2020, 8, 18, 7, 3, 8, ....))
객체의 속성값을 바꾸고 싶은 경우,
q.question_text = "What's up?" 라는 명령어를 치면
"What's New?"에 해당했던 question_text 부분이 "What's up?"으로 바뀌게 된다.
Question.objects.all()을 통해 모든 객체의 쿼리셋을 확인할 수 있고,
Question.objects.values()을 통해 모든 객체의 속성까지도 확인할 수 있다.
shell basic 2 __str__
이 부분은 내가 프로젝트를 하면서 굉장히 궁금했던 것 중 하나이다. QuerySet을 Question.objects.all()로 모두 부르면, 객체 자체로 쿼리셋이 형성되어 나오는 것 말고 객체의 속성으로 나오는 경우를 동기나 멘토분들을 보면 더러 있었다. 나도 그런 방식으로 쿼리셋을 호출하고 싶었는데, 그 방법은 아래와 같다.
먼저 models.py에서
    def __str__(self):
        return self.question_text
이 부분을 각각의 클래스 아래에 작성해준다. 이 때 return self. 다음 부분이 내가 대표값으로 보고 싶은 해당 객체의 속성 이름에 해당한다.
이렇게 적고나서 다시 shell을 킨 후 Question.objects.all()을 입력하면,
원래는 아래처럼 나왔던 값이

이제 이렇게 나온다.
또한, 객체 자체로 쿼리셋을 호출하지 않고 속성으로 호출하고 싶은 경우에는 인덱스를 붙여줄 수도 있다.
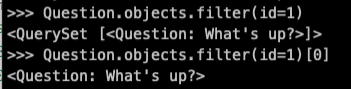
shell basic 3 역참조 관계
models.py를 짜면서 알았지만, question과 choice의 관계는 choice가 question을 참조하는(모델링에서 Choice 테이블이 ForeignKey로 Question 테이블을 향하고 있다. 당연히 choice라는 것이 어떤 question에 대한 choice이므로 그럴 수밖에 없음. ) 즉 달리 말해, question이 choice를 역참조하는 관계에 놓여있다. 이럴 때 장고 ORM은 참 편리한 기능을 제공한다.
q = Question.objects.get(pk=1)이라고 q 변수를 선언하면, Question에서 pk(==id)가 1인 객체가 q에 들어간다. 이 때, 역참조 관계에 있는 choice 테이블까지 그 영향력을 뻗고(display any choices from the related object set) 싶다면 이렇게 엮어줄 수 있다.
q.choice_set.all()
choice 다음 _set이 들어간 이유는 위에서 말했듯 choice가 question의 역참조 테이블이기 때문이다.
이 상태에서 Choice table의 객체를 생성할 수 있다.
q.choice_set.create(choice_text='Not much', votes=0) (choice 객체 1 생성)
q.choice_set.create(choice_text='The sky', votes=0) (choice 객체 2 생성)
c = q.choice_set.create(choice_text='Just hacking again', votes=0) (choice 객체 3 생성 후 변수 c에 담음)
이 때, 변수 c는 question 객체에서 시작한 것이므로 도로 Question 객체의 속성으로의 접근도 가능하다 (Choice objects have API access to their related Question objects.)
c.question (출력값: <Question: What's up?>)
references:
https://docs.djangoproject.com/en/3.1/intro/tutorial01/
https://docs.djangoproject.com/en/3.1/intro/tutorial02/
https://wayhome25.github.io/django/2017/03/20/django-ep6-migrations/ (migrate vs. makemigrations)