📗 Prototype Pattern
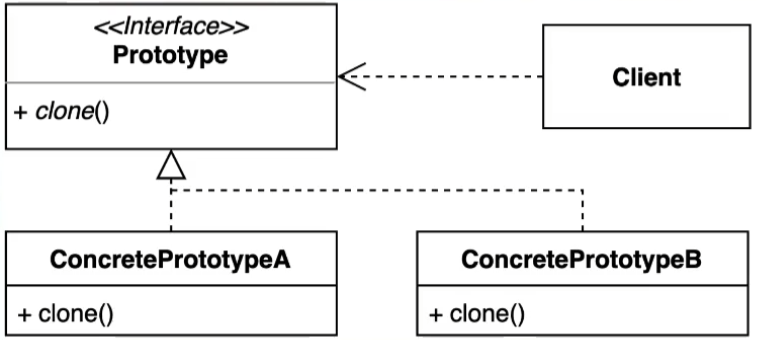
프로토 타입 패턴이란 이미 생성되어 있는 객체를 복사해서 반환해주는 패턴이다. 이러한 패턴을 사용하는 이유는 똑같은 객체를 복사해야할 때 해당 객체를 또 생성해 내는 절차가 복잡하거나 외부적(api 통신, db 접근 등) 리소스가 크게 들어갈 경우에 객체의 정보만 그대로 복사하기 위해서 사용한다!
📄 패턴 적용 전
⌨️ Author class 생성
public class Author {
    private String author;
    private String company;

    public Author(String author, String company) {
        this.author = author;
        this.company = company;
    }

    public String getAuthor() {
        return author;
    }

    public String getCompany() {
        return company;
    }

    public void changeAuthor(String author, String company){
        this.author = author;
        this.company = company;
    }
}
public class Publisher implements Cloneable{
private Author author;
private String bookName;
private String publisherName;
public Publisher(Author author) {
this.author = author;
}
public void createPublisher(String bookName, String name){
this.bookName = bookName;
this.publisherName = name;
}
public Author getAuthor() {
return author;
}
public String getBook(){
return String.format("[책 이름] : %s, [출판사] : %s, [저자] : %s, [저자의 직장] : %s", bookName, publisherName, author.getAuthor(), author.getCompany());
}
}저자와 출판사 class를 각각 만들어서 책을 찍어낼 때 저자의 정보를 그대로 가져와 책을 만드려고 한다.
public class Client {
    public static void main(String[] args) {
        Author author = new Author("최준호", "유명한 회사");
        Publisher publisher = new Publisher(author);
        publisher.createPublisher("좋은 책", "좋은 출판사");
        System.out.println(publisher.getBook());
    }
}
코드를 실행해보자!

예상한 결과가 잘 나온다. 이제 책을 판매하기 위해 책들을 계속 복사해서 만들어야 하는데 Author와 Publisher를 계속 만들어 내려면 저 코드를 계속해서 복사 해야한다.
public class Client {
    public static void main(String[] args) {
        Author author = new Author("최준호", "유명한 회사");
        Publisher publisher = new Publisher(author);
        publisher.createPublisher("좋은 책", "좋은 출판사");
        System.out.println(publisher.getBook());

        Author author2 = new Author("최준호", "유명한 회사");
        Publisher publisher2 = new Publisher(author2);
        publisher2.createPublisher("좋은 책", "좋은 출판사");
        System.out.println(publisher2.getBook());
    }
}
만약 여기서 Author에 정보를 얻기 위해 DB에 접근해야하거나 API 통신이 발생한다면 우리는 책을 생성하기 위해 더 큰 리소스가 필요해진다.
이를 해결하기 위해 프로토 타입 패턴을 사용하여 책을 찍어내 보자!
📄 얕은 복사 (shallow copy)
Java에서 제공하는 Object의 clone을 활용하면 얕은 복사가 가능하다.
⌨️ Object를 사용하여 clone 해보기!
public class Publisher implements Cloneable{
    private Author author;
    private String bookName;
    private String publisherName;

    public Publisher(Author author) {
        this.author = author;
    }

    public void createPublisher(String bookName, String name){
        this.bookName = bookName;
        this.publisherName = name;
    }

    public String getBook(){
        return String.format("[책 이름] : %s, [출판사] : %s, [저자] : %s, [저자의 직장] : %s", bookName, publisherName, author.getAuthor(), author.getCompany());
    }

    @Override
    protected Object clone() throws CloneNotSupportedException {
        return super.clone();
    }
}
다음과 같이 Cloneable interface를 사용하여 clone() method를 구현할 수 있다. 접근자는 상황에 맞춰서 변경해주면 된다.
이제 코드를 작성해서 실행해보자.
public class Client {
    public static void main(String[] args) throws CloneNotSupportedException {
        Author author = new Author("최준호", "유명한 회사");
        Publisher publisher = new Publisher(author);
        publisher.createPublisher("좋은 책", "좋은 출판사");
        System.out.println(publisher.getBook());

        Publisher publisher2 = (Publisher) publisher.clone();
        System.out.println(publisher2.getBook());
    }
}
코드를 실행해보면

clone() method를 한번만 실행함으로써 똑같은 내용의 객체를 만들어 냈다.
여기서 얕은 복사와 깊은 복사의 차이를 알아야하는데. 차이를 코드로 알아보자!
public class Client {
    public static void main(String[] args) throws CloneNotSupportedException {
        Author author = new Author("최준호", "유명한 회사");
        Publisher publisher = new Publisher(author);
        publisher.createPublisher("좋은 책", "좋은 출판사");
        System.out.println(publisher.getBook());

        Publisher publisher2 = (Publisher) publisher.clone();
        author.changeAuthor("juno choi", "famous company");
        System.out.println(publisher2.getBook());
    }
}
다음과 같이 얕은 복사의 경우 Publisher에 주입된 Author의 정보가 변경되었을 경우 어떻게 작동할까?
이미 clone을 통해서 저자의 내용이 변경되기 전에 복사된 publisher2의 출력 내용은

다음과 같이 변경되어서 출력된다. 이 이유는 객체를 복사할 때 동일한 author을 참조하도록 복사되었기 때문이다.
더 확실히 확인하기 위해
public class Client {
    public static void main(String[] args) throws CloneNotSupportedException {
        Author author = new Author("최준호", "유명한 회사");
        Publisher publisher = new Publisher(author);
        publisher.createPublisher("좋은 책", "좋은 출판사");
        System.out.println(publisher.getBook());

        Publisher publisher2 = (Publisher) publisher.clone();
        author.changeAuthor("juno choi", "famous company");
        System.out.println(publisher2.getBook());

        System.out.println(publisher == publisher2);
        System.out.println(publisher.getClass() == publisher2.getClass());
        System.out.println(publisher.getAuthor() == publisher2.getAuthor());
    }
}
두 객체가 다름을 확인할 수 있고
두 객체가 사용하는 class type이 같은것을 확인할 수 있다.
두 Author가 같은지 비교했을 때 true가 나오는 것을 확인할 수 있다.
📄 깊은 복사 (deep copy)
⌨️ clone 코드 리팩토링
public class Publisher implements Cloneable{
    private Author author;
    private String bookName;
    private String publisherName;

    public Publisher(Author author) {
        this.author = author;
    }

    public void createPublisher(String bookName, String name){
        this.bookName = bookName;
        this.publisherName = name;
    }

    public Author getAuthor() {
        return author;
    }

    public String getBook(){
        return String.format("[책 이름] : %s, [출판사] : %s, [저자] : %s, [저자의 직장] : %s", bookName, publisherName, author.getAuthor(), author.getCompany());
    }

    @Override
    public Object clone() throws CloneNotSupportedException {
        return super.clone();
    }

    public Object deepClone(){
        Author author = new Author(this.author.getAuthor(), this.author.getCompany());
        Publisher publisher = new Publisher(author);
        publisher.createPublisher("좋은 책", "좋은 출판사");
        return publisher;
    }
}
deepClone() 메서드를 추가해주었다. 크게 다른 코드는 아니고 Client main 내에서 직접 만들었던 코드를 그대로 복사해준 것이다. 하지만 다른것은 위 clone과 다르게 직접 객체를 생성해서 만들어 준다는 차이점이다.
public class Client {
    public static void main(String[] args) throws CloneNotSupportedException {
        Author author = new Author("최준호", "유명한 회사");
        Publisher publisher = new Publisher(author);
        publisher.createPublisher("좋은 책", "좋은 출판사");
        System.out.println(publisher.getBook());

        Publisher publisher2 = (Publisher) publisher.deepClone();
        author.changeAuthor("juno choi", "famous company");
        System.out.println(publisher2.getBook());

        System.out.println(publisher == publisher2);
        System.out.println(publisher.getClass() == publisher2.getClass());
        System.out.println(publisher.getAuthor() == publisher2.getAuthor());
    }
}
Client 코드를 clone -> deepClone으로 변경해주고 실행해보자.

이제는 같은 Author을 참조하지 않으므로 변경되지 않은 출력 내용을 확인해볼 수 있다.
또한
두 객체가 다름을 확인할 수 있고
두 객체가 사용하는 class type이 같은것을 확인할 수 있다.
두 Author가 같은지 비교했을 때 false가 나오는 것을 확인할 수 있다.
