
🔴 Batch 5.0 이후
스프링에서 배치를 5.0 이후로는 세팅이 완전히 달라졌다. 그래서 해당 내용을 정리해두려고 한다.
🔵 TestJob 만들기
🟢 @EnableBatchProcessing 삭제
처음부터 소스를 따라하시려는 분들에겐 상관 없는 내용이니 내용을 참고하지 않아도 된다기존 배치를 사용했던 분들이라면 @EnableBatchProcessing 어노테이션을 먼저 붙이고 시작할텐데 해당 내용은 Spring 3.0 이후부턴 삭제되었다.
spring batch No Micrometer observation registry found, defaulting to ObservationRegistry.NOOP해당 에러와 비슷한 문구가 보인다면 어노테이션 탓이니 삭제하자
🟢 의존성 설정
plugins {
	id 'java'
	id 'org.springframework.boot' version '3.2.0'
	id 'io.spring.dependency-management' version '1.1.4'
}

group = 'com.simol'
version = '0.0.1-SNAPSHOT'

java {
	sourceCompatibility = '17'
}

repositories {
	mavenCentral()
}

dependencies {
	implementation 'org.springframework.boot:spring-boot-starter-batch'
	implementation 'org.springframework.boot:spring-boot-starter-data-jdbc'
	implementation 'org.springframework.boot:spring-boot-starter-webflux'
	implementation 'org.springframework.boot:spring-boot-starter-web'
	compileOnly 'org.projectlombok:lombok'
	runtimeOnly 'com.h2database:h2'
	runtimeOnly 'com.mysql:mysql-connector-j'
	annotationProcessor 'org.projectlombok:lombok'
	testImplementation 'org.springframework.boot:spring-boot-starter-test'
	testImplementation 'io.projectreactor:reactor-test'
	testImplementation 'org.springframework.batch:spring-batch-test'
}

tasks.named('test') {
	useJUnitPlatform()
}
나의 의존성 설정은 다음과 같은데 web의 경우 h2-console 창을 띄우기 위해서 넣어준 설정이므로 h2를 내장으로 사용하지 않으실 분들을 필요가 없다. webflux도 WebClient를 사용하기 위한 설정이므로 자신이 맞는 의존성을 설정해주면 된다.
batch는 필수이고 나머지는 선택이다!
🟢 yml 설정
spring:
  profiles:
    active: ${server.profile:local}
  batch:
    job:
      name: ${job.name:NONE}
logging:
  pattern:
    console: "[%d{HH:mm:ss.SSS}][%-5level][%logger.%method:line%line] - %msg%n"
  level:
    root: info
    com.juno.batch: debug


--- # local
spring:
  config:
    activate:
      on-profile: local
  h2:
    console:
      enabled: true
      settings:
        web-allow-others: true
      path: /h2-console
  datasource:
    hikari:
      driver-class-name: org.h2.Driver
      jdbc-url: jdbc:h2:mem:batch;mode=mysql
      username: sa
      password:
나의 yml 설정이다. 로깅이나 디비 설정의 경우는 각자 알맞게 설정하면 되고 batch.job.name 부분만 참고하면 될것 같다.
🟢 Job 만들기
@Configuration
@RequiredArgsConstructor
@Slf4j
public class TestJob {

    @Bean
    public Job testSimpleJob(PlatformTransactionManager transactionManager, JobRepository jobRepository) {
        return new JobBuilder("testSimpleJob", jobRepository)
                .start(testSimpleStep(transactionManager, jobRepository))
                .build();
    }

    @Bean
    public Step testSimpleStep(PlatformTransactionManager transactionManager, JobRepository jobRepository) {

        return new StepBuilder("testSimpleStep", jobRepository)
                .tasklet(testTasklet(), transactionManager)
                .build();
    }

    public Tasklet testTasklet() {
        return (contribution, chunkContext) -> {
            log.info("test");
            return RepeatStatus.FINISHED;
        };
    }
}
job의 경우 간단하게 작성할 수 있다.
🟢 DB 초기 데이터 세팅
batch를 작동시키려면
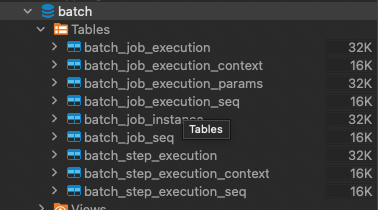
다음과 같이 테이블 초기 세팅이 필요하다.
/org.springframework.batch/spring-batch-core/5.1.0/spring-batch-core-5.1.0.jar!/org/springframework/batch/core/schema-mysql.sql
외부 라이브러리의 다음 위치에 존재한다.
🟢 job 실행

다음과 같이 로그가 나온다면 정상적으로 실행되었다는 것이다.
java -jar [file명].jar --job.name=[job명] --version=[version]
다음과 같이 jar를 실행시켜주면 되고 version의 경우 꼭 사용하지 않고 다른 용어로 사용해도 된다. 스프링 배치에서 실행 파라미터를 관리하고 있어서 중복된 파라미터 사용시 배치 실행 도중 실패한 경우 실패한 지점부터 다시 실행시켜주고 이미 완료된 job의 경우 실패한다.

안녕하세요 궁금증이 있어 댓글 남깁니다.
혹시 멀티플 잡의 경우 어떻게 job등록을 할 수 있을까요?