필수 개념
블록체인에 대한 필요한 개념 설명은 아래 링크를 참고해주세요.
블록체인 기초개념 블록체인 구조, 머클 트리, 합의 알고리즘
이전에 올린 블록체인 구현 (Javascript) - (1)에 이어서 진행합니다.
수정사항
<2022.01.05>
- 이전에 올렸을 때, 잘못 이해하고 적은 부분들이 많아서 많은 부분 수정했고, 그중 대표적인게 아래 내용입니다.
- 서버를 두 개의 파일로 분할하고 각각의 프로세스로 열었습니다. (하나의 프로세스로 두 개의 서버를 여니까 같은 메모리를 공유하게 돼서, 원하는 테스트 환경으로 만들 수 없었습니다.)
- 잦은 에러 때문에
checkValidBlock.js파일의 내용을chainedBlock.js로 합쳤습니다.
블록체인 코드로 구현하기 - (2)
1. 개발 환경
Ubuntu-20.04
2. 사용한 언어 및 라이브러리
JavascriptNodeJSExpress
3. 사용 모듈
fs: FileSystem의 약자로 파일 처리와 관련된 모듈merkle: 머클 트리 생성 및 검증 메서드 제공crypto-js: SHA256, AES 등의 여러 암호화 메서드 제공express: 이것은 npm 레지스트리를 통해 사용할 수 있는 Node.js 모듈body-parser: Node.js body parsing middleware로 POST, PUT 등의 요청 시 req.body를 파싱하는 역할을 함 (body-parser 설명 참고 사이트)
4. 전체 소스 코드
- github 에 올려두었습니다.
5. 구현 목표
- 생성한 블록과 블록체인이 올바른 구조인지 검증한다.
- 두 개의 REST 서버를 만들고 각각의 노드에서 다른 블록을 생성해본다.
nonce를 이용한 블록 찾기
6. 구현 과정
1) 블록 검증하기
1-1) 블록 구조 검증
블록 구조 요소들의 데이터 타입을 검증
function isValidBlockStructure(block) {
	return(
		(typeof block.header.version		=== "string") &&
		(typeof block.header.index 		=== "number") &&
		(typeof block.header.previousBlockHash  === "string") &&
		(typeof block.header.merkleRoot		=== "string") &&
		(typeof block.header.timestamp 		=== "number") &&
		(typeof block.header.difficulty		=== "number") &&
		(typeof block.header.nonce		=== "number")
	)
}
1-2) 새로운 블록 검증
isValidBlockStructure()를 이용해서 블록 구조 확인- 이전 블록의 index와 비교(이전 블록보다 1이 커야함)
createHash를 이용해서 이전 블록의 해시 값과 비교merkle을 사용해서 현재 블록의 머클 루트와 비교timestamp검증- ``
function isValidNewBlock(newBlock, prevBlock) {
	/**
	 * 1. check if valid block structure
	 * 2. check if valid index
	 * 3. check if valid hash
	 * 4. check if valid merkleRoot
	 * 5. check if valid timestamp
	 * 6. check if valid difficulty
	 */
	if (!isValidBlockStructure(newBlock)) {
		console.log("*** Invalid BlockStructure ***");
		return false;
	} else if (newBlock.header.index !== prevBlock.header.index + 1) {
		console.log("*** Invalid Index ***");
		return false;
	} else if (newBlock.header.previousBlockHash !== createHash(prevBlock)) {
		console.log("*** Invalid BlockStructure ***");
		return false;
	} else if (
		// If body is empty, it should be "0".repeat(64),
		// If body is not empty, calculated body's merkle root is same with header.merkleRoot
		(newBlock.body.length === 0 &&
			"0".repeat(64) !== newBlock.header.merkleRoot) ||
		(newBlock.body.length !== 0 &&
			merkle("sha256").sync(newBlock.body).root() !== newBlock.header.merkleRoot)
	) {
		console.log("*** Invalid MerkleRoot ***");
		return false;
	} else if (!isValidTimestamp(newBlock, prevBlock)) {
		console.log("*** Invalid Timestamp ***");
		return false;
	} else if (!hashMatchesDifficulty(createHash(newBlock), newBlock.header.difficulty)){
		console.log("*** Invalid Difficulty ***");
		return false;
	}
	return true;
}
isValidTimestamp,hashMatchesDifficulty함수는 바로 아래서 정의!
1-3) timestamp 검증
isValidTimestamp
블록 생성 간격이 10초 이내면 잘못된 블록으로 간주한다.
또한, 현재 시간보다 미래에 생성된 블록은 있을 수 없으므로, 현재 시간과 비교한다.
function getCurrentTimestamp() {
	/**
	 * time unit : seconds
	 * Math.round : Round off number
	 */
	return Math.round(Date.now()/1000)
}

function isValidTimestamp(newBlock, prevBlock) {
	// if block create time interval is less than 10 sec, return false
	if (newBlock.header.timestamp - prevBlock.header.timestamp < 10 ) {
		return false;
	}
	// new block create time should be smaller than Date.now()
	if (getCurrentTimestamp() < newBlock.header.timestamp )
	return true;
}
1-4) difficulty 검증
hashMatchesDifficulty
설정된 difficulty 값 만큼 hash의 시작 숫자가 0이 들어가는지 검증한다.
function hashMatchesDifficulty(hash, difficulty) {
  	// check how many "0"s the hash starts with
	const requiredPrefix = '0'.repeat(difficulty);
	return hash.startsWith(requiredPrefix);
}
calculateHash
블록의 헤더 요소들을 넣었을 때 해시값을 반환한다.
function calculateHash(
	version,
	index,
	previousBlockHash,
	merkleRoot,
	timestamp,
	difficulty,
	nonce
) {
	const blockString =
		version +
		index +
		previousBlockHash +
		merkleRoot +
		timestamp +
		difficulty +
		nonce;
	return cryptojs.SHA256(blockString).toString();
}
findBlock
설정된 difficulty 값에 맞는 hash를 찾을 때까지 hashMatchesDifficulty를 반복한다.
이때 hash의 값을 변화를 주기 위해 nonce의 값을 1씩 증가시키면서 반복한다.
원하는 hash를 찾았다면, 이에 맞는 BlockHeader를 반환한다.
function findBlock(
	currentVersion,
	nextIndex,
	previousBlockHash,
	merkleRoot,
	nextTimestamp,
	difficulty
) {
	let nonce = 0;
	while (true) {
		let hash = calculateHash(
			currentVersion,
			nextIndex,
			previousBlockHash,
			merkleRoot,
			nextTimestamp,
			difficulty,
			nonce
		);
		if (hashMatchesDifficulty(hash, difficulty)) {
			return new BlockHeader(
				currentVersion,
				nextIndex,
				previousBlockHash,
				merkleRoot,
				nextTimestamp,
				difficulty,
				nonce
			);
		}
		nonce++;
	}
}
1-5) nextBlock 함수 수정하기
- 위에서
findBlock을 통해 얻은BlockHeader를 이전에 만들었던nextBlock함수에 넣어준다. nonce:findBlock의 리턴값을 받으므로 지워도 된다.difficulty: 원하는 난이도로 바꿔주자. 난이도가 높을수록 블록 생성 시간이 오래 걸린다. (다음 포스팅에서 난이도를 조정하는 함수를 다룰 예정이다.)
function nextBlock(bodyData) {
	const prevBlock = getLastBlock();
	const version = getVersion();
	const index = prevBlock.header.index + 1;
	const previousBlockHash = createHash(prevBlock);
	const tree = merkle("sha256").sync(bodyData);
	const merkleRoot = tree.root() || "0".repeat(64);
	const timestamp = parseInt(Date.now() / 1000);
	const difficulty = 3;
	// const nonce = 0;

	const header = findBlock(
		version,
		index,
		previousBlockHash,
		merkleRoot,
		timestamp,
		difficulty
	);

	return new Block(header, bodyData);
}
1-6) addBlock 함수 수정하기
isValidNewBlock을 추가해서 새로 생성되는 블록을 검증하고, 참이면 블록체인에 추가한다.
function addBlock(newBlock) {
	if (isValidNewBlock(newBlock, getLastBlock())) {
		Blocks.push(newBlock);
		return true;
	}
	return false;
}
1-7) 테스트 해보기
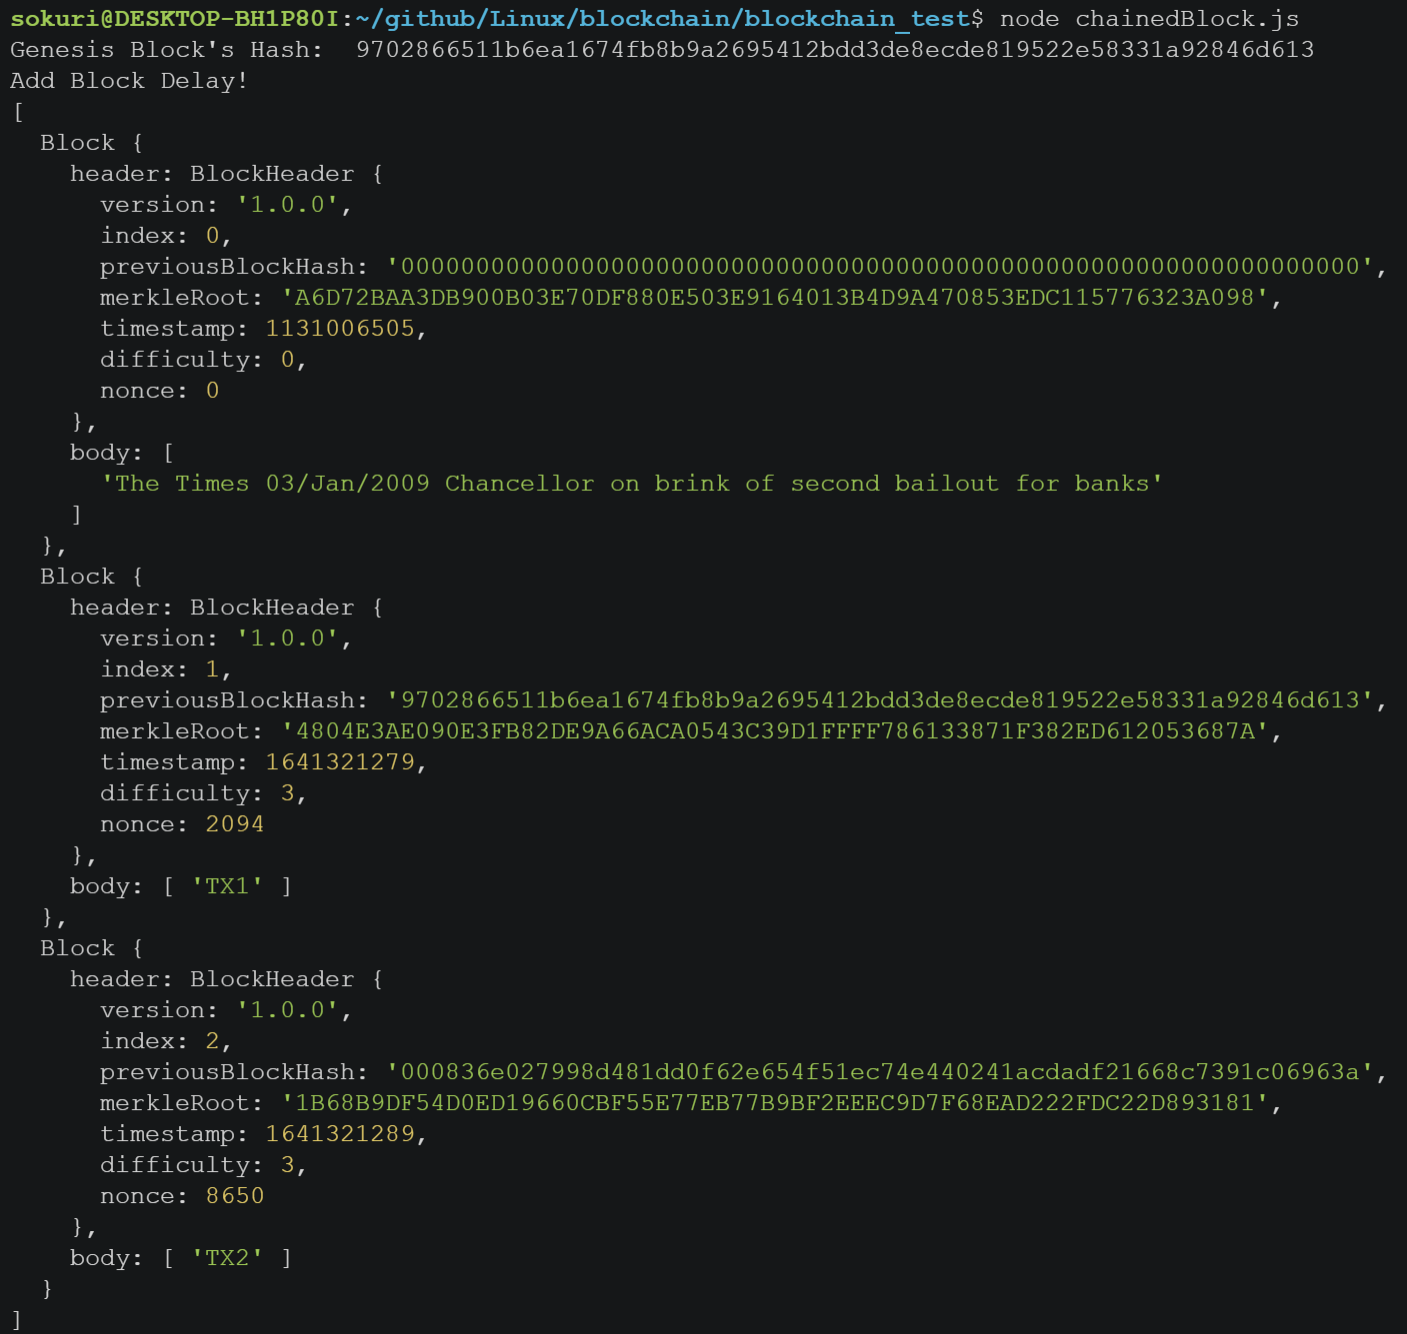
- 해시 비교를 위해
genesisBlock의 해시를 계산했다. isValidTimestamp때문에 10초 이내에 생성된 블록은 추가하지 않으므로setTimeout으로 딜레이를 10초 주었다.
/***** Using functions *****/
// Create genesisBlock
const genesisBlock = createGenesisBlock();
let Blocks = [genesisBlock];
const genesisHash = createHash(genesisBlock);
console.log("Genesis Block's Hash: ", genesisHash);

// Create Block1
const Block1 = nextBlock(["TX1"]);
addBlock(Block1);

// Create Block2 in 10 sec
setTimeout(function() {
  console.log('Add Block Delay!');
	const Block2 = nextBlock(["TX2"])
	addBlock(Block2)
	console.log(Blocks);
}, 10000);
Block1은genesisBlock해시를 가리키고 있다.Block2의previousBlockHash를 보면difficulty값 3만큼 "0"이 반복되어 시작된 것을 확인할 수 있다.nonce값은 해시값을 찾을 때 반복한 횟수이며, 각 블록마다 그 횟수가 다른 것을 확인할 수 있다.
2) REST 서버 만들기
- REST 서버 개념이 궁금하다면 링크 참고
2-1) express로 서버 기본 틀 구성
/*****************/
/* httpServer.js */
/*****************/

const express = require("express");
const bodyParser = require("body-parser");
const {
	getLastBlock,
	getBlocks,
	nextBlock,
	getVersion,
	Blocks,
} = require("./chainedBlock.js");
const { addBlock, isValidChain, } = require("./checkValidBlock.js");

// set server port
const http_port = process.env.HTTP_PORT || 3001;

function initHttpServer(port) {
	const app = express();
	app.use(bodyParser.json());

	app.get("/", (req, res) => {
		res.send(`Welcome to Server ${port}`)
	})

	app.post("/stop", (req, res) => {
		res.send({ msg: "Stop Server!" });
		process.exit();
	});

	app.listen(port, () => {
		console.log("Listening HTTP Port : " + port);
	});
}

// open server
initHttpServer(http_port);
서버가 잘열리는지 확인
$ node httpServer.js &

2-2) router 생성
위에서 만든 함수를 활용하여 원하는 동작을 만들어주자.
"/blocks": 현재 블록 정보를 불러온다."/mineBlock": 생성할 블록 데이터를 보내고 새로운 블록을 추가한다."/getVersion": 블록의 버전을 불러온다.
...

  // Get version
  app.get("/version", (req, res) => {
    res.send(getVersion())
  })

  // Get blocks' info
  app.get("/blocks", (req, res) => {
    res.send(getBlocks());
  });

  // Mining blocks
  app.post("/mineBlock", (req,res) => {
    const data = req.body.data || [];
    const newBlock = nextBlock(data);
    const result_addBlock = addBlock(newBlock);
    if (result_addBlock) {
      console.log("Mining has done Successfuly");
    } else {
      console.log("Mining has failed.");
      console.log("Check the error message.");
    }
    res.send(getLastBlock())
  })

...
2-3) curl 명령어로 테스트 해보기
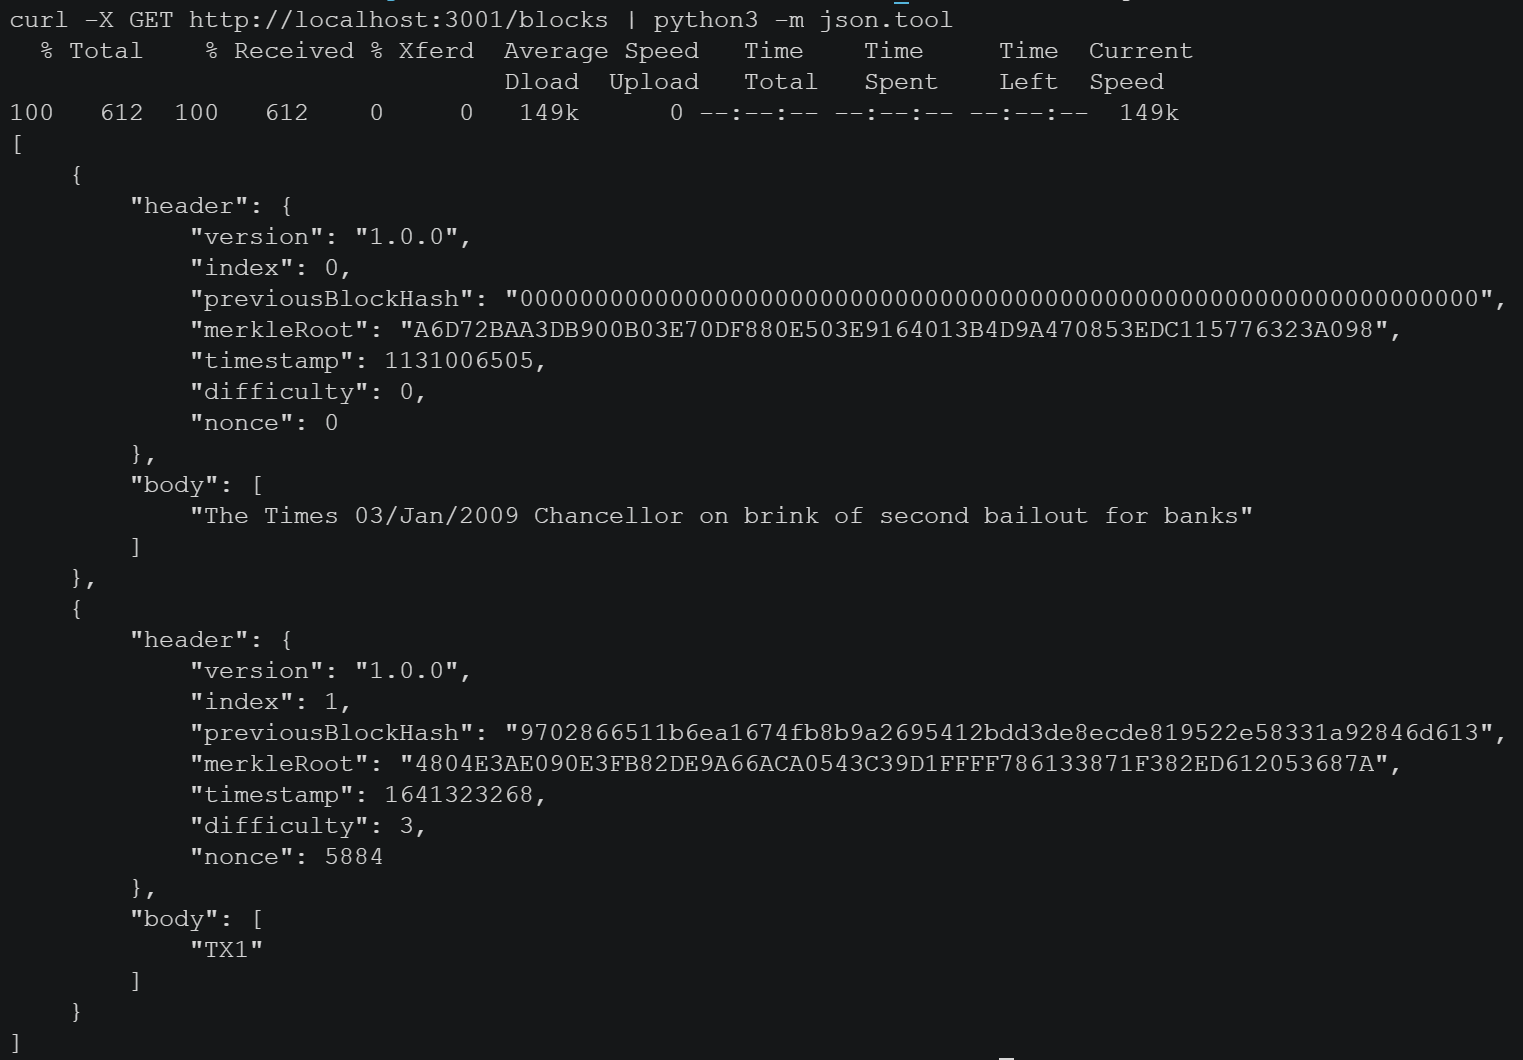
/blocks
curl -X GET 주소의 형태로 GET요청을 보내면 된다.
응답이 JSON 형태로 오기 때문에 python3의 json.tool을 사용해서 보면 보기 편하다.
$ curl -X GET http://localhost:3001/blocks | python3 -m json.tool
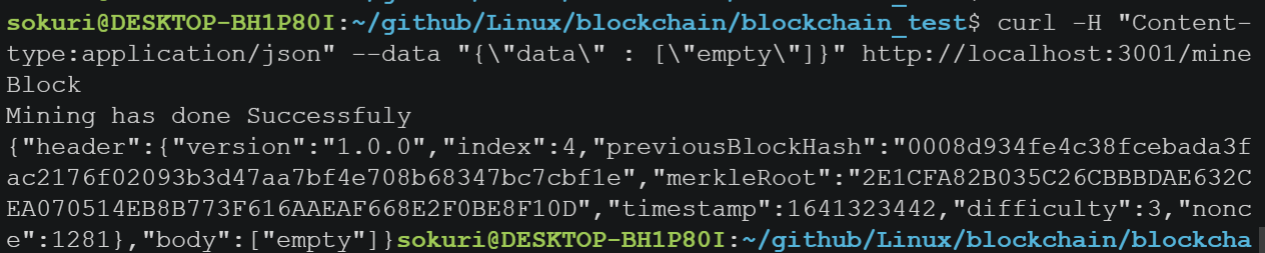
/mineBlock
curl -X GET 주소의 형태로 GET요청을 보내면 된다.
$ curl -H "Content-type:application/json" --data "{\"data\" : [\"empty\"]}" http://localhost:3001/mineBlock
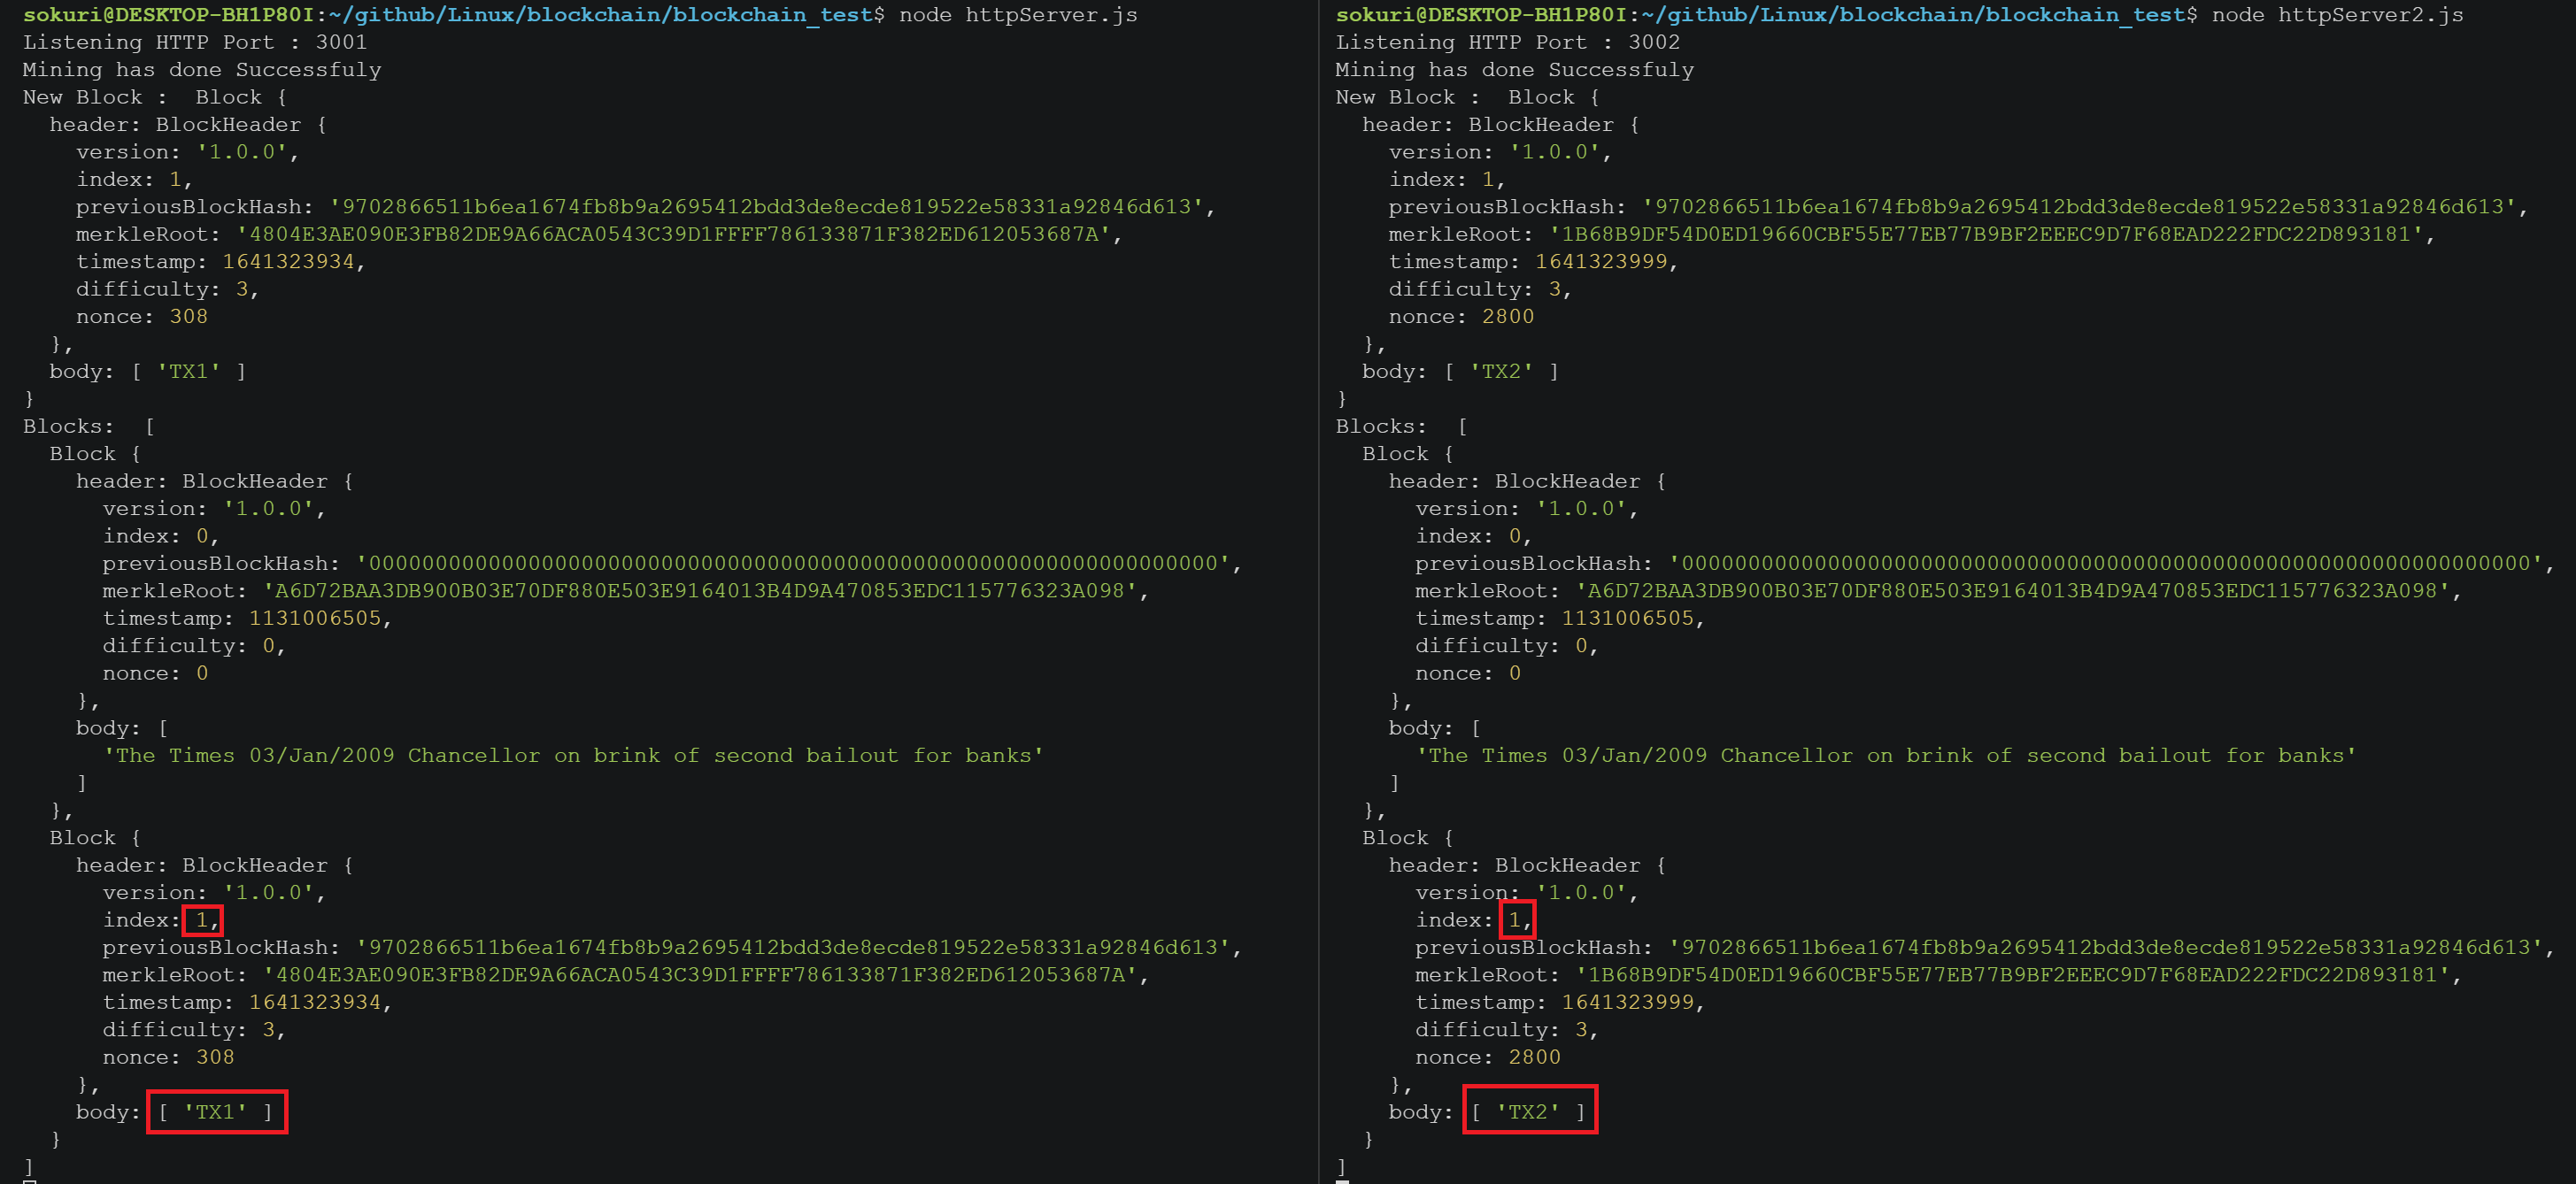
httpServer2.js
마지막으로
httpServer2.js를 똑같이 하나 만들고 port만 3002로 설정하자.
그리고 두 서버에서 블록을 생성해보면, 서로 다른 원장을 갖고 있다는 것을 알 수 있다.
그렇다면 어떤 노드의 블록이 참인 것일까?
다음 포스팅에서작업증명 합의 알고리즘을 활용해서 이를 해결할 예정이다.
7. 마무리
처음에 잘못된 접근으로 이해하는데 시간이 오래걸렸다.
다음 포스팅에서는 socket을 활용한 p2p server를 만들고, 각 노드들의 통신을 통해 어떤 블록이 참인지 결정하는 코드를 만들 예정이다.