요약
1. Nest.js에서 Request Scope 객체를 주입하면, DI 그래프가 복잡해지고 요청마다 많은 객체가 새로 생성되며 리소스 낭비가 발생한다.
2. 이를 해결하기 위해 Node.js의 AsyncLocalStorage 를 활용해 Request Scope를 대체하는 Context Store를 구현했다.
3. MikroORM의 구조를 참고하여 Request Scope 없이도 요청 단위 Context를 안전하게 관리할 수 있도록 개선했다.
서론
회사에서 팀원분이 Nest.js DevTools를 사용해보시더니, 우리 프로젝트의 대부분의 객체가 Request Scope로 설정됐다는 문제가 있다고 말씀을 해주셨다. 이전 Nest.js Dynamic Multi Tenancy 구현하기글에서 구현한 방식대로 구현해서 거의 대부분이 Request Scope로 변경됐기 때문이다.
이 상태가 유지가 된다면, 모든 요청에 대부분의 객체를 계속 new로 생성하기 때문에 트래픽이 높아지면 메모리 문제로 이어질 가능성이 높았다.
문제를 해결하기 위해서, MikroORM은 어떻게 구현했는지 분석하고 적용하려고 했다.
왜 MikroORM에서 찾아보게 됐는가?
MikroORM을 사용하고 있었는데, ORM에서 요청마다 항상 다른 EntityManager를 주입해주고 있었다.
주입하더라도 해당 Service가 Request Scope로 변하지 않는다는 점을 확인했다.
이러한 점이 현재 내가 맞닥들인 문제와 동일하다고 판단했고, MikroORM을 파악해보기로 했다.
코드를 조금 파악해보니 한번에 알 수 있었다. RequestContext라는 객체가 존재했고, 여기서 Node.js의 AsyncLocalStorage를 활용해서 Context를 새로 만들어서 관리하고 있었다.
Node.js AsyncLocalStorage
AsyncLocalStorage는 Node.js에서 비동기 흐름 전체에 걸쳐 값을 저장하고 전달할 수 있는 컨텍스트 저장소(Context Store) 이다.
import { AsyncLocalStorage } from 'async_hooks';

const storage = new AsyncLocalStorage();

function handleRequest(req, res) {
  const context = { tenantId: req.headers['tenant-id'] };

  // 새로운 async context 시작
  storage.run(context, () => {
    processRequest();
  });
}

function processRequest() {
  console.log(storage.getStore().tenantId); // 요청별 tenantId 출력
}- 위와 같이, Callback이 끝날때까지 context 객체에 접근할 수 있다.
- 이러한 장점을 통해 Controller/Service/Repository/Logger 등등... 여러곳에서 파라미터를 계속 넘겨서 처리하는 것이 아닌 필요할 때 호출해서 사용할 수 있는 형태로 구성할 수 있다.
아키텍처
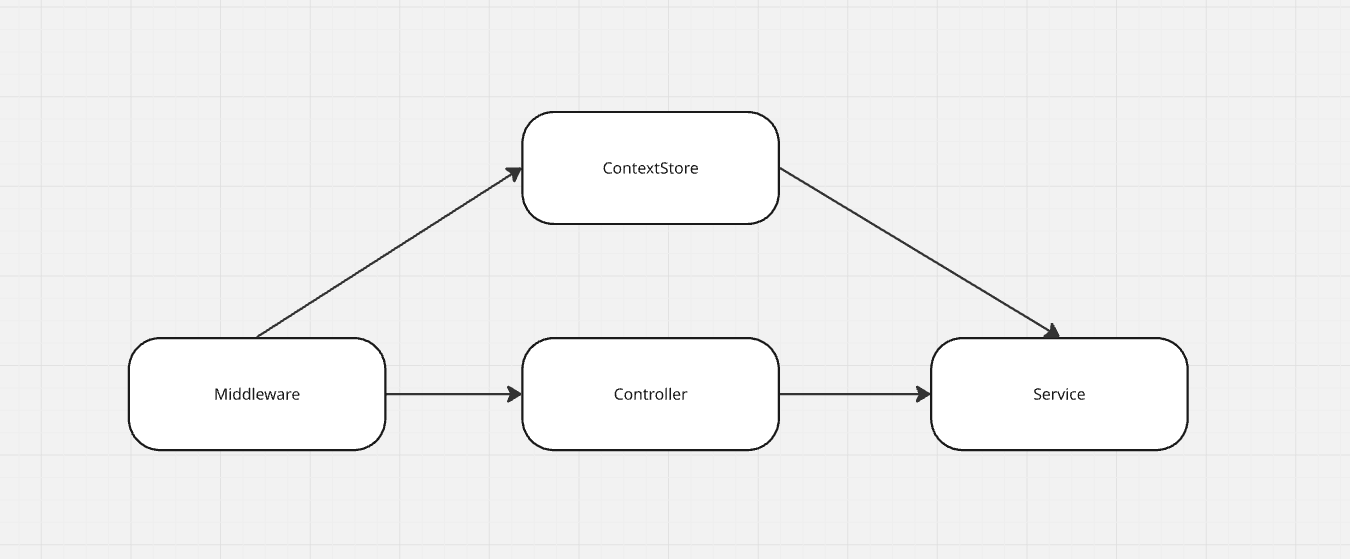
- Middleware에서 요청마다 새로운 Context 객체 생성
AsyncLocalStorage.run()안에서 next() 호출- 이후 모든 계층에서 Context Store를 통해 해당 요청 Context 접근 가능
- Service/Repository/Logger에서 Context 활용
- Service에서 User Session 데이터를 가져와서 처리
- Repository 내부에서 Tenant 정보를 가져와서 처리
import { Injectable } from '@nestjs/common';
import { AsyncLocalStorage } from 'node:async_hooks';

@Injectable()
export class ContextStore<Data extends Record<string, any> = Record<string, any>> {
  private readonly store = new AsyncLocalStorage<Data>();

  public create<T = any>(callback: () => T, data: Data = {} as Data) {
    return this.store.run(data, callback);
  }

  public getContext() {
    const ctx = this.store.getStore();

    if (!ctx) {
      throw new Error('No context found');
    }

    return ctx;
  }
}@Injectable()
export class ContextMiddleware implements NestMiddleware {
constructor(private readonly contextStore: ContextStore) {}
public use(_: any, __: any, next: () => void) {
const requestContext = {};
return this.contextStore.create(next, requestContext);
}
}
- 위 코드처럼 구성하게 되면, 해당 Middleware가 지나간 이후부터
contextStore.getContext()를 통해 requestContext에 접근할 수 있다.
개선한 이후
- 대부분의 객체들이 RequestScope에서 변환이 됐다.
- 기존에 억지로 Nest.js Context에서 꺼내서 사용하던 변수들도 깔끔하게 Context에 담아서 필요한 곳에서 자유롭게 꺼낼 수 있도록 코드가 개선됐다.
번외1. gRPC에서의 문제점
현재 메인 서버를 Nest.js gRPC로 운영하고 있었는데, Nest.js gRPC에는 Middleware가 존재하지 않는다.
이러한 문제를 해결하기 위해서, Guard / Interceptor / Nest.js Context를 활용해서 구현했다.
- Guard가 가장 먼저 요청을 처리하기 때문에 Guard에서 Context를 생성하고, Nest.js Context에 강제로 추가한다.
- 이후 Interceptor에서 next.handle()을 활용해서 처리한다.
export class ContextGuard implements CanActivate {
  public async canActivate(context: ExecutionContext) {
    const ctx = {};
    const nestContext = context.getArgs();

    // ctx에 데이터 채우기
    // 3으로 설정하는 이유는, 그 앞에 데이터가 있기 때문
    nestContext[3] = ctx;

    return true;
  }
}@Injectable()
export class ContextInterceptor implements NestInterceptor {
constructor(private readonly contextStore: ContextStore) {}
public async intercept(context: ExecutionContext, next: CallHandler<any>): Promise<Observable<any>> {
const nestContext = context.getArgs();
const ctx = nestContext[3];
if (ctx === undefined) {
return next.handle();
}
return new Observable((observer) => {
this.contextStore.create(
() =>
next.handle().subscribe({
next: (value) => observer.next(value),
error: (err) => observer.error(err),
complete: () => observer.complete(),
}),
ctx
);
});
}
}위와 같이 Guard에서 생성하고, Interceptor에서 create 하도록 구성했다.
이 방식의 문제점은 Nest.js 업데이트를 통해 getArgs에 3번 인덱스에 데이터가 생겼을 때 문제가 발생한다.
번외2. Nest.js Context를 사용하지 않은 이유
Nest.js에도 Context가 존재하지만 아래 이유때문에 사용하지 않았다.
1. 내부 Context 타입을 관리하기 위해서 declare 파일을 만들고, 억지로 넣는 것이 마음에 들지 않았음.
2. Service/Logger와 같은 다른 곳에서 꺼내서 사용하기 불편했음.
3. ExecutionContext와 ArgumentsHost 객체가 있는데 Nest Context 자체를 확장해서 공용 저장소로 사용하는것이 목적과 다른 것 같아서