
1. 자바스크립트로 태그 선택하기
HTML id 속성으로 태그 선택하기
👉 id에 해당하는 태그 하나
document.getElementById('id')HTML class속성으로 태그 선택하기
👉 class에 해당하는 태그 모음(HTMLCollection)
document.getElementsByClassName('class')HTML 태그 이름으로 태그 선택하기
👉 tag에 해당하는 태그 모음(HTMLCollection)
document.getElementsByTagName('tag')css 선택자로 태그 선택하기
👉 css 선택자에 해당하는 태그 중 가장 첫번째 태그 하나
document.querySelector('css')👉 css 선택자에 해당하는 태그 모음(NodeList)
document.querySelectorAll('css')유사 배열이란?
배열처럼 동작하는 객체를 말함
ex) HTMLCollection, NodeList, DOMTokenList, ...
특징
-
배열과 유사한 객체로 배열처럼 0부터 시작하는 숫자로
indexing된 요소를 가집니다. -
객체에 포함된 요소의 개수를 나타내는
length프로퍼티가 있습니다. -
그러나, 배열의 기본 메소드를 사용할 수 없다❌❌❌(ex. map, forEach, reduce 등등)
-
유사 배열 객체는 반복 가능(iterable)할 수 있으며,
for...of루프나Array.from()또는스프레드 연산자를 사용하여 요소를 순회할 수 있습니다. -
Array.isArray(유사배열)===false
유사 배열은 배열과 비슷하지만 배열은 아니기 때문에false를 리턴합니다.
🤚 객체가 배열인지 확인하기 위해서는 isArray() 함수를 사용 -
함수에서 처리 결과로 배열을 반환하고 싶을 때 또는, Array에서 기본으로 내포되어있는 기능을 제공하고 싶지 않거나 Array에 내포되어있지 않은 기능을 제공하고싶을때 사용
HTMLCollection과 NodeList 차이 이해하기
- HTMLCollection과 NodeList는 모두
유사 배열 객체이면서이터러블입니다.- 둘 다
length프로퍼티를 가지므로 객체를 배열처럼 접근할 수 있고반복문을 돌 수 있습니다.- 유사 배열 객체이기 때문에 자바스크립트에서 제공하는 배열 객체의
메소드는 사용할 수 없습니다. (ex. map, forEach, reduce 등등)
🤚 이터러블 : ES6 에서는 순회 가능한 자료구조를 ”이터러블"로 통일하여 for…of 문, 스프레드 문법, 배열 디스트럭처링 할당의 대상으로 사용할 수 있도록 일원화했다.
HTMLCollection
getElementsByClassName
getElementsByTagName
- 노드 객체의 상태 변화를 실시간으로 반영하는 살아있는 live DOM 컬렉션 객체
(객체가 스스로 실시간 노드 객체의 상태 변경을 반영함)- 요소 노드의 추가나 삭제를 바로 반영
NodeList
querySelectorAll
- 노드 객체의 상태 변경을 실시간으로 반영하지 않고 과거의 정적 상태를 유지하는 non-live DOM 컬렉션 객체
- NodeList.prototype.forEach 메서드를 상속받아 사용할 수 있음
forEach 외의 Array.prototype에서 제공하는 map, reduce, filter 등의 메서드는 사용할 수 없음.
따라서 HTMLCollection과 NodeList 모두 편리하게 사용하기 위해서는 배열로 만들어줘야 합니다.
특히 HTMLCollection과 같은 live 객체는 반복문을 순회하면서 노드가 변경되는 경우, 개발자의 의도와는 다른 결과가 발생할 수 있으므로 배열로 바꾸어 사용하는 것이 바람직합니다.
- Array.from
- 스프레드 연산자
const $greeting = document.querySelectorAll('.greeting');
Array.from($greeting);
[...$greeting];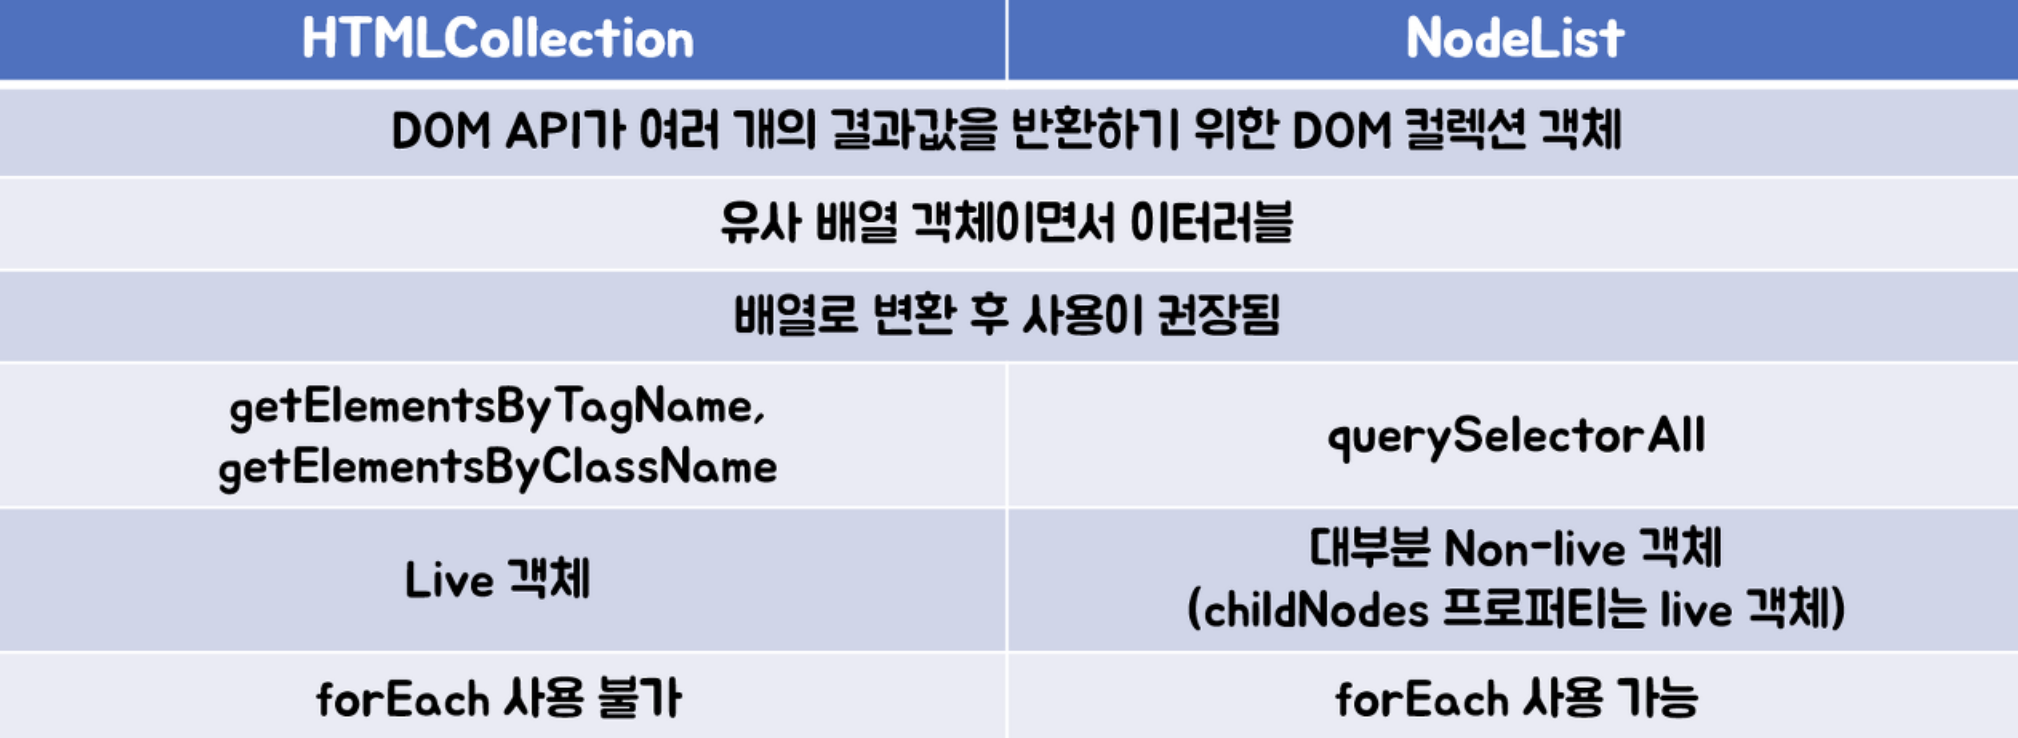
2. DOM 트리 여행하기
HTML 태그 👉 요소 노드
문자 👉 텍스트 노드
주석 👉 주석 노드
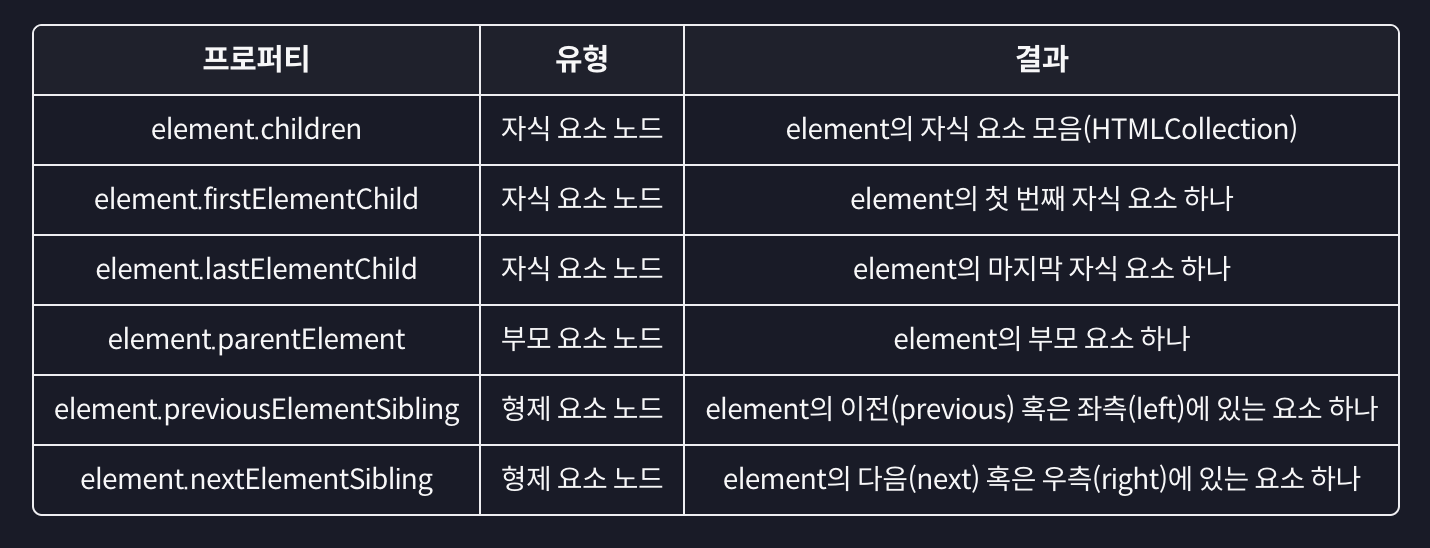
요소 노드에 대한 이동 프로퍼티
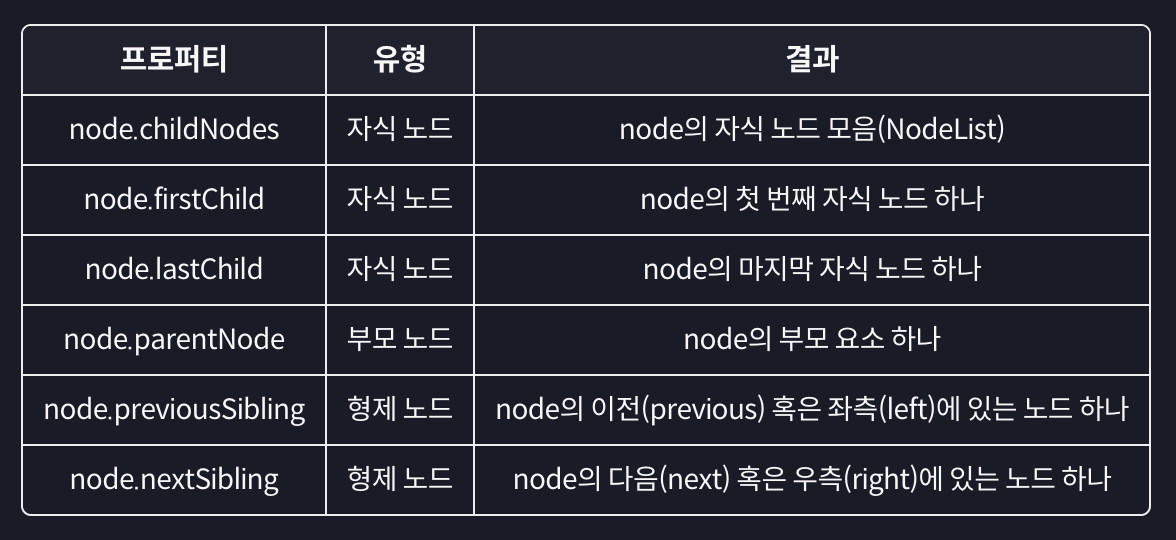
모든 노드에 대한 이동 프로퍼티
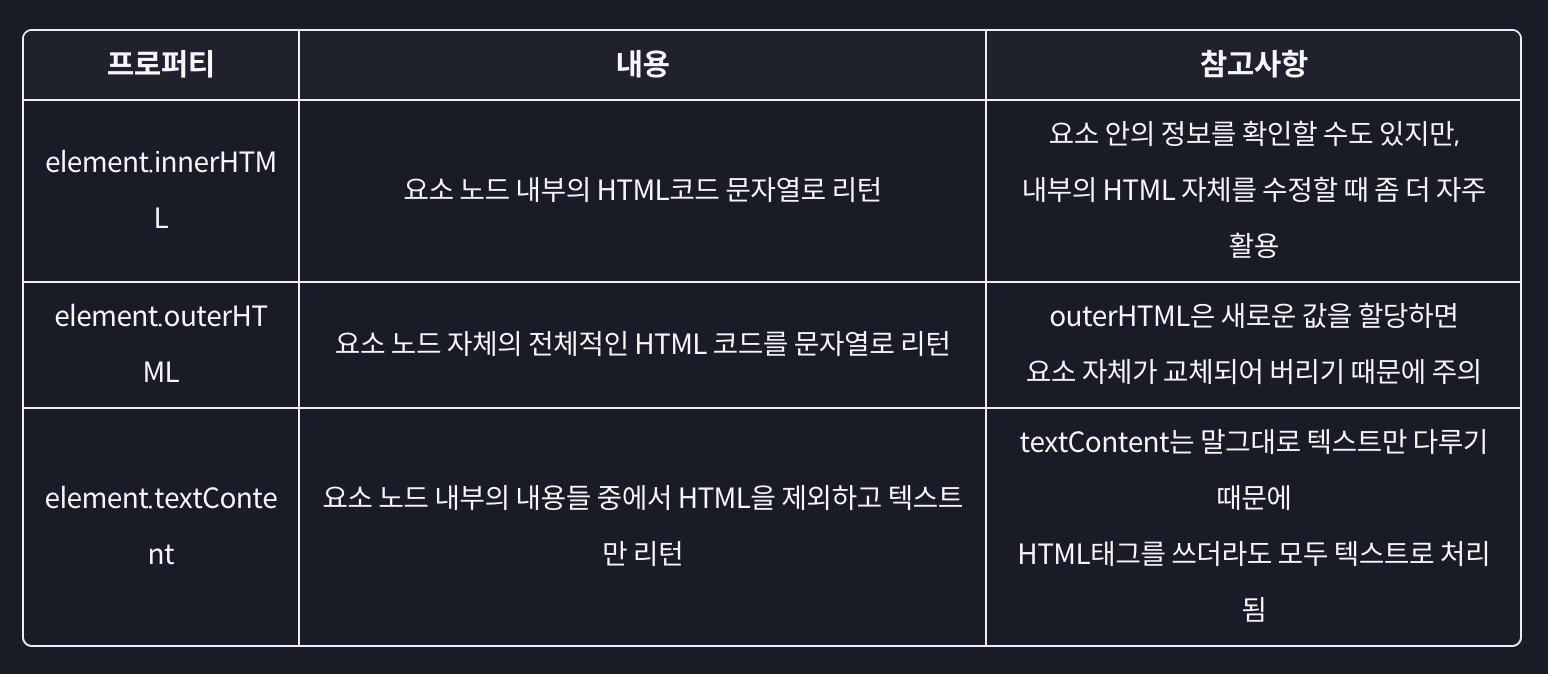
주요 요소 노드 프로퍼티
일반적으로 우리가 다루고자 하는 대상은 태그!
3. 요소 노드 추가하기
- 요소 노드 만들기: document.
createElement('태그이름')- 요소 노드 꾸미기: element.
textContent, element.innerHTML, ...- 요소 노드 추가 혹은 이동하기: element.
prepend, element.append, element.after, element.before- 요소 노드 삭제하기: element.
remove()
const tomorrow = document.querySelector('#tomorrow')

// 1. 요소 노드 만들기: document.createElement('태그이름')
const first = document.createElement('li');

// 2. 요소 노드 꾸미기: textConent, innerHTML, ...
first.textContent = "처음";

// 3. 요소 노드 추가하기: Node.prepend(맨 앞), append(맨 뒤),
// after(형제 노드 앞), before(형제 노드 뒤)
tomorrow.prepend(first);
4. 노드 삭제와 이동
// 노드 삭제하기: Node.remove()
tomorrow.remove()
today.children[2].remove()

//노드 이동하기: prepend, append, before, after
today.append(tomorrow.children[1]);
tomorrow.children[1].after(today.children[1]);
tomorrow.lastElementChild.before(today.children[1])
5. HTML 속성 다루기
- 속성에 접근하기: element.
getAttribute('속성')- 속성 추가(수정)하기: element.
setAttribute('속성', '값')- 속성 제거하기: element.
removeAttribute('속성')
elem.getAttribute('속성'): 속성에 접근하기
console.log(tomorrow.getAttribute('href'));
console.log(tomorrow.getAttribute('class'));
elem.setAttribute('속성', '값'): 속성 추가(수정)하기
tomorrow.setAttribute('class', 'list');
tomorrow.setAttribute('href', 'https://naver.com');
elem.removeAttribute('속성'): 속성 제거하기
tomorrow.removeAttribute('href');
tomorrow.removeAttribute('CLass');
// ✅ 속성 이름은 대소문자를 구분하지 않음!
6. 스타일 다루기
- style 프로퍼티 활용하기: element.style.styleName = 'value';
- class 변경을 통해 간접적으로 스타일 적용하기: element.className, element.classList
- ✨
style 프로퍼티를 사용하게 되면 태그에inline-style이 적용되므로 css의우선순위가 달라질 경우가 발생! 따라서class 변경을 통해간접적으로 적용하는 것을 권고하고 있음!
classList: add, remove, toggle
const today = document.querySelector('#today');
const tomorrow = document.querySelector('#tomorrow');
const item = tomorrow.children[1];

item.classList.add('done');
// 👉 done이라는 class 추가됨
item.classList.add('done', 'other');
// 👉 여러개의 class 추가할 때 사용

item.classList.remove('done')
item.classList.remove('done', 'other')

item.classList.toggle('done');
// 👉 class 하나만을 다룸(여러개 ❌)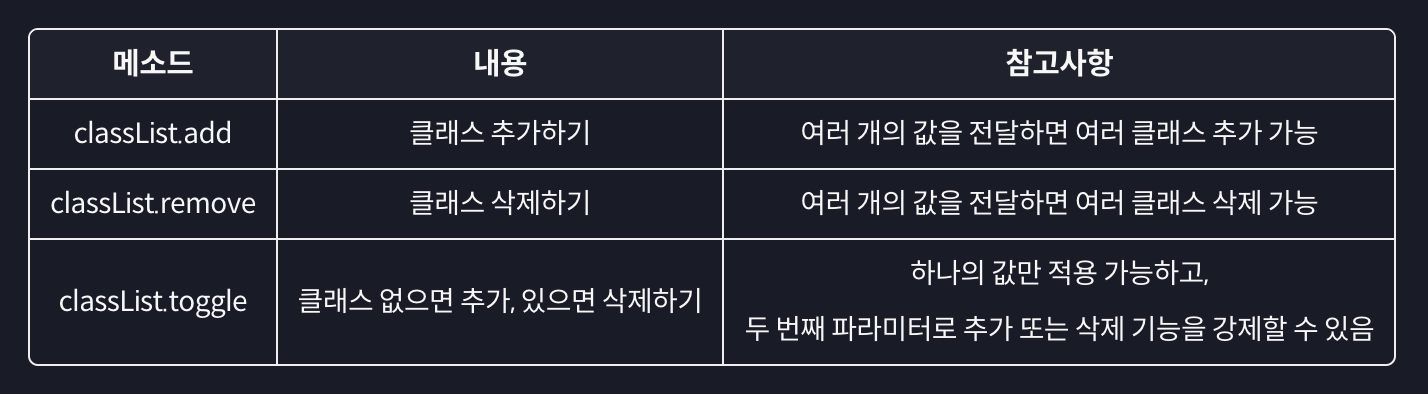
className
today.children[1].className = 'done';
// 👉 class가 done으로 아예 바뀜(통째로 바뀜)
style 프로퍼티
today.children[0].style.backgroundColor = '#DDDDDD';style 프로퍼티 보다는 태그에 class를 다루는 방식이 더 권장되는 방식!!