40장 이벤트
1. 이벤트 드리븐 프로그래밍
- 이벤트 드리븐 프로그래밍: 프로그램의 흐름을 이벤트 중심으로 제어하는 프로그래밍
- 이벤트핸들러 : 이벤트가 발생했을 때 호출될 함수
- 이벤트 핸들러 등록 : 이벤트가 발생했을 때 브라우저에 이벤트 핸들러의 호출을 위임하는 것
<!DOCTYPE html>
<html>
<body>
  <button>Click me!</button>
  <script>
    const $button = document.querySelector('button');

    // 사용자가 버튼을 클릭하면 함수를 호출하도록 요청
    $button.onclick = () => { alert('button click'); };
  </script>
</body>
</html>
※ 사용자가 언제 함수 호출을 언제할 지 개발자는 알 수 없다.
2. 이벤트 타입
2.1 마우스 이벤트
| 이벤트 타입 | 이벤트 발생 시점 |
|---|---|
| click | 마우스 버튼을 클릭했을 때 |
| dblclick | 마우스 버튼을 더블 클릭했을 때 |
| mousedown | 마우스 버튼을 눌렀을 때 |
| mouseup | 누르고 있던 마우스 버튼을 놓았을 때 |
| mousemove | 마우스 커서를 움직였을 때 |
| mouseenter | 마우스 커서를 HTML 요소 안으로 이동했을 때(버블링되지 않는다) |
| mouseover | 마우스 커서를 HTML 요소 안으로 이동했을 때(버블링된다) |
| mouseleave | 마우스 커서를 HTML 요소 밖으로 이동했을 때(버블링되지 않는다) |
| mouseout | 마우스 커서를 HTML 요소 밖으로 이동했을 때(버블링 된다) |
2.2 키보드 이벤트
| 이벤트 타입 | 이벤트 발생 시점 |
|---|---|
| keydown | 모든 키를 눌렀을 때 발생한다. * control, option, shift, tab, delete, enter, 방향 키와 문자, 숫자, 특수 문자 키를 눌렀을 때 발생한다. 단, 문자, 숫자, 특수 문자, enter 키를 눌렀을 때는 연속적으로 발생하지만 그 외 키를 눌렀을 때는 한번만 발생한다. |
| keypress | 문자 키를 눌렀을 때 연속적으로 발생한다 control, option, shift, tab, delet, 방향 키 등을 눌렀을 때는 발생하지 않고 문자, 숫자, 특수 문자, enter키를 눌렀을 때만 발생한다. 폐지(deprecated)되었으므로 사용하지 않는 것을 권장한다 |
| keyup | 누르고 있던 키를 놓았을 때 한 번만 발생한다. control, option, shift, delete, enter, 방향 키와 문자, 숫자, 특수 문자 키를 놓았을 때 발생한다. |
2.3 포커스 이벤트
| 이벤트 타입 | 이벤트 발생 시점 |
|---|---|
| focus | HTML 요소가 포커스를 받았을 때(버블링되지 않는다) |
| blur | HTML 요소가 포커스를 잃었을 때(버블링되지 않는다) |
| focusin | HTML 요소가 포커스를 받았을 때(버블링된다) |
| focuseout | HTML 요소가 포커스를 잃었을 때(버블링된다) |
2.4 폼 이벤트
| 이벤트 타입 | 이벤트 발생 시점 |
|---|---|
| submit | 1. from 요소 내의 input(text, checkbox, radio), select 입력 필드(textarea 제외)에서 엔터키를 눌렀을 때 2. form 요소 내의 submit 버튼( <button>, <input type="submit">)을 클릭했을 때submit 이벤트는 form 요소에서 발생한다 |
| reset | form 요소 내의 reset 버튼을 클릭했을 때(최근에는 사용 X) |
2.5 값 변경 이벤트
| 이벤트 타입 | 이벤트 발생 시점 |
|---|---|
| input | input(text, checkbox, radio), select, textarea 요소의 값이 입력되었을 때 |
| change | input(text, checkbox, radio), select, textarea 요소의 값이 변경되었을 때 change 이벤트는 input 이벤트와 달리 HTML 요소가 포커스를 잃었을 때 사용자 입력이 종료되었다고 인식하여 발생한다. 즉, 사용자가 입력하고 있을 때는 input 이벤트가 발생하고 사용자 입력이 종료되어 값이 변경되면 change 이벤트가 발생한다 |
| readystatechange | HTML 문서의 로드와 파싱 상태를 나타내는 document, readyState 프로퍼티 값('loading', 'interative', 'complete')이 변경될 때 발생 |
2.6 DOM 뮤테이션 이벤트
| 이벤트 타입 | 이벤트 발생 시점 |
|---|---|
| DOMContentLoaded | HTML 문서의 로드와 파싱이 완료되어 DOM 생성이 완료되었을 때 |
2.7 뷰 이벤트
| 이벤트 타입 | 이벤트 발생 시점 |
|---|---|
| resize | 브라우저 윈도우(window)의 크기를 리사이즈할 때 연속적으로 발생한다 window 객체에서만 발생 |
| scroll | 웹페이지(document) 또는 HTML 요소를 스크롤할 때 연속적으로 발생한다 |
2.8 리소스 이벤트
| 이벤트 타입 | 이벤트 발생 시점 |
|---|---|
| load | DOMContentLoaded 이벤트가 발생한 이후, 모든 리소스(이미지, 폰트 등)의 로딩이 완료되었을 때(주로 |
| window 객체에서 발생) | |
| unload | 리소스가 언로드될 때(주로 새로운 웹페이지를 요청한 경우) |
| abort | 리소스 로딩이 중단되었을 때 |
| error | 리소스 로딩이 실패했을 때 |
3. 이벤트 핸들러 등록
3.1 이벤트 핸들러 어트리뷰트 방식
- 이벤트 핸들러의 어트리뷰트 값으로 함수 호출문 등의 문을 할당하여 이벤트 핸들러를 등록
<!DOCTYPE html>
<html>
<body>
  <button onclick="sayHi('Lee')">Click me!</button>
  <script>
    function sayHi(name) {
      console.log(`Hi! ${name}.`);
    }
  </script>
</body>
</html>- 이벤트 핸들러 어트리뷰트 값은 사실 암묵적으로 생성될 이벤트 핸들러의 함수 몸체를 의미
- 위 예제에서어트리뷰트는 파싱되어 다음과 같은 함수를 암묵적으로 생성하며, 이벤트 핸들러 어트리뷰트 이름과 동일한 키 onClick 이벤트 핸들러 프로퍼티에 할당한다
function onClick(event){
	sayHi('Lee');
}- 이벤트 핸들러 어트리뷰트 방식은 HTML과 JS가 혼재된 방식이라서 사용을 지양한다. 되도록 HTML과 JS는 분리하는 것이 관리에 좋기 때문이다.
- 다만 Angluar, 리액트, vue.js에서는 오히려 이벤트 핸들러 어트리뷰트 방식을 사용한다는데... 그건 리액트 공부할 때나 생각할 것
3.2 이벤트 핸들러 프로퍼티 방식
<!DOCTYPE html>
<html>
<body>
  <button>Click me!</button>
  <script>
    const $button = document.querySelector('button');

    // 이벤트 핸들러 프로퍼티에 이벤트 핸들러를 바인딩
    $button.onclick = function () {
      console.log('button click');
    };
  </script>
</body>
</html>- HTML과 JS가 뒤섞이는 걸 방지한다
- 하지만 하나의 이벤트 핸들러만 바인딩 할 수 있다
<script>
	const $button = document.querySelector('button');

    $button.onclick = function(){
 		console.log('button click 1');
 	};
    // 아래 이벤트가 재할당된다
    $button.onclick = function(){
 		console.log('button click 2');
 	};
</script>- 근본적으로 이벤트 핸들러 프로퍼티 방식과 이벤트 핸들러 어트리뷰트 방식은 서로 다르지 않다.
3.3 addEventListener 메서드 방식
- EventTarget.prototype.addEventListener 메서드를 사용하여 이벤트 핸들러를 등록
<!DOCTYPE html>
<html>
<body>
  <button>Click me!</button>
  <script>
    const $button = document.querySelector('button');

    // 이벤트 핸들러 프로퍼티 방식
    // $button.onclick = function () {
    //   console.log('button click');
    // };

    // addEventListener 메서드 방식
    $button.addEventListener('click', function () {
      console.log('button click');
    });
  </script>
</body>
</html>- 이벤트 핸들러 프로퍼티 방식은 이벤트 핸들러 프로퍼티에 이벤트핸들러를 바인딩한다.
- addEventListener 메서드에는 이벤트 핸들러를 인수로 전달한다.
- 만약 두 방식으로 이벤트 핸들러를 사용하면? 다음과 같이 중복되는 문제가 생긴다.
<!DOCTYPE html>
<html>
<body>
  <button>Click me!</button>
  <script>
    const $button = document.querySelector('button');

    // 이벤트 핸들러 프로퍼티 방식
    $button.onclick = function () {
      console.log('[이벤트 핸들러 프로퍼티 방식]button click');
    };

    // addEventListener 메서드 방식
    $button.addEventListener('click', function () {
      console.log('[addEventListener 메서드 방식]button click');
    });
  </script>
</body>
</html>- 하지만 중복되어도 정상 동작한다.
- addEventListener, 너 참 맘에 든다😎
4. 이벤트 핸들러 제거
- EventTarget.prototype.removeEventListener 메서드를 사용
- addEventListener 메서드로 등록한 이벤트 핸들러를 제거한다
- 이 때 등록한 메서드와 삭제 메서드의 인수가 동일해야 한다
<!DOCTYPE html>
<html>
<body>
  <button>Click me!</button>
  <script>
    const $button = document.querySelector('button');

    const handleClick = () => console.log('button click');

    // 이벤트 핸들러 등록
    $button.addEventListener('click', handleClick);

    // 이벤트 핸들러 제거
    // addEventListener 메서드에 전달한 인수와 removeEventListener 메서드에
    // 전달한 인수가 일치하지 않으면 이벤트 핸들러가 제거되지 않는다.
    $button.removeEventListener('click', handleClick, true); // 실패
    $button.removeEventListener('click', handleClick); // 성공
  </script>
</body>
</html>- 그런데 익명 함수가 이벤트 핸들러로 등록됐다면? 그럼 방법이 없다.
// 이벤트 핸들러 등록
$button.addEventListener('click', () => console.log('button click'));
// 등록한 이벤트 핸들러를 참조할 수 없으므로 제거할 수 없다.- 이벤트 핸들러 프로퍼티 방식으로 등록한 이벤트는? 프로퍼티에 null을 할당하여 제거할 수 있다.
5. 이벤트 객체
- 이벤트가 발생하면 이벤트에 관련한 다양한 정보를 담고 있는 이벤트 객체가 동적으로 생성된다
- 생성된 이벤트 객체는 이벤트 핸들러의 첫 번째 인수로 전달된다
이벤트 핸들러 프로퍼티 방식의 이벤트 객체
<!DOCTYPE html>
<html>
<body>
  <p>클릭하세요. 클릭한 곳의 좌표가 표시됩니다.</p>
  <em class="message"></em>
  <script>
    const $msg = document.querySelector('.message');

    // 클릭 이벤트에 의해 생성된 이벤트 객체는 이벤트 핸들러의 첫 번째 인수로 전달된다.
    function showCoords(e) {
      $msg.textContent = `clientX: ${e.clientX}, clientY: ${e.clientY}`;
    }

    document.onclick = showCoords;
  </script>
</body>
</html>- e.preventDefault()나 e.stopPropagation()에서의 바로 그거다..
이벤트 핸들러 어트리뷰트 방식의 이벤트 객체
<!DOCTYPE html>
<html>
<head>
  <style>
    html, body { height: 100%; }
  </style>
</head>
<!-- 이벤트 핸들러 어트리뷰트 방식의 경우 event가 아닌 다른 이름으로는 이벤트 객체를 전달받지 못한다. -->
<body onclick="showCoords(event)"> // event 여야 한다
  <p>클릭하세요. 클릭한 곳의 좌표가 표시됩니다.</p>
  <em class="message"></em>
  <script>
    const $msg = document.querySelector('.message');

    // 클릭 이벤트에 의해 생성된 이벤트 객체는 이벤트 핸들러의 첫 번째 인수로 전달된다.
    function showCoords(e) {
      $msg.textContent = `clientX: ${e.clientX}, clientY: ${e.clientY}`;
    }
  </script>
</body>
</html>
주의 : 매개변수 이름이 반드시 event 여야만 한다
그냥 이벤트 핸들러 어트리뷰트 방식 자체를 쓰지 말자..
5.1 이벤트 객체의 상속 구조
- 이벤트가 발생하면 암묵적으로 생성되는 이벤트 객체도 생성자 함수에 의해 생성된다
- 생성된 이벤트 객체는 생성자 함수와 더불어 생성되는 프로토타입으로 구성된 프로토타입 체인에 등록된다
<!DOCTYPE html>
<html>
  <body>
    <script>
      // Event 생성자 함수를 호출하여 foo 이벤트 타입의 Event 객체를 생성한다.
      let e = new Event('foo');
      console.log(e);
      // Event {isTrusted: false, type: "foo", target: null, ....}

      console.log(e.type); // "foo"
      console.log(e instance of Event); // true
      console.log(e instance of Object); // true

      // FocusEvent 생성자 함수를 호출하여 focus 이벤트 타입의 FocusEvent 객체를 생성한다.
      e = new FocusEvent('focus')
      console.log(e);
      // FocusEvent {isTrusted: false, relatedTarget: null, view: null, ...}

      // MouseEvent 생성자 함수를 호출하여 click 이벤트 타입의 FocusEvent 객체를 생성한다.
      e = new MouseEvent('click');
      // MouseEvent {isTrusted: false, screenX: 0, screenY: 0, clientX: 0, ...}

      // KeyboardEvent 생성자 함수를 호출하여 keyup 이벤트 타입의 KeyboardEvent 객체를 생성한다.
      e = new KeyboardEvent('keyup');
      console.log(e)
      // KeyboardEvent {isTrusted: false, key: "", code: "", ctrlKey: false, ...}

      // InputEvent 생성자 함수를 호출하여 change 이벤트 타입의 InputEvent 객체를 생성한다.
      e = new InputEvnet('change');
      console.log(e);
      // InputEvent {isTrusted: false, data: null, inputType: "", ...}
    </script>
  </body>
</html>- Event 인터페이스는 DOM 내에서 발생한 이벤트에 의해 생성되는 이벤트 객체를 나타낸다
- 모든 이벤트 객체에는 공통 프로퍼티가 정의되어 있다
- FocusEvent, MouseEvent, KeyboardEvent, WheelEvent 같은 하위 인터페이스에는 이벤트 타입에 따라 고유한 프로퍼티가 정의되어 있다
<!DOCTYPE html>
<html>
  <body>
   <input type="text">
   <input type="checkbox">
   <button>Click me!</button>
   <script>
     const $input = document.querySelector('input[type=text]');
     const $checkbox = document.querySelector('input[type=checkbox]');
     const $button = document.querySelector('button');

     // load 이벤트가 발생하면 Event 타입의 이벤트 객체가 생성
     window.onload = console.log;

     // change 이벤트가 발생하면 Event 타입의 이벤트 객체가 생성
     $checkbox.onchage = console.log;
     // focus 이벤트가 발생하면 FocusEvent 타입의 이벤트 객체가 생성
     $input.onfocus = console.log;

     // input 이벤트가 발생하면 InputEvent 타입의 이벤트 객체가 생성
     $input.oninput = console.log;

     // keyup 이벤트가 발생하면 KeyboardEvent 타입의 이벤트 객체가 생성
     $input.onkeyup = console.log;

     // click 이벤트가 발생하면 MouseEvent 타입의 이벤트 객체가 생성
     $button.onclick = console.log;
   </script>
  </body>
</html>
5.2 이벤트 객체의 공통 프로퍼티
| 공통 프로퍼티 | 설명 | 타입 |
|---|---|---|
| type | 이벤트 타입 | string |
| target | 이벤트를 발생시킨 DOM 요소 | DOM 요소 노드 |
| currentTarget | 이벤트 핸들러가 바인딩된 DOM 요소 | DOM 요소 노드 |
| eventPhase | 이벤트 전파 단계 0: 이벤트 없음, 1: 캡처링 단계, 2: 타깃단계, 3: 버블링단계 | number |
| bubbles | 이벤트를 버블링으로 전파하는지 여부. 다음 이벤트는 bubbles: flase로 버블링하지 않는다 - 포커스 이벤트 focus/blur - 리소스 이벤트 load/unload/abort/error - 마우스 이벤트 mouseenter/mouseleave | boolean |
| cancelable | preventDefault 메서드를 호출하여 이벤트의 기본 동작을 취소할 수 있는지 여부. 다음 이벤트는 concelable: false로 취소할 수 없다 - 포커스 이벤트 focus/blur - 리소스 이벤트 load/unload/abort/error - 마우스 이벤트 dbclick/mouseenter/mouseleave | boolean |
| defaultPrevented | preventDefault 메서드를 호출하여 이벤트를 취소했는지 여부 | boolean |
| isTrusted | 사용자의 행위에 의해 발생한 이벤트인지 여부. 예를 들어, click 메서드 또는 dispatchEvent메서드를 통해 인위적으로 발생시킨 이벤트인 경우 isTrusted는 false | boolean |
| timeStamp | 이벤트가 발생한 시각(1970/01/01/00:00:0부터 경과한 밀리초) | number |
5.3 마우스 정보 취득
- mouseEvent 타입의 이벤트 객체는 다음과 같은 고유의 프로퍼티를 갖는다.
마우스 포인터의 좌표정보를 나타내는 프로퍼티 : screenX/screenY, clientX/clientY, pageX/pageY, offsetX/offsetY
버튼 정보를 나타내는 프로퍼티 : altKey, ctrlKey, shiftKey, button
5.4 키보드 정보 취득
- keyboardEvent 타입의 이벤트 객체는 altKey, ctrlKey, shiftKey, metaKey, key, keyCode 같은 고유의 프로퍼티를 갖는다.
<!DOCTYPE html>
<html>
  <body>
    <input type="text" />
    <em class="message"></em>

    <script>
      const $input = document.querySelector('input[type=text]');
      const $msg = document.querySelector('.message');

      $input.onkeyup = e => {
      // e.key는 입력한 키 값을 문자열로 반환한다.
      // 입력한 키가 'Enter'가 아니면 무시한다
      if(e.key !== 'Enter') return;

      // 엔터키가 입력되면 현재까지 입력 필드에 입력된 값을 출력한다.
      $msg.textcontent = e.target.value;
      e.tartget.value = '';
      };
    </script>
  </body>
</html>- input 요소의 입력 필드에 한글을 입력하고 엔터 키를 누르면 keyup 이벤트 핸들러가 두 번 호출되는 현상이 발생
- 이런 문제를 회피하려면 keyup 이벤트 대신 keydown 이벤트를 캐치할 것
6. 이벤트 전파
- 이벤트 전파 : DOM 요소 노드에서 발생한 이벤트는 DOM 트리를 통해 전파된다
예시
<!DOCTYPE html>
<html>
<body>
  <ul id="fruits">
    <li id="apple">Apple</li>
    <li id="banana">Banana</li>
    <li id="orange">Orange</li>
  </ul>
</body>
</html>- ul 요소의 두 번째 자식 요소인 li 요소를 클릭하면 클릭 이벤트가 발생한다고 가정
- 클릭 시 생성된 이벤트 객체는 이벤트를 발생시킨 DOM 요소인 이벤트 타킷 중심으로 DOM 트리를 통해 전파된다.
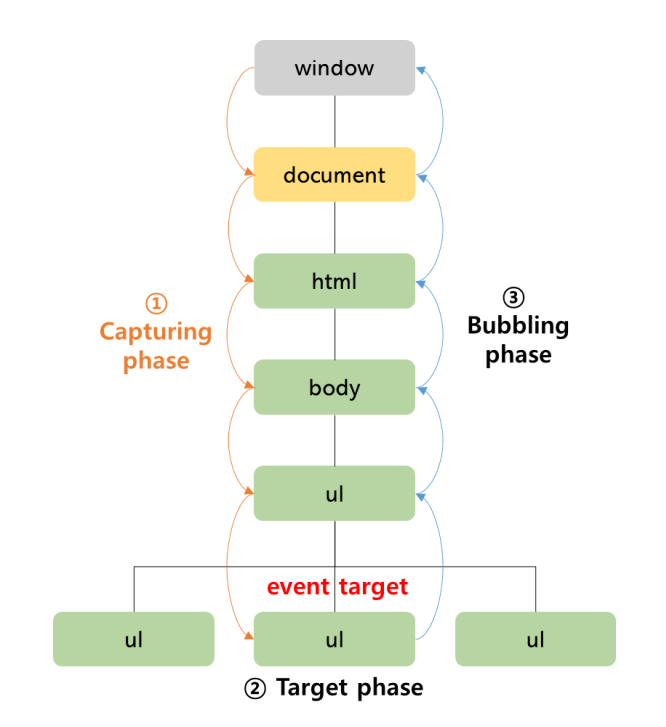
캡처링 단계(Capturing phase) : 이벤트가 상위 요소에서 하위 요소 방향으로 전파
타깃 단계(Target phase) : 이벤트가 이벤트 타깃에 도달
버블링 단계(Bubbling phase) : 이벤트가 하위 요소에서 상위 요소 방향으로 전파
- 예를 들어, ul 요소에 이벤트 핸들러를 바인딩하고 ul 하위 요소인 li 요소를 클릭한다고 가정
- 이때 이벤트 타켓(event.target) 이벤트가 발생한곳은 li 요소이고 커런트 타깃(event.currentTarget)
=> 즉, 이벤트 핸들러를 바인딩 한 ul 요소
<!DOCTYPE html>
<html>
<body>
  <ul id="fruits">
    <li id="apple">Apple</li>
    <li id="banana">Banana</li>
    <li id="orange">Orange</li>
  </ul>
  <script>
    const $fruits = document.getElementById('furits');
    const $banana = document.getElementById('banana');

    // #fruits 요소 하위 요소인 li 요소를 클릭한 경우 캡처링 단계의 이벤트를 캐치
    $fruits.addEventListener('click', e => {
      console.log(`이벤트 단계: ${e.eventPhase}`); // 1. 캡처링 단계
      console.log(`이벤트 타깃: ${e.target}`); // [object HTMLLIElement]
      console.log(`커런트 타깃: ${e.currentTarget}`); // [object HTMLUListElement]
    }, true);

    // 타깃 단계의 이벤트를 캐치한다.
    $banana.addEventListener('click', e => {
      console.log(`이벤트 단계: ${e.eventPhase}`); // 2. 타깃 단계
      console.log(`이벤트 타깃: ${e.target}`); // [object HTMLLIElement]
      console.log(`커런트 타깃: ${e.currentTarget}`); // [object HTMLLIElement]
    });

    // 버블링 단계의 이벤트를 캐치한다.
    $fruits.addEventListener('click', e => {
      console.log(`이벤트 단계: ${e.eventPhase}`); // 3. 버블링 단계
      console.log(`이벤트 타깃: ${e.target}`); // [object HTMLLIElement]
      console.log(`커런트 타깃: ${e.currentTarget}`); // [object HTMLUListElement]
    });
  </script>
</body>
</html>- 위처럼 대부분의 이벤트는 캡처링과 버블링을 통해 전파된다
- 그러나 다음 예외가 있다
- 이 이벤트들은 버블링을 통한 이벤트 전파 여부를 나타내는 이벤트 객체의 공통 프로퍼티 event.bubbles의 값이 false이다
- 포커스 이벤트 : focus / blue
- 리소스 이벤트 : load / unload / abort / error
- 마우스 이벤트 : mouseenter / mouseleave
7. 이벤트 위임
- 사용자가 내비게이션 아이템(li 요소)을 클릭하여 현재 선택된 내비게이션 아니켐에 active 클래스를 추가하고 그 외의 모든 내비게이션 아이템의 active 클래스는 제거하는 코드를 작성해야한다면 모든 내비게이션 아이템이 클릭 이벤트에 반응하도록 내비게이션 아이템에 이벤트 핸들러인 active를 등록할 수 있다.
- 하지만 이런 방법은 아이템이 100개라면 100개의 이벤트 핸들러를 등록해야하고, 성능저하의 원인이 된다.
이벤트 위임 :여러 개의 하위 DOM 요소에 각각 이벤트 핸들러를 등록하는 대신 하나의 상위 DOM 요소에 이벤트 핸들러를 등록하는 방법
- 이벤트 위임을 통해 상위 DOM 요소에 이벤트 핸들러를 등록하면 여러 개의 하위 DOM 요소에 이벤트 핸들러를 등록할 필요가 없다.
- 또한 동적으로 하위 DOM 요소를 추가하더라도 일일이 추가된 DOM 요소에 이벤트 핸들러를 등록할 필요가 없다.
<!DOCTYPE html>
<html>
  <head>
    <style>
      #fruits {
      	display: flex;
      	list-style-type: none;
      	padding: 0;
      }
      #fruits li {
      	width: 100px;
      	cursor: pointer;
      }
      #fruits .active {
      	color: red;
      	text-decoration: underline;
      }
    </style>
  </head>
<body>
  <nav>
    <ul id="fruits">
      <li id="apple" class="active">Apple</li>
      <li id="banana">Banana</li>
      <li id="orange">Orange</li>
    </ul>
  </nav>
<div>선택된 내비게이션 아이템: <em class="msg">apple</em></div>
<script>
  const $fruits = document.getElementById('fruits');
  const $msg = document.querySelector('.msg');
  // 사용자 클릭에 의해 선택된 내비게이션 아이템(li)에 active 클래스를 추가
  // 그 외의 모든 내비게이션 아이템의 active를 제거
  function activate({target}){
  // 이벤트를 발생시킨 요소(target)가 ul#fruits의 자식 요소가 아니라면 무시
  if(!target.matches('#fruits > li')) return;
  [...$fruits.children].forEach($fruit => {
      $fruit.classList.toggle('active', $fruits === target);
      $msg.textContent = target.id;
	});
  }
  // 이벤트 위임: 상위 요소(ul#fruits)는 하위 요소의 이벤트를 캐치할 수 있다
  $fruits.onclick = activate;
</script>
</body>
</html>- 이벤트 위임을 통해 하위 DOM 요소에서 발생한 이벤트를 처리할 때 주의할 점 : 상위 요소에 이벤트 핸들러를 등록하기 때문에 이벤트 타깃, 즉 이벤트를 실제로 발생시킨 DOM 요소가 개발자가 기대한 DOM요소가 아닐 수도 있다는 것
- 따라서 이벤트 반응이 필요한 DOM 요소에 한정하여 이벤트 핸들러가 실행되도록 이벤트 타깃을 검사할 필요가 있음
- 위 예제에서는 $fruits 요소에 이벤트를 바인딩 했다
- 이벤트 객체의 currentTarget 프로퍼티는 언제나 변함없이 $fruits 요소를 가리키지만, 이벤트 객체의 target 프로퍼티는 실제로 이벤트를 발생시킨 DOM 요소를 가리킨다
8. DOM 요소의 기본 동작 조작
8.1 DOM 요소의 기본 동작 중단
- DOM 요소는 저마다 기본 동작이 있다
- 예)
- a 요소를 클릭하면 href 어트리뷰트에 지정된 링크로 이동
- checkbox 또는 radio 요소를 클릭하면 체크 또는 해제
- 이벤트 객체의 preventDefault 메서드는 이러한 DOM 요소의 기본 동작을 중단시킨다
<!DOCTYPE html>
<html>
<body>
  <a href="https://www.google.com">go</a>
  <input type="checkbox">
  <script>
    document.querySelector('a').onclick = e => {
      // a 요소의 기본 동작을 중단한다.
      e.preventDefault();
    };

    document.querySelector('input[type=checkbox]').onclick = e => {
      // checkbox 요소의 기본 동작을 중단한다.
      e.preventDefault();
    };
  </script>
</body>
</html>
8.2 이벤트 전파 방지
- stopPropagation 메서드를 사용해 이벤트 전파를 막을 수 있다.
<!DOCTYPE html>
<html>
<body>
  <div class="container">
    <button class="btn1">Button 1</button>
    <button class="btn2">Button 2</button>
    <button class="btn3">Button 3</button>
  </div>
  <script>
    // 이벤트 위임. 클릭된 하위 버튼 요소의 color를 변경한다.
    document.querySelector('.container').onclick = ({ target }) => {
      if (!target.matches('.container > button')) return;
      target.style.color = 'red';
    };

    // .btn2 요소는 이벤트를 전파하지 않으므로 상위 요소에서 이벤트를 캐치할 수 없다.
    document.querySelector('.btn2').onclick = e => {
      e.stopPropagation(); // 이벤트 전파 중단
      e.target.style.color = 'blue';
    };
  </script>
</body>
</html>- 위 예제에서는 상위 DOM 요소 container 요소에 이벤트를 위임했다
- 따라서 하위 DOM 요소에서 클릭 이벤트 발생시 상위에서 이벤트를 캐치하여 처리한다
- 그러나 하위 요소 중에서 btn2 요소는 자신이 발생시킨 이벤트가 전파되는 것을 막았다
- 이처럼 stopPropagation 메서드는 하위 DOM 요소의 이벤트를 개별적으로 처리하기 위해 이벤트의 전파를 중단시킨다
9. 이벤트 핸들러 내부의 this
9.1 이벤트 핸들어 어트리뷰트 방식
<!DOCTYPE html>
<html>
<body>
  <button onclick="handleClick()">Click me</button>
  <script>
    function handleClick() {
      console.log(this); // window
    }
  </script>
</body>
</html>- 위 예제에서 this는 전역 객체 window
- handleClick 함수는 이벤트 핸들러에 의해 일반 함수로 호출되기 때문
- 일반 함수로 호출된 함수 내부의 this는 전역 객체이다
<!DOCTYPE html>
<html>
<body>
  <button onclick="handleClick(this)">Click me</button>
  <script>
    function handleClick(button) {
      console.log(button); // 이벤트를 바인딩한 button 요소
      console.log(this); // window
    }
  </script>
</body>
</html>- 단, 이벤트 핸들러를 호출할 떄 인수로 전달한 this는 이벤트를 바인딩한 DOM 요소를 가리킨다.
9.2 이벤트 핸들러 프로퍼티 방식과 addEventListener 메서드 방식
이벤트 핸들러 프로퍼티 방식과 addEventListener 메서드 방식
<!DOCTYPE html>
<html>
<body>
  <button class="btn1">0</button>
  <button class="btn2">0</button>
  <script>
    const $button1 = document.querySelector('.btn1');
    const $button2 = document.querySelector('.btn2');

    // 이벤트 핸들러 프로퍼티 방식
    $button1.onclick = function (e) {
      // this는 이벤트를 바인딩한 DOM 요소를 가리킨다.
      console.log(this); // $button1
      console.log(e.currentTarget); // $button1
      console.log(this === e.currentTarget); // true

      // $button1의 textContent를 1 증가시킨다.
      ++this.textContent;
    };

    // addEventListener 메서드 방식
    $button2.addEventListener('click', function (e) {
      // this는 이벤트를 바인딩한 DOM 요소를 가리킨다.
      console.log(this); // $button2
      console.log(e.currentTarget); // $button2
      console.log(this === e.currentTarget); // true

      // $button2의 textContent를 1 증가시킨다.
      ++this.textContent;
    });
  </script>
</body>
</html>- 이벤트 핸들러 프로퍼티 방식과 addEventListener 메서드 방식 모두 이벤트 핸들러 내부의 this는 이벤트를 바인딩한 DOM 요소를 카리킨다
=> 즉, 이벤트 핸들러 내부의 this는 이벤트 객체의 currentTarget 프로퍼티와 같다.
화살표 함수로 정의한 이벤트 핸들러
<!DOCTYPE html>
<html>
<body>
  <button class="btn1">0</button>
  <button class="btn2">0</button>
  <script>
    const $button1 = document.querySelector('.btn1');
    const $button2 = document.querySelector('.btn2');

    // 이벤트 핸들러 프로퍼티 방식
    $button1.onclick = e => {
      // 화살표 함수 내부의 this는 상위 스코프의 this를 가리킨다
      console.log(this); // window
      console.log(e.currentTarget); // $button1
      console.log(this === e.currentTarget); // false

      // window.textContent에 NaN(undefined + 1)을 할당한다
      ++this.textContent;
    };

    // addEventListener 메서드 방식
    $button2.addEventListener('click', e => {
      // 화살표 함수 내부의 this는 상위 스코프의 this를 가리킨다
      console.log(this); // window
      console.log(e.currentTarget); // $button2
      console.log(this === e.currentTarget); // false

      // window.textContent에 NaN(undefined + 1)을 할당한다
      ++this.textContent;
    });
  </script>
</body>
</html>- 화살표 함수로 정의한 이벤트 핸들러 내부의 this는 상위 스코프의 this를 가리킨다
- 화살표 함수는 함수 자체의 this 바인딩을 갖지 않기 때문
클래스에서 이벤트 핸들러를 바인딩하는 경우
<!DOCTYPE html>
<html>
<body>
  <button class="btn">0</button>
  <script>
    class App {
      constructor() {
        this.$button = document.querySelector('.btn');
        this.count = 0;

        // increase 메서드를 이벤트 핸들러로 등록
        this.$button.onclick = this.increase;
      }
      increase() {
        // 이벤트 핸들러 increase 내부의 this는 DOM요소를 가리킨다
        // 따라서 this.$button은 this.$button.$button과 같다
        this.$button.textContent = ++this.count;
        // => TypeError
      }
    }
    new App();
  </script>
</body>
</html>- 클래스에서 이벤트 핸들러를 바인딩하는 경우 this에 주의해야 한다
- 위 예제의 경우 이벤트 핸들러 프로퍼티 방식을 사용하고 있으나 addEventListener 메서드를 사용하는 경우와 동일
- 위 예제의 increase 메서드 내부의 this는 클래스가 생성할 인스턴스를 가리키지 않는다
- 이벤트 핸들러 내부의 this는 이벤트를 바인딩한 DOM 요소를 가리키기 때문에 increase 메서드 내부의 this는 this.$button을 가리킨다
<!DOCTYPE html>
<html>
<body>
	<button class="btn">0</button>
  <script>
  class App {
    constructor() {
      this.$button = document.querySelector('.btn');
      this.count = 0;
      // increase 메서드를 이벤트 핸들러로 등록
      // this.$button.onclick = this.increase;
      // increase 메서드 내부의 this가 인스턴스를 가리키도록 한다
      this.$button.onclick = this.increase.bind(this);
    }
    increase() {
      this.$button.textContent = ++this.count;
    }
  }
  new App();
  </script>
</body>
</html>- 따라서 위처럼 increase 메서드를 이벤트 핸들러로 바인딩할 때 bind 메서드를 사용할 this를 전달하여 increase 메서드 내부의 this가 클래스가 생성할 인스턴스를 가리키도록 해야한다
<!DOCTYPE html>
<html>
<body>
  <button class="btn">0</button>
  <script>
  class App {
    constructor() {
      this.$button = document.querySelector('.btn');
      this.count = 0;
      // increase 메서드를 이벤트 핸들러로 등록
      this.$button.onclick = this.increase;
    }
    increase = () => this.$button.textContent = ++this.count;
  }
  new APP();
  </script>
</body>
</html>- 위처럼 클래스 필드에 할당한 화살표 함수를 이벤트 핸들러로 등록하여 이벤트 핸들러 내부의 this가 인스턴스를 가리키도록 할 수도 있다
- 다만 이벤트 핸들러 increase는 프로토타입 메서드가 아닌 인스턴스 메서드가 된다
10. 이벤트 핸들러에 인수 전달
- 함수에 인수를 전달하려면 함수를 호출할 때 전달해야 한다.
- 이벤트 핸들러 어트리뷰트 방식은 함수 호출문을 사용할 수 있기 때문에 인수를 전달할 수 있다
- 반면 이벤트 핸들러 프로퍼티 방식과 addEventListener 메서드 방식의 경우 이벤트 핸들러를 브라우저가 호출하기 때문에, 함수 호출문이 아닌 함수 자체를 등록하기 때문에 인수를 전달할 수 없..을 것 같다.
<!DOCTYPE html>
<html>
<body>
  <label>User name <input type='text'></label>
  <em class="message"></em>
  <script>
    const MIN_USER_NAME_LENGTH = 5; // 이름 최소길이
    const $input = document.querySelector('input[type="text"]');
    const $msg = document.querySelector('.message');
    const checkUserNameLength = min => {
      $msg.textContent = $input.value.length < min ? `이름은 ${min}자 이상 입력해 주세요` : '' ;
    };
    // 이벤트 핸들러 내부에서 함수를 호출하면서 인수를 전달
    $input.onblur = () => {
      checkUserNameLength(MIN_USER_NAME_LENGTH);
    };
  </script>
</body>
</html>- 하지만 위와 같이 이벤트 핸들러 내부에서 함수를 호출하면서 인수를 전달할 수 있다
<!DOCTYPE html>
<html>
<body>
  <label>User name <input type='text'></label>
  <em class="message"></em>
  <script>
    const MIN_USER_NAME_LENGTH = 5; // 이름 최소길이
    const $input = document.querySelector('input[type="text"]');
    const $msg = document.querySelector('.message');
    const checkUserNameLength = min => {
      $msg.textContent = $input.value.length < min ? `이름은 ${min}자 이상 입력해 주세요` : '' ;
    };
    // 이벤트 핸들러를 반환하는 함수를 호출하면서 인수를 전달
    $input.onblur = checkUserNameLength(MIN_USER_NAME_LENGTH);
  </script>
</body>
</html>- 위와 같이 이벤트 핸들러를 반환하는 함수를 호출하면서 인수를 전달할 수 있다
- 위 예제에서 checkUserNameLength 함수는 함수를 반환한다
- 따라서 $input.onblur에는 결국 checkUserNameLength 함수가 반환하는 함수가 바인딩 된다
11. 커스텀 이벤트
11.1 커스텀 이벤트 생성
- 이벤트 객체는 Event, UIEvent, MouseEvent 같은 이벤트 생성자 함수로 생성할 수 있다
- 이벤트가 발생하면 암묵적으로 생성되는 이벤트 객체는 발생한 이벤트의 종류에 따라 이벤트 타입이 결정된다
- 하지만 Event, UIEvent, MouseEvent 같은 이벤트 생성자 함수를 호출하여 명시적으로 생성한 이벤트 객체는 임의의 이벤트 타입을 지정할 수 있다
- 이처럼 개발자의 의도로 생성된 이벤트를 커스텀 이벤트라고 한다
CustomEvent 이벤트 생성자 함수 사용
// KeyboardEvent 생성자 함수로 keyup 이벤트 타입의 커스텀 이벤트 객체를 생성
const keyboardEvent = new KeyboardEvent('keyup');
console.log(keyboardEvent.type); // keyup

// CustomEvent 생성자 함수로 foo 이벤트 타입의 커스텀 이벤트 객체를 생성
const customEvent = new CustomEvent('foo');
console.log(customEvent.type); // foo- 위처럼 이벤트 생성자 함수를 사용해 커스텀 이벤트 객체를 생성할 수 있다.
- 이벤트 타입은 기존 타입을 사용해도 되고, 임의의 문자열을 사용할 수도 있다.
// MouseEvent 생성자 함수로 click 이벤트 타입의 커스텀 이벤트 객체를 생성
const customEvent = new MouseEvent('click');
console.log(customEvent.type); // click
console.log(customEvent.bubbles); // false
console.log(customEvent.cancelable); // false- 생성된 커스텀 이벤트 객체는 버블링되지 않으며 preventDefault 메서드로 취소할 수도 없다
- 커스텀 이벤트 객체는 bubbbles와 cancelable 프로퍼티의 값이 false로 기본 설정된다
// MouseEvent 생성자 함수로 click 이벤트 타입의 커스텀 이벤트 객체를 생성
const customEvent = new MouseEvent('click', {
  bubbles: true,
  cancelable: true
});
console.log(customEvent.bubbles); // true
console.log(customEvent.cancelable); // true- 만약 커스텀 이벤트 객체의 bubbles 또는 cancelable 프로퍼티를 true로 설정하려면?
- 위처럼 이벤트 생성자 함수의 두 번째 인수로 bubbles 또는 cancelable 프로퍼티를 갖는 객체를 전달한다
// MouseEvent 생성자 함수로 click 이벤트 타입의 커스텀 이벤트 객체를 생성
const mouseEvent = new MouseEvent('click', {
  bubbles: true,
  cancelable: true,
  clientX: 50,
  clientY: 100
});
console.log(mouseEvent.clientX); // 50
console.log(mouseEvent.clientY); // 100
// KeyboardEvent 생성자 함수로 keyup 이벤트 타입의 커스텀 이벤트 객체를 생성
const keyboardEvent = new KeyboardEvent('keyup', { key: 'Enter' });
console.log(keyboardEvent.key); // Enter- 커스텀 이벤트 객체에는 bubbles 또는 cancelable 프로퍼티뿐만 아니라 이벤트 타입에 따라 가지는 이벤트 고유의 프로퍼티 값을 지정할 수 있다
- 이벤트 고유의 프로퍼티 값을 지정하려면 이벤트 생성자 함수의 두 번째 인수로 프로퍼티를 전달한다
const customEvent = new InputEvent('foo');
console.log(customEvent.isTrusted); // false- 이벤트 생성자 함수로 생성한 커스텀 이벤트는 isTrusted 프로퍼티의 값이 언제나 false
- 커스텀 이벤트가 아닌 사용자의 행위에 의해 발생한 이벤트에 의해 상성된 이벤트 객체의 isTrusted 프로퍼티 값은 언제나 true
11.2 커스텀 이벤트 디스패치
<!DOCTYPE html>
<html>
<body>
  <button class="btn">Click me</button>
  <script>
  const $button = document.querySelector('.btn');
  // 버튼 요소에 foo 커스텀 이벤트 핸들러를 등록
  // 커스텀 이벤트를 디스패치 하기 전에 핸들러를 등록해야 한다.
  $button.addEventListener('click', e => {
    console.log(e); // MouseEvent {isTreustedL false, screenX: 0, ...}
    alert(`${e} Clicked!`);
  });
  // 커스텀 이벤트 생성
  const customEvent = new MouseEvnet('click');
  // 커스텀 이벤트 디스패치(동기 처리). click 이벤트가 발생한다
  $button.dispatchEvent(customEvent);
  </script>
</body>
</html>- 생성된 커스텀 이벤트는 dispatchEvent 메서드로 디스패치할 수 있다
- dispatch : 이벤트를 발생시키는 행위
- dispatchEvent 메서드에 이벤트 객체를 인수로 전달하면서 호출하면 인수로 전달한 이벤트 타입의 이벤트가 발생
- 일반적으로 이벤트 핸들러는 비동기 처리 방식으로 동작하지만 distpatchEvent 메서드는 이벤트 핸들러를 동기처리 방식으로 호출한다
- 즉, dispatchEvent 메서드를 호출하면 커스텀 이벤트에 바인딩된 이벤트 핸들러를 직접 호출하는 것과 같다
- 따라서 dispatchEvent 메서드로 이벤트를 디스패치 하기 이전에 커스텀 이벤트를 처리할 이벤트 핸들러를 등록해야 한다
// CustomEvent 생성자 함수로 foo 이벤트 타입의 커스텀 이벤트 객체럴 생성
const customEvent = new CustomEvent('foo');
console.log(customEvent.type); // foo- 기존 이벤트 타입이 아닌 임의의 이벤트 타입을 지정하여 이벤트 객체를 생성하는 경우, 일반적으로 위 예시와 같이 CustomEvent 이벤트 생성자 함수를 사용한다
- 이때 CustomEvent 이벤트 생성자 함수에는 두 번째 인수로 이벤트와 함께 전달하고 싶은 정보를 담은 detail 프로퍼티를 포함하는 객체를 전달할 수 있다
- 이 정보는 이벤트 객체의 detail 프로퍼티(e.detail)에 담겨 전달된다
<!DOCTYPE html>
<html>
<body>
  <button class="btn">Click me</button>
  <script>
    const $button = document.querySelector('.btn');

    // 버튼 요소에 foo 커스텀 이벤트 핸들러를 등록
    // 커스텀 이벤트를 디스패치 하기 전에 핸들러를 등록해야 한다.
    $button.addEventListener('foo', e => {
      // e.detail에는 CustomEvent 함수의 두 번째 인수로 전달한 정보가 담겨 있다.
      alert(e.detail.message);
    });

    //CustomEvent 생성자 함수로 foo 이벤트 타입의 커스텀 이벤트 객체를 생성
    const customEvent = new CustomEvent('foo', {
      detail: { message: 'Hello' } // 이벤트와 함께 전달하고 싶은 정보
    });

    // 커스텀 이벤트 디스패치
    $button.dispatchEvent(customEvent);
  </script>
</body>
</html>- 기존 이벤트 타입이 아닌 임의의 이벤트 타입을 지정하여 커스텀 이벤트 객체를 생성한 경우 반드시 addEventListener 메서드 방식으로 이벤트 핸들러를 등록해야 한다
- 이벤트 핸들러 어트리뷰트/프로퍼티 방식을 사용할 수 없는 이유?? 'on + 이벤트 타입'으로 이루어진 이벤트 핸들러 어트리뷰트/프로퍼티가 커스텀 이벤트 요소 노드에 존재하지 않기 때문