Table View
-
UITableViewclass의 instance이다. -
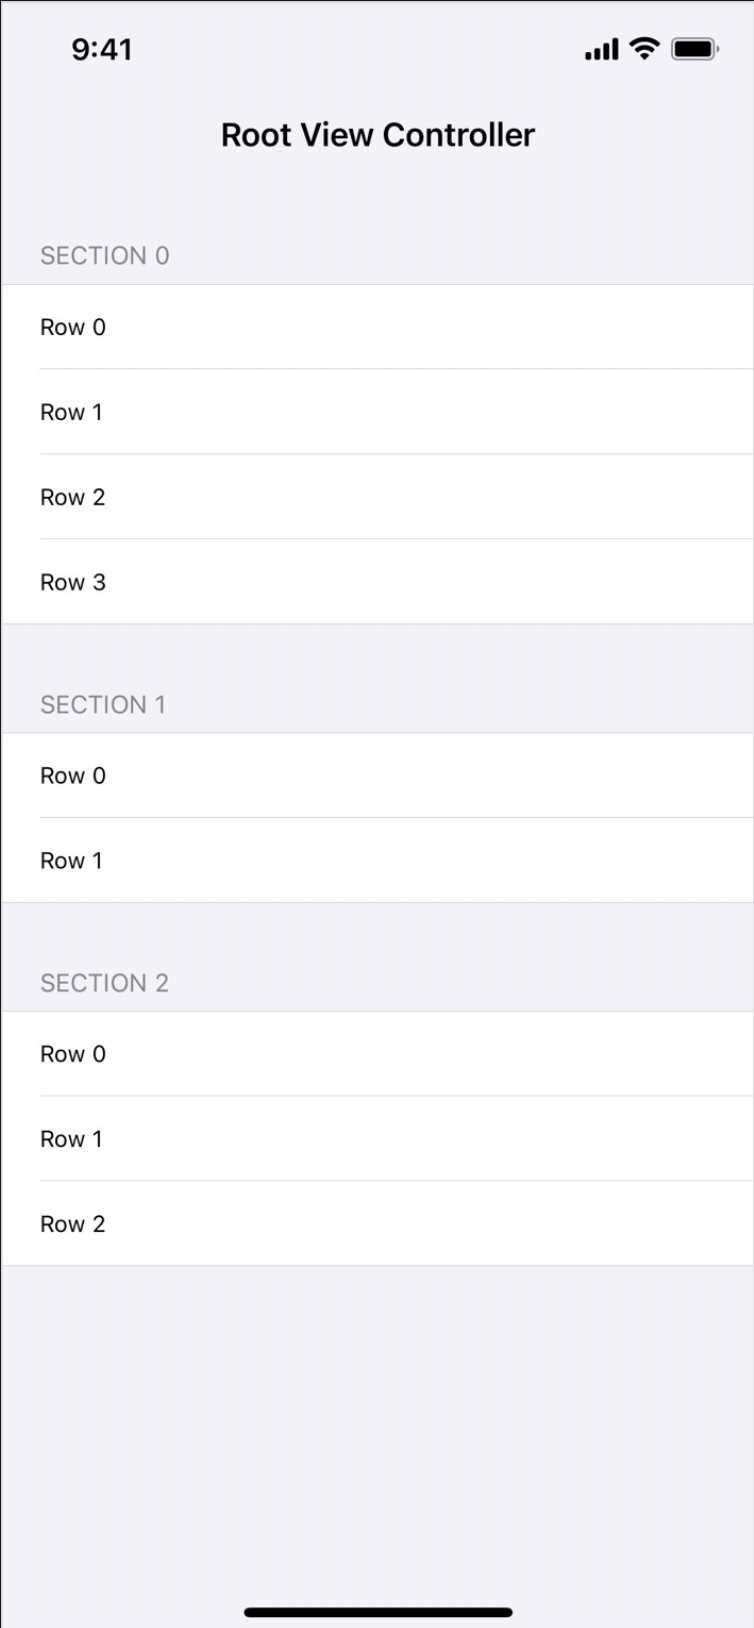
row들이 section으로 나누어져 있고, 스크롤링이 가능한 단일 column list를 뜻한다.
-
각 section은 첫번째 item 위에 header, 마지막 item 아래에 footer를 가진다.
(table view 스스로 자신의 header, footer를 가질 수도 있다.) -
model object의 집합과 같이 비슷한 데이터의 집합을 보여주기 적합하다.
ex) array, dictionary
Table View Controller
-
어떻게 table view를 사용할지에 따라 project에 table view를 추가하는 2가지 방법이 있다.
1. view controller의 view에 직접 table view instance를 추가한다.
-
data source, delegate object의 설정과 table view의 위치, 크기를 직접 관리해야한다.
-
table view의 특징을 사용하기 위해선 추가적인 코드를 작성해야 한다.
ex) 키보드를 적용하기 위해 table view의 scroll view 조절이 필요하다.
만약 regular view controller에 table view를 추가한다면, 키보드가 나타날 때 모니터하기 위한 코드를 작성해야 하고 table view의 내용물을 적절하게 조절해야 한다.
2. table view controller를 사용한다.
-
UITableViewController는 single table view instance를 관리하는 view control의 subclass이다.-
전체 view가 table view이므로 table view의 크기를 조절할 수 없다.
-
스스로 table view의 data source, delegate로서의 역할을 수행한다.
-
-
-
빈 StoryBoard에 navigation controller를 추가하면 자동으로 table view controller가 second view로 설정된다.
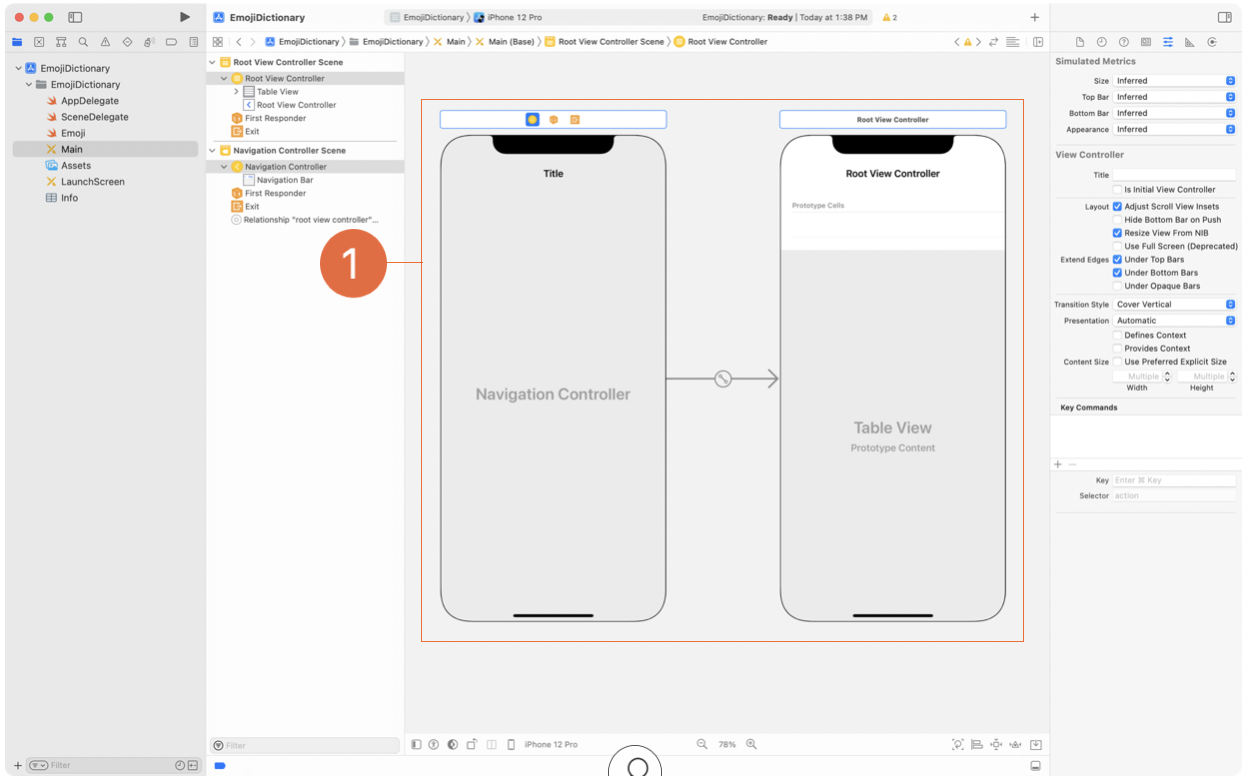
Table View Style
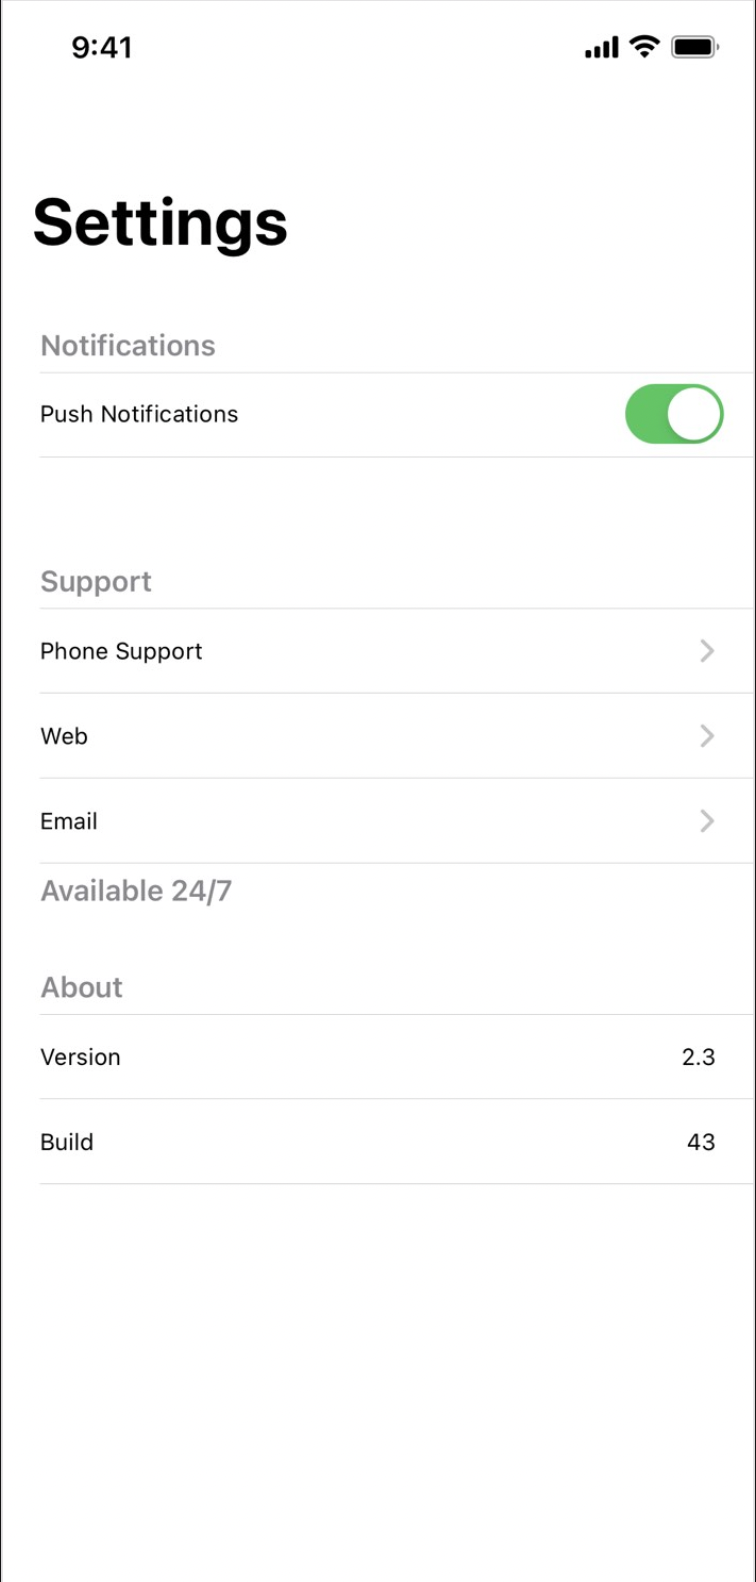
1. Plain
-
default style
-
row는 오른쪽 가장자리에 있는 index를 가진 라벨 section에 의해 선택적으로 분리될 수 있다.
ex) Contacts App의 alphabet index -
각 section은 간격 없이 바로 이전 section과 이어져 잘리지 않는 리스트가 생성된다.
2. Grouped
- row는 index option 없이 간격을 통해 시각적으로 구별되는 section으로 표현된다.

3. Inset Grouped
-
grouped table view와 유사하게 그룹핑된다.
-
각각의 그룹은 곡선의 모서리를 갖는 view로 이루어져있다.
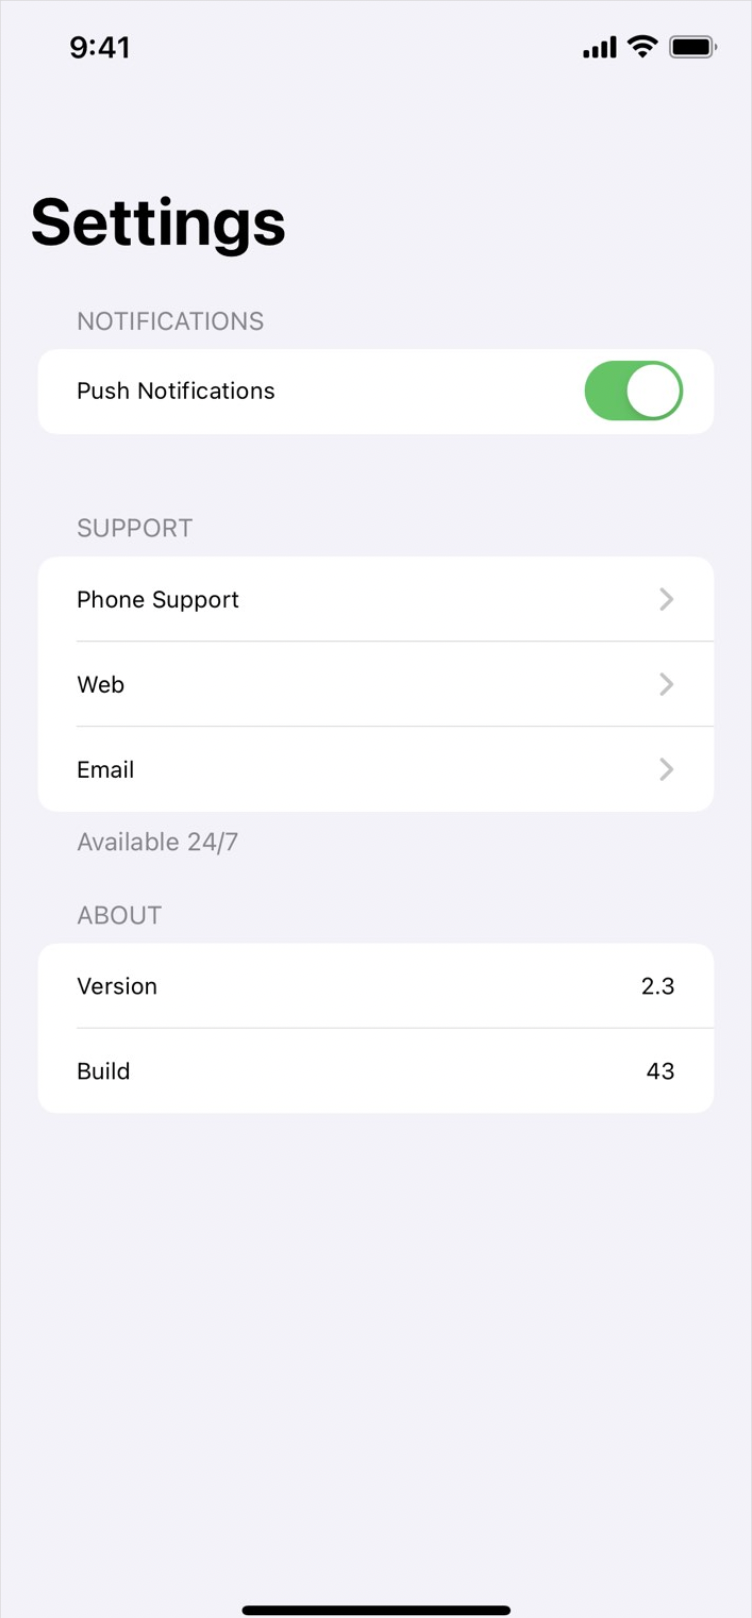
Table View Cells
1. non-editing mode
-
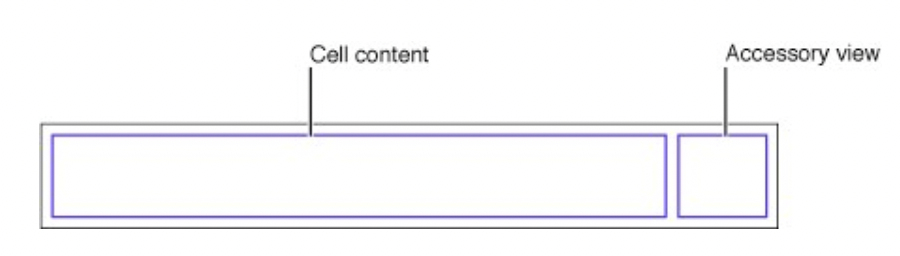
table view의 모든 row는 table view cell(
UITableViewCellinstance)로 표현된다. -
cell은 text, image, 다른
UIView등을 보여줄 수 있는 재사용이 가능한 view이다. -
각각의 cell은 cell content 이외에 선택적으로 accessory view를 갖는다.
2. editing mode

-
기본 non-editing mode에서 셀 삽입, 삭제, 재배열이 가능한 editing mode로 전환할 수 있다.
-
editing mode에서 editing, reorder control을 위해 cell content의 크기는 줄어들고, accessory view는 사라진다.
3. cell content property
UITableViewCellclass는 cell content의 3가지 property를 정의한다.1.
textLabel- 제목을 표현하는
UILabel
2.
detailTextLabel- 부제목 또는 추가적인 상세정보를 표현하는
UILabel
3.
imageView- 사진을 위한
UIImageView
- 제목을 표현하는
4. defaultContentConfiguration
-
cell configuration은 cell의 view를 직접적으로 업데이트하고 cell에 포함되어 있는 것을 묘사한다.
-
cell은 자신의 view를 설정하고 업데이트하기 위한 정보를 갖고 있지만, 추상화를 통해 내용을 보여주는 방식을 제어하고 보여주고 싶은 데이터에 집중할 수 있도록 한다.
(textLabel,detailTextLabel,imageViewproperty는 deprecate 될 예정이며 가능한 cell configurations을 사용하는 것이 좋다.) -
올바른 cell 설정 방법
-
defaultContentConfiguration을 요청하고 content configuration이 반환하는 property를 셋팅한다. -
그 후, 업데이트된 설정을 갖고 cell의
contentConfigurationproperty를 업데이트한다.
-
-
configuration은
text,secondaryText,image등등 cell의 외적 요소들에 관한 property를 갖고있다.
5. Cell Style
-
UIKitframework는UITableViewCell.CellStyleenum을 통해 Interface Builder 또는 코드로써 선택할 수 있는 4가지 기본 cell 스타일을 갖고 있다. -
각 스타일은 property과 layout의 결합으로 이루어져있다.
1. Basic (
.default)
textLabel,imageView
2. Subtitle(
.subtitle)
textLabel,detailTextLabel,imageView
3. Right Detail(
.value1)
textLabel,detailTextLabel,imageView
4. Left Detail(
.value2)
textLabel,detailTextLabel
6. Accessory Type
-
table이 default(view-only) 모드일 경우, cell은
UITableViewCell.AccessoryTypeenum을 사용하여 Interface Builder 또는 코드를 통해 선택할 수 있는 accessory view를 가진다. -
iOS SDK는 button처럼 사용자의 터치로 반응하는 5개의 기본 accessory type을 정의한다.
-
delegate method를 통해, 사용자가 accessory view를 탭할 때 수행되는 코드를 정의할 수 있다.
-
accessory view 종류에 상관없이, 사용자가 cell 또는 accessory view를 탭할 때 코드는 반응해야한다.
-
Accessory view는 cell의 본질에 대해 사용자에게 알려주는 존재이다.
1. None(
none)
- 아무 accessory view도 보이지 않는 상태
- content view가 전체 cell을 차지한다.
2. Disclosure Indicator(
.disclosureIndicator)
- 일반적으로 cell을 tab하면 show segue가 호출된다.
- accessory view는 터치를 추적하지 않는다.
3. Detail(
.detailButton)
- accessory view는 touch를 추적한다.
- 일반적으로 tab을 하면, cell content에 관한 추가적인 정보를 보여준다.
4. Detail Disclosure(
.detailDisclosureButton)
- 일반적으로 tab을 하면, show segue를 호출한다.
- accessory view는 터치를 추적하고 일반적으로 cell content에 대한 추가적인 정보를 보여준다.
5. Checkmark(
checkmark)
- 터치를 추적하지 않는다.
Readability Margins
-
기본적으로, table view cell은 table view의 전체 너비를 차지한다.
-
큰 화면에서 매우 긴 text를 읽거나 label이 accessory view와 너무 멀리 떨어져 있는 경우 가독성을 떨어트릴 수 있다.
-
해결 방법
-
Size inspector에서
Follow Readable Widthoption을 선택 -
코드로
cellLayoutMarginsFollowReadableWidthproperty 를true로 세팅
-

Index Paths
-
table view의 대다수의 API method는 parameter 또는 return 값을 위해 index path에 접근한다.
-
table view의 구체적인 section에서 구체적인 row를 가르킨다.
-
index path의
row,sectionproperty를 통해 값에 접근할 수 있다.
Cell Dequeueing
-
table view는 아주 많은 model object를 보여주기에 적합하며, 각각의 object는 cell에 의해 보여지고, cell은 다수의 view를 가질 수 있다.
-
문제
-
화면에 보여지는 모든 view는 기기의 유한한 메모리에 존재해야만 한다.
-
만약, table view가 모든 object의 cell을 초기화하려 한다면, 거대한 list는 기기 메모리를 초과할 것이고 충돌이 발생할 것이다.
-
-
해결방안
-
해당 issue를 해결하기 위해, table view는 보여지는 cell과 추가로 스크롤링을 부드럽게 유지하기 위한 약간의 cell들만 로딩한다.
-
사용자가 table view를 스크롤하면, cell은 눈에 보이는 영역을 떠나고 기기의 반대편 끝에 있는 다른 cell들이 나타난다.
-
이론적으로, 눈에 보이는 영역에 들어오는 cell들은 그 영역을 떠났던 cell들과 같은 layout을 공유한다.
-
-
dequeueing은 table view가 cell을 관리하는 과정이다.
-
table view에 있는 각각의 cell은 Attribute Inspector에서 설정한
reuseIdentifier문자열에 의해 구별될 수 있고, 해당 reuse identifier를 이용하여 cell의 비축을 관리한다. -
cell이 필요할 경우, table view instance method인
dequeueReusableCell(withIdentifier:for:)을 사용하여 원하는 cell type의 reuse identifier를 제공한다. -
이 method는 table view instance에게 재사용이 가능한 cell과의 매칭을 제공한다.
-
dequeueing 과정을 통해, table view는 필요한 만큼의 cell만 생성하고 로딩한다.
-
dequeueing은 최상의 사용자 경험을 제공하기 위해 메모리를 절약하고 table view가 부드럽게 스크롤 될 수 있도록 한다.
-
Table View Protocols
-
dynamic table view object는 data source object를 반드시 가지고, delegate object는 선택적으로 가진다.
-
data source는 table view와 app의 data model 사이의 중간 역할을 한다.
-
optional delegate는 실제 cell의 '-'와 같은 외적 요소와 table view의 행동을 관리한다.
-
UITableViewclass는 그자체로 content를 구성하는 method, property, data를 갖고 있지 않으므로, 다른 object에게 책임을 위임한다. -
data source와 delegate는 종종 같은 object이고, 이론적으로
UITableViewController의 custom subclass이다. -
data source와 delegate의 책임은
UITableViewDataSource,UITableVIewDelegateprotocol에 의해 정의된다.
1. Data Source
-
UITableViewDataSourceprotocol를 차용하는 data source는 table view object에 필요한 데이터를 제공하는 책임을 갖고있다. -
table view에 필요한 정보(row의 갯수, 각 cell의 content)를 제공하기 위해서,
UITableViewDataSource에 설명된 method를 수행한다. -
table view가 data를 로딩 또는 재로딩할 때, 눈에 보이는 row의 정보를 요청하기 위해 각 method들을 한번 또는 여러번 호출함으로써 data source에 질문한다.
-
사용자가 table view를 스크롤해서 다른 행들이 보이기 시작할 때, table view는 새로운 행을 채우기 위해 data source에게 계속 요청한다.
-
data source는 method에 parameter로 들어오는 값을 기준으로 요청되는 정보를 반환한다.
1. Number of Sections
optional func numberOfSections(in tableView: UITableView) -> Int- table view에 보여지길 원하는 section의 수를 반환한다.
optionalmodifier
- 만약 해당 function을 작성하지 않으면, table view는 1개의 section을 보여준다.
2. Number of Rows in a Sections
func tableView(_ tableView: UITableView, numberOfRowsInSection section: Int) -> Int-
table view가 몇개의 section을 보여줄지 알고나면, 각 section의 row 수를 알아야한다.
-
정보를 요구하는 table view와 궁금한 section 정보가 parameter로 제공된다.
-
parameter를 기반으로, 주어진 section의 row 수를 반환한다.
-
해당 method는 table view의 모든 section에서 호출된다.
3. Cell for Row at Index Path
func tableView(_ tableView: UITableView, cellForRowAt indexPath: IndexPath) -> UITableViewCell-
table view는 보여줄 section의 수와 각 section의 row 수를 알고 있다.
-
method의 body에서 dequeue, configure을 수행하고, 보여질 table view의 cell을 반환한다.
-
일반적으로 다음의 상황이 진행된다.
-
cell을 dequeueing함으로써 올바른 cell type을 불러온다.
// UITableViewCell instance 반환 let cell = tableView.dequeueReusableCell(withIdentifier: "EmojiCell", for: indexPath) -
cell에 보여질 model object를 불러온다.
// indexPath는 section, row parameter를 가진다. let emoji = emojis[indexPath.row] -
model object의 property로 cell property를 구성한다.
(model object를 기반으로 label, image view 등 view를 세팅한다.)var content = cell.defaultContentConfiguration() content.text = "\(emoji.symbol) - \(emoji.name)" content.secondaryText = emoji.description cell.contentConfiguration = content -
완전히 구성된 cell을 반환한다.
return cell
-
4. Edit the Table View
override func tableView(_ tableView: UITableView, moveRowAt fromIndexPath: IndexPath, to: IndexPath) {
	// row reorder code 예시
    let movedEmoji = emojis.remove(at: fromIndexPath.row)
    emojis.insert(movedEmoji, at: to.row)
}-
table view에 의해 보여지는 cell들을 재배치한다.
-
cell은 3가지 요인을 충족 시 reorder control을 보여준다.
-
UITableViewCellclass의 property인showsReorderControl이true로 세팅되어 있어야 한다. -
data source method가 쓰여야한다.
-
table은 editing mode에 있어야한다.
-
-
reorder control은 cell content의 오른쪽에 나타나고, 사용자는 cell을 드래그하여 재배치를 할 수 있다.
-
reorder control 세팅하는 2가지 방법
@IBAction을 이용
cell.showsReorderControl = true// Navigation bar에 'Edit' mode의 bar button을 추가하여 연결 @IBAction func editButtonTapped(_ sender: UIBarButtonItem) { let tableViewEditingMode = tableView.isEditing tableView.setEditing(!tableViewEditingMode, animated: true) }- 코드로 Edit button 추가
// table view의 editing 모드를 관리하는 버튼을 미리 정의 override func viewDidLoad() { super.viewDidLoad() navigationItem.leftBarButtonItem = editButtonItem } -
delete button은 content의 왼쪽에 나타난다.

- reorder는 허락하되, delete는 금지하고 싶다면, delete indicator를 제거하기 위해 table view controller에 아래의 method 추가한다.
override func tableView(_ tableView: UITableView, editingStyleForRowAt indexPath: IndexPath) -> UITableViewCell.EditingStyle {
    return .none
}
2. Table View Delegate
-
table view API의 2번째 protocol은 delegate이다.
-
UITableViewDelegateprotocol을 차용하는 delegate object는 table view를 위한 다음과 같은 역할의 method를 갖고있다.- table view의 시각적 양상을 수정
- 선택을 관리
- accessory view를 지원
- 각 row의 수정 지원
-
data source protocol과 달리, delegate protocol은 required method가 존재하지 않는다.
1. Accessory Button Tapped for Row
tableView(_:accessoryButtonTappedForRowWith:)-
cell이 detail 또는 detail disclosure accessory type을 갖고 있고 (사용자의 상호작용을 추적하는 accessory type), 사용자가 detail indicator를 탭한다면 row의 accessory button이 동작한다.
-
해당 accessory type은 사용자와 상호작용할 기회를 주고, tap된 accessory button의 row에 상응하는 model object를 얻을 수 있도록 index path을 전달한다.
2. Did Select Row
tableView(_:didSelectRowAt:)-
table view에서 table view delegate method를 수행함으로써 사용자와의 상호작용에 반응할 수 있다.
-
cell selection style이
.none으로 세팅되어있지 않을 때 사용자가 cell을 tap하면, table view는 해당 row를 선택할 것이다. -
기본적으로, table view는 선택된 cell의 배경을 흰색에서 회색으로 바꾸고 이전에 선택된 cell을 초기화한다.
-
일단 선택이 완료되면 해당 method가 호출되고, 현재 선택된 index path는
indexPathForSelectedRowtable view property를 통해 접근할 수 있다.
Reload Data
-
table view의 데이터를 재로딩하는 것이 필요할 수 있다.
ex) 사용자가 분리된 view controller에서 새로운 model object를 추가하고 이미 로딩된 table vieew로 돌아오는 경우 -
table view는 리프레시를 강제화하는
reloadData()라는 built-in instance method를 갖는다. -
만약 사용자가 view로 다시 돌아왔을 때, 새로운 데이터로 수정되길 원한다면 view will appear method에서
reloadData()를 호출하면 된다.
override func viewWillAppear(_ animated: Bool) {
    super.viewWillAppear(animated)
    tableView.reloadData()
}