
Building Spotify App in Swift 5 & UIKit - Part 10 (Xcode 12, 2021, Swift 5) - Build App
Spotify Clone: Browse UI 3
구현 목표
Browse UI 2와 마찬가지로 커스텀 컬렉션 뷰 셀 구현
구현 태스크
- 섹션 별 컬렉션 뷰 셀이 사용할 뷰 모델 패치
- 뷰 모델을 통한 셀 데이터 바인딩
- 뷰 모델 데이터를 통한 UI 레이아웃 배치
핵심 코드
struct FeaturedPlaylistCellViewModel {
    let name: String
    let artworkURL: URL?
    let creatorName: String
}

struct RecommendedTrackCellViewModel {
    let name: String
    let artistName: String
    let artworkURL: URL?
}- 이미지가 없는 아이템도 있기 때문에 옵셔널 선언
- 뷰 모델 데이터를 통해 셀 UI를 그리기
sections.append(.featuredPlaylists(viewModels: playlists.compactMap({ playlist in
            return FeaturedPlaylistCellViewModel(name: playlist.name, artworkURL: URL(string:playlist.images.first?.url ?? ""), creatorName: playlist.owner.display_name)
        })))
        sections.append(.recommendedTracks(viewModels: tracks.compactMap({ track in
            return RecommendedTrackCellViewModel(name: track.name, artistName: track.artists.first?.name ?? "-", artworkURL: URL(string: track.album.images.first?.url ?? ""))
})))- 데이터 패치 이후 해당 섹션에 뷰 모델 데이터를 넣어주는 과정
- 컴팩트 맵을 통해 널 값을 자동으로 체크
    func collectionView(_ collectionView: UICollectionView, cellForItemAt indexPath: IndexPath) -> UICollectionViewCell {
        let type = sections[indexPath.section]
        switch type {
        ...
        case .featuredPlaylists(viewModels: let viewModels):
            guard let cell = collectionView.dequeueReusableCell(withReuseIdentifier: FeaturedPlaylistCollectionViewCell.identifier, for: indexPath) as? FeaturedPlaylistCollectionViewCell else {
                return UICollectionViewCell()
            }
            let viewModel = viewModels[indexPath.row]
            cell.configure(with: viewModel)
            return cell
        case .recommendedTracks(viewModels: let viewModels):
            guard let cell = collectionView.dequeueReusableCell(withReuseIdentifier: RecommendedTrackCollectionViewCell.identifier, for: indexPath) as? RecommendedTrackCollectionViewCell else {
                return UICollectionViewCell()
            }
            let viewModel = viewModels[indexPath.row]
            cell.configure(with: viewModel)
            return cell
        }
}- 해당 섹션의 종류에 따라 어떠한 컬렉션 뷰 셀을 사용할 것인지 타입 체크
- 셀이 가지고 있는 뷰 뮤델을 사용
configure함수로 셀 UI 패치 → 해당 셀을 리턴
import UIKit
import SDWebImage

class FeaturedPlaylistCollectionViewCell: UICollectionViewCell {
    static let identifier = "FeaturedPlaylistCollectionViewCell"

    private let playlistCoverImageView: UIImageView = {
        // imageView
    }()

    private let playlistNameLabel: UILabel = {
        // label
    }()

    private let creatorNameLabel: UILabel = {
        // label
    }()

    ...

    override func layoutSubviews() {
        // UI layout
    }

    override func prepareForReuse() {
        super.prepareForReuse()
        playlistCoverImageView.image = nil
        playlistNameLabel.text = nil
        creatorNameLabel.text = nil
    }

    func configure(with viewModel: FeaturedPlaylistCellViewModel) {
        playlistCoverImageView.sd_setImage(with: viewModel.artworkURL, completed: nil)
        playlistNameLabel.text = viewModel.name
        creatorNameLabel.text = viewModel.creatorName
    }
}- 레이아웃 배치 이후
configure함수 호출 시 뷰 모델의 데이터에 따라 자동으로 셀 UI가 그려짐 - 셀 재사용 시
prepareForReuse함수가 호출되기 때문에 해당 데이터에 널을 할당, 메모리 낭비를 방지
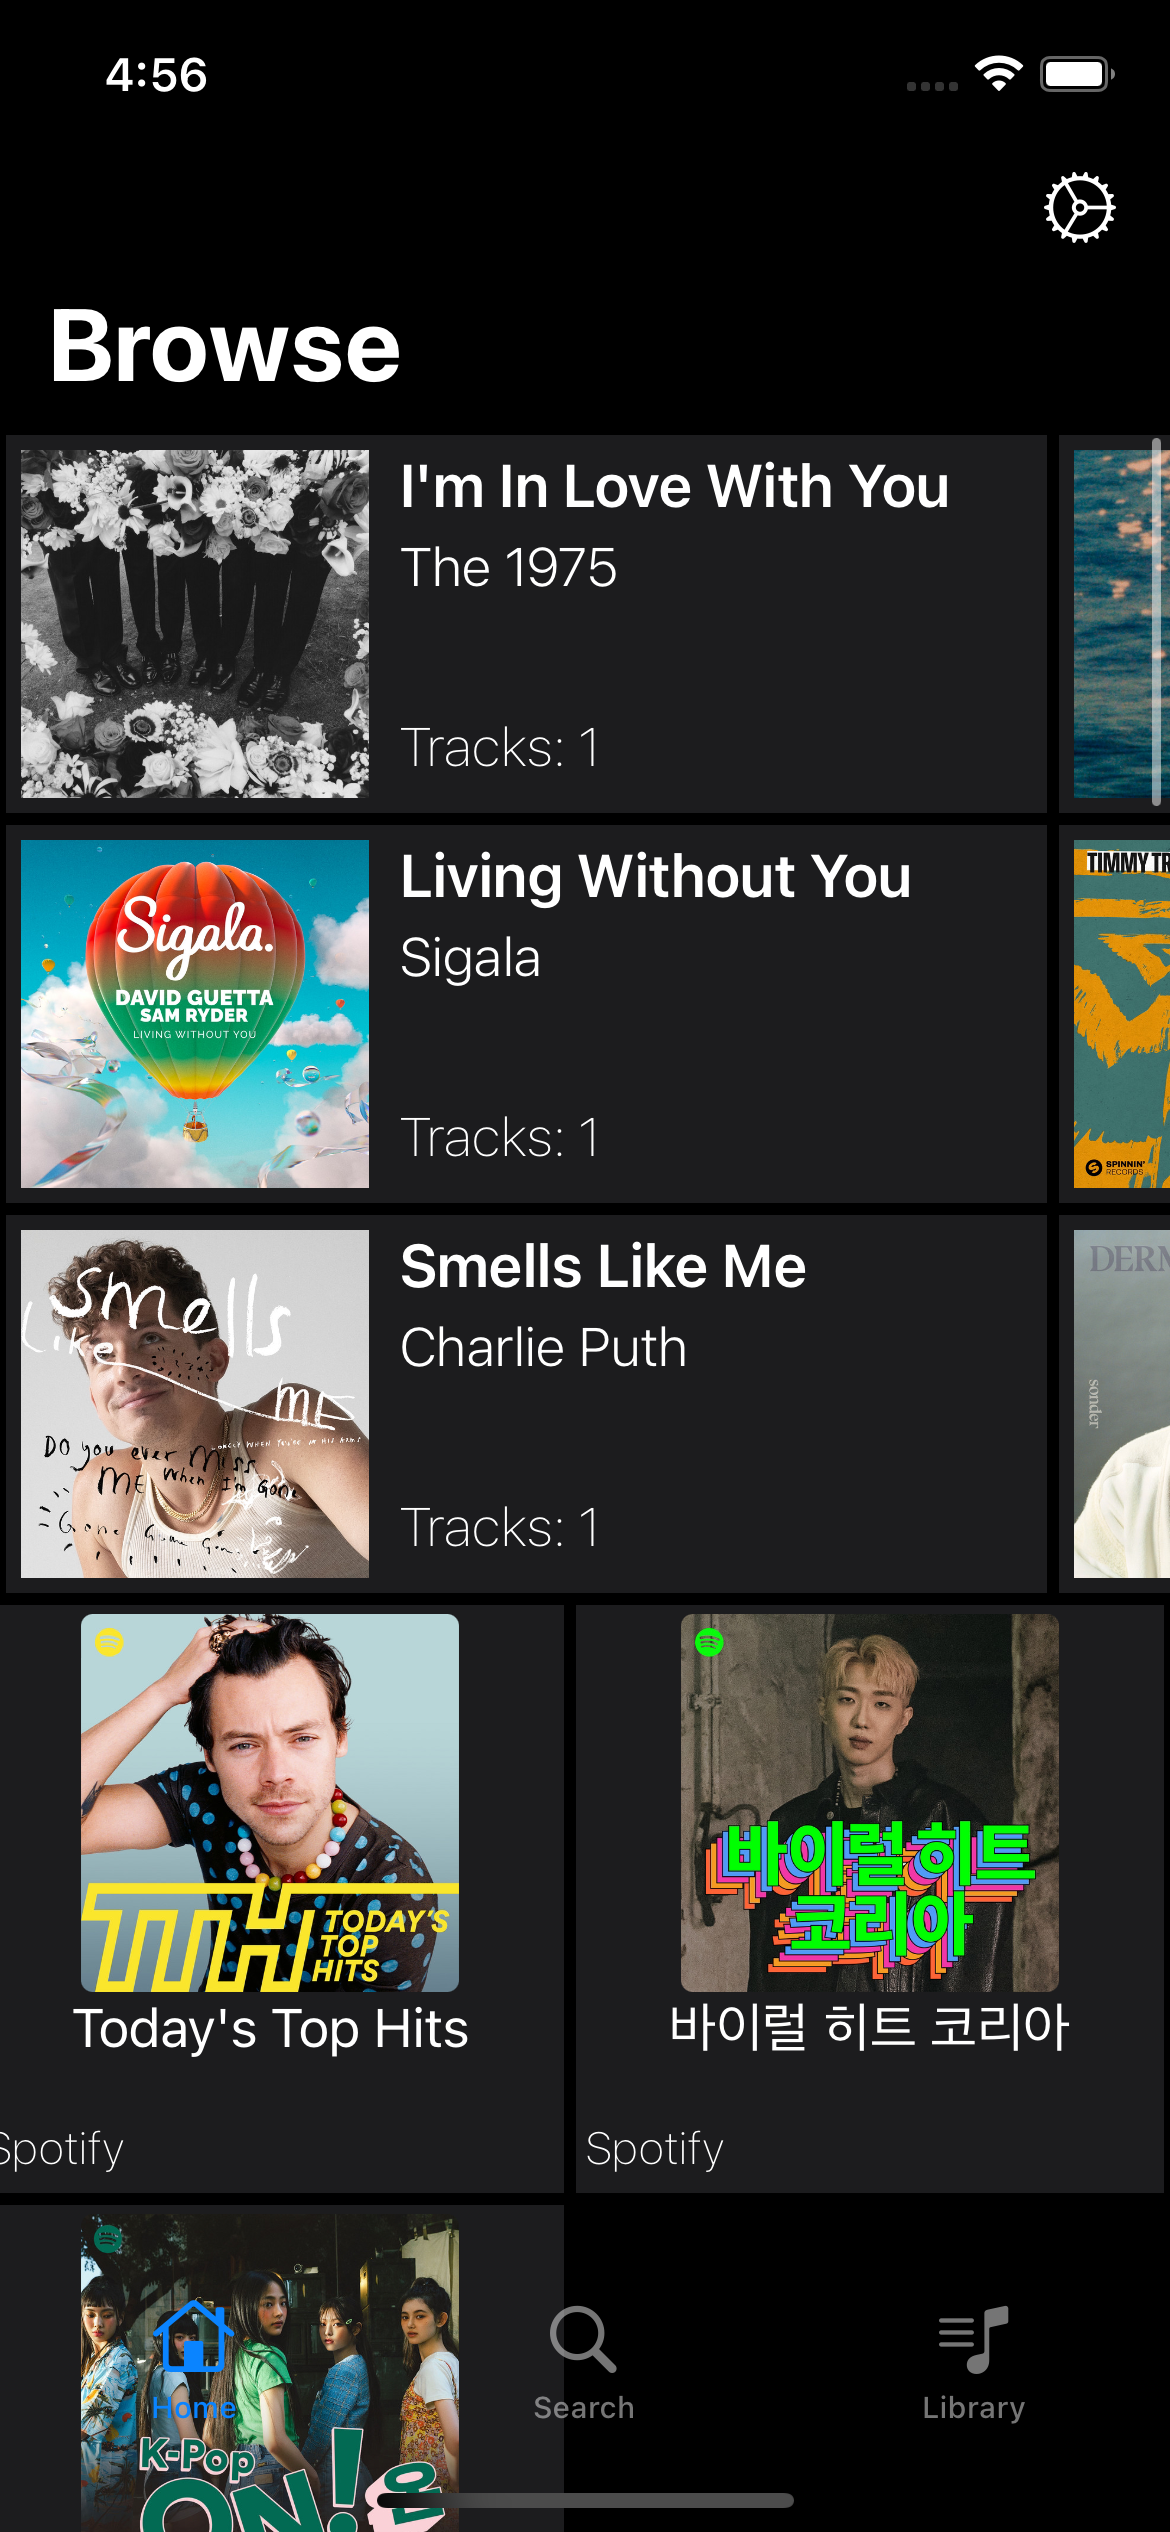
구현 화면
첫 번째 섹션을 그리는 로직과 동일한 방법으로 두 번째, 세 번째 섹션을 그린다.
- 동일한 컬렉션 뷰에 다양한 종류의 커스텀 컬렉션 뷰 셀을 등록할 수 있기 때문에 어떤 섹션에 어떤 종류의 셀이 들어갈지 판단하고, 해당 셀이 가지는 뷰 모델의 데이터를
configure하는 코드를 작성하자! - 이미지 레이아웃 배치는 본 클론 코딩에 나와 있는 것처럼 프레임을 줄 때 직접적으로
x,y를 통해 줄 수도 있고, 오토 레이아웃에false를 주고anchor를 통해 조정할 수도 있다. 편리한 방식대로 구현하자. - 효율적인 셀 사용을 위해
prepareForUse함수를 오버라이드, 해당 셀이 재사용될 때 본 셀에 '들어갔던' 데이터 값(이미 바인딩하여 스크린에 보이는)에 널 값을 주어 해제하는 게 중요한 방법!

JUST DO IT