
Building Spotify App in Swift 5 & UIKit - Get Started (Xcode 12, 2022, Swift 5) - Build App
Spotify Clone: TabBar
구현 목표
- 스포티파이 클론 코딩 → 코드 베이스(programmatically code), 스토리보드를 사용하지 않는 방법
- MVVM 패턴 → 뷰 모델을 통한 뷰와 모델 간의 데이터 바인딩, 뷰 모델을 도와주는 데이터 서비스(매니저) 클래스
구현 태스크
SceneDelegate를 통한 루트 뷰 변경하기- 탭 뷰를 통한 자식 뷰 네비게이션 연결하기
핵심 코드
class SceneDelegate: UIResponder, UIWindowSceneDelegate {

    var window: UIWindow?

    func scene(_ scene: UIScene, willConnectTo session: UISceneSession, options connectionOptions: UIScene.ConnectionOptions) {
        guard let windowScene = (scene as? UIWindowScene) else { return }
        let window = UIWindow(windowScene: windowScene)
        if AuthManager.shared.isSignedIn {
            window.rootViewController = TabBarViewController()
        } else {
            let navVC = UINavigationController(rootViewController: WelcomeViewController())
            navVC.navigationBar.prefersLargeTitles = true
            navVC.viewControllers.first?.navigationItem.largeTitleDisplayMode = .always
            window.rootViewController = navVC
        }
        window.makeKeyAndVisible()
        self.window = window
    }
...
}- 현재 앱에 띄울 UI가 연결될 때 호출되는 함수
WelcomeView내의 네비게이션 타이틀을 보기 위해서 해당 뷰를 자식 뷰로 보는 네비게이션 뷰 컨트롤러를 생성, 이후 네비게이션 타이틀 주기TapBarView는 내부에서 탭 뷰 아이템을 뷰 컨트롤러로 등록AppDelegate의didFinishLaunchingWithOptions관련 함수에서도 루트 뷰로 실행할 뷰를 윈도우에 연결함
    private func setTabUI() {
        let vc1 = HomeViewController()
        let vc2 = SearchViewController()
        let vc3 = LibraryViewController()
        vc1.title = "Browse"
        vc2.title = "Search"
        vc3.title = "Library"

        vc1.navigationItem.largeTitleDisplayMode = .always
        vc2.navigationItem.largeTitleDisplayMode = .always
        vc3.navigationItem.largeTitleDisplayMode = .always

        let nav1 = UINavigationController(rootViewController: vc1)
        let nav2 = UINavigationController(rootViewController: vc2)
        let nav3 = UINavigationController(rootViewController: vc3)

        nav1.tabBarItem = UITabBarItem(title: "Home", image: UIImage(systemName: "house"), tag: 1)
        nav2.tabBarItem = UITabBarItem(title: "Search", image: UIImage(systemName: "magnifyingglass"), tag: 2)
        nav3.tabBarItem = UITabBarItem(title: "Library", image: UIImage(systemName: "music.note.list"), tag: 3)

        nav1.navigationBar.prefersLargeTitles = true
        nav2.navigationBar.prefersLargeTitles = true
        nav3.navigationBar.prefersLargeTitles = true

        setViewControllers([nav1, nav2, nav3], animated: false)
}- 현재 탭뷰의 해당 탭에 해당하는 뷰를 뷰 컨트롤러로 등록하는
setViewControllers - 해당 뷰의 타이틀은 라지 타이틀로 고정, 탭 아이템 또한 등록
구현 화면
WelcomeView는 현재 유저 상황에 따라 현재Scene에 올라간다.
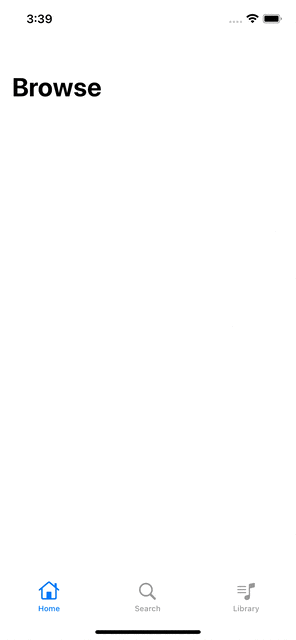
- 탭 뷰의 세 가지 뷰는 부모 뷰/자식 뷰 관계(네비게이션)

JUST DO IT