출처: https://projects.wojtekmaj.pl/react-lifecycle-methods-diagram/
리액트 컴포넌트는 각각의 생명주기를 갖는다.
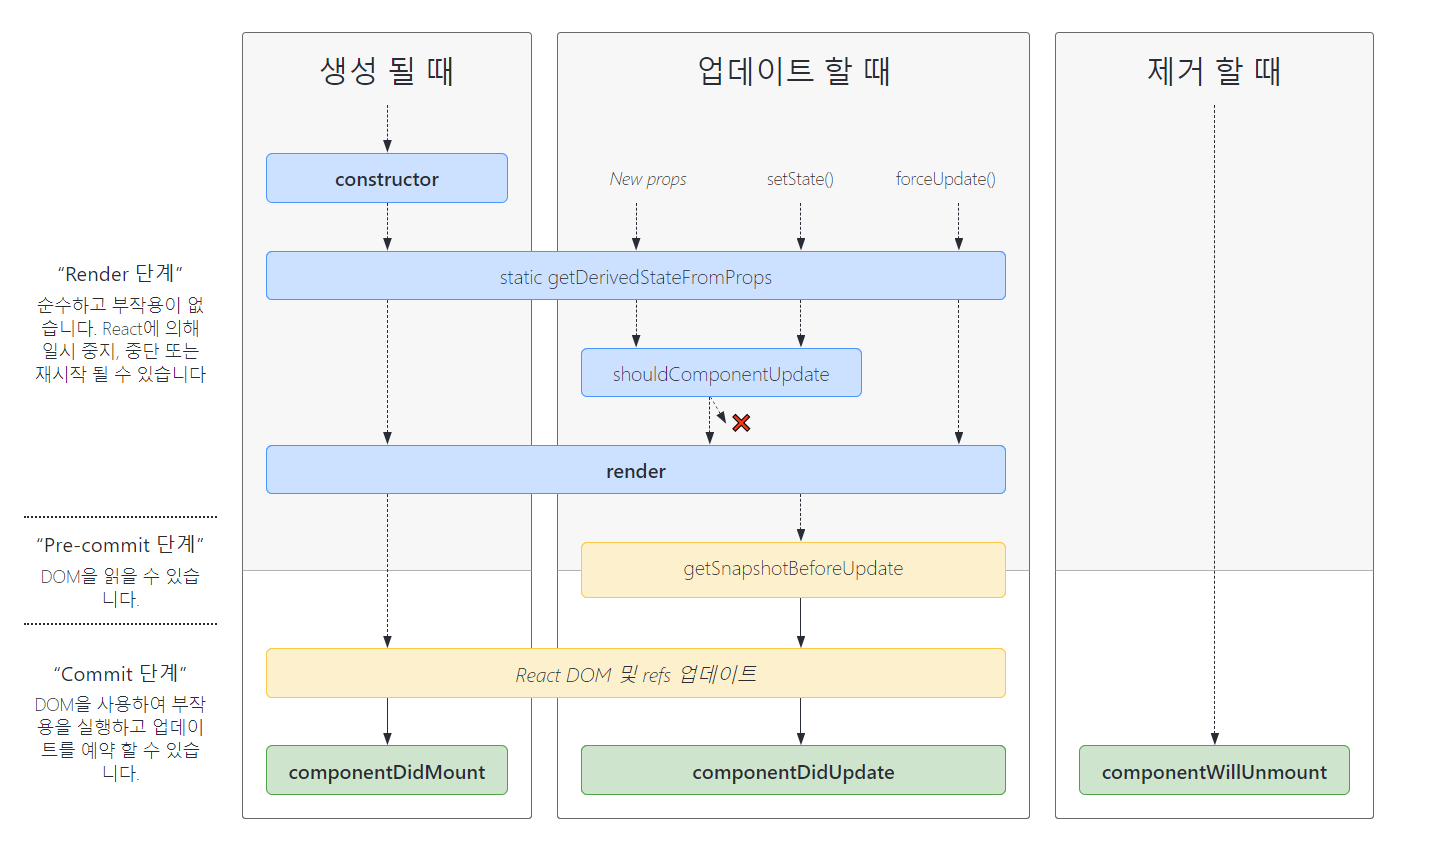
1. Mount
React Element가 생성되고 DOM에 삽입될 때
constructor, render, componentDidMount 순으로 호출
2. Update
props 혹은 state가 변해 다시 렌더링될 때
shouldComponentUpdate, render, componentDidUpdate 순으로 호출
3. Unmount
React Element를 DOM에서 제거할 때
componentWillUnmount
크게 살펴보면 다음과 같다. 리액트에서 각각의 단계를 어떻게 활용하는지 알아보자.
🎃 예시(클래스형 컴포넌트)
class MyComponent extends Component {
  constructor() {
    console.log("Constructor");
    super();
    this.state = { counter: 0 };
    this.handleDecrement = this.handleDecrement.bind(this);
    this.handleIncrement = this.handleIncrement.bind(this);
  }

  shouldComponentUpdate(nextProps, nextState) {
    console.log("   Should I?");
    if (this.state === nextState) {
      console.log("     No Update");
      return false;
    }

    return true;
  }

  componentDidMount() {
    console.log("Component is Mounted");
  }

  componentDidUpdate() {
    console.log("   Component was updated");
  }

  componentWillUnmount() {
    console.log("Component will be unmounted");
  }

  handleIncrement() {
    this.setState({ ...this.state, counter: this.state.counter + 1 });
  }

  handleDecrement() {
    this.setState({ ...this.state, counter: this.state.counter - 1 });
  }

  render() {
    console.log("   render");
    return (
      <div>
        Hello I'm a Counter
        <span>{` current count is ${this.state.counter}`}</span>
        <button onClick={this.handleIncrement}>+</button>
        <button onClick={this.handleDecrement}>-</button>
      </div>
    );
  }
}
class App extends Component {
constructor() {
super();
this.state = { flag: true, dummy: true };
this.handleClick = this.handleClick.bind(this);
this._handleClick = this._handleClick.bind(this);
}
handleClick() {
this.setState({ ...this.state, flag: !this.state.flag });
}
_handleClick() {
this.setState({ ...this.state, dummy: !this.state.dummy });
}
render() {
return (
<div className='App'>
{this.state.flag && <MyComponent />}
<button onClick={this.handleClick}>Click Me!</button>
<button onClick={this._handleClick}>
Do not affect to inner component~
</button>
</div>
);
}
}
다음과 같은 화면을 구성하는 컴포넌트다.
App 컴포넌트는 두 개의 버튼을 가지는데 하나는 MyComponent를 보여주거나 숨기는 버튼, 다른 하나는 자신의 독립적인 state를 업데이트하는 버튼이다.
MyComponent는 생명주기 메소드와 자신의 state를 업데이트하는 버튼 두 개를 가지고 있다.
MyComponent는 각각의 메소드에 콘솔을 출력하고 있는데 어떤 출력이 발생될까? 첫 렌더링은 아래와 같다.

이것이 큰 생명주기 3단계 중 Mount 단계에 불리는 메소드들이다.
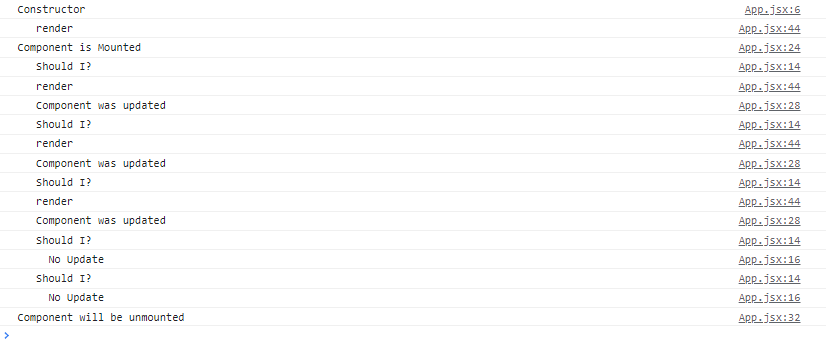
버튼을 통해 업데이트, 제거를 하면 다음과 같은 출력이 발생한다.
모두 직관적이지만 shouldcomponentupdate 부분이 눈에 띈다. 해당 메소드는 업데이트 할 때마다 실행된다.
shouldcomponentupdate는 두 개의 인자를 받을 수 있는데 각각 nextProps, nextState이다.
이때 위의 코드에서 볼 수 있는 것처럼 다음 상태와 현재 상태를 비교하여 업데이트를 막을 수도 있다.
기본 값은 true를 리턴하며 false를 리턴할 경우 업데이트가 일어나지 않는다.
😀 예시(함수형 컴포넌트, hooks)
위의 클래스형 컴포넌트는 너무 과하다는 생각이 든다. 이렇게 간단한 기능을 구현하는데 수십 줄의 코드를 작성해야한다.
그리고 사용법도 혼란스럽다. this를 붙여야하고, 만약 mount될 때와 update될 때 네트워크 통신이나 무언가 작업을 해야한다면 코드를 중복해서 작성해야한다.
리액트 개발 팀(페이스북(메타) 개발팀)은 이러한 문제점을 인식하고 새로운 대안은 발표했다.
본래 함수형 컴포넌트는 state나 생명주기 메소드를 활용할 수 없었지만 hooks라는 기능을 이용해 그 이점을 누릴 수 있게 되었다.
function MyComponent() {
  const [counter, setCounter] = useState(0);
  console.log("   render");

  useEffect(() => {
    console.log("Component is Mounted??");

    return () => {
      console.log("Component will be unmounted??");
    };
  }, []);

  useEffect(() => {
    console.log("Component is updated");
  }, [counter]);

  const handleIncrement = () => {
    setCounter((prev) => prev + 1);
  };

  const handleDecrement = () => {
    setCounter((prev) => prev - 1);
  };

  return (
    <div>
      Hello I'm a Counter
      <span>{` current count is ${counter}`}</span>
      <button onClick={handleIncrement}>+</button>
      <button onClick={handleDecrement}>-</button>
    </div>
  );
}
function App() {
const [flag, setFlag] = useState(true);
const [dummy, setDummy] = useState(false);
const handleClick = () => {
setFlag((prev) => !prev);
};
const _handleClick = () => {
setDummy((prev) => !prev);
};
return (
<div className='App'>
{flag && <MyComponent />}
<button onClick={handleClick}>Click Me!</button>
<button onClick={_handleClick}>Do not affect to inner component~</button>
</div>
);
}클래스형 컴포넌트를 함수형 컴포넌트로 바꿨다. 마찬가지로 출력을 확인해보자.

클래스형 컴포넌트에서 Constructor만 없는 출력이다. 계속해서 확인해보자.
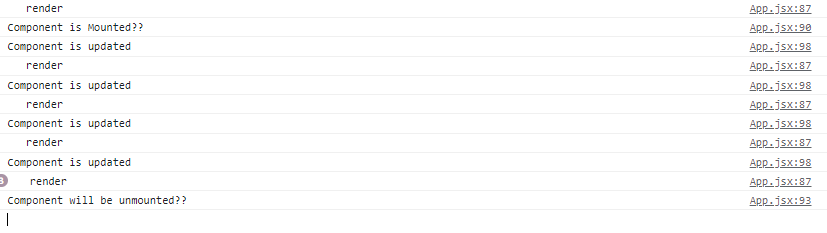
클래스형 컴포넌트와 마찬가지로 counter를 업데이트하고, Do not affect 버튼을 클릭한 후 제거한 모습이다.
몇몇 아주 상세한 생명주기 메소드를 제외하고는 대부분의 주요한 메소드들을 hooks로 대체할 수 있다.
hook flow에 대한 자세한 내용은 React Hook flow에 작성해놓았다.
후기
useEffect의 의존성 배열로 빈 배열을 전달할 시 함수형 컴포넌트의 첫 실행에 effect 함수를 사용하고, clean up 함수를 제거 시 실행하도록 할 수 있다.
그런데 컴포넌트 함수가 실행된 후 화면에 그려지는 것인데 어떻게 effect가 함수의 실행 이후에 발생할까?
사실 함수형 컴포넌트가 실행됐다고 해서 DOM에 바로 반영되는 건 아니다. 그것은 React Element를 만드는 과정이고 DOM에 업데이트 하는 건 또 다른 작업이다.
함수형 컴포넌트에서는 최적화 내용을 고려하지 않았는데 추후 함수형 컴포넌트를 최적화하는 방법에 대해서 다룰 때 포스팅 할 예정이다.