Authentication 과 SecurityContextHolder
인증된 Authentication은 어떻게SecurityContextHolder 들어가는가?
앞선 포스팅에서 폼로그인시 AuthenticationManager 의 구현체인 ProviderManager에 의해 DaoAuthenticationProvider 가
UserDetailsService 을 사용해 UsernamePasswordAuthenticationToken 형태의 Authentication을 생성하는 과정을 살펴보았다. 그렇다면 이렇게 인증된 Authentication 은 어떤 과정을 거쳐 SecurityContexyHolder 에 들어가게 되는지 알아보자.
UsernameAuthenticationFilter
UsernameAuthenticationFilter 는 템플릿 패턴이 적용된 필터이다, 동작 플로우를 확인하려면 AbstractAuthenticationFilter 를 가서 확인하면 된다.
(참고 - https://velog.io/@jaden_94/추상클래스와-템플릿패턴)
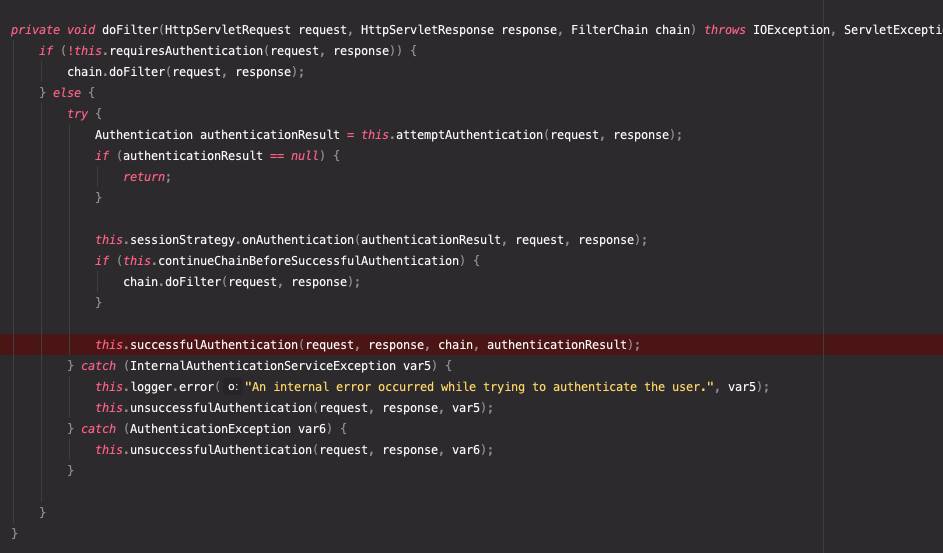
결론부터 말하면 요청이 들어오는 과정에서 필터체인을 거칠때, UsernameAuthenticationFilter 에서 ProviderManager 을 사용해 인증과정을 거치고 인증된 Authentication을 받아와 리턴된다. 그리고 인증된 Authentication 이 있을 경우 successfulAuthentication() 이 실행되는데 바로 여기서 SecurityContextHolder.getContext().setAuthentication(authResult); 를 통해 SecurityContextHolder 에 authResult(= Authentication 객체이다) 를 넣어주는 것을 확인할 수 있다.
직접코드를 까보면서 반복설명을 해보자면,

위 코드를 통해 AbstractAuthenticationProcessingFilter 에서 필터처리를 어떠한 flow로 처리할지 알 수 있다. attempAuthentication() 을 통해 인증처리를 하고 인증된 authenticationResult를 받아와 suceessfulAuthentication() 을 진행하는 것을 확인할 수 있다

suceessfulAuthentication()에서는 위 사진의 빨간줄처럼 SecurityContextHolder.getContext().setAuthentication(authResult); 을 통해 SecurityContextHolder 에 authentication을 넣어주는 모습을 볼 수 있다.
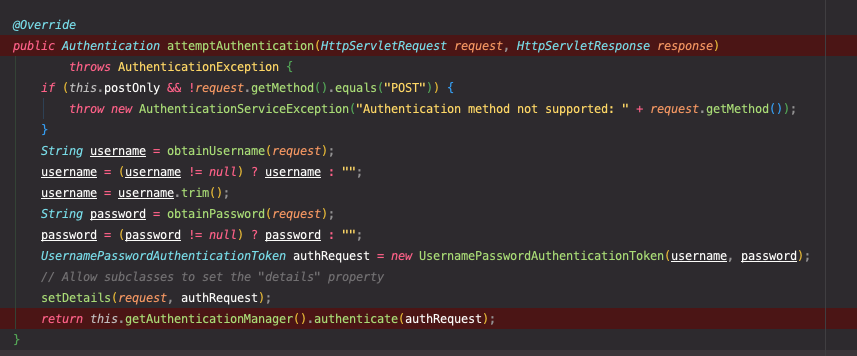
그리고 현재 폼로그인을 통해 시큐리티 구조를 파악하고 있기 때문에, 폼 로그인시 동작하는 UsernamePasswordAuthenticationFilter 가 위와 같은 flow 를 따라 진행된다. 다음은, UsernamePasswordAuthenticationFilter 에서
attempAuthentication()을 진행하는 모습니다.

getAuthenticationManger().authenticate()를 통해 인증을 처리하고 그 결과를 리턴하는 것을 확인할 수 있다. 저 부분에서 앞선 포스팅에서 살펴보았던, 작업이 이루어지게 되는 것이다.
결론 : UsernamePasswordAuthenticationFilter 에서 Authentication을 인증하고 인증된 Authentication을 SecurityContextHolder에 넣어준다.
모든 요청시에 이러한 인증과정을 거쳐 SecurityContextHolder 에 인증된 Authentication을 넣는 것인가?
모든 요청마다 인증과정을 거쳐서 넣어도 상관은 없을 것이다. 하지만 매 요청마다 로그인을 요구하는 것은 굉장히 거슬리는 일이고, 이를 해결하기 위해 Session 을 사용해 stateful 한 방법을 사용할 수도 있다.
SecurityContextPesistenceFilter
요청이 들어오면 UsernameAuthenticationFilter 보다 앞서서 실행되는 SecurityContextPesistenceFilter 라는 필터가 있다.
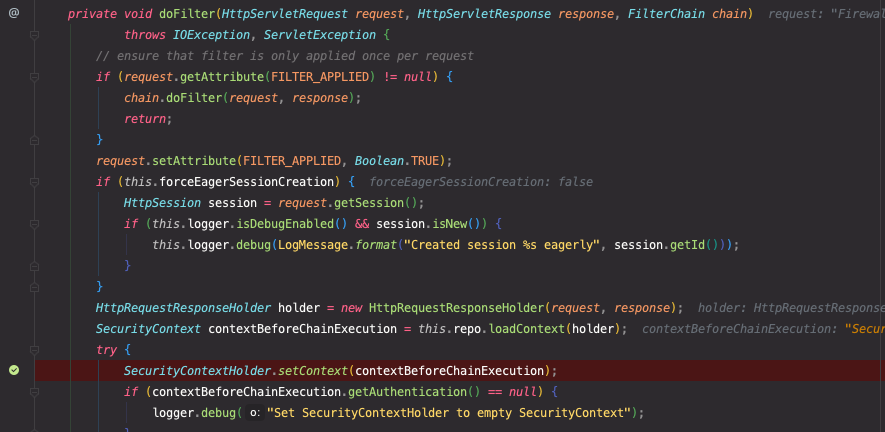
SecurityContextPesistenceFilter 이 필터에서는 session이 가지고 있는 SecurityContext의 Authentication 정보가 있다면 위에서 살펴본 인증과정을 통해 SecuirtyContextHolder에 authentication을 넣는 작업을 하지않고, 이 필터에서 session 이 가지고 있는 Authentication 을 SecurityContextHolder 에 넣는 작업을 수행한다. 
위으 코드는 SecurityContextPesistenceFilter 의 doFilter() 과정의 일부분인데 디버거를 잡아놓을곳과 그 위쪽 부분을 보면 HttpSession 에서 SecurityContext를 복윈해 SecurityContextHolder 에 setting 하는 코드를 확인할 수 있다.
만약, 정보가 없다면 다음 필터로 넘어가고 결국 앞서서 살펴본 작업이 이루어지게 될 것이다. 그리고 해당 필터에서는 session 에서 SecurityContext를 받아와 SecurityContextHolder 에 넣는 작업 뿐만 아니라, 요청을 처리한 후 SecurityContextHolder 를 비워주고 session 에 SecurityContext를 집어넣는 작업도 해주는 필터이다. 다음의 코드를 통해 확인해 볼 수 있다.

결론: Session에 SecurityContext 정보가 있다면, SecurityContextPesistenceFilter 에서 Authentication을 SecurityContextHolder 에 넣어주고 요청을 처리한 후, SecurityContextHolder 을 비우고 session에 Authentication을 넣어준다.
*참고: 이 포스팅은 백기선님의 스프링시큐리티 강의를 듣고, 제 나름대로 다시 공부하고 정리한 포스팅 입니다. 만약, 조금 더 자세한 내용을 듣고 싶으시다면 이곳의 강의를 참고해보시기 바랍니다
