
서론
next.js 14버전의 변경점을 알아보기 전, 체감상 가장 많은 변화가 있었던 13버전에 대해 먼저 알아보고자 한다. 아래 기술하는 내용은 next 공식 사이트와 기술 블로그를 찾아보며 나름대로 정리한 내용이다.
next.js 13버전에서는 크게 다음과 같은 변경점이 있었다.
APP Router, Data fetch, React Server Component, Layouts, Streaming, Turbopack, next/Image, @next/font, next/link
하나하나 알아보도록 하자.
Next.js 13 주요 업데이트
APP Router
- 기존 src/pages 라우팅 방식과 다르게 src/app 라우팅 방식
- 라우팅 환경개선 뿐만 아니라 Layouts, Server Component, Data Fetching 까지 지원
1) Layouts
공통적인 UI를 랩핑 컴포넌트 형태로 제공하고, 내부에 children을 포함한다. 폴더 경로 안에, layout.js 컴포넌트만 추가해주면 된다.
- 공통 레이아웃의 상태를 유지하고, 불필요한 리렌더링을 방지한다
- 컴포넌트 간 상호작용을 향상시킨다.
- 12버전에서 _app.tsx와 비슷한 기능이다.
// next.config.js

/** @type {import('next').NextConfig} */
const nextConfig = {
  reactStricMode: true,
  experimental:{
    appDir: true
  }
}

module.exports = nextConfig
experimental 설정에 appDir:true 설정을 해주어야 경고가 뜨지 않는다.
2) Server Component
컴포넌트가 렌더링되는 장소가 서버인지 클라이언트인지의 차이이다.13버전에서는 App 폴더 내 모든 컴포넌트들은 기본적으로 Server Component 이고 기존처럼 클라이언트 컴포넌트로 사용하려면 상단에 "use client" 를 명시해야 한다.
- 클라이언트에 전송되는 JS 코드양을 줄여 초기 페이지 로드가 빠르다.
- route(경로)가 로드될 때, Next.js 및 React 런타임이 로드되어 캐시가 가능하고 크기를 예측할 수 있다.
[ Client Component를 사용해야 하는 상황 ]
- useState, useEffect 훅을 사용하는 경우
- 특정 브라우저 API에 의존성이 있는 경우
- 특정 Event Listeners를 추가하는 경우
// client componet 예시
"use client";
import { useState } from "react";
export default function Counter() {
const [count, setCount] = useState(0);
return (
<div>
<p>You clicked the Count++ button {count} times</p>
<button onClick={() => setCount(count + 1)}>Count++</button>
</div>
);
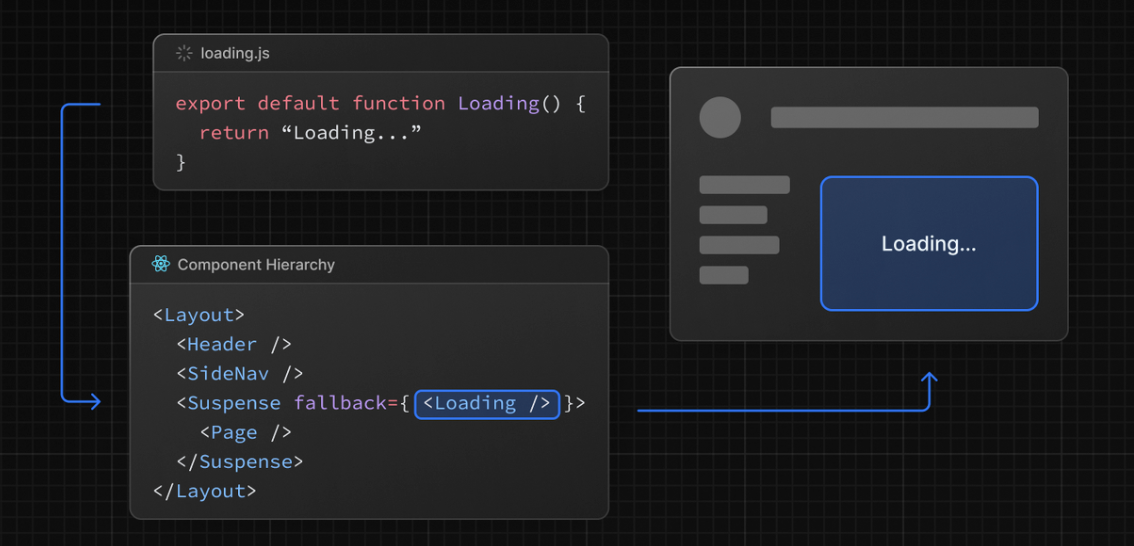
}3) Streaming
SSR의 경우 서버에서 데이터를 Fetch 하게 되는데 이때 데이터가 필요없는 UI(레이아웃 등...)를 먼저 보여주고 데이터 로딩이 끝나면 화면에 그려준다.
또한, loading.js 파일을 생성하면 React Suspense를 자동으로 래핑하여 로딩 화면을 보여주고 데이터 로딩이 끝나면 자동으로 교체된다.
/* app/dashboard/loading.tsx */

export default function Loading() {
  // You can add any UI inside Loading, including a Skeleton.
  return <LoadingSkeleton />;
}- 같은 폴더에서 loading.js는 layout.js 안에 중첩된다. 경계에서 page.js 파일과 그 아래의 모든 자식을 자동으로 래핑
Data Fetching
fetch() web Api를 사용할 수 있게 되면서 컴포넌트 레벨에서도 SSR의 적용이 가능하고 기존의 SSG/SSR/ISR 등의 기법을 fech() 옵션으로 대체한다.
- 기본적으로 서버 컴포넌트 이므로 서버단에서 데이터를 불러온다.
- 데이터 패칭이 병렬적으로 일어난다.( 각각의 패칭이 비동기 chaining으로 일어나지 않는다.)
- 데이터 패칭은 자동으로 중복제거된다. ( 부모, 자식 간의 동일한 요청들은 1회로 실행)
// This request should be cached until manually invalidated.
// Similar to `getStaticProps`.
// `force-cache` is the default and can be omitted.
fetch(URL, { cache: 'force-cache' });
// This request should be refetched on every request.
// Similar to `getServerSideProps`.
fetch(URL, { cache: 'no-store' });// This request should be cached with a lifetime of 10 seconds.
// Similar to `getStaticProps` with the `revalidate` option.
fetch(URL, { next: { revalidate: 10 } });Turbopack
Rust 기반의 JS 번들링 툴이며 개발에 필요한 최소한의 어셋만 번들링해 트렌스파일링과 시작 시간이 빠르다.
- Webpack 보다 700배 빠른 업데이트
- Vite 보다 10배 빠른 업데이트
- Webpack 보다 4배 빠른 cold start
next/Image (Stable)
기존 Image 컴포넌트가 next/legacy/Image로 변경되면서 향상된 기능을 제공한다.
- 클라이언트에서 더 적은양의 JS코드를 갖는다.
- alt 속성을 필수로 제한하여 웹 접근성 향상
- 이미지 로드가 느리면 레이아웃이 밀리는 layout shift 방지 ( width, height 필수)
@next/font
구글 폰트를 내장시켜 새로운 폰트 시스템을 도입했다. 이 시스템을 통해 성능 개선과 개인 정보를 보호하여 모든 구글 폰트를 편하게 관리할 수 있다.
- 커스텀 폰트를 포함해 폰트를 자동으로 최적화 시킨다.
- 개인 정보 보호 및 성능 향상을 위한 외부 네트워크 요청을 제거한다.
  // Roboto 폰트 커스텀
import { Roboto } from '@next/font/google'

const roboto = Roboto({
  weight: '400',
  subsets: ['latin'],
})

export default function MyApp({ Component, pageProps }) {
  return (
    <main className={roboto.className}>
      <Component {...pageProps} />
    </main>
  )
}
커스텀 폰트들도 자동 self-hosting, 캐싱, pre-loading 등이 제공된다.
//커스텀 폰트
import localFont from '@next/font/local';

const myFont = localFont({ src: './my-font.woff2' });

<html className={myFont.className}>
폰트를 전역으로 설정할수도 있다.
// 전역 폰트설정
import { Inter } from '@next/font/google'

const inter = Inter({ subsets: ['latin'] })

export default function MyApp({ Component, pageProps }) {
  return (
    <>
      <style jsx global>{`
        html {
          font-family: ${inter.style.fontFamily};
        }
      `}</style>
      <Component {...pageProps} />
    </>
  )
}

// next.config.js
module.exports = {
  experimental: {
    fontLoaders: [
      { loader: '@next/font/google', options: { subsets: ['latin'] } },
    ],
  },
}
향상된 next/link (stable)
Link 컴포넌트에 수동으로 a 태그를 추가할 필요가 없어졌다. Link는 이제 기본값으로 a태그를 렌더링할 수 있다.
import Link from 'next/link'

// Next.js 12: `<a>` has to be nested otherwise it's excluded
<Link href="/about">
<a>About</a>
</Link>

// Next.js 13: `<Link>` always renders `<a>`
<Link href="/about">
About
</Link>
OG 이미지 생성
sns를 통해 링크를 공유하면 OG Image라고 하는 소셜 카드가 뜬다.

정적 소셜카드는 시간 소비, 에러 이슈 등 유지보수가 까다로워 스킵되곤 하는데, Next 13에서는 이를 개선한 동적 소셜카드 생성 라이브러리인 @vercel/log를 도입했다.
  // pages/api/og.jsx

import { ImageResponse } from '@vercel/og';

export const config = {
  runtime: 'experimental-edge',
};

export default function () {
  return new ImageResponse(
    (
      <div
        style={{
          display: 'flex',
          fontSize: 128,
          background: 'white',
          width: '100%',
          height: '100%',
        }}
      >
        Hello, World!
      </div>
    ),
  );
}
출처