1. 퍼사드 (Facade) 패턴 : 복잡한 서브 시스템 의존성을 최소화하는 방법.
-
퍼사드 패턴은 복잡한 서브 시스템에 대한 의존성을 단순화하고, 클라이언트가 사용하기 쉬운 하나의 인터페이스(퍼사드)를 제공한다.
-
클라이언트는 퍼사드 인터페이스를 통해 서브 시스템과 상호작용하며, 내부 구현에 대해 알 필요가 없다.
Before
Client
public class Client {

    public static void main(String[] args) {
        String to = "keesun@whiteship.me";
        String from = "whiteship@whiteship.me";
        String host = "127.0.0.1";

        Properties properties = System.getProperties();
        properties.setProperty("mail.smtp.host", host);

        Session session = Session.getDefaultInstance(properties);

        try {
            MimeMessage message = new MimeMessage(session);
            message.setFrom(new InternetAddress(from));
            message.addRecipient(Message.RecipientType.TO, new InternetAddress(to));
            message.setSubject("Test Mail from Java Program");
            message.setText("message");

            Transport.send(message);
        } catch (MessagingException e) {
            e.printStackTrace();
        }
    }
}
Before 코드 분석
구조
1. 직접 서브 시스템 사용:
- 클라이언트가 이메일 전송에 필요한 모든 설정 및 로직(Session, MimeMessage 등)을 직접 작성.
- 서브 시스템의 복잡한 API(Properties, Session, MimeMessage 등)에 직접 접근.
2. 문제점
- 복잡성 증가: 클라이언트는 이메일 전송을 위해 많은 설정과 코드를 작성해야 함.
- 유지보수 어려움: 서브 시스템이 변경되면 클라이언트 코드도 수정해야 함.
- 코드 중복: 여러 클라이언트에서 동일한 서브 시스템을 사용하면 코드가 중복될 가능성이 큼.
After
구조
1. 퍼사드 클래스 도입:
- EmailSender는 클라이언트가 복잡한 이메일 전송 로직(Properties, Session, MimeMessage 등)을 알 필요 없이 간단히 이메일을 보낼 수 있는 인터페이스를 제공한다.
- 이메일 설정(EmailSettings)과 이메일 내용(EmailMessage)도 별도로 분리하여 역할을 명확히 함.
2. 클라이언트 코드 간소화:
- 클라이언트는 EmailSender의 sendEmail() 메서드만 호출하여 이메일을 전송할 수 있음.
EmailSender
public class EmailSender {

    private EmailSettings emailSettings;

    public EmailSender(EmailSettings emailSettings) {
        this.emailSettings = emailSettings;
    }

    /**
     * 이메일 보내는 메소드
     * @param emailMessage
     */
    public void sendEmail(EmailMessage emailMessage) {
        Properties properties = System.getProperties();
        properties.setProperty("mail.smtp.host", emailSettings.getHost());

        Session session = Session.getDefaultInstance(properties);

        try {
            MimeMessage message = new MimeMessage(session);
            message.setFrom(new InternetAddress(emailMessage.getFrom()));
            message.addRecipient(Message.RecipientType.TO, new InternetAddress(emailMessage.getTo()));
            message.addRecipient(Message.RecipientType.CC, new InternetAddress(emailMessage.getCc()));
            message.setSubject(emailMessage.getSubject());
            message.setText(emailMessage.getText());

            Transport.send(message);
        } catch (MessagingException e) {
            e.printStackTrace();
        }
    }


}
EmailSettings
public class EmailSettings {

    private String host;

    public String getHost() {
        return host;
    }

    public void setHost(String host) {
        this.host = host;
    }
}
EmailMessage
public class EmailMessage {

    private String from;

    private String to;
    private String cc;
    private String bcc;

    private String subject;

    private String text;

    public String getFrom() {
        return from;
    }

    public void setFrom(String from) {
        this.from = from;
    }

    public String getTo() {
        return to;
    }

    public void setTo(String to) {
        this.to = to;
    }

    public String getSubject() {
        return subject;
    }

    public void setSubject(String subject) {
        this.subject = subject;
    }

    public String getText() {
        return text;
    }

    public void setText(String text) {
        this.text = text;
    }

    public String getCc() {
        return cc;
    }

    public void setCc(String cc) {
        this.cc = cc;
    }

    public String getBcc() {
        return bcc;
    }

    public void setBcc(String bcc) {
        this.bcc = bcc;
    }
}
Client
public class Client {

    public static void main(String[] args) {
        EmailSettings emailSettings = new EmailSettings();
        emailSettings.setHost("127.0.0.1");

        EmailSender emailSender = new EmailSender(emailSettings);

        EmailMessage emailMessage = new EmailMessage();
        emailMessage.setFrom("keesun");
        emailMessage.setTo("whiteship");
        emailMessage.setCc("일남");
        emailMessage.setSubject("오징어게임");
        emailMessage.setText("밖은 더 지옥이더라고..");

        emailSender.sendEmail(emailMessage);
    }
}
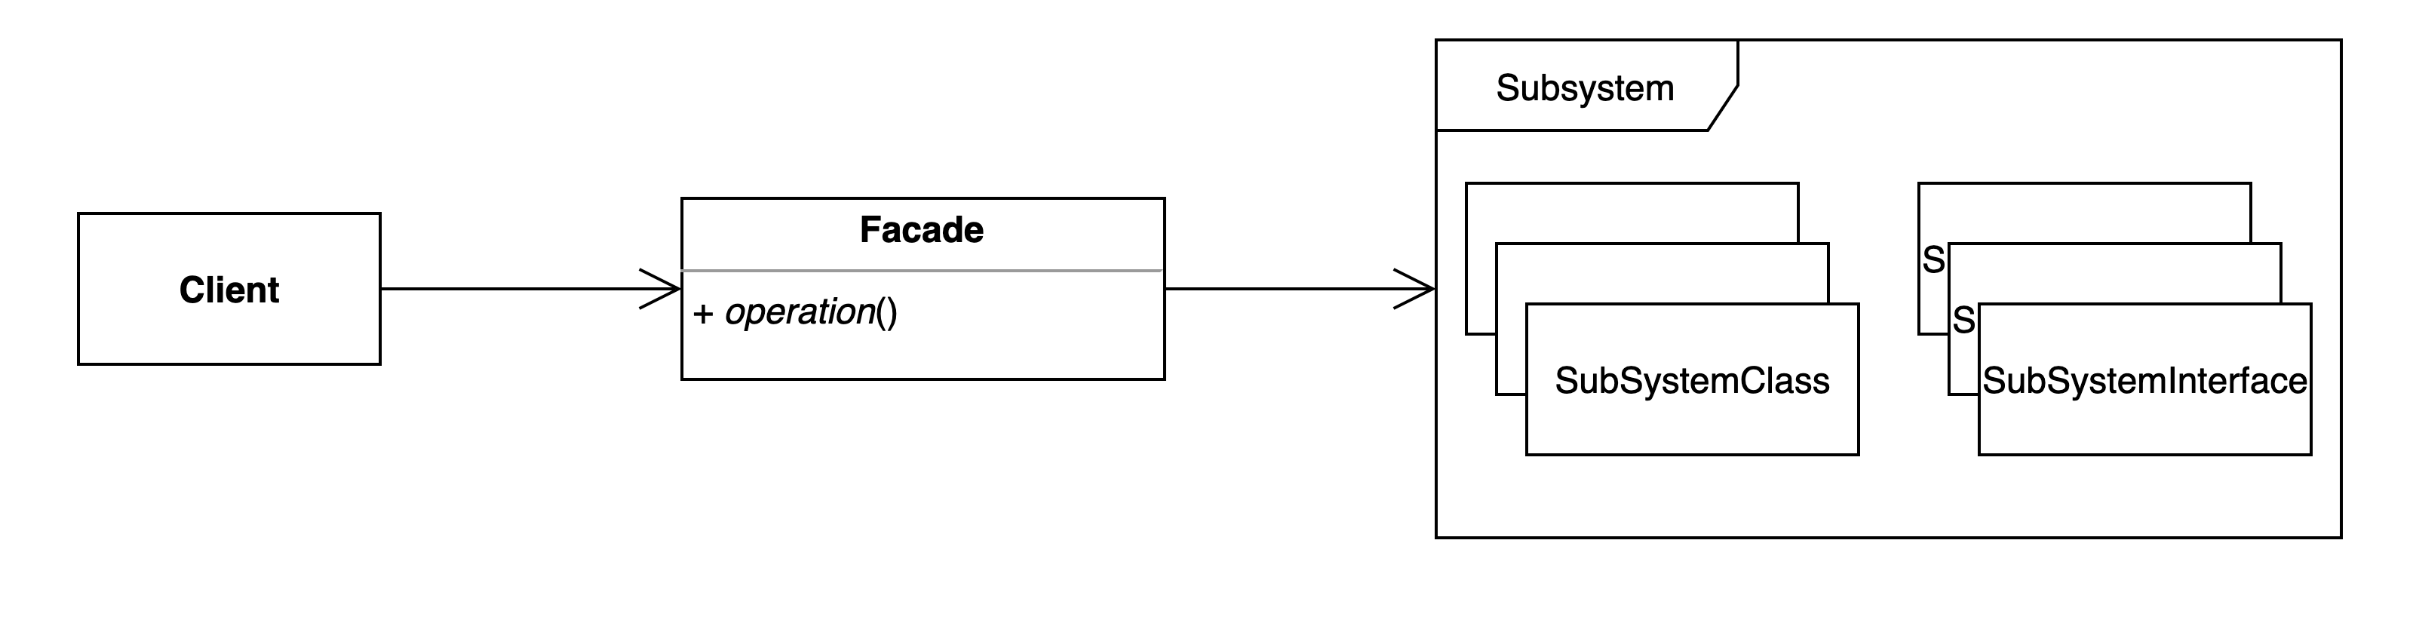
다이어그램

개선점
1. 의존성 관리:
- 클라이언트는 서브 시스템(Session, MimeMessage 등)에 직접 접근하지 않음.
- 의존성은 EmailSender 내부에서 관리되므로, 클라이언트 코드는 변경에 영향을 받지 않음.
2. 코드 간소화:
- 클라이언트 코드는 간결하며, 서브 시스템의 복잡성을 몰라도 동작.
3. 유지보수성 증가:
- 서브 시스템의 변경이 발생해도, EmailSender 클래스만 수정하면 됨.
4. 역할 분리:
- EmailSettings: 이메일 전송 설정(host).
- EmailMessage: 이메일 전송에 필요한 데이터(from, to, cc, subject, text).
- EmailSender: 이메일 전송 로직.
퍼사드 패턴의 장단점
장점
1. 의존성 단순화:
- 클라이언트가 복잡한 서브 시스템에 직접 접근하지 않도록 하여, 서브 시스템과의 의존성을 한 곳(퍼사드 클래스)으로 모음.
2. 코드 재사용성 증가:
- 퍼사드 클래스(EmailSender)는 공통된 서브 시스템 작업을 캡슐화하여 여러 클라이언트에서 재사용 가능.
3. 유지보수 용이:
- 서브 시스템의 변경 사항은 퍼사드 클래스만 수정하면 됨.
- 클라이언트 코드는 변경에 영향을 받지 않음.
4. 코드 간소화:
- 클라이언트 코드는 퍼사드 클래스의 간단한 인터페이스를 호출하기만 하면 됨.
단점
1. 퍼사드 클래스에 과도한 책임:
- 퍼사드 클래스가 서브 시스템의 모든 의존성을 관리하면, 책임이 커지고 복잡해질 수 있음.
2. 추가 계층으로 인한 성능 저하 가능성:
- 퍼사드 클래스가 단순히 서브 시스템의 메서드를 호출하는 경우, 추가 계층이 불필요한 오버헤드를 유발할 수 있음.
퍼사드 패턴, 실무에서는?
1. 스프링 MVC
Controller:
- 클라이언트(사용자)는 복잡한 서비스 계층이나 DAO 계층과 직접 상호작용하지 않음.
- 컨트롤러는 클라이언트와 서브 시스템(Service, Repository) 간의 퍼사드 역할을 수행.
2. 스프링의 기술 독립적인 인터페이스
JdbcTemplate:
- 데이터베이스 작업을 캡슐화하여, 클라이언트가 JDBC API의 복잡성을 알 필요 없이 데이터베이스 작업을 수행할 수 있도록 도와줌.
RestTemplate:
- HTTP 요청을 캡슐화하여 클라이언트가 직접 HttpURLConnection 등과 상호작용하지 않도록 도와줌.
2. 플라이웨이트 (Flyweight) 패턴 : 객체를 가볍게 만들어 메모리 사용을 줄이는 패턴.
자주 변하는 속성(또는 외적인 속성, extrinsit)과 변하지 않는 속성(또는 내적인 속성, intrinsit)을 분리하고 재사용하여 메모리 사용을 줄일 수 있다.

Before
1. 구조
-
Character클래스:- 문자(
value), 색상(color), 폰트(fontFamily,fontSize) 속성을 가진 클래스. - 모든
Character객체는 각각의 속성을 독립적으로 가짐.
public class Character { private char value; private String color; private String fontFamily; private int fontSize; public Character(char value, String color, String fontFamily, int fontSize) { this.value = value; this.color = color; this.fontFamily = fontFamily; this.fontSize = fontSize; } } - 문자(
-
Client클래스:- 각 문자(
Character) 객체를 독립적으로 생성하며, 동일한 속성을 반복적으로 사용.
public class Client { public static void main(String[] args) { Character c1 = new Character('h', "white", "Nanum", 12); Character c2 = new Character('e', "white", "Nanum", 12); Character c3 = new Character('l', "white", "Nanum", 12); Character c4 = new Character('l', "white", "Nanum", 12); Character c5 = new Character('o', "white", "Nanum", 12); } } - 각 문자(
2. 문제점
- 동일한 폰트(
fontFamily,fontSize)를 사용하는 객체를 반복적으로 생성하므로, 메모리를 불필요하게 소비. - 예:
Nanum:12폰트를 사용하는Character객체마다 동일한 폰트 정보를 중복 저장. - 객체 수가 많아질수록 메모리 사용량이 기하급수적으로 증가.
After
1. 구조
-
Character클래스:fontFamily와fontSize를 분리하고, 대신Font객체를 사용.Font객체는 변하지 않는 속성(내적 속성)을 캡슐화.
public class Character { private char value; private String color; // 외적 속성 private Font font; // 내적 속성 (재사용 가능) public Character(char value, String color, Font font) { this.value = value; this.color = color; this.font = font; } } -
Font클래스:fontFamily와fontSize를 캡슐화.- 내적 속성만 포함하며, 재사용 가능하도록 설계.
public final class Font { final String family; final int size; public Font(String family, int size) { this.family = family; this.size = size; } public String getFamily() { return family; } public int getSize() { return size; } } -
FontFactory클래스:Font객체를 생성하고, 캐시(Map)에서 동일한Font객체를 재사용.getFont()메서드를 통해Font객체를 반환.
public class FontFactory { private Map<String, Font> cache = new HashMap<>(); public Font getFont(String font) { if (cache.containsKey(font)) { return cache.get(font); } else { String[] split = font.split(":"); Font newFont = new Font(split[0], Integer.parseInt(split[1])); cache.put(font, newFont); return newFont; } } } -
Client클래스:FontFactory를 사용하여 동일한Font객체를 재사용.Character객체는Font를 참조하며, 색상(color)과 문자(value)만 개별적으로 저장.
public class Client {
    public static void main(String[] args) {
        FontFactory fontFactory = new FontFactory();
        Character c1 = new Character('h', "white", fontFactory.getFont("nanum:12"));
        Character c2 = new Character('e', "white", fontFactory.getFont("nanum:12"));
        Character c3 = new Character('l', "white", fontFactory.getFont("nanum:12"));
    }
}
다이어 그램
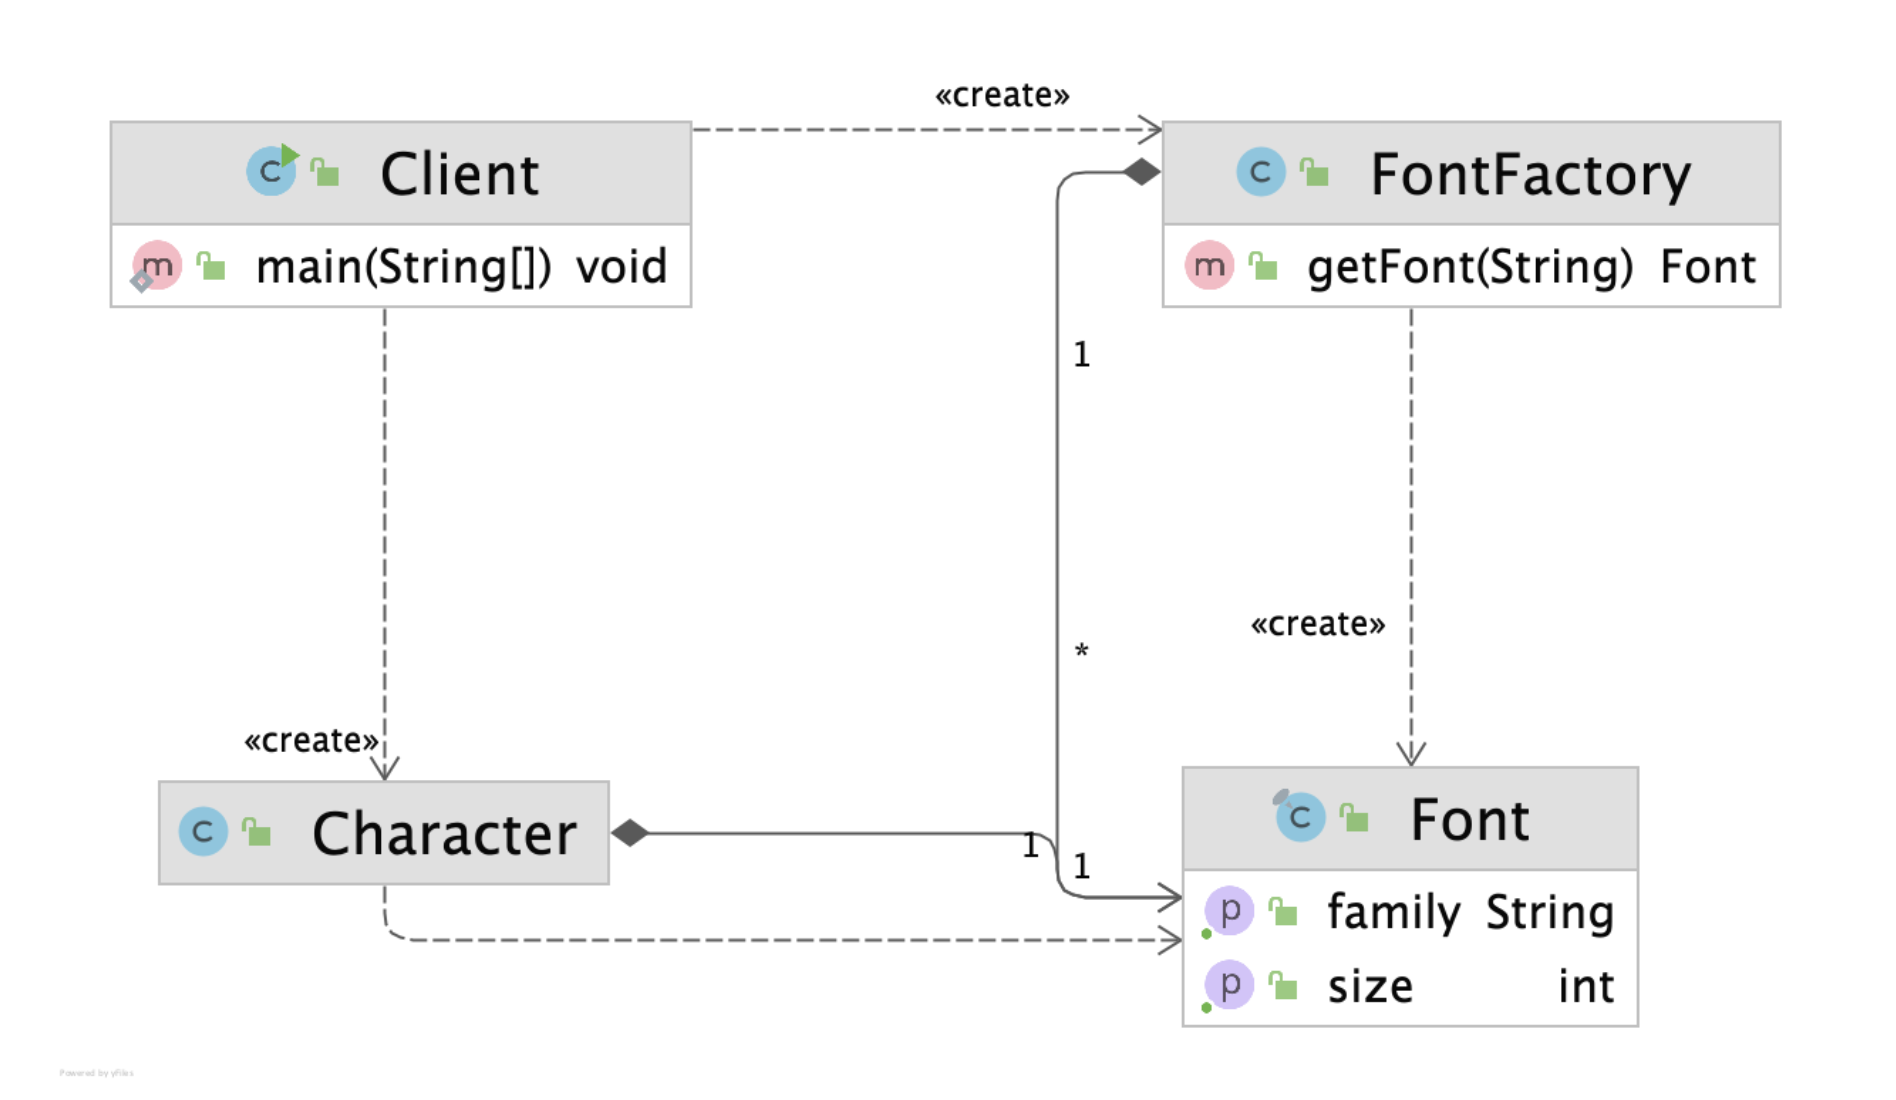
2. 개선점
-
중복 제거:
Font객체는FontFactory에서 캐싱되므로, 동일한 폰트를 사용하는 객체는 메모리를 공유.- 결과적으로 메모리 사용량이 크게 줄어듦.
-
내적/외적 속성 분리:
- 내적 속성(
Font)은 변하지 않으므로 재사용. - 외적 속성(
color,value)만 개별적으로 유지.
- 내적 속성(
-
유지보수 용이:
- 폰트 속성 변경 시, 캐싱된
Font객체만 수정하면 됨.
- 폰트 속성 변경 시, 캐싱된
플라이웨이트 패턴의 장단점
장점
-
메모리 사용 감소:
- 객체의 내적 속성을 재사용함으로써 메모리 사용량을 줄일 수 있음.
- 특히, 동일한 속성을 공유하는 객체가 많은 경우 효과적.
-
객체 생성 비용 감소:
- 기존 객체를 재사용하므로 객체 생성 비용이 줄어듦.
-
내적/외적 속성의 명확한 분리:
- 객체의 내적 속성과 외적 속성을 분리하여, 설계가 명확해짐.
단점
-
코드 복잡성 증가:
- 내적 속성과 외적 속성을 분리하고, 이를 관리하는 추가 클래스(예:
FontFactory)가 필요. - 단순한 문제에 적용하면 오히려 불필요한 복잡성을 초래할 수 있음.
- 내적 속성과 외적 속성을 분리하고, 이를 관리하는 추가 클래스(예:
-
캐싱 관리 필요:
- 객체 캐싱과 재사용을 위해 캐시(Map)를 관리해야 하므로, 추가적인 메모리와 로직이 필요.
실무에서의 활용 사례
1. 자바
-
Integer.valueOf(int):Integer는 -128부터 127까지의 정수 객체를 캐싱하여 재사용.- 동일한 값의
Integer객체를 반복적으로 생성하지 않음. - ex)
Integer a = Integer.valueOf(127);
Integer b = Integer.valueOf(127);
System.out.println(a == b); // true (같은 객체 참조)
-
문자열 풀(String Pool):
- 자바는 동일한 값을 가진 문자열 리터럴을 재사용하도록 설계.
- ex)
String s1 = "hello";
String s2 = "hello";
System.out.println(s1 == s2); // true (같은 객체 참조)
2. UI 컴포넌트
- UI 라이브러리에서 동일한 스타일(폰트, 색상, 테두리 등)을 공유하는 요소를 효율적으로 관리.
3. 프록시(Proxy) 패턴 : 특정 객체에 대한 접근을 제어하거나 기능을 추가할 수 있는 패턴.
1) 프록시(Proxy) 패턴은 특정 객체에 대한 대리 객체를 두어, 접근을 제어하거나 부가적인 작업을 수행할 수 있도록 하는 디자인 패턴이다.
2) 클라이언트는 실제 객체가 아닌 프록시 객체를 통해 간접적으로 실제 객체에 접근한다.
3) 초기화 지연, 접근 제어, 로깅, 캐싱 등 다양하게 응용해 사용 할 수 있다.

Before
1. 구조
-
Client 클래스:
GameService객체를 직접 생성하고,startGame()메서드를 호출한다.
public class Client { public static void main(String[] args) throws InterruptedException { GameService gameService = new GameService(); gameService.startGame(); } } -
GameService 클래스:
- 게임 시작 로직(
startGame())을 담당하는 단순한 클래스.
public class GameService { public void startGame() { System.out.println("이 자리에 오신 여러분을 진심으로 환영합니다."); } } - 게임 시작 로직(
2. 문제점
- 확장성 부족:
GameService의startGame()메서드에 부가적인 작업(예: 로깅, 성능 측정)을 추가하려면 기존 코드를 수정해야 함.- OCP(Open-Closed Principle, 개방-폐쇄 원칙)에 위배됨.
- 클라이언트가 직접 실제 객체에 접근:
- 클라이언트는
GameService객체에 직접 접근하며, 객체 생성 로직이나 접근 제어를 추가하기 어렵다.
- 클라이언트는
After
1. 구조
-
GameService 인터페이스:
GameService와 그 구현체(DefaultGameService,GameServiceProxy)의 공통 인터페이스.
public interface GameService { void startGame(); } -
DefaultGameService:
GameService의 실제 구현체.- 기존의
GameService와 동일하게startGame()메서드를 구현.
public class DefaultGameService implements GameService { @Override public void startGame() { System.out.println("이 자리에 오신 여러분을 진심으로 환영합니다."); } } -
GameServiceProxy:
- 프록시 클래스로, 실제 객체(
DefaultGameService)에 대한 접근을 제어. - 클라이언트는 프록시 객체를 통해 실제 객체에 접근하며, 추가 작업(예: 로깅, 성능 측정)을 수행할 수 있음.
public class GameServiceProxy implements GameService { private GameService gameService; @Override public void startGame() { long before = System.currentTimeMillis(); if (this.gameService == null) { this.gameService = new DefaultGameService(); } gameService.startGame(); System.out.println(System.currentTimeMillis() - before); } } - 프록시 클래스로, 실제 객체(
-
Client 클래스:
- 클라이언트는
GameServiceProxy객체를 사용하여startGame()메서드를 호출. - 클라이언트는 실제 객체(
DefaultGameService)를 직접 알 필요가 없음.
public class Client { public static void main(String[] args) { GameService gameService = new GameServiceProxy(); gameService.startGame(); } } - 클라이언트는
다이어그램
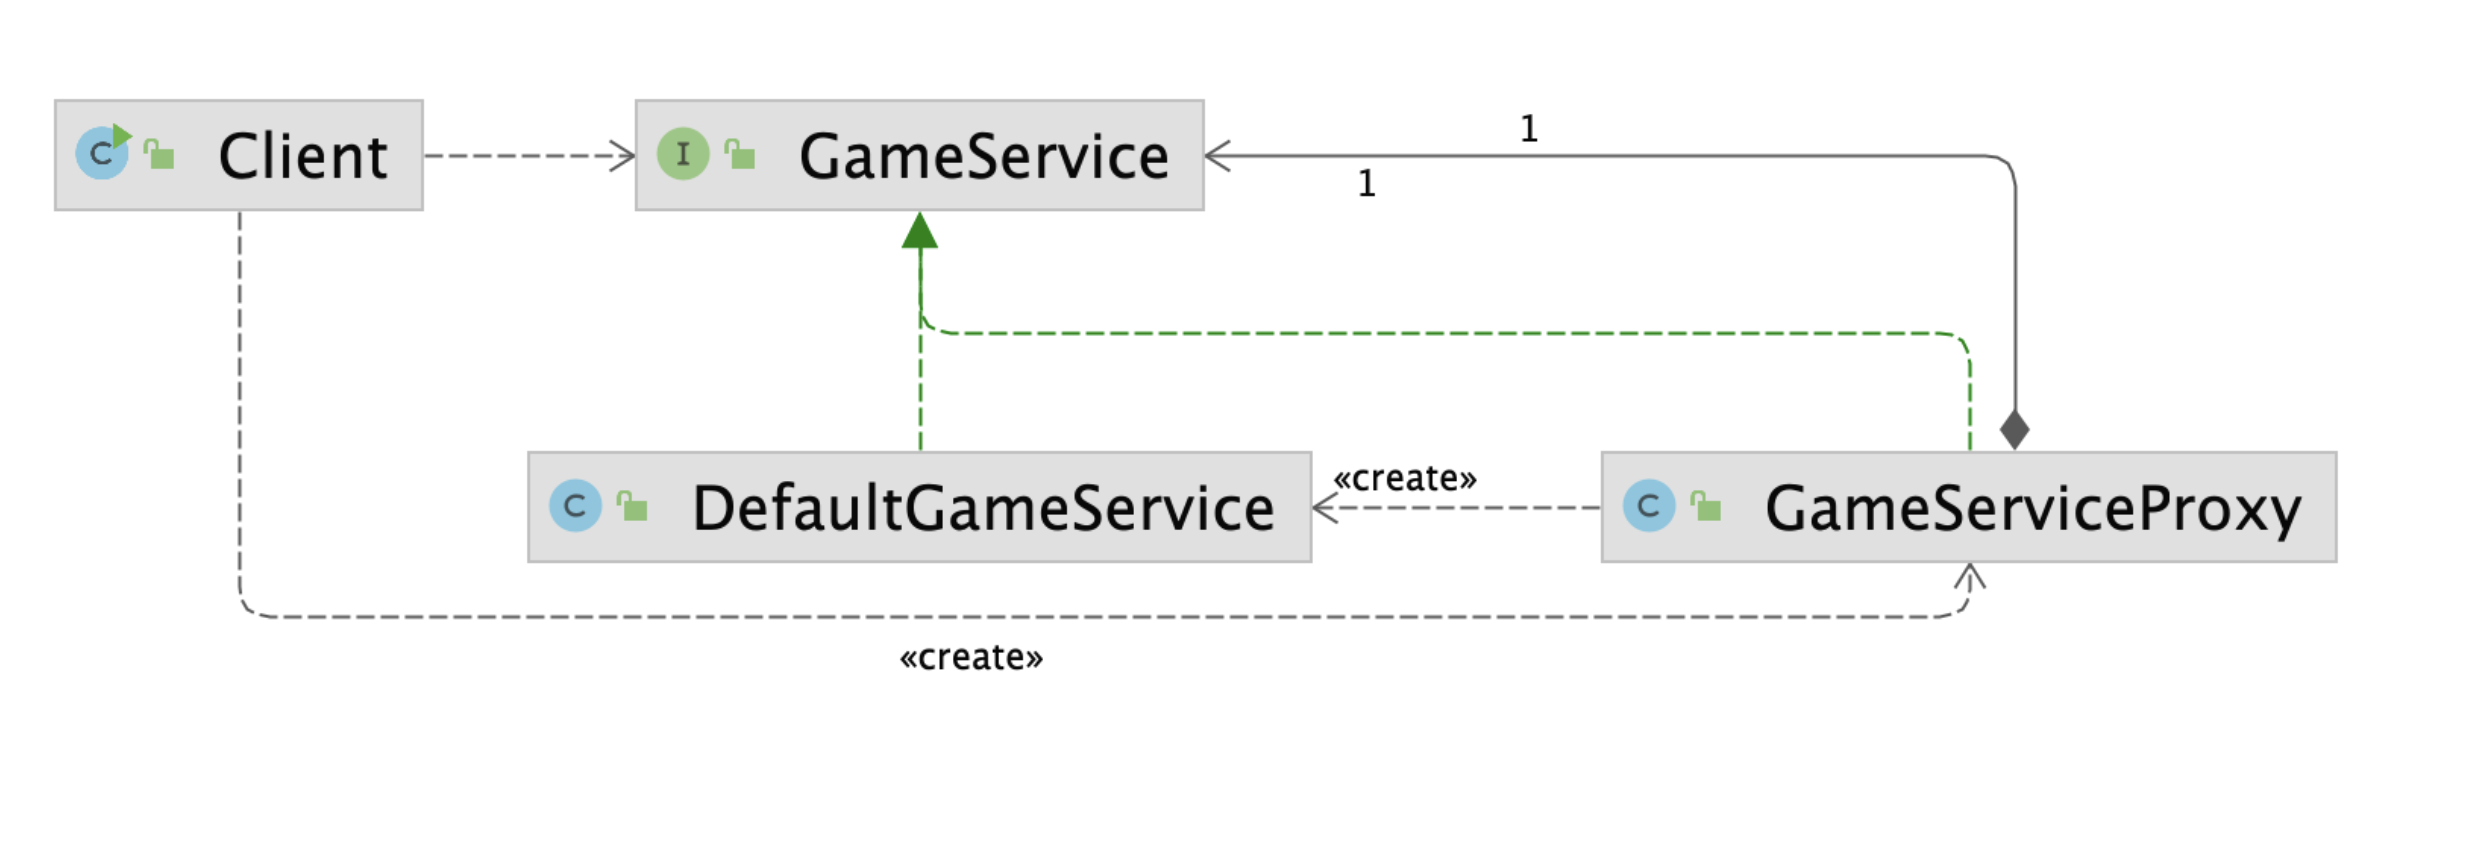
2. 개선점
-
확장성 증가:
- 부가적인 작업(예: 로깅, 성능 측정)을 프록시 클래스에서 처리하므로, 실제 구현체(
DefaultGameService)는 수정하지 않아도 됨. - OCP(개방-폐쇄 원칙)을 준수.
- 부가적인 작업(예: 로깅, 성능 측정)을 프록시 클래스에서 처리하므로, 실제 구현체(
-
실제 객체에 대한 간접 접근:
- 클라이언트는 프록시 객체를 통해 실제 객체에 접근하며, 객체 생성 및 접근 로직을 제어할 수 있음.
-
지연 초기화(Lazy Initialization):
- 실제 객체(
DefaultGameService)는 필요할 때만 생성(if (this.gameService == null)).
- 실제 객체(
-
부가 작업 수행:
- 프록시 클래스에서 성능 측정(
System.currentTimeMillis())과 같은 추가 작업을 수행.
- 프록시 클래스에서 성능 측정(
프록시 패턴의 특징
1. 프록시 객체의 역할
- 프록시 객체는 실제 객체를 감싸며, 클라이언트가 실제 객체와 상호작용할 때 부가적인 작업(로깅, 접근 제어, 성능 측정 등)을 수행.
- 실제 객체가 필요할 때만 생성하거나, 필요에 따라 요청을 필터링.
2. 실제 객체와 클라이언트 간의 결합도 감소
- 클라이언트는 프록시 객체를 사용하며, 실제 객체에 직접 접근하지 않음.
- 실제 객체와 클라이언트 간의 결합도가 줄어들어 유연성이 증가.
프록시 패턴의 장단점
장점
-
부가 작업 처리:
- 프록시 객체를 통해 부가 작업(로깅, 캐싱, 지연 로딩 등)을 쉽게 추가할 수 있음.
-
확장성:
- 실제 객체의 코드를 수정하지 않고도 기능을 확장 가능.
-
지연 초기화(Lazy Initialization):
- 실제 객체를 필요할 때만 생성하여 리소스를 절약.
-
접근 제어:
- 프록시를 통해 요청을 필터링하거나, 특정 조건에서만 실제 객체에 접근을 허용할 수 있음.
단점
-
추가 클래스 필요:
- 프록시 객체를 추가로 구현해야 하므로, 클래스 수가 증가하고 설계가 복잡해질 수 있음.
-
오버헤드 증가:
- 프록시 객체를 거쳐야 하므로 호출 과정에서 약간의 성능 오버헤드가 발생.
프록시 패턴의 실무 활용
1. 자바의 동적 프록시 (Dynamic Proxy)
핵심 개념
- 자바의
java.lang.reflect.Proxy를 사용하여 런타임에 프록시 객체를 동적으로 생성. InvocationHandler를 통해 모든 메서드 호출을 가로채고 부가 작업을 처리.
코드 설명
-
프록시 객체 생성:
Proxy.newProxyInstance()를 사용하여GameService인터페이스를 구현한 프록시 객체를 생성.InvocationHandler는 메서드 호출을 가로채어 실행 흐름을 제어.
-
부가 작업:
- 메서드 호출 전/후에 로깅 작업 추가 (
System.out.println("O"),"ㅁ"출력).
- 메서드 호출 전/후에 로깅 작업 추가 (
-
클라이언트 실행 흐름:
- 클라이언트는
getGameServiceProxy()메서드를 통해 프록시 객체를 생성하고startGame()메서드를 호출. - 프록시 객체는 호출을 가로채고, 실제 객체(
DefaultGameService)의 메서드를 실행.
- 클라이언트는
코드
import java.lang.reflect.Proxy;

public class ProxyInJava {

    public static void main(String[] args) {
        ProxyInJava proxyInJava = new ProxyInJava();
        proxyInJava.dynamicProxy();
    }

    private void dynamicProxy() {
        GameService gameServiceProxy = getGameServiceProxy(new DefaultGameService());
        gameServiceProxy.startGame();
    }

    private GameService getGameServiceProxy(GameService target) {
        return (GameService) Proxy.newProxyInstance(
                this.getClass().getClassLoader(),
                new Class[]{GameService.class},
                (proxy, method, args) -> {
                    System.out.println("O"); // 호출 전 작업
                    method.invoke(target, args); // 실제 메서드 호출
                    System.out.println("ㅁ"); // 호출 후 작업
                    return null;
                });
    }
}

// GameService 인터페이스
public interface GameService {
    void startGame();
}

// DefaultGameService (실제 객체)
public class DefaultGameService implements GameService {
    @Override
    public void startGame() {
        System.out.println("게임이 시작되었습니다!");
    }
}
출력 결과
O
게임이 시작되었습니다!
ㅁ
2. 스프링 AOP (Aspect-Oriented Programming)
핵심 개념
- 스프링은 프록시 객체를 활용하여 AOP(Aspect-Oriented Programming)를 구현.
- AOP는 비즈니스 로직(핵심 로직)과 부가 작업(로깅, 트랜잭션, 성능 측정 등)을 분리하여 코드의 모듈성과 재사용성을 높입니다.
스프링 AOP 작동 방식
-
프록시 생성:
- 스프링 컨테이너는 프록시 객체를 생성하여 클라이언트 요청을 처리.
- 인터페이스 기반 클래스는 JDK 동적 프록시, 구체 클래스는 CGLIB를 사용.
-
부가 작업 처리:
- 클라이언트가 프록시 객체의 메서드를 호출하면, AOP 설정에 따라 부가 작업을 수행.
- 예: 메서드 실행 전/후로 실행 시간 측정.
코드
-
Aspect 클래스:
@Aspect와@Around를 사용하여 AOP 설정.- 메서드 실행 전/후로 실행 시간을 측정.
@Aspect @Component public class PerfAspect { @Around("bean(gameService)") public void timestamp(ProceedingJoinPoint point) throws Throwable { long before = System.currentTimeMillis(); // 실행 전 작업 point.proceed(); // 실제 메서드 실행 System.out.println(System.currentTimeMillis() - before); // 실행 후 작업 } } -
스프링 빈 (Target 클래스):
GameService인터페이스를 구현한 실제 객체.
@Component("gameService") public class DefaultGameService implements GameService { @Override public void startGame() { System.out.println("게임이 시작되었습니다!"); } } -
출력 결과:
게임이 시작되었습니다!
5 (실행 시간 출력)