
FastAPI와 MySQL 연동해보자
필요한 모듈 설치
pip install fastapi
pip install pydantic
pip install SQLAlchemy
pip install alembic
pip install mysql <- mysql용
pip install psycopg2 <- postgresql용
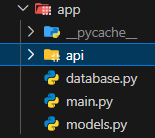
database.py : sqlalchemy를 통해 연결
 데이터베이스 연결 엔진을 생성하는 함수
from sqlalchemy import create_engine
테이블과 모델을 정의하기 위한 기본 클래스를 생성
from sqlalchemy.ext.declarative import declarative_base
데이터베이스 세션을 생성하기 위한 팩토리 함수를 생성
 Sesstion : 데이터베이스 트랜잭션을 관리
from sqlalchemy.orm import sessionmaker, Session
제너레이터 함수의 반환 타입을 정의하는 타입 힌트
from typing import Generator
의존성 주입 도구
from fastapi import Depends

데이터베이스 URL 설정
mysql용
SQLALCHEMY_DATABASE_URL = "mysql+pymysql://root:mypassword@localhost/mydiarydb"

postgresql용
SQLALCHEMY_DATABASE_URL = "postgresql+psycopg2://username:password@host:port/dbname"


엔진 생성
engine = create_engine(SQLALCHEMY_DATABASE_URL)
세션 생성
SessionLocal = sessionmaker(autocommit=False, autoflush=False, bind=engine)
데이터베이스 베이스 클래스 생성
Base = declarative_base()
def get_db() -> Generator[Session, None, None]:
    db = SessionLocal()
    try:
        yield db
    finally:
        db.close()
models.py : 기획에서 짠 테이블(DB와 매핑)
from sqlalchemy import Column, Integer, String, ForeignKey, TIMESTAMP, Text, Boolean
from sqlalchemy.ext.declarative import declarative_base

Base = declarative_base()

class User(Base):
    __tablename__ = 'user'

    user_id = Column(Integer, primary_key=True)
    kakao_id = Column(String(255), nullable=True)
    nickname = Column(String(100), nullable=True)
    created_at = Column(TIMESTAMP, nullable=True)
    updated_at = Column(TIMESTAMP, nullable=True)
    last_login = Column(TIMESTAMP, nullable=True)
main.py : FastAPI 애플리케이션에서 데이터베이스와 연동하여 테이블을 생성하는 역할
from fastapi import FastAPI
from .database import engine, Base
from .models import *  # 모델을 임포트하여 테이블을 생성하도록 함

# DB 테이블을 생성
Base.metadata.create_all(bind=engine)

from .api.v1 import V1

app = FastAPI()
app.include_router(V1)

@app.get("/")
def read_root():
    return {"DDRAWRY": "This is ddrawry's API server"}
작업들을 마친 후
uvicorn app:app --reload실행을 하면
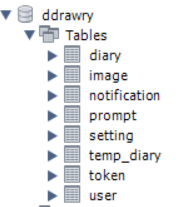
테이블이 잘 적용되어 있습니다.

Upward Developer