안드로이드 With Java #29 PIN 인증 구현하기
개발 환경
- sdk 버전 29
구현 방법
시행착오
A-Z까지 내가 구현하기 보다는 라이브러리를 커스터마이즈해서 구현하기로 하였다. 커스터마이즈할 라이브러리의 선정 기준은 최근까지도 커밋이 되며 업데이트 되고 있는 라이브러리 중 하나로 선정하려고 했고, PFLockScreen이라는 라이브러리를 선택했다.
최신 업데이트가 약 10개월 전이지만, 많은 라이브러리들을 살펴보면 2년전 3년전이 마지막 업데이트인 라이브러리가 허다하다. 아마 PIN 인증이 최근에 잘 안쓰이기도 하고, 직접 만들기도 워낙 간단해서 그런 것 같다.
의존성 설치
// PIN 인증
implementation 'com.github.thealeksandr:PFLockScreen-Android:1.0.0-beta7'
// Android security
implementation 'androidx.security:security-crypto:1.0.0-rc03'
// For Identity Credential APIs
implementation "androidx.security:security-identity-credential:1.0.0-alpha01"
위와 같은 의존성을 설치해주었는데, PIN 인증에 사용하기로 한 라이브러리인 PFLockScreen과 EncryptedSharedPreferences를 제공하는 androidx.security 의존성을 설치하였다.
컨테이너 레이아웃 만들기
먼저, 이 라이브러리를 설치해서 그냥 아무 액티비티에나 fragment 방식으로 올리면, 화면이 보이긴 한다. activity_auth_pincode.xml이라는 레이아웃 파일을 작성하여, fragment를 담을 전용 컨테이너를 만들어주었다.
내용은 별 거 없고, 그냥 LinearLayout 안에 LinearLayout 을 꽉 채웠다.
기본 구동 자바 소스 생성
기본 구동 자바 소스는 매우 간단하다.
Fragment 생성하기
PFLockScreenFragment fragment = new PFLockScreenFragment();위와 같은 방식으로 Fragment를 생성해주면 된다. 타입은 PFLockScreenFragment이다. 생성한 Fragment에 config로 builder의 설정들을 넣어줘야 Fragment가 제대로 생성된다.
기본 Builder 생성하기
기본 빌더 생성은 아래와 같이 메소드 체인 형식으로 여러가지 세팅을 해주면 된다. 세팅에 관한 세부적인 내용은 영어만 할 줄 알면 직관적으로 이해가 되는데, 이해가 안되는 부분이 있다면 공식문서를 참조하면 된다.
builder = new PFFLockScreenConfiguration.Builder(this).
setMode(PFFLockScreenConfiguration.MODE_CREATE)
.setTitle("PIN 번호를 생성해주세요")
.setNewCodeValidation(true)
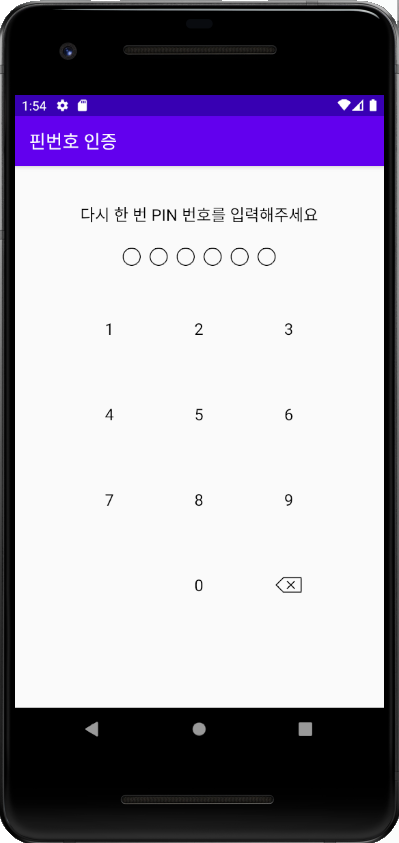
.setNewCodeValidationTitle("다시 한 번 PIN 번호를 입력해주세요")
.setNextButton("다음")
.setUseFingerprint(false)
.setCodeLength(6);Fragment에 Builder 설정 넣기
fragment.setConfiguration(builder.build());위와 같이 setConfiguration에 넣어주면 된다. 나는 이 작업들을 전부 onCreate()에서 했었다.
FragmentManager를 이용한 화면 띄우기
getSupportFragmentManager().beginTransaction().replace(R.id.auth_pincode_container, fragment).commit();위와 같은 소스 하나만 onCreate() 콜백에 박아두면 작동한다.
화면 확인
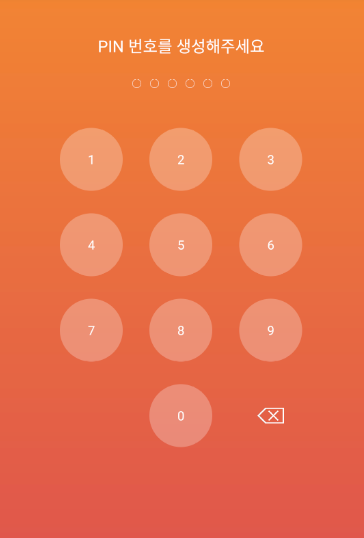
처음 화면은 대략 아래와 같이 생성된다.
디자인을 커스터마이징 할 수 있는데, styles.xml에서 특정 이름의 item을 스타일로 설정해주면 된다. 이것도 물론 공식문서에 나와있다.
나는 styles.xml을 다음과 같이 설정했다.
<resources>
    <!-- Base application theme. -->
    <style name="AppTheme" parent="Theme.AppCompat.Light.DarkActionBar">
        <!-- Customize your theme here. -->
        <item name="colorPrimary">@color/colorPrimary</item>
        <item name="colorPrimaryDark">@color/colorPrimaryDark</item>
        <item name="colorAccent">@color/colorAccent</item>

        <!-- Customized pin auth design. -->
        <item name="pf_lock_screen">@style/PinLockScreenStyle</item>
        <item name="pf_key_button">@style/PinLockButtonStyle</item>
        <item name="pf_code_view">@style/PinLockCodeView</item>
        <item name="pf_delete_button">@style/PinLockDeleteButtonStyle</item>
        <item name="pf_title">@style/PinLockTitleStyle</item>
        <item name="pf_next">@style/PinLockNextButtonStyle</item>
        <item name="pf_hint">@style/PinLockHintStyle</item>
    </style>

    <style name="PinLockScreenStyle">
        <item name="android:background">@android:color/transparent</item>
        <item name="android:foreground">@android:color/transparent</item>
        <item name="android:textColor">@android:color/black</item>
    </style>

    <style name="PinLockButtonStyle">
        <item name="android:textColor">@android:color/black</item>
        <item name="android:textSize">18dp</item>
        <item name="android:foreground">@android:color/transparent</item>
        <item name="android:background">@android:color/transparent</item>
    </style>

    <style name="PinLockDeleteButtonStyle">
        <item name="android:src">@drawable/pin_delete_button</item>
    </style>

    <style name="PinLockCodeView">
        <item name="android:button">@drawable/pin_selector</item>
    </style>

    <style name="PinLockTitleStyle">
        <item name="android:textColor">@android:color/black</item>
    </style>

    <style name="PinLockNextButtonStyle">
        <item name="android:textColor">@android:color/black</item>
        <item name="android:textSize">23dp</item>
        <item name="android:background">@android:color/transparent</item>
        <item name="android:layout_margin">0dp</item>
    </style>

    <style name="PinLockHintStyle">
        <item name="android:textColor">@android:color/black</item>
    </style>

</resources>
결과 및 소스
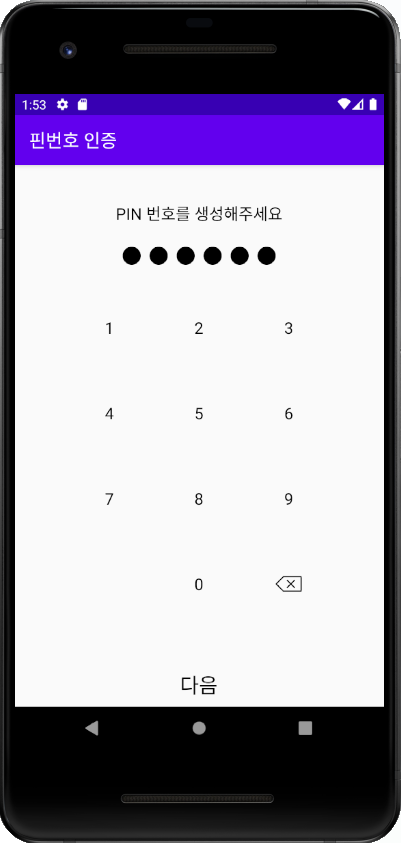
처음 PIN 인증을 켰을 때
- PIN을 설정하라고 화면이 나온다.
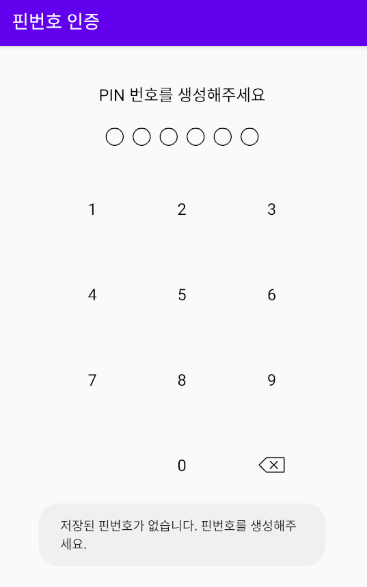
- PIN을 입력하면 다음 버튼이 생긴다.
- PIN을 재확인한다.
- 앱의 메인으로 이동하며, PIN이 생성되었다는 메시지를 송출한다.

PIN 번호가 있는 상태에서 PIN 인증을 할 때
PIN 번호가 틀렸을 때

휴대폰에서 진동이 울리며 핀번호 인증에 실패하였다는 메세지가 나온다.
PIN 번호가 맞았을 때

PIN번호 인증이 성공했을 때의 액티비티로 이동하며, 핀번호 인증에 성공하였다는 메세지를 송출한다.
전체 Java 소스
import android.content.Context;
import android.content.SharedPreferences;
import android.os.Bundle;
import android.util.Log;
import android.view.View;
import android.widget.Toast;

import androidx.annotation.Nullable;
import androidx.appcompat.app.AppCompatActivity;
import androidx.lifecycle.Observer;
import androidx.security.crypto.EncryptedSharedPreferences;
import androidx.security.crypto.MasterKeys;

import com.beautycoder.pflockscreen.PFFLockScreenConfiguration;
import com.beautycoder.pflockscreen.fragments.PFLockScreenFragment;
import com.beautycoder.pflockscreen.security.PFResult;
import com.beautycoder.pflockscreen.security.PFSecurityManager;
import com.beautycoder.pflockscreen.security.callbacks.PFPinCodeHelperCallback;
import com.beautycoder.pflockscreen.viewmodels.PFPinCodeViewModel;

import java.io.IOException;
import java.security.GeneralSecurityException;

public class AuthPincodeActivity extends AppCompatActivity {
    String masterKeyAlias;
    SharedPreferences sharedPreferences;
    SharedPreferences.Editor editor;
    PFLockScreenFragment fragment;
    PFFLockScreenConfiguration.Builder builder;
    Context context;
    Boolean isPinExist;

    @Override
    protected void onCreate(@Nullable Bundle savedInstanceState) {
        super.onCreate(savedInstanceState);
        setContentView(R.layout.activity_auth_pincode );
        context = this;
        showLockScreenFragment();
    }

    private void showLockScreenFragment(boolean isPinExist) {

        try {
            masterKeyAlias = MasterKeys.getOrCreate(MasterKeys.AES256_GCM_SPEC);
            sharedPreferences = EncryptedSharedPreferences.create(
                    "secret",
                    masterKeyAlias,
                    this,
                    EncryptedSharedPreferences.PrefKeyEncryptionScheme.AES256_SIV,
                    EncryptedSharedPreferences.PrefValueEncryptionScheme.AES256_GCM
            );

        } catch (GeneralSecurityException e) {
            e.printStackTrace();
        } catch (IOException e) {
            e.printStackTrace();
        }

        editor = sharedPreferences.edit();
        fragment = new PFLockScreenFragment();

        if(isPinExist && !sharedPreferences.getString("encoded_pin_code", "").equals("")) {
            fragment.setEncodedPinCode(sharedPreferences.getString("encoded_pin_code", ""));
            builder = new PFFLockScreenConfiguration.Builder(this).
                    setMode(PFFLockScreenConfiguration.MODE_AUTH)
                    .setTitle("PIN 번호를 인증해주세요")
                    .setLeftButton("취소")
                    .setNextButton("다음")
                    .setCodeLength(6);
        }else {
            Log.d("encoded_pin_code","저장된 핀코드 확인 ...");
            Toast.makeText(getApplicationContext(), "저장된 핀번호가 없습니다. 핀번호를 생성해주세요.", Toast.LENGTH_LONG).show();
            builder = new PFFLockScreenConfiguration.Builder(this).
                    setMode(PFFLockScreenConfiguration.MODE_CREATE)
                    .setTitle("PIN 번호를 생성해주세요")
                    .setNewCodeValidation(true)
                    .setNewCodeValidationTitle("다시 한 번 PIN 번호를 입력해주세요")
                    .setNextButton("다음")
                    .setUseFingerprint(false)
                    .setCodeLength(6);
        }

        fragment.setConfiguration(builder.build());
        fragment.setOnLeftButtonClickListener(new View.OnClickListener() {
            @Override
            public void onClick(View view) {
                Toast.makeText(getApplicationContext(), "핀번호가 초기화되었습니다.", Toast.LENGTH_LONG);

                /*
                * 테스트용 핀번호 초기화 코드
                * */
                PFSecurityManager.getInstance().getPinCodeHelper().delete(new PFPinCodeHelperCallback<Boolean>() {
                    @Override
                    public void onResult(PFResult<Boolean> result) {
                        Log.d("encoded_pin_code", "코드 삭제 결과" + result.getResult());

                    }
                });
                // getSupportFragmentManager().beginTransaction().remove(fragment).commit();
                finish();
            }
        });

        fragment.setLoginListener(new PFLockScreenFragment.OnPFLockScreenLoginListener() {
            @Override
            public void onCodeInputSuccessful() {
                Log.d("encoded_pin_code", "인증 성공");
                Toast.makeText(context, "핀번호 인증에 성공하였습니다.", Toast.LENGTH_LONG).show();
                finish();
            }

            @Override
            public void onFingerprintSuccessful() {
                Log.d("encoded_pin_code", "지문 인증 성공");
            }

            @Override
            public void onPinLoginFailed() {
                Log.d("encoded_pin_code", "핀 인증 실패");
                Toast.makeText(getApplicationContext(), "핀번호 인증에 실패하였습니다.", Toast.LENGTH_LONG).show();
            }

            @Override
            public void onFingerprintLoginFailed() {
                Log.d("encoded_pin_code", "지문 인증 실패");
            }
        });

        fragment.setCodeCreateListener(new PFLockScreenFragment.OnPFLockScreenCodeCreateListener() {
            @Override
            public void onCodeCreated(String encodedCode) {
                editor.putString("encoded_pin_code", encodedCode);
                editor.commit();
                Log.d("encoded_pin_code", "핀 번호 생성 완료 : " + encodedCode);
                Toast.makeText(getApplicationContext(), "핀번호가 생성되었습니다.", Toast.LENGTH_LONG).show();
                finish();
            }

            @Override
            public void onNewCodeValidationFailed() {
                Toast.makeText(getApplicationContext(), "핀번호를 이전과 똑같이 입력해주세요.", Toast.LENGTH_LONG).show();
            }
        });


        getSupportFragmentManager().beginTransaction().replace(R.id.auth_pincode_container, fragment).commit();
    }

    private void showLockScreenFragment() {
        new PFPinCodeViewModel().isPinCodeEncryptionKeyExist().observe(this,
                new Observer<PFResult<Boolean>>() {
                    @Override
                    public void onChanged(PFResult<Boolean> result) {
                        Log.d("encoded_pin_code", "on Changed");

                        if (result == null) {
                            return;
                        }
                        if(result.getError() != null) {
                            Toast.makeText(AuthPincodeActivity.this, "핀 정보를 가져올 수 없습니다.", Toast.LENGTH_SHORT).show();
                            return;
                        }
                        showLockScreenFragment(result.getResult());
                    }
                });
    }
}
개발 단계의 코드라 로그 메세지 송출 등이 많다.