안드로이드 With Java #28 지문인식 구현하기
개발 환경
- sdk 버전 29
구현 방법
시행착오
처음에는 구글에 대충 '안드로이드 지문인식 구현' 이렇게 치고 블로그 보고 따라하려고 했는데, 블로그에는 생각보다 옛날 자료가 너무 많았다.
블로그에서 본 것처럼 FingerprintManager 클래스를 이용하려고 하니 deprecated되었다고 해서 공식문서를 뒤져보았다.
여기에 구현방법이 있다.
이제는 지문인식용 클래스를 따로 빼는 게 아니라 생체정보 인증 자체를 하나의 클래스로 묶어서 다루려고 하는 것 같다.
그래서 BIOMETRIC이라는 키워드 자체로 묶였다.
Manifest 권한 추가하기
먼저, 내 앱에 생체인증을 할 수 있는 권한을 주자
<!-- 지문 인식 권한 -->
<uses-permission android:name="android.permission.USE_BIOMETRIC" />
위의 권한을 추가하면 된다.
dependency 추가하기
implementation 'androidx.biometric:biometric:1.0.1'위와 같이 androidx.biometric 을 추가해주면 된다.
지문인식에 이용할 Activity Layout 구성하기
<?xml version="1.0" encoding="utf-8"?>
<LinearLayout
    xmlns:android="http://schemas.android.com/apk/res/android"
    android:layout_width="match_parent"
    android:layout_height="match_parent"
    android:gravity="center">

    <Button
        android:layout_width="wrap_content"
        android:layout_height="wrap_content"
        android:padding="20dp"
        android:text="지문 인증하기"
        android:textSize="30dp"
        android:gravity="center"
        android:id="@+id/buttonAuthWithFingerprint"
        />

</LinearLayout>
위와 같이 구성했다.
지문인식에 이용할 Activity 구성하기
import android.os.Bundle;
import android.view.View;
import android.widget.Button;
import android.widget.Toast;

import androidx.annotation.NonNull;
import androidx.annotation.Nullable;
import androidx.appcompat.app.AppCompatActivity;
import androidx.biometric.BiometricPrompt;
import androidx.core.content.ContextCompat;

import java.util.concurrent.Executor;

public class AuthFingerprintActivity extends AppCompatActivity {

    private Executor executor;
    private BiometricPrompt biometricPrompt;
    private BiometricPrompt.PromptInfo promptInfo;

    @Override
    protected void onCreate(@Nullable Bundle savedInstanceState) {
        super.onCreate(savedInstanceState);
        setContentView(R.layout.activity_auth_fingerprint );


        executor = ContextCompat.getMainExecutor(this);
        biometricPrompt = new BiometricPrompt(this,
                executor, new BiometricPrompt.AuthenticationCallback() {
            @Override
            public void onAuthenticationError(int errorCode,
                                              @NonNull CharSequence errString) {
                super.onAuthenticationError(errorCode, errString);
                Toast.makeText(getApplicationContext(),
                        R.string.auth_error_message, Toast.LENGTH_SHORT)
                        .show();
            }

            @Override
            public void onAuthenticationSucceeded(
                    @NonNull BiometricPrompt.AuthenticationResult result) {
                super.onAuthenticationSucceeded(result);
                Toast.makeText(getApplicationContext(),
                        R.string.auth_success_message, Toast.LENGTH_SHORT).show();
            }

            @Override
            public void onAuthenticationFailed() {
                super.onAuthenticationFailed();
                Toast.makeText(getApplicationContext(), R.string.auth_fail_message,
                        Toast.LENGTH_SHORT)
                        .show();
            }
        });

        promptInfo = new BiometricPrompt.PromptInfo.Builder()
                .setTitle("지문 인증")
                .setSubtitle("기기에 등록된 지문을 이용하여 지문을 인증해주세요.")
                .setNegativeButtonText("취소")
                .setDeviceCredentialAllowed(false)
                .build();

        //  사용자가 다른 인증을 이용하길 원할 때 추가하기

        Button biometricLoginButton = findViewById(R.id.buttonAuthWithFingerprint);
        biometricLoginButton.setOnClickListener(new View.OnClickListener() {
            @Override
            public void onClick(View view) {
                biometricPrompt.authenticate(promptInfo);
            }
        });

    }
}
이건 뭐 그냥 공식문서 복붙하면 된다.
프롬프트를 빌드할 때 사용되는 세부적인 옵션들은 여기에 있다.
결과
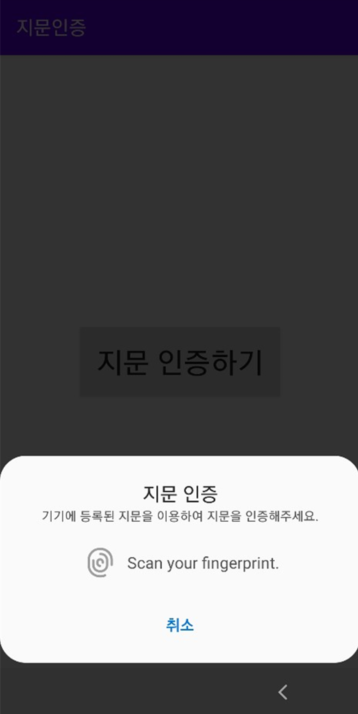
잘 된다.

풀스택 웹개발자로 일하고 있는 Jake Seo입니다. 주로 Jake Seo라는 닉네임을 많이 씁니다. 프론트엔드: Javascript, React 백엔드: Spring Framework에 관심이 있습니다.
좋은정보 감사합니다. 도움되었습니다. :)