[Swift] 코드로 UI 구현하기

StoryBoard없이 코드로 Initial ViewController 구현하기
에서
1. 프로젝트를 생성하고,
2. MainViewController를 만들고,
3. SceneDelegate에서 UIWindow객체를 생성한 후 MainViewController를 window의 rootViewController로 지정했습니다.
잠깐, 저번에 시뮬레이터 실행 시 검은 화면이 나오는 것 까지는 확인 했는데요.
view의 backgroundColor를 흰색으로 하면 흰 배경으로 나옵니다.
//
//  MainViewController.swift
//  NewsApp
//
//  Created by 장일규 on 2022/01/08.
//

import UIKit

class MainViewController: UIViewController {

    override func viewDidLoad() {
        super.viewDidLoad()
        view.backgroundColor = .white
    }

}
MainViewController.swift에 코드로 UILabel UI구현
자!!!!!!!!!!!!!!!!! 그럼 이번에는 코드로 UI를 만들어 보고자 합니다.
//
//  MainViewController.swift
//  NewsApp
//
//  Created by 장일규 on 2022/01/08.
//

import UIKit

class MainViewController: UIViewController {

    let homeLabel: UILabel = {
        let lb = UILabel()
        lb.text = "Home"
        lb.textAlignment = .center
        lb.font = .systemFont(ofSize: 30)
        lb.textColor = .black
        lb.backgroundColor = .red

        return lb
    }()

    override func viewDidLoad() {
        super.viewDidLoad()

        setup()
        mainLabelConstraints()
    }

    func setup() {
        view.backgroundColor = .white
        addViews()
    }

    func addViews() {
        view.addSubview(homeLabel)
    }

    func mainLabelConstraints() {
        homeLabel.translatesAutoresizingMaskIntoConstraints = false // 오토리사이징x -> 코드로 작성하기 위해서 자동으로
        homeLabel.widthAnchor.constraint(equalToConstant: 125).isActive = true //너비
        homeLabel.heightAnchor.constraint(equalToConstant: 50).isActive = true // 높이
        homeLabel.leadingAnchor.constraint(equalTo: view.leadingAnchor).isActive = true
        homeLabel.topAnchor.constraint(equalTo: view.safeAreaLayoutGuide.topAnchor, constant: 20).isActive = true
    }

}
위에 코드는 전체 코드이고 하나씩 뜯어 보겠습니다.~~
1. UILabel 코드로 만들기
let mainView = UIView() 이런식으로 객체 생성하고 해도 되지만, 클로저인 즉시 실행 함수를 만들면 해당 UI에 역할에 대한 여러가지 세팅들을 할 수 있습니다.
    let homeLabel: UILabel = {
        let lb = UILabel()
        lb.text = "Home"
        lb.textAlignment = .center
        lb.font = .systemFont(ofSize: 30)
        lb.textColor = .black
        lb.backgroundColor = .red

        return lb
    }()
lb라는 UILabel객체를 만들었습니다.
그 후에, ....
2. viewDidLoad()
setup()과 mainLabelConstraints()함수를 호출합니다.
    override func viewDidLoad() {
        super.viewDidLoad()

        setup()
        homeLabelConstraints()
    }
3. setup()
view의 backgroundColor컬러를 흰색으로 설정하고, addViews()함수를 호출합니다.
    func setup() {
        view.backgroundColor = .white
        addViews()
    }
4. addView()
addView함수에서는 자식뷰로 추가해줍니다.
func addViews() {
view.addSubview(homeLabel)
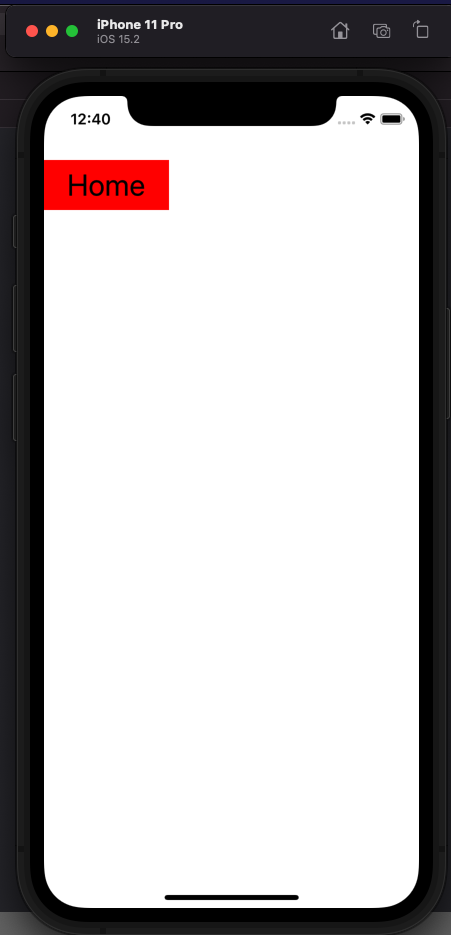
}5. homeLabelConstraints()
homeLabelConstraints함수에서는 뷰에 대한 너비,높이,x축,y축에 대한 속성을 설정해줍니다.
    func homeLabelConstraints() {
        homeLabel.translatesAutoresizingMaskIntoConstraints = false // 오토리사이징x -> 코드로 작성하기 위해서 자동으로
        homeLabel.widthAnchor.constraint(equalToConstant: 125).isActive = true //너비
        homeLabel.heightAnchor.constraint(equalToConstant: 50).isActive = true // 높이
        homeLabel.leadingAnchor.constraint(equalTo: view.leadingAnchor).isActive = true
        homeLabel.topAnchor.constraint(equalTo: view.safeAreaLayoutGuide.topAnchor, constant: 20).isActive = true
    }