-
Yolo는 워싱턴대의 Joseph Redmon등이 주축이 되서 만든 알고리즘으로 Darknet이라는 C 기반의 딥러닝 프레임에서 만듬 (Darknet은 Tensorflow와 같은 딥러닝 프레임웍)
-
이후 Joseph Redmon 이 더이상 computer vision연구를 하지 않겠다고 선언한뒤 Yolo의 후속 버전은 계속 다른 사람들이 연구하게 됨
-
Yolo v4는 이후 Alexey Bochkoviskiy가 구현했는데, 얼마되지 않아서 glenn jocher가 Ultralytics 라는 개인 스타트업을 만들고 다시 Yolo v5를 내놓음
< 진행 절차 >
1. MS COCO Dataset으로 사전학습된 Yolov11 모델 Prediction 기능이용 시 예측에 사용할 이미지 준비
2. Colab 으로 데이터셋 업로드
3. ultralytics 패키지 설치하기
pip install ultralytics- 모델 선언 후 학습하기
from ultralytics import YOLO
model = YOLO('yolo11n.pt')
model.train(data='coco8.yaml', epochs=10, imgsz=640)- 예측하기
results = model.predict('test_image.jpg')1. 라이브러리 설치 및 가져오기
# 필요 라이브러리 설치
!pip install -q ultralytics
# 필요 라이브러리 가져오기
import ultralytics
ultralytics.checks()2. 데이터셋 가져오기
- 구글 드라이브에 test_image_dir.zip 파일을 업로드한 후 다운로드
- 다운로드한 압축 파일을 같은 이름의 폴더 하위에 압축 해제
# 테스트 데이터 다운로드하기 : test_image_dir.zip
!gdown 1WYogZUiINXsjGNFO9hCj0thW2HGTP-tM

# 압축 파일 해제하기 : test_image_dir 폴더 하위에
!unzip -qq 'test_image_dir' -d test_image_dir
2-1. 테스트 이미지 나타내기
# 테스트 이미지 1개 나타내기
from PIL import Image
from IPython.display import display
import os

with Image.open('/content/test_image_dir/test1.jpg') as test_image:
    display(test_image)  # display 함수를 사용해 이미지를 출력합니다.
# 테스트 이미지 모두 나타내기
image_dir = '/content/test_image_dir'

for file_name in os.listdir(image_dir):
    file_path = os.path.join(image_dir, file_name)
    # 파일 확장자가 .jpg인 경우에만 처리
    if file_path.endswith('.jpg'):
        with Image.open(file_path) as img:
            display(img)
3. 객체 감지하기(Detection)
3-1.모델 가져오기
# 모델 가져오기
from ultralytics import YOLO
model = YOLO('yolo11n.pt')
# coco8.yaml 로 학습시키기
model.train(data='coco8.yaml', epochs=10)모델이 학습한 클래스 이름 확인해보기
model.names
print(type(model.names), len(model.names))
print(model.names)
3-2. 예측하기
test image로 객체 검출하기(prediction)
results = model.predict(source='/content/test_image_dir/*.jpg', save=True)3-3.test image 객체 검출 결과 내용 및 이미지 출력
- 테스트한 이미지 중 첫번째 이미지의 예측 결과 나타내기
# 예
import numpy as np

# 예시 클래스 인덱스 배열
cls_indices = np.array([0, 1, 0, 1, 2, 0])

# np.unique 사용, return_counts=True
unique_classes, counts = np.unique(cls_indices, return_counts=True)

print("Unique Classes:", unique_classes)
print("Counts:", counts) # return_counts=True 지정 시 빈도 수 알 수 있음- 결과:
Unique Classes: [0 1 2]
Counts: [3 2 1]
results[0].boxes.cls.cpu().numpy()를 통해 GPU 텐서를 CPU의 NumPy 배열로 변환한다.
np.unique에 return_counts=True를 주어 고유한 클래스 번호와 각 클래스별 탐지 개수를 구한다.
uniq_cnt_dict에 {클래스번호: 탐지개수} 형태로 저장
- for 문에서 각 탐지된 객체에 대해
- 클래스 번호 → 정수 변환
- 클래스 이름(예: person, car 등) 추출
- 해당 객체의 신뢰도(확률) 추출
import numpy as np

# 객체의 종류를 나타내는 고유값이 result.boxes.cls에 저장되어 있음 (PyTorch 텐서 형식으로)
# uniq : 고유한 클래스 인덱스 , cnt : 각 클래스의 개수
uniq, cnt = np.unique(results[0].boxes.cls.cpu().numpy(), return_counts=True) # Torch.Tensor => numpy 로 변환
uniq_cnt_dict = dict(zip(uniq, cnt))

# Yolov11모델을 그대로 사용해서 MS COCO Dataset에서 정의한 0~79값이 기본적으로 사용됨
print(f'\nclass num : counts = , {uniq_cnt_dict}')

for i, c in enumerate(results[0].boxes.cls):

    class_id = int(c)
    class_name = results[0].names[class_id]  # 예측 클래스 이름

    confidence_score = results[0].boxes.conf[i]  # 예측 확률
    print(f'class num: {class_id}, class name: {class_name :<12}, confidence: {confidence_score:.2f}')

# 이미지 파일을 엽니다.
with Image.open('/content/runs/detect/train22/test1.jpg') as pred_image:
    display(pred_image)  # display 함수를 사용해 이미지를 출력합니다.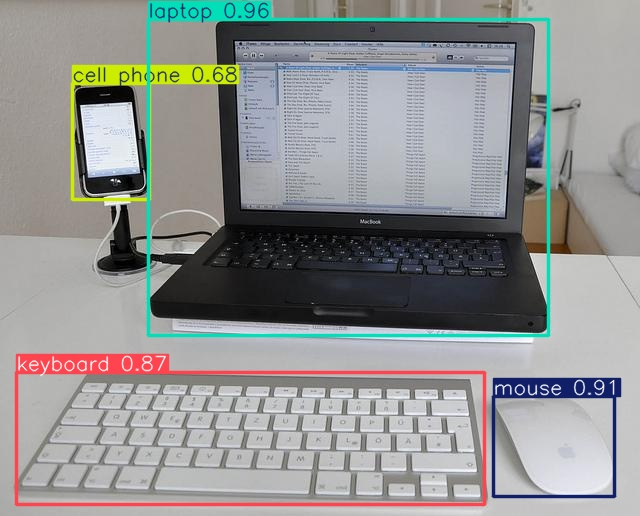
테스트 이미지 모두 예측 결과 나타내기
# results 에 있는 사항을 반복문을 사용하여 다음 출력과 같이 나오도록 합니다.
import numpy as np

for idx, result in enumerate(results[:4]):  # 처음 4개 이미지 결과 반복
    uniq, cnt = np.unique(result.boxes.cls.cpu().numpy(), return_counts=True)
    uniq_cnt_dict = dict(zip(uniq, cnt))
    print(f"\n[Image {idx+1}] {{class num:counts}} = {uniq_cnt_dict}\n")

    for i, c in enumerate(result.boxes.cls):
        class_id = int(c)
        class_name = result.names[class_id]
        confidence = result.boxes.conf[i].item()
        print(f"class num: {class_id} , class name: {class_name:<12} , confidence: {confidence:.2f}")
테스트 이미지 모두 예측 결과 이미지로 나타내기
# 이미지가 저장된 폴더 경로
image_dir = '/content/runs/detect/train22'

# 폴더 내의 모든 파일을 순회
for file_name in os.listdir(image_dir):
    file_path = os.path.join(image_dir, file_name)
    # 파일 확장자가 .jpg인 경우에만 처리
    if file_path.endswith('.jpg'):
        with Image.open(file_path) as img:
            display(img)
짱아의 개발 일지