
이번 스프린트는 react를 통해 유튜브 웹앱을 구현해 보는 스프린트입니다. 기다리고 기다리던 리액트를 접하고 직접 사용해보는 시간을 가졌습니다.스프린트를 기반으로 리액트에서 중요한 개념도 같이 설명해 나가는 포스팅을 하겠습니다.
최하위 컴포넌트에서 최상위 컴포넌트까지의 구조를 먼저 파악 한 뒤 그에 따라 상태의 유무와 상태가 있어야하는 이유를 설명 하겠습니다.
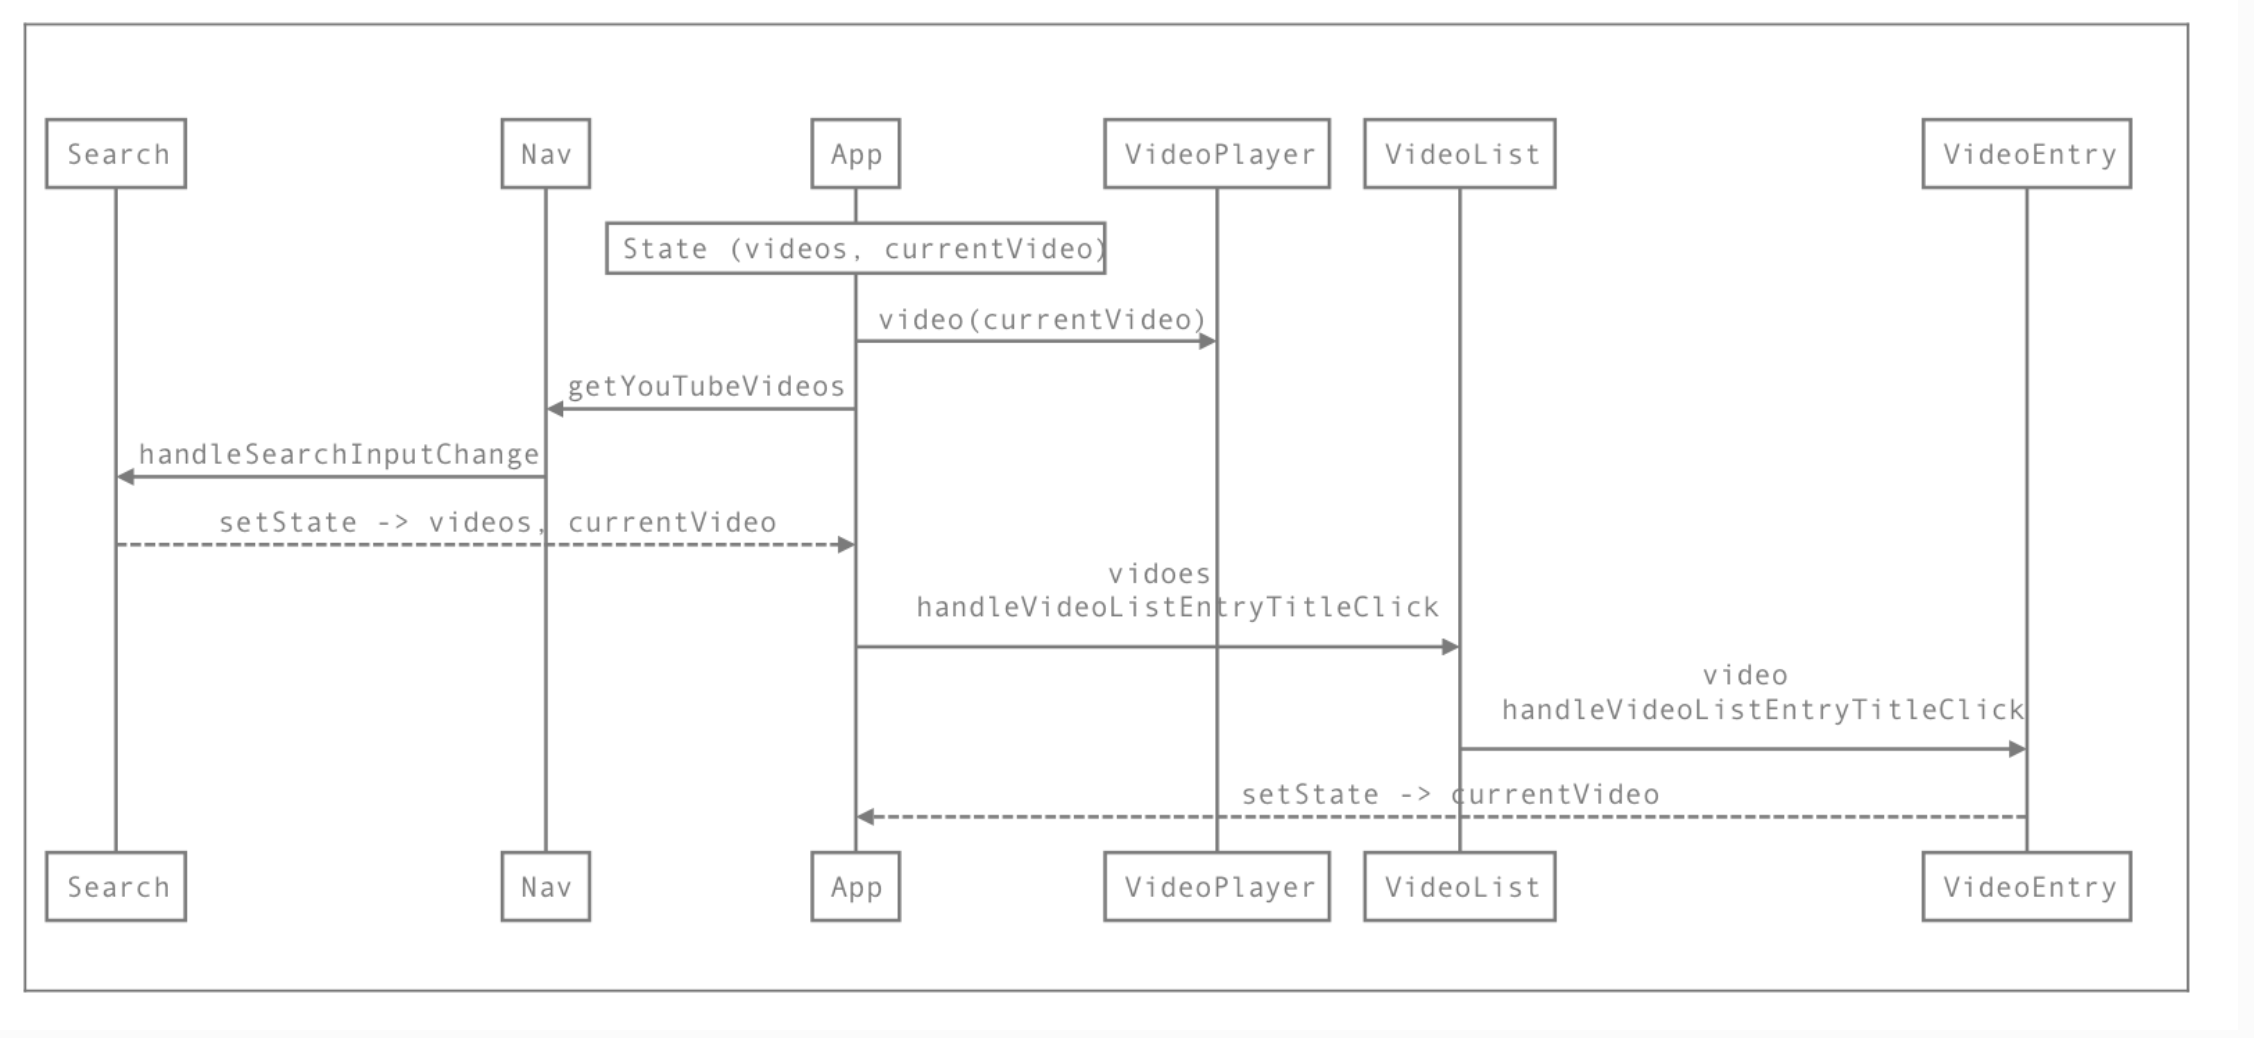
위를 그림을 보아 App이 최상위 컴포넌트, 최하위 컴포넌트는 search,videoEntry로 알 수 있습니다. Nav는 search 컴포넌트에게 props로 전달만 해주면 되는 역할임을 알 수 있고 videoList또한 VideoEntry에게 props로 전달하면 됩니다.
여기서 search와 videoEntry를 통해 상태 변경을 해주기 위해서 최상위 컨테이너인 App에 상태 변경 함수를 만들어 주어 해결합니다.
//App.js (최상위 컨테이너)

import React from "react";
import Nav from "./Nav";
import VideoPlayer from "./VideoPlayer";
import VideoList from "./VideoList";
import { YOUTUBE_API_KEY } from "../../config/youtube";
import { fakeData } from "./__test__/fakeData";
import { searchYouTube } from "../searchYouTube";
// import AddList from "./AddList";
//import AddList from "./AddList";

class App extends React.Component {
  constructor(props) {
    super(props);
    this.state = {
      curVideo: fakeData[0],
      videos: fakeData,
    };

    this.handleClick = this.handleClick.bind(this);
    this.handleTitle = this.handleTitle.bind(this);
  }

  // fetch -> 화면이 렌더 된 후에 유튜브 데이터를 불러 옵니다.
  componentDidMount() {
    searchYouTube({ query: "노래", max: 5, key: YOUTUBE_API_KEY }, (items) => {
      this.setState({
        curVideo: items[0],
        videos: items,
      });
    });
  }

  handleClick(string) {
    searchYouTube({ query: string, max: 5, key: YOUTUBE_API_KEY }, (items) => {
      this.setState({
        curVideo: items[0],
        videos: items,
      });
    });
  }

  handleTitle(video) {
    this.setState({
      curVideo: video,
    });
  }

  render() {
    return (
      <div>
        <Nav handleClick={this.handleClick} />
        <div className="col-md-7">
          <VideoPlayer video={this.state.curVideo} />
        </div>
        <div className="col-md-7">
          <VideoList
            videos={this.state.videos}
            handleTitle={this.handleTitle}
          />
        </div>
      </div>
    );
  }
}

export default App;
// VideoListEntry.js

import React from "react";

const VideoListEntry = (props) => (
  // console.log(props)
  <div className="video-list-entry">
    <div className="media-left media-middle">
      <img
        className="media-object"
        src={props.video.snippet.thumbnails.default.url}
        alt=""
      />
    </div>
    <div className="media-body">
      <div
        className="video-list-entry-title"
        onClick={() => props.handleTitle(props.video)}
      >
        {props.video.snippet.title}
      </div>
      <div className="video-list-entry-detail">
        {props.video.snippet.description}
      </div>
      <div>
        <button id="addButton">watch later</button>
      </div>
    </div>
  </div>
);

export default VideoListEntry;
// VideoList.js

import React from "react";
import VideoListEntry from "./VideoListEntry";

const VideoList = (props) => (
  <div className="video-list media">
    {props.videos.map((video) => (
      <VideoListEntry
        handleTitle={props.handleTitle}
        video={video}
        key={video.etag}
      />
    ))}
  </div>
);

export default VideoList;
// Nav.js

import React from "react";
import Search from "./Search";

const Nav = (props) => (
  <nav className="navbar">
    <div className="col-md-6 col-md-offset-3">
      <Search handleClick={props.handleClick} />
    </div>
  </nav>
);

export default Nav;
// Search.js

import React from "react";
// import { searchYouTube } from "../searchYouTube";
// import { YOUTUBE_API_KEY } from "../../config/youtube.js";

const Search = (props) => (
  // console.log(props)
  <div className="search-bar form-inline">
    <input className="form-control" type="text" />
    <button
      className="btn hidden-sm-down"
      onClick={() =>
        props.handleClick(document.querySelector(".form-control").value)
      }
    >
      <span className="glyphicon glyphicon-search"></span>
    </button>
  </div>
);

export default Search;
어제보다 오늘 더 노력하는 프론트엔드 개발자