
안녕하세요 단테입니다.
Next.js13 Master Course에 오신 여러분 환영합니다.
오늘은 아래 내용에 대해 이야기합니다.

이전 강의인 동적/정적 렌더링에서 데이터 패칭에서 revalidate 옵션을 이용해 동적 렌더링과 정적 렌더링을 변경하여 앱을 작성하는 방법을 배워봤습니다.
오늘은 데이터 패칭에 좀 더 집중하여 공부해보겠습니다.
Data Fetching
Next.js 13 app directory 이전 버전인 page directory와 비교해 컴포넌트 내부에서 데이터 패칭을 할 수 있다는 큰 차이점이 있습니다.
아래에서 보여드리는 코드는 단순 예제 코드이며 우리가 작성중인 앱의 코드와는 관계가 없습니다.
Pages Directory
import Link from 'next/link'

export default function PostsPage({postsData}) {
  // Return the JSX for rendering the posts list
  return (
    <div>
      <h1>Posts</h1>
      <ul>
        {postsData.map(post => (
          <li key={post.id}>
            <Link href={`/posts/${post.id}`}>
              <a>
                <h2>{post.title}</h2>
                <p>{post.body}</p>
              </a>
            </Link>
          </li>
        ))}
      </ul>
    </div>
  )
}

// Define the getStaticProps function to fetch the data at build time
export async function getStaticProps() {
  // Fetch the posts data from the API
  const posts = await fetch('https://jsonplaceholder.typicode.com/posts')
  // Convert the response to JSON
  const postsData = await posts.json()
  // Return the data as props
  return {
    props: {
      postsData
    }
  }
}
위에서 보듯이 페이지 레벨로 api를 호출하기 위해서는 getStaticProps와 같이 nextjs에서 이미 정해놓은 함수를 호출해야 합니다. 예제 코드에서는getStaticProps 를 사용해 정적 렌더링을 구현하고 있습니다.
App Directory
import {use} from 'react'
import {useRouter} from 'next/router'

export default function PostsPage() {
  // Fetch the posts data from the API
  const posts = await fetch('https://jsonplaceholder.typicode.com/posts')
  // Convert the response to JSON
  const postsData = await posts.json()
  // Get the router instance
  const router = useRouter()
  // Define a function to handle clicking on a post
  const handleClick = (id) => {
    // Navigate to the post detail page using the router
    router.push(`/posts/${id}`)
  }
  // Return the JSX for rendering the posts list
  return (
    <div>
      <h1>Posts</h1>
      <ul>
        {postsData.map(post => (
          <li key={post.id} onClick={() => handleClick(post.id)}>
            <h2>{post.title}</h2>
            <p>{post.body}</p>
          </li>
        ))}
      </ul>
    </div>
  )
}
그와 반대로 Next.js13 app directory에서는 서버 컴포넌트를 사용하기 때문에 컴포넌트 내부에서 바로 데이터 패칭 함수를 호출합니다. 별도로 정의해둔 getServerSideProps, getStaticProps 같은 함수를 사용하지 않아도 손쉽게 데이터 패칭을 할 수 있습니다.
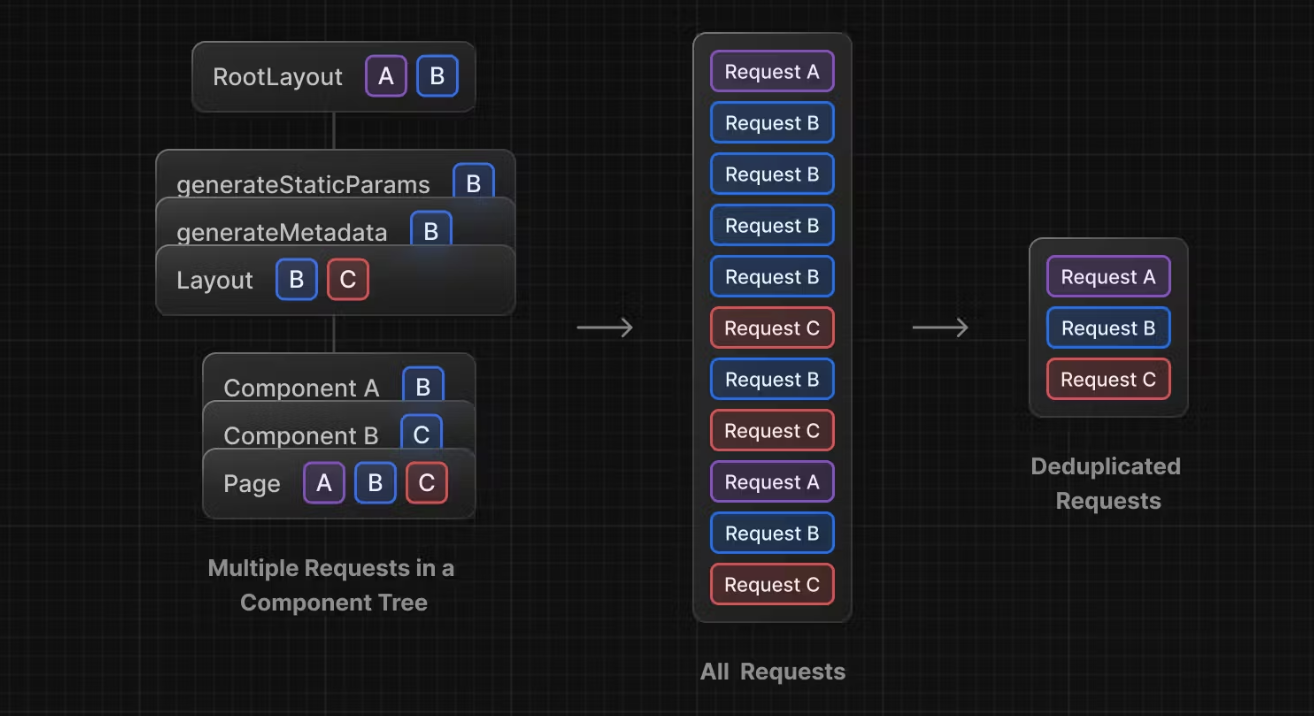
자동 중복 호출 제거
서버 컴포넌트 단위로 api를 호출할 때 각 컴포넌트에서 데이터패칭이 선언되는 횟수 만큼 네트워크 리퀘스트가 중복으로 호출될 수 있지 않을까에 대한 부분입니다.
app directory에서는 이렇게 컴포넌트 별로 선언된 여러 개의 데이터 패칭의 중복 코드를 자동으로 줄여주어 네트워크 호출이 낭비되지 않게 해줍니다. 이러한 기능은 동일한 인자와 동일한 url을 사용한 데이터 패칭의 경우 적용됩니다.
use / suspense
이전에 작성했던 post 페이지를 좀더 작은 단위의 서버 컴포넌트들로 쪼개어 작성해보겠습니다.
app/api/post/post.d.ts
type Post = {
  id: number
  title: string
  content: string
  author: string
  date: string
  comments: Array<{ id: number; text: string; author: string }>
  time: string
}
우리가 작성할 post 폴더 하위 디렉토리의 모습입니다.

app/post/post.tsx
새롭게 작성할 post 컴포넌트입니다.
export type PostProps = {
  postPromise: Promise<Post[]>
}

export const Post = async ({ postPromise }: PostProps) => {
  const posts = await postPromise

  return (
    <>
      {posts.map((post) => (
        <div key={post.id} className="bg-white p-4 rounded shadow mb-4">
          <h2 className="text-2xl font-bold mb-2">{post.title}</h2>
          <p className="text-gray-600 mb-2">
            By {post.author} | {post.date}
          </p>
          <p className="mb-4">{post.content}</p>
          <div className="bg-gray-100 p-2 rounded">
            {post.comments.map((comment, idx) => (
              <div
                key={comment.id}
                className="mb-2"
              >
                <p className="text-gray-600 mb-1">{comment.author}</p>
                <p>{comment.text}</p>
                <div>{post.time}</div>
              </div>
            ))}
          </div>
        </div>
      ))}
    </>
  )
}
코드를 좀 살펴보겠습니다.
먼저 Post props인 postPromise를 봅시다.
export type PostProps = {
  postPromise: Promise<Post[]>
}
보통 컴포넌트 내부에서 데이터 패칭을 하거나 상위 컴포넌트에서 데이터를 패칭한 이후 Promise 타입이 아닌 Post[] 타입만 props로 전달하지만
서버 컴포넌트인 Post에서는 postPromise라는 Promise 타입을 props로 전달하고 있습니다.
이 컴포넌트를 사용하는 page.tsx를 살펴보겠습니다.
app/post/page.tsx
import { Suspense } from "react"
import { getPosts } from "../lib/get-posts"
import LoadingSkeleton from "../ui/LoadingSkeleton"
import { Post } from "./post"
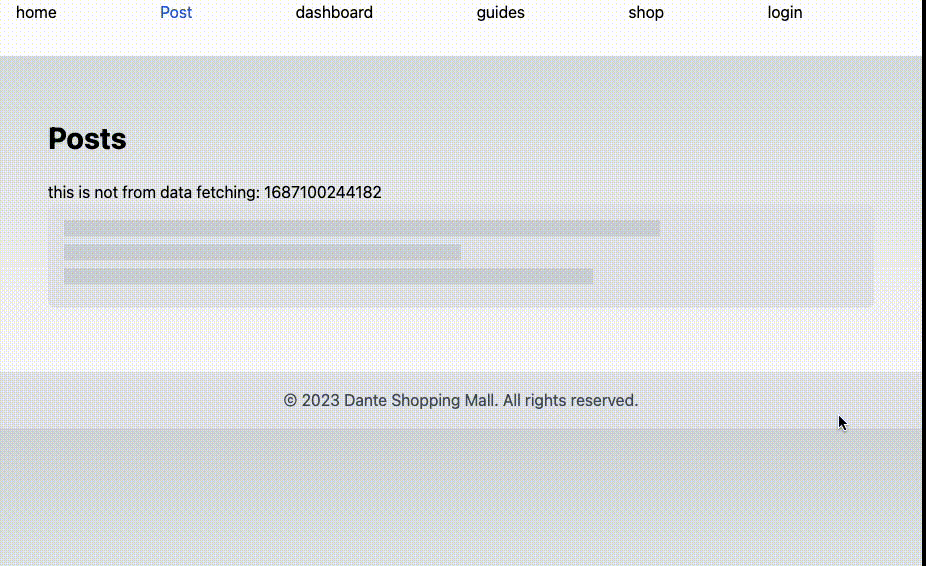
export default function PostPage() {
const posts = getPosts()
return (
<div className="container mx-auto py-8">
<h1 className="text-3xl font-bold mb-6">Posts</h1>
<div>
this is not from data fetching: {new Date().getTime().toString()}
</div>
<Suspense fallback={<LoadingSkeleton />}>
<Post postPromise={posts} />
</Suspense>
</div>
)
}이 중 Suspense로 둘러쌓인 Post 컴포넌트를 보겠습니다.
<Suspense fallback={<LoadingSkeleton />}>
  <Post postPromise={posts} />
</Suspense>
PostPage 내부에서 async await을 사용하지 않고 Promise 타입인 posts를 그대로 서버 컴포넌트인 Post의 props로 전달합니다.
posts의 데이터 패칭을 페이지 컴포넌트에서 기다리는게 아니라 실제로 데이터를 사용하는 곳에서 기다립니다.
Post 컴포넌트의 타입이 Element가 아닌 Promise<Element>이기 때문에
Promise가 resolve 상태로 변경되기 전에는
Suspense의 fallback 컴포넌트가 Post 영역에 보여지게됩니다.
이러한 부분은 리엑트의 서버컴포넌트를 앱에 적용하며 발견할 수 있는 굉장히 흥미로운 부분입니다.
각각의 서버 컴포넌트를 잘게 작성하고 해당 부분에 선언적으로 loading UI를 적용시킬 수 있습니다.
적용된 모습을 봅시다
타입 에러가 발생합니다.
사용하는 타입스크립트 버전에 따라 이러한 타입 에러가 발생할 수 있습니다.
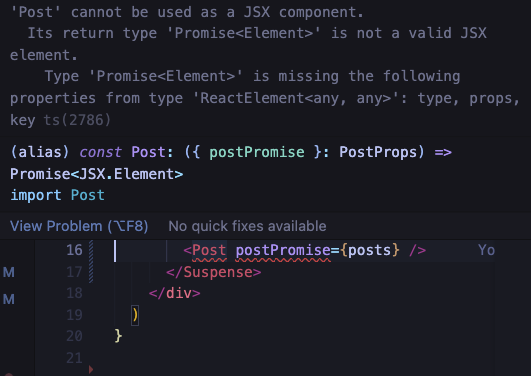
서버 컴포넌트를 타입 에러 없이 사용하기 위해서는
타입스크립트를 5.1.3이상의 버전, 혹은 @types/react 18.2.8이상의 버전을 사용해야 합니다.
그 미만의 버전을 사용할 경우 코멘트 처리를 할 수 있습니다.
{/* @ts-expect-error Async Server Component */}
export default function PostPage() {
  const posts = getPosts()

  return (
    <div className="container mx-auto py-8">
      <h1 className="text-3xl font-bold mb-6">Posts</h1>
      <div>
        this is not from data fetching: {new Date().getTime().toString()}
      </div>
      <Suspense fallback={<LoadingSkeleton />}>
        {/* @ts-expect-error Async Server Component */}
        <Post postPromise={posts} />
      </Suspense>
    </div>
  )
}
이제 use hook이라는 새로운 훅을 사용해서 이를 개선해보겠습니다.
use hook
use hook은 리엑트의 RFC로 제안된 훅이며 현재 next.js 13 app directory에서 사용 가능한 api입니다.
use hook을 사용해 기존 post 서버 컴포넌트를 재작성해보겠습니다.
app/post/post.tsx
import { use } from "react"
import { getPosts } from "../api/post/getPosts"

export const Post = () => {
  // 변경된 부분
  const posts = use(getPosts())

  return (
    <>
      {posts.map((post) => (
        <div key={post.id} className="bg-white p-4 rounded shadow mb-4">
          <h2 className="text-2xl font-bold mb-2">{post.title}</h2>
          <p className="text-gray-600 mb-2">
            By {post.author} | {post.date}
          </p>
          <p className="mb-4">{post.content}</p>
          <div className="bg-gray-100 p-2 rounded">
            {post.comments.map((comment, idx) => (
              <div key={comment.id} className="mb-2">
                <p className="text-gray-600 mb-1">{comment.author}</p>
                <p>{comment.text}</p>
                <div>{post.time}</div>
              </div>
            ))}
          </div>
        </div>
      ))}
    </>
  )
}
async 키워드를 없애야 합니다. 그렇지 않으면 에러가 발생합니다.
props를 전달하지 않는 것으로 변경했습니다.
이 컴포넌트를 사용하는 page.tsx에서 기존에 사용했던 타입 에러를 무시하는 코멘트를 삭제할 수 있습니다.
app/post/page.tsx
import { Suspense } from "react"
import LoadingSkeleton from "../ui/LoadingSkeleton"
import { Post } from "./post"

export default function PostPage() {
  return (
    <div className="container mx-auto py-8">
      <h1 className="text-3xl font-bold mb-6">Posts</h1>
      <div>
        this is not from data fetching: {new Date().getTime().toString()}
      </div>
      <Suspense fallback={<LoadingSkeleton />}>
        <Post />
      </Suspense>
    </div>
  )
}
수고하셨습니다.
오늘은 서버컴포넌트에서 데이터를 호출하는 방식에 대해 알아보았습니다.
별도 조건부 렌더링 코드를 작성하지 않아도 Suspense를 사용해 각 서버 컴포넌트에서 관심있는 데이터의 로딩 상태에 따라 로딩 UI를 표현할 수 있습니다.
use 훅을 사용해서 로딩 컴포넌트를 렌더링 해보시고 사용하지 않고 props로 promise 타입의 데이터를 전달해서 로딩 UI를 표현해보세요.
다음 강의에서 뵙겠습니다!

use를 쓰면 prop으로 promise를 안넘겨도 suspense가 작동이 되는건가요?