
안녕하세요 단테입니다.
오늘은 next.js에서 스타일링을 적용하는 방법에 대해서 알아보겠습니다.
현재 저희 예제 코드에서는 tailwind css를 사용하고 있으나 Next.js 13 app directory에 스타일링을 적용하는 방법 중 가장 많이 사용하는 CSS Modules부터 차근차근 알아보도록 하겠습니다.
Global Styles (전역 스타일 설정)
컴포넌트 단위가 아닌 앱에 전체적으로 적용해야할 글로벌 스타일이 있습니다.
만약 UI 라이브러리를 사용하거나 마크다운 라이브러리를 사용하는데 글로벌 스타일을 적용해야 한다면 이 섹션을 참고할 수 있을 것입니다.
next.js 12 pages directory 에서는...
전역 스타일 설정은 오직 _app.js에만 적용시킬 수 있었습니다.
next.js 13 app directory 에서는!
우리 앱은 지금 전역 스타일을 적용하고 있습니다.
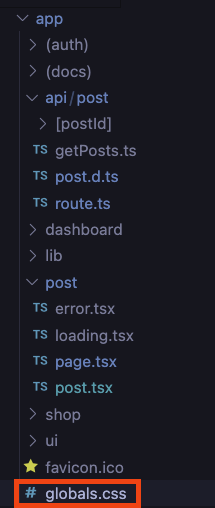
app/globals.css
나중에 tailwind css를 사용하는 방법을 따로 알아보겠지만 우리 앱은 tailwind를 사용하기 때문에 관련 코드가 적용되어 있는 것을 볼 수 있습니다.
그리고 이 파일은 지금 app/layout.tsx에 임포트 되고 있습니다.
@tailwind base;
@tailwind components;
@tailwind utilities;

:root {
  --foreground-rgb: 0, 0, 0;
  --background-start-rgb: 214, 219, 220;
  --background-end-rgb: 255, 255, 255;
}

body {
  color: rgb(var(--foreground-rgb));
  background: linear-gradient(
      to bottom,
      transparent,
      rgb(var(--background-end-rgb))
    )
    rgb(var(--background-start-rgb));
}
app/layout.tsx
// These styles apply to every route in the application
import './global.css'

export default function RootLayout({
  children,
}: {
  children: React.ReactNode
}) {
  return (
    <html lang="en">
      <body>{children}</body>
    </html>
  )
}
외부 라이브러리 스타일시트
위에서 봤었던 pages directory와는 다르게 app directory내에서는 서버컴포넌트 어디에서든 공통 레이아웃 역할을 하는 컴포넌트 내부에 외부 라이브러리 스타일시트를 올릴 수 있다.
app/layout.tsx
import 'bootstrap/dist/css/bootstrap.css'

export default function RootLayout({
  children,
}: {
  children: React.ReactNode
}) {
  return (
    <html lang="en">
      <body className="container">{children}</body>
    </html>
  )
}
CSS Modules

먼저 이 단어에 대해 처음 들어보신 분들도 있을 것 같습니다.
CSS 모듈은 각각의 모듈이 자체적으로 캡슐화되고 독립적으로 작동할 수 있도록 하는 CSS 기법을 이야기합니다.
이는 각 모듈이 다른 모듈의 스타일에 영향을 주거나 다른 모듈의 스타일에 영향을 받지 않는다는 것을 의미합니다.
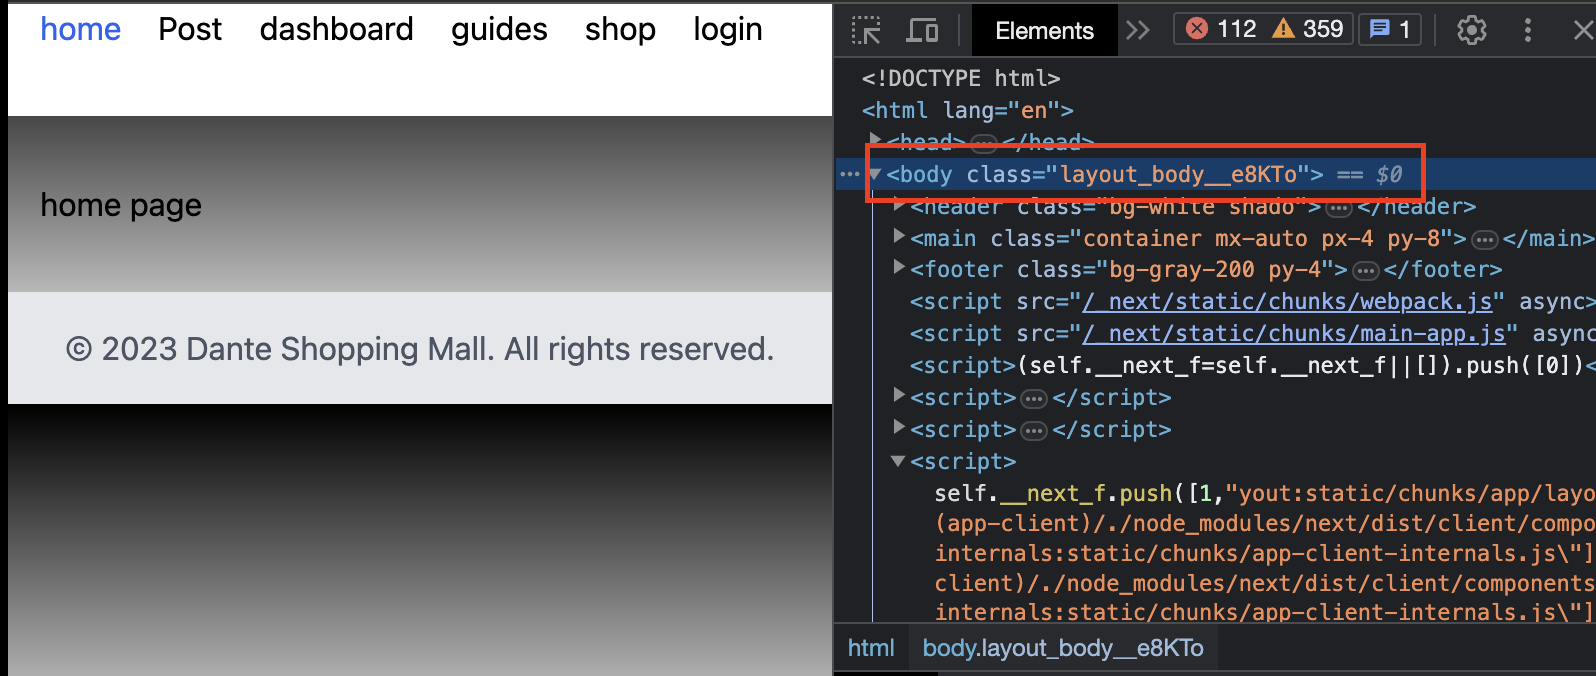
html에서 각 엘리먼트에 적용하는 클래스들의 이름이 사소한 실수 하나로 동일하게 작성된다면 CSS에 적용한 스타일이 예기치 못하게 서로 충돌하는 문제가 발생합니다. CSS Module을 사용한다면 클래스 이름이 서로 충돌되지 않게 랜덤으로 생성됩니다.
이로 인해 코드의 충돌이나 간섭을 줄이고, 유지 보수성을 향상시킬 수 있습니다.
css 모듈을 사용하는 방법은 간단합니다. *.module.css으로 이름을 작성한 다음 컴포넌트 파일 내부에서 임포트한 후 클래스 이름을 태그에 할당합니다. css파일에 작성한 dashboard 클래스 이름이 있다면 styles.css로 할당합니다.
layout.tsx
import styles from "./styles.module.css"
export default function DashboardLayout({
  children,
}: {
  children: React.ReactNode
}) {
  return <section classname={styles.dashboard}>{children}</section>
}
styles.module.css
.dashboard {
  padding: 24px;
}
fast refresh
스타일과 관련된 내용은 아니지만 next dev 명령어를 통해 개발할때 글로벌 스타일시트나 CSS Module 스타일시트를 변경한다면 Fast Refresh를 통해 변경사항이 바로 적용됩니다.
CSS build
next build를 사용하면 CSS 파일들은 minify 된 몇개의 css 파일로 만들어집니다. 이를 통해 network 통신 횟수를 줄이면서 앱에 필요한 스타일시트를 모두 다운로드 받을 수 있게 됩니다.
Tailwind CSS
Next.js를 먼저 설치할때 CLI Tailwind css를 선택하신 분들은 별도로 설치할 필요는 없습니다.

프로젝트 세팅이후 추가로 설치해야 하면 아래와 같이 터미널에 입력해 설치합니다.
npm install -D tailwindcss postcss autoprefixer
npx tailwindcss init -p
Tailwind Config
tailwind 클래스 이름을 사용할 파일 이름들을 tailwind.config.js 파일 내부에서 설정할 수 있습니다.
tailwind.config.js 1
/** @type {import('tailwindcss').Config} */
module.exports = {
  content: [
    './app/**/*.{js,ts,jsx,tsx,mdx}', // 앱 디렉토리
    './pages/**/*.{js,ts,jsx,tsx,mdx}', // 페이지 디렉토리
    './components/**/*.{js,ts,jsx,tsx,mdx}', // 공통 컴포넌트

    // Or if using `src` directory:
    './src/**/*.{js,ts,jsx,tsx,mdx}',
  ],
  theme: {
    extend: {},
  },
  plugins: [],
}
tailwind.config.js 2
우리가 지금 사용하고 있는 설정 파일은 아래와 같이 나타낼 수 있습니다.
const { fontFamily } = require("tailwindcss/defaultTheme")

/** @type {import('tailwindcss').Config} */
module.exports = {
  content: ["./app/**/*.{ts,tsx}"],
  darkMode: ["class"],
  theme: {
    container: {
      center: true,
      padding: "2rem",
      screens: {
        "2xl": "1400px",
      },
    },
  },
}
postcss.config.js
postcss.config.js는 따로 설정할 필요가 없습니다.
전역 스타일 임포트
tailwind의 디렉티브에 대한 자세한 내요은 이번 강의 범위에 포함되지 않습니다.
위에서 봤듯이 디렉티브는 전역 스타일시트에 임포트합니다.
app/globals.css
@tailwind base;
@tailwind components;
@tailwind utilities;
app/layout.tsx
import "./globals.css"
import { Navigation } from "./ui/Navigation"
...
export default function RootLayout({
  children,
}: {
  children: React.ReactNode
}) {
  return (
    <html lang="en">
      {/* inter.className */}
      <body className={""}>
        <header className="bg-white shado">
          <div className="container mx-auto px-4">
            //...
CSS-in-JS
app 디렉토리가 스테이블 버전이 된지 얼마 되지 않았기 때문에 각 CSS-in-JS 라이브러리마다 지원여부를 잘 살펴봐야합니다.
현재 글을 쓰고 있는 23년 6월 이후에도 공식적으로 지원되는 라이브러리들이 많이 생길 것으로 예상됩니다.
이번 강의에서는 대표적으로 사용되는 CSS-in-JS 라이브러리들에 대해서 살펴보겠습니다.
useServerInsertedHTML
CSS-in-JS를 적용하실때 자주 보게되실 api는 useServerInsertedHTML입니다. 이 함수는 서버에서 HTML Streaming할때 페이로드에 싣기 위해 적용하는 함수입니다.
styled-jsx
app/ui/styled-jsx/registry.tsx
"use client"

import { useServerInsertedHTML } from "next/navigation"
import { useState } from "react"
import { StyleRegistry, createStyleRegistry } from "styled-jsx"

export const Registry = ({ children }: { children: React.ReactNode }) => {
  const [jsxStyleRegistry] = useState(() => createStyleRegistry())

  useServerInsertedHTML(() => {
    const styles = jsxStyleRegistry.styles()
    jsxStyleRegistry.flush()
    return <>{styles}</>
  })

  return <StyleRegistry registry={jsxStyleRegistry}>{children}</StyleRegistry>
}
app/layout.tsx
import { Registry as StyledJSXRegistry } from "./ui/styled-jsx/registry"
// ...
export default function RootLayout({
children,
}: {
children: React.ReactNode
}) {
return (
<html lang="en">
<body>
<StyledJSXRegistry> // 추가된 코드
<header className="bg-white shado">
<div className="container mx-auto px-4">
<Navigation links={links} />
<nav className="flex items-center justify-between py-4"></nav>
</div>
</header>
<main className="container mx-auto px-4 py-8">{children}</main>
<footer className="bg-gray-200 py-4">
<div className="container mx-auto px-4">
<p className="text-center text-gray-600">
© {new Date().getFullYear()} Dante Shopping Mall. All
rights reserved.
</p>
</div>
</footer>
</StyledJSXRegistry>
</body>
</html>
)
}
Styled Components
styled-components@v6.0.0-rc.1 이상 버전 설치
특별한 이유가 아니면 최신 버전 설치하시면 됩니다.
yarn add styled-componentsstyle 추출 및 head 태그에 주입
styled-components 에서 제공하는 api를 통해 렌더링할때 생성되는 css style들을 추출하는 Registry 컴포넌트를 만들어줍니다. 그리고 useServerInsertedHTML훅을 이용해 Registry 컴포넌트에서 추출한 스타일을 head 태그에 넣어줍니다.
app/ui/styled-components/Registry.tsx
"use client"

import { useServerInsertedHTML } from "next/navigation"
import React, { useState } from "react"
import { ServerStyleSheet, StyleSheetManager } from "styled-components"

export const Registry = ({ children }: { children: React.ReactNode }) => {
  const [sheet] = useState(() => new ServerStyleSheet())

  useServerInsertedHTML(() => {
    const styles = sheet.getStyleElement() // style 태그를 돔에 생성하기 위한 리엑트 엘리먼트들을 배열형태로 반환합니다.
    sheet.instance.clearTag()
    return <>{styles}</>
  })

  if (typeof document !== "undefined") {
    return <>{children}</>
  }

  return (
    <StyleSheetManager sheet={sheet.instance}>{children}</StyleSheetManager>
  )
}
styles 변수를 출력하면 아래와 같습니다.
styles:  [
  {
    '$$typeof': Symbol(react.element),
    type: 'style',
    key: 'sc-0-0',
    ref: null,
    props: {
      'data-styled': '',
      'data-styled-version': '6.0.0-rc.6',
      dangerouslySetInnerHTML: [Object]
    },
    _owner: null,
    _store: {}
  }
]
이렇게 정의한 Registry를 layout에 적용하면 끝입니다.
app/layout.tsx
// ... 생략
import { Registry as StyledComponentRegistry } from "./ui/styled-components/Registry"
// ... 생략
export default function RootLayout({
children,
}: {
children: React.ReactNode
}) {
return (
<html lang="en">
<body className={""}>
<StyledComponentRegistry>
<header className="bg-white shado">
<div className="container mx-auto px-4">
<Navigation links={links} />
<nav className="flex items-center justify-between py-4"></nav>
</div>
</header>
<main className="container mx-auto px-4 py-8">{children}</main>
<footer className="bg-gray-200 py-4">
<div className="container mx-auto px-4">
<p className="text-center text-gray-600">
© {new Date().getFullYear()} Dante Shopping Mall. All
rights reserved.
</p>
</div>
</footer>
</StyledComponentRegistry>
</body>
</html>
)
}emotion
emotion은 styled-components와 함께 많이 사용되는 CSS-in-JS 라이브러리입니다.
서버 컴포넌트에 대한 emotion의 지원은 아직 완벽하지 않는데요
가급적 서버컴포넌트 적용 방법이 공식적으로 안내되기 전까지는 다른 라이브러리를 사용하시기 바랍니다.
emotion과 app directory 관련 이슈
!비공식 적용 방법! app/ui/emotion/Registry.tsx
nextjs app directory에서의 사용을 위해서 현재는 아래와 같은 방법이 비공식적으로 안내되고 있습니다.
"use client"

import createCache from "@emotion/cache"
import { CacheProvider } from "@emotion/react"
import { useServerInsertedHTML } from "next/navigation"
import { useState } from "react"

export const Registry = ({ children }: { children: React.ReactNode }) => {
  const [cache] = useState(() => {
    const cache = createCache({ key: "css" })
    cache.compat = true
    return cache
  })

  useServerInsertedHTML(() => {
    return (
      <style
        data-emotion={`${cache.key} ${Object.keys(cache.inserted).join(" ")}`}
        dangerouslySetInnerHTML={{
          __html: Object.values(cache.inserted).join(" "),
        }}
      />
    )
  })

  return <CacheProvider value={cache}>{children}</CacheProvider>
}
!비공식 적용 방법! app/layout.tsx
// ... 생략
import { Registry as EmotionRootStyleRegistry } from "./ui/emotion/Registry"
// ... 생략
export default function RootLayout({
children,
}: {
children: React.ReactNode
}) {
return (
<html lang="en">
<body className={""}>
<EmotionRootStyleRegistry>
<header className="bg-white shado">
<div className="container mx-auto px-4">
<Navigation links={links} />
<nav className="flex items-center justify-between py-4"></nav>
</div>
</header>
<main className="container mx-auto px-4 py-8">{children}</main>
<footer className="bg-gray-200 py-4">
<div className="container mx-auto px-4">
<p className="text-center text-gray-600">
© {new Date().getFullYear()} Dante Shopping Mall. All
rights reserved.
</p>
</div>
</footer>
</EmotionRootStyleRegistry>
</body>
</html>
)
}
Sass
Next.js에서는 sass, scss를 공식 지원하기 때문에 Sass를 적용하는 것은 매우 간편하고 쉬운일입니다.
앞서 봤던 CSS Modules와 마찬가지로 *.module.scss, *.module.sass 와 같이 스타일파일을 작성하고 컴포넌트에 스타일을 적용시킬 수 있습니다.
sass 패키지 설치
sass사용이 빌트인 서포트일지라도 아래와 같이 패키지를 설치해줘야 합니다.
그렇지 않으면 에러가 발생합니다.
- error ./app/layout.module.scss
To use Next.js' built-in Sass support, you first need to install `sass`.
Run `npm i sass` or `yarn add sass` inside your workspace.
yarn add -D sassapp/layout.module.scss
제대로 설치되었는지 확인하기 위해 scss 파일을 작성해보겠습니다.
실제 프로젝트에서 사용할 스타일은 아닙니다.
.body {
  background-color: black;
}
app/layout.tsx
//.. 중략
 <html lang="en">
      <body className={styles.body}> // <- 적용한 scss module
        <EmotionRootStyleRegistry>
// ..
아래와 잘 적용됨을 확인할 수 있습니다. 클래스 이름이 css module과 마찬가지로 난수로 생성되었습니다.
수고하셨습니다.

오늘은 next.js 13 app directory에 스타일링을 적용하는 방법에 대해 알아보았습니다.
CSS-in-JS를 적용하실 경우 현재 사용하는 라이브러리의 버전이 app directory와 호환되는지 꼭 먼저 살펴보시기 바랍니다.
감사합니다.